Camera settings for Time-lapse photography
With even smart phones now offering a Time-lapse Photography mode, this interesting area of photography is accessible to anyone. For the smooth, professional-looking time-Lapse sequences you see in movies and TV series, you would have to put some thought into how you control your camera – and specifically, your camera settings for time-lapse photography. The smoothness of a time-lapse sequence is mostly dependent on the choice of camera settings … and there is a specific thought-process involved.
This does involve a bit of mathematics, but it is quite simple really. And there are always Time-Lapse Calculators available as apps for your smart phone.
There are a few things we need to be aware of, and decide on before shooting a time-lapse sequence:
How long is the duration of the event we are photographing – sometimes we have a specific duration … sometimes not. In the example above, there is no real duration because there will always be people milling around in Times Square. But other times you might be photographing an event with a specific duration.
The length of the final video clip is also something we need to decide on beforehand. This of course ties in with the intended use of the video, and whether it will be added to a longer video clip. Generally, 1 minute is really long – Youtube metrics show that people usually click away at around a minute. So decide whether you need 10 seconds, 20 seconds or 30 seconds, or however long we need.
What kind of subject movement do we have? i.e., speed and flow of movement. Clouds, water, cars, moving people, etc, all have slightly different considerations with what will translate best in a Time-Lapse video clip.
These three things:
– duration of the event,
– length of the final video,
– subject movement,
will help determine our shutter speed …. and our interval.
If this all sounds confusing, hang in there – this all locks in together.
The time-lapse video shown above has several different levels of movement – the clouds, people (static and moving), and traffic. Then on top of that, the camera is moving as well. So there are a bunch of things to juggle here in determining our shutter speed and interval.
This is also discussed in the video clip featured on PDN: How to shoot cinematic time-lapses
But let’s break this all down into steps:
Timelapse photography – a complete introduction
There are several websites that are loaded with information – and then there is this thorough primer on the topic, written by Ryan Chilinski: Everything you want to know about Time-Lapse Photography. (Amazon)
Selecting the time-lapse interval
The interval is the length of time between shots.
With that one number – the interval – we control two things:
- how fast the time-lapse change appears to take place
- how smooth that action appears on the screen
For smooth movement, ideal is that our shutter speed should be at least 2/3rd of our interval. This will help give us continuity in the movement in our video. When our shutter speed is too short, the video will look jerky – like bad stop-motion.
For that continuous, fluid look to our video, we need to slow our shutter speed down to be appropriate for our chosen interval. We usually don’t want that fast shutter look. Invariably, we need to slow our shutter speed down. Now, the first thing that we need to realize here, is that with video, we preferably don’t use a fast shutter speeds. Here we need to break free from a photographer’s mindset where we often have fast shutter speeds to freeze action. With video, we don’t usually need crisp individual images. For a smoother look with video, we usually adhere to the “180 degree rule”, which suggests that our optimum shutter speed is twice our frame rate. However, with Time-lapse, it is slightly different – we use even slower shutter speeds if we want that continuous smooth look to our final video.
Our persistence of vision creates the illusion of continuous, fluid movement. Our brains retain the visual image for a short while, to give us a sense of continuity.
Next step – we need to decide on the Frame-Rate that the video needs to be compiled with.
Choosing the Frame Rate
How fast should your clip be played back? 30fps / 24 fps / 25 fps? Our final decision will be made when we render the video, but it does affect our initial decision about our settings because frame rate affects our calculations.
An example of how we decide on our camera settings:
Scenario: Let’s say we have a cityscape with fast moving clouds.
Let’s say we decide on a 10 seconds clip, to be used in a longer final video. If we want a 10 second clip, it would be wise to add a 2 seconds buffer for fade-in and fade-out (for the video transitions).
Hence, 12 seconds. Let’s decide on a frame-rate of 30 fps.
How many photos are we going to take?
12 x 30 – 360 frames
Simple as that: 12 seconds at 30 frames a second = 12×30 = 360 frames. We need to shoot 360 frames as a minimum.
Now let’s calculate the interval and shutter speed and the duration of our shoot.
General advice is that clouds need an interval of 1 to 3 seconds. (This, and other subjects are also covered in Ryan Chilinski’s book on Time-Lapse Photography (Amazon).
So for fast moving clouds, 2 seconds is a good choice.
360 photos at 2 seconds intervals = ??
(720 seconds.)
360 frames * 2 second intervals = 720 second shooting time.
720 seconds = 720 / 60 seconds = 12 minutes.
So we will be shooting for 12 minutes. Our camera is going to fire every 2 seconds, for 12 minutes.
With a 2 second interval, our shutter speed should be about 1.3 or 1.6 seconds. That will give us smooth movement.
That was fairly simple. And as I mentioned, there are Time-Lapse Calculator apps for your phone which will help you juggle these values.
If it wasn’t clear until now, it should be more apparent that we absolutely need Neutral Density filters of some kind to pull our shutter speeds this slow in daylight. The most common options are the 6-stop and 10-stop ND filters.
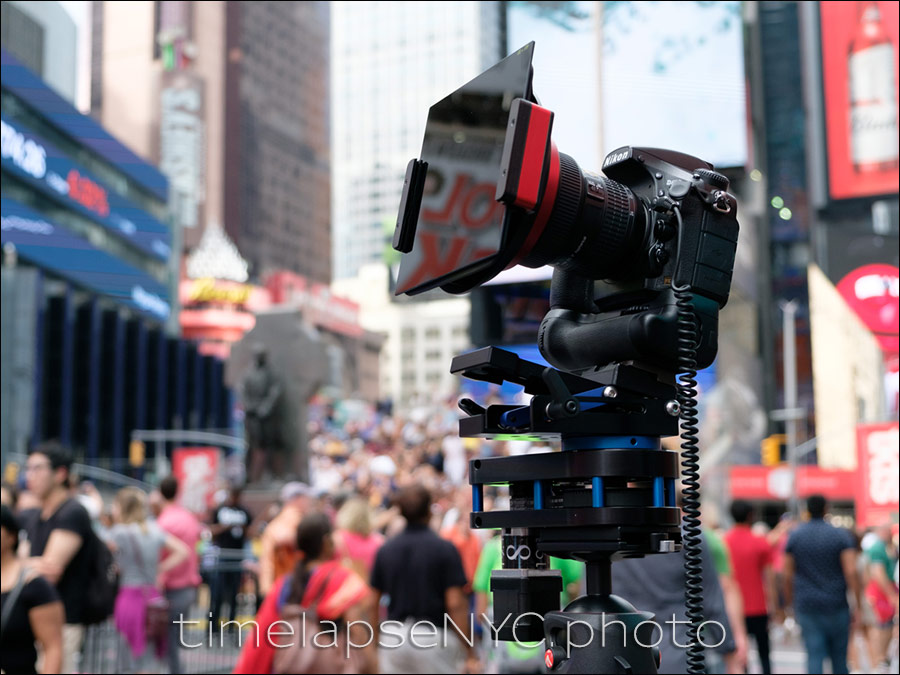
Camera settings used with this Time-Lapse shoot
The lens was set to f/8 and the ISO was set to 64
Shutter speed: 8 second exposures @ 10 second intervals
approx 2.5 hr event duration. (6:15pm – 8:53pm)
= 940 images
Ramping done manually in post, via Bridge … the hard way. The flickering lights of the displays there in Times Square appear to throw off the ramping device I used on the 2nd camera. So I used the footage shot on the one camera, and then manually did the exposure ramping during post.
Photo gear used with this Time-Lapse shoot
- Nikon D810 (B&H / Amazon)
- Nikon 14-24mm f/2.8 (B&H / Amazon)
- with Lee 6-stop Neutral Density filter (Amazon)
- Manfrotto 057 Carbon Fiber Tripod (B&H / Amazon), with the Manfrotto 057 Magnesium Ball Head (Amazon)
- Dynamic Perception Stage R Motion Controller
My choice of camera for Time-Lapse Photography
If we consider that 1080p video is only around 2 megapixel resolution, and that even 4k resolution is only approximately 8 megapixel resolution, it might appear that the 36-megapixels of the Nikon D810 camera is overkill. Perhaps, perhaps. But it does allow me a lot of extra wriggle room in post-production. Let’s have a look how this impacted this video clip shown here.
Camera settings and details for this Time-Lapse video clip, shot in Bryant Park for a client.
4 second exposures @ 6 second intervals
f/8 @ 80 ISO
Nikon D810, Nikon 14-24mm f/2.8 with 10 stop filter
2828 images @ double speed = 47 seconds
Here is the screen capture of the full image. Since I tilted my camera up, there is perspective distortion. Because this was specifically about one of the properties surrounding the park, I had to correct for those leaning buildings.
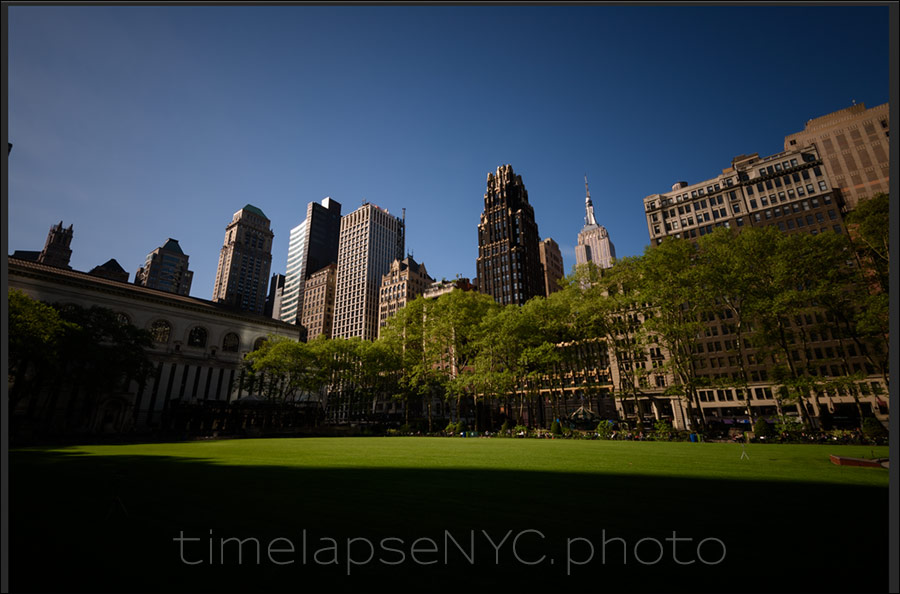
Correcting for this in post-production of the RAW files, left me with about a 24-megapixel image. Still a lot of detail.
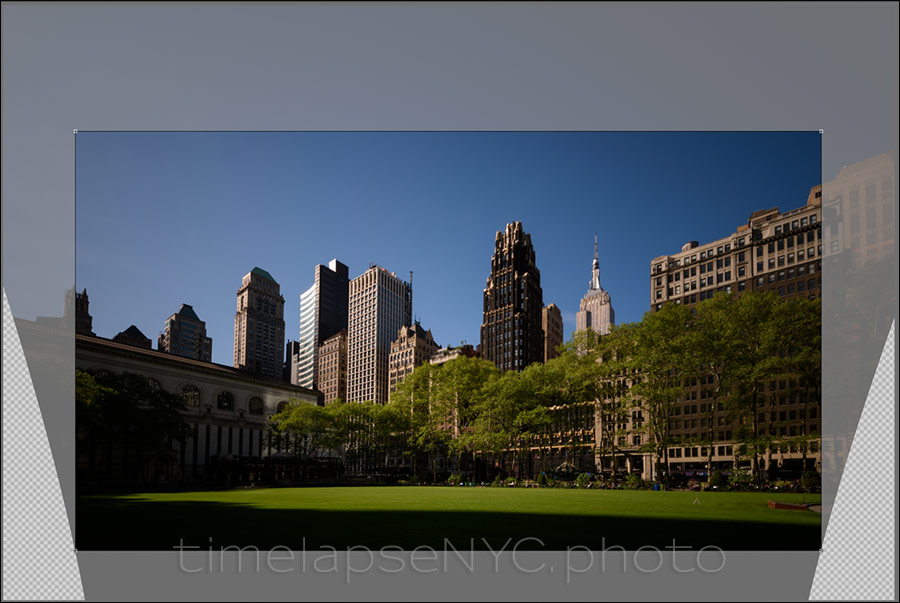
This comes in very handy with the zoom effect that was applied in post-production via Final Cut Pro X. I started off with defining the wide view as a Key Frame, and then I defined a tighter composition as a Key Frame. The final, tighter view is still larger than 2 megapixels. Hence, no loss in resolution as the video zoomed closer!
Camera settings again: our choice of shutter speed
Here is one of the test clips I shot for the client a few days before, to explore different viewpoints, and to help me in confirming my exact camera settings ahead of time.
- f/11 @ 250 ISO
- Nikon D810 (B&H / Amazon)
- Nikon 14-24mm f/2.8 (B&H / Amazon)
- with Lee 6-stop Neutral Density filter (Amazon)
- Manfrotto 057 Carbon Fiber Tripod (B&H / Amazon), with the Manfrotto 057 Magnesium Ball Head (Amazon)
The first half of this clip was shot with 30 second shutter speed / 45 second intervals;
and you can immediately see how crazily rushed the movement of the clouds look! It might be useful for dramatic effect somewhere, but not in this instance – a more relaxed tempo is needed.
The 2nd half of that clip: 4 second shutter speed / 5 second intervals;
and the tempo is immediately more pleasing to the eye.
Summary
This comparison example, clearly shows that we have to put some thought into how we juggle the camera settings for a final result that is visually pleasing.
All of these things:
– the duration of the event,
– length of the final video,
– subject movement,
will help determine our shutter speed and our interval … and ultimately, the success of our time-lapse video.
Related articles
- Featured on PDN: How to shoot cinematic time-lapses
- Other articles on Time-lapse photography
- Everything you want to know about Time-Lapse Photography, an E-book by Ryan Chilinski
- Time-lapse photography NYC
I don’t know how you did it but, that was a really comprehensive and very well organized explanation of a photographic/video technique that is easy to do but so much more difficult to do well, with a professional looking end product.
That was very informative and inspirational.
Question: What was your advice on what to do, when Homeland Security Cops tell you you have to move out of your location after you’ve spent a couple hours babysitting the camera as it runs it’s course? :)
Thank you Neil. Why did you use a square neutral density filter instead of a screw-on round one? Does it reduce vignetting?
It’s the only typer of filter and filter holder that fits over the bulbous front of the Nikon 14-24mm f/2.8 lens.
Thanks for sharing your knowledge and hard work! You’re an amazing guy Neil!
– Brendan
Last year I spent a most enjoyable a week playing around with time lapse. This was only possible because the wife was out of the country for that week. I went to a local lake and found a spot with long grass and bamboo in the foreground which led to an island in the background and some moving cloud. Very simple but effective.
Although Lightroom doesn’t have a feature for processing time lapse I found a Template that works perfectly and it’s free.
Processing of raw images can be done exactly as you do movie film including adding music.
Download the Template
Open Lightroom and right click User Template and choose import.
Choose Slideshow Templates > User Templates.
Highlight your choice. And click import. A good starting point is 24 frames per second.
When you are happy with any changes you have made to your images simply click, Export Video, choose a size 720 or 1080 give it a name and choose save.
I also used a free app from the Play Store.
Graham.
Link for the template http://lightroom-blog.com/2012/12/31/lrtip-update-your-metadata-preset/.
Neil, just to make sure – I suppose that what you said there, “The ideal is that our shutter speed should be at least 2/3rd of our interval”, doesn’t apply to long-term time-lapses? Say if I wanted to show how the view from my window changes with the seasons, and I would shoot 365 frames a year, 1 photo every day. Sure I won’t be setting the shutter speed to several hours. What do you do in such situations? Just shoot at “normal” shutter speeds and accept the fact that the movement in the video will be jerky?
Oh yes, this is for short-term time-lapse where we can get smooth motion. With long-term time-lapse we have other considerations, and shooting that many frames aren’t practical. Therefore, long-term time-lapse won’t look as smooth.
Your work is impressive to me. As such, I hope you will explain something.
In the course of watching one of your tutorials I came to a bit of confusion. The source of the confusion was the idea that timelapse shutter speed should be 2/3 of the shot-to-shot interval for a smooth video.
I have not used this method so yesterday I went to a golf course and set up a D850 and a D5 next to each other. I shot players putting before the start of play. On the D850 I shot 1/320, f/8.0, ISO100 at 1 second interval for 300 shots using a 70mm focal length. On the D5 I shot the same thing at the same focal length with 1/1.3 second exposure using a variable ND filter to keep a correct exposure range. I repeated everything at a 3 second interval where the D5 was set to a 2 second exposure.
I imported everything into LR, made a few adjustments and then exported to PS where I rendered the files into mp4 at 24 fps. I didn’t mess with LRTimelapse or other software. I was hoping that the idea of “smoother” would show in the longer exposures. The players were blurred as they moved. I thought about the idea and came to the thought that when the mp4 is being made there are simply 24 still images being concatenated per second. Frame rate and interval (subject movement distance vs time) is controlling the smoothness of motion. The blurring of the images is there in the D5 images (the D850 images are sharp) but the motion blur is more of a defect to my eye than a means of creating a perception of smoothness.
Am I missing something? Is there a technique flaw in my test? Does the smoothing take place with other subjects? Please explain the idea of smoother with the 2/3 interval shutter speed.
Hi there Mark
This is an interesting question, and I think one to which there isn’t a hard & fast answer. It’ll sometimes come down to “it depends”.
The ideal in cinema or video is smooth movement – we want that persistence of vision so that movement doesn’t become “jagged” or stuttering. In video, we can see this effect where the shutter speed is too high, and doesn’t conform to the 180 degree rule. With the 180 degree rule, we use a shutter speed twice that of the frames-per-second rate. That gives us smooth movement.
We want to attempt that with time-lapse as well with our choice of interval and shutter speed. If our shutter speed is much shorter than our interval, we get jerky movement.
Here is an example: I shot a few clips of the Naked Cowboy in Times Square. The interval (if I remember correctly), was 3 seconds. In the first sequence, my shutter speed was 1/60 and in the second part, I had brought my shutter speed down to 1/2 second. I didn’t keep to the suggestion that the shutter speed should be (at least) half of the chosen interval. But you can clearly see the effect here of too high a shutter speed.
Now, with time-lapse (or video), you don’t really need the individual images to be crisply sharp, like you would for most of photography. It’s that fluid movement that creates the sensation of movement. Compare it to a movie like Gladiator, where they used fast shutter speeds to create that staccato effect to movement.
I think you’ll agree the the slower shutter speed of 1/2 second, worked better here.
With the time-lapse clip shown at the top of this article, I had several streams of movement to contend with – the clouds, and the passersby (moving at uneven speeds), and the traffic. I chose an interval where the clouds movement looked good, and the movement of the people looked okay too. But since the people moved with irregular speeds, I wouldn’t have been able to get super-smooth movement there.
Now, if you were to do time-lapse of something being built, you have to balance whether you want the building process to look smooth, (and the people to blur out), or to keep some of the movement of the people and show how they built the object / building. It becomes an artistic choice, but also a practical one where you have to keep in mind your client’s request. (Or what they think they requested.)
As an example of a time-lapse video where I purposely kept the shutter speed higher than the half-of-the-interval rule – this shows the container carriers being built at Port Newark Container Terminal. This time-lapse clip shows how a straddle carrier is built up – an event that would be too slow for video, but time-lapse shows the activity in a compressed time-frame and is a better way to depict the activity.
I wanted my client to see the movement of the people too. So the movement in the video is less smooth than the ideal, but I think it is pretty good in imparting a sense of how the carriers are built.
So, as you found, you might want to re-interpret the rule about interval and shutter speed choice, depending on your subject, and what the video might be used for.
If you want to show fluid movement – traffic; a river; clouds; something being constructed – you would keep to the rule. But if you want to keep a sense of the people there, then you would interpret your settings in a different way … depending on your intention.
Neil,
First, thanks for your response above.
I was out several nights this week doing Milky Way time lapse. As this is a multi-hour adventure in sleeplessness, I had time to consider your answer. Here are some thoughts I had:
1) When we render still images at 24 fps we are at a speed wherein persistence of vision kicks in a one frame blends with the next. This is nothing new, it’s “the movies” we all watch.
2) When the images are shot, we can freeze action with short shutter speeds or allow motion blur with longer duration photos.
3) When the short shutter speed “frozen” images are rendered into video there is a clear jump from one point in subject motion to the position in the next frame. When motion is slow or distant, this is not particularly objectionable.
4) When motion is faster than some subjective point, the use of longer shutter speeds leads to motion blur and may even result in motion disappearing as it won’t be well captured.
5) it is the blurring in 4) that I believe “fools” our brain into believing the motion is smooth. I believe that, because we haven’t changed the interval for any of this, the actual jerkiness of the motion is unchanged. We, not being machines doing motion analysis, just see it differently. It’s a perception thing not an actual change in motion (distance, velocity or acceleration).
So, what do you think about my perception theory?
My Milky Way sequence (at 24 fps) was smooth. I happened to shoot on a 20 second interval, 15 second exposure and 5 second delay. Obviously, this is roughly the shutter speed to interval ratio being discussed. When viewed there is almost no stepping visible, it looks nice and smooth. As such, I am thoroughly convinced that there are very good applications for the 1/2 to 2/3 or even 3/4 shutter/interval ratio. In the case of the Milky Way there is little apparent motion. I think that judicious use where there is more apparent motion could work also but I tend to prefer to work on the shorter end of long shutter speeds – essentially keeping motion blur at lesser levels.
Your thoughts, in return, please.
Best regards, Mark
That’s exactly how it works, regarding persistence of vision, and why it makes sense usually for the shutter speed to be at least 1/2 of the interval.