Tangents

photography tutorials, reviews & workshops

tangents photography blog
learn : discuss : share
  • Tangents
  • Tutorials
    • Flash Photography
    • Wedding Photography
    • Studio Photography
    • Posing People
    • Understanding Your Camera
    • Exposure metering
    • BFT
    • Best Photo Books
  • Reviews
    • Sony
    • Nikon
    • Canon
    • Fuji
    • Profoto
    • lighting gear
  • Workshops
    • Info: Workshops
    • In-person
      tutoring sessions
    • Online
      tutoring sessions
    • Workshops in
      New Jersey (NJ)
    • Workshops in
      New York (NYC)
    • Photo walks in NYC
    • Studio Workshop
    • Video tutorials
    • Workshop results
  • Books
    • On-Camera Flash (revised ed.)
    • Direction & Quality of Light
    • Off-Camera Flash Photography
    • Lighting & Design
    • On-Camera Flash (1st ed.)
  • Projects
    • Two Perspectives
    • B&W Infrared
    • Vintage lenses
    • Time-lapse photography
  • Info
    • About
    • Contact
    • My Photo Gear
    • Books by NvN
    • Join us on Facebook
    • Acclaim
    • Success Stories

using on-camera bounce flash outside

September 19, 2009 Neil vN 8 Comments

an example of using on-camera bounce flash outside

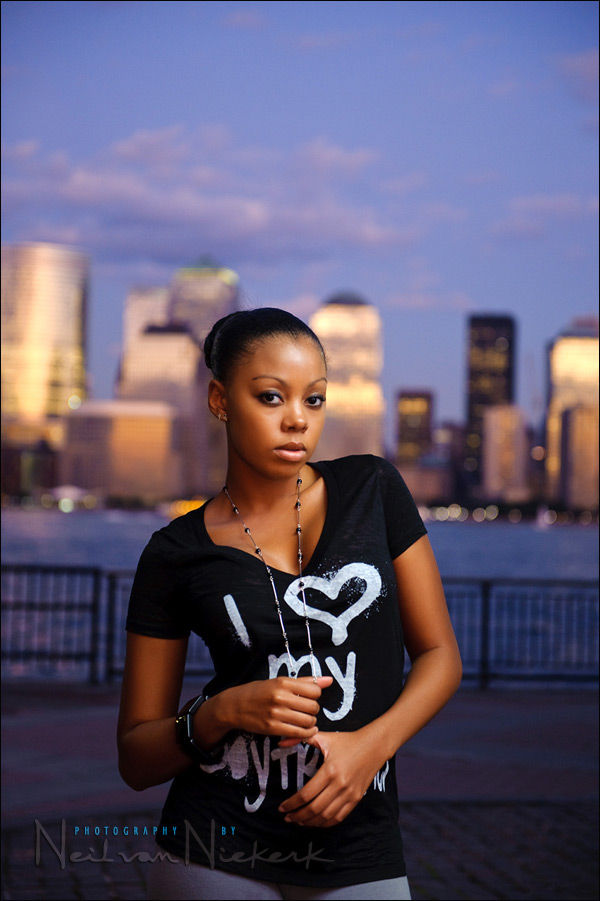
This photograph of our model, Precious, taken during a flash photography workshop, is an example from the practical session where we used areas outside to bounce our flash off. By adding that bit of light from our on-camera speedlights, we can sweeten the existing light.

Working in the early evening in lower light levels, it becomes easier to get effective light from our speedlight even when bounced off the side of a building.

camera settings: 1/60 @ f3.2 @ 800 ISO – on-camera TTL flash, bounced.
Nikon D3;  Nikon 24-70mm f2.8G ED AF-S (B&H);  Nikon SB-900

My starting point for my camera settings was to expose correctly for the city scene behind our model. Then I added the light from the speed light.

Here is the pull-back shot to show what we bounced our flash off …

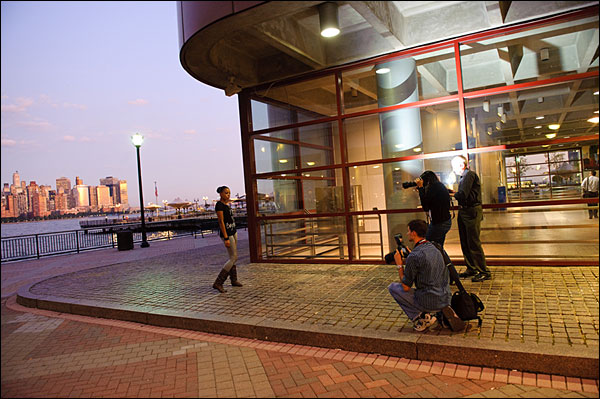
The side of the Path train station in Jersey City.  I bounced my flash a bit more forward of where you see that splash of light from the flashgun – part of the glass side, pillar and ceiling.  I used the black foamie thing to flag my flash so that I was able to bounce it ‘forward’ towards our model, but NOT get any direct flash on her.  This also gave me that directional look to the light from my flash. Note again, I bounced my flash forward, and not behind me where all the light would’ve been lost.

The key here is that we specifically posed our model here where there were surfaces to bounce our flash off!

Filed Under: bounce flash photography, flash photography Tagged With: bounce flash photography, on-camera bounce flash, on-camera flash photography, on-camera flash techniques


Help support this website

If you find these articles of value, please help support this website by using these B&H and Amazon affiliate links to order your photo gear.

I also offer photography workshops and tutoring sessions, whether in person, or via online video tutoring sessions.

Please follow me on Instagram for more.

You can also join our thriving photo community in the Tangents group on Facebook, where we show our photos and discuss all things photography.

Thank you,

Neil vN

Books by Neil van Niekerk


8 Comments, Add Your Own

  1. 1frank johnson says

    September 19, 2009 at 12:48 pm

    Beautiful color modulation from light blue of sky through the darker blue of the water to the purplish blue of the pavement and back to light sky blue in her jeans! Wonderful how the f/3.2 golden background blur of twilight-reflecting skyline glass blends with the medium cocoa butter of her skin!
    This appears to be fill flash. So why didn’t you use TTL instead of TTLBL? What difference, if any, would that have made? When you were setting for the ambient light, did you make any special adjustment for the cocoa-butter color of her skin and the black, but boldly white-lettered, shirt? Did you dial flash compensation up or down?
    I’ve read and reread your excellent book. Now I repeatedly study its photos and their exposure data, trying to square that material with your stated general principles.
    Frank, who is trying hard to master his D3, SB-900, black-foam for flash, as well as his Nikkor 70-200 2.8, 85 1.4, 14-24 2.8, and 50 1.4.

    Reply
  2. 2Neil says

    September 19, 2009 at 2:49 pm

    Frank, the choice between TTL and TTL-BL becomes less important in a situation like this when you realize that either mode would’ve worked .. but might have needed different levels of flash exposure compensation. (FEC)

    A test shot will indicate if you need more or less FEC to get the TTL flash exposure correct. I did dial down my FEC by another 0.3ev compared to my usual default setting.

    Neil vN

    Reply
  3. 3Bob says

    September 19, 2009 at 4:06 pm

    New to your site and you’ve opened my eyes to a new technique. On-Camera Flash is a lot more flexible than I’ve been led to believe.

    When you take your shots, do you usually take a shot without a flash then turn it on and take another? Or do you run with your flash on and adjust as needed?

    Reply
  4. 4Neil says

    September 19, 2009 at 6:51 pm

    Bob, it varies whether I take a test shot without flash first. In this instance, I did meter for the background with my camera’s built-in meter, and then took a test shot to confirm.

    Neil vN

    Reply
  5. 5David Purslow says

    September 20, 2009 at 3:52 am

    Hey Neil, can I ask a few questions please, and I dont know if your black foam thing is a ABBC or not but I have just got one so will if permitted talk in terms of a ABBC

    Having just received my ABBC ultimate to replace my lightsphere I am loving the light it puts out, I can see the feathering in my pics, taking a little more time to think about taking pictures with it but not much….

    My questions are these.

    In the example above do you have the foam on the short side of the flash – I am guessing since its a port image you have it on the long side with the head at at about 35 degrees or so.

    If I am correct in my assumption do you generally use your foam thing on the long side or short side of the flash ?

    Again in the example above is the gobo side of the abbc on the camera left side of the flash

    Would using the ABBC ultimate give you much (in this example) different light than the an all black ABBC and for bouncing flash, is an all black ABBC better than one with a small amount of white space ?

    last but not least and guessing a hard one, what do you think is about the maximum distance you can get fairly usable bounced light from a surface like this.

    thanks mate, sorry for all the questions

    ciao

    dp

    Reply
  6. 6Neil says

    September 20, 2009 at 8:56 am

    David, for that vertical image, I had to hold my camera with my right-hand under the camera. I then bounced the flash slightly forward towards the model .. and therefore had to use the black foamie thing to block / gobo / flag my flash so that there is no direct flash. I turned the black foamie thing around on the flash-head so that it blocked direct flash. It really is as simple as that.

    I don’t think it is possible to tell in advance what distance I can get out of bouncing my flash off surfaces like that .. but you might be surprised when you do try it out by how successful you are in situations where you thought you wouldn’t be able to. The key here though is to use a wide aperture, and as high an ISO as you are comfortable with.

    Neil vN

    Reply
  7. 7Andrew Westran says

    September 20, 2009 at 11:02 am

    Hi Neil,

    I just shot my second wedding using various tidbits from your site.
    (In particular, your ‘black foamie thing’, which in my case is actually just a more-or-less A5 square of black paper attached to my speedlight with a hairband…)

    Thanks again for all of the excellent advice and tips you offer so freely.

    Regards,
    Andrew Westran
    Durban, South Africa
    https://www.flickr.com/photos/37871415@N00/

    Reply
  8. 8Libby says

    September 29, 2009 at 1:15 am

    It’s really great to see a “how to” shot.

    Thanks for a great blog!

    Reply

Leave a Reply Cancel reply

Your email address will not be published. Required fields are marked *

categories

Articles & Tutorials

  • • About myself & this site
    • Books by Neil vN
    • Best photography books
    • Black foamie thing
    • Photographers’ success stories
  • • Flash Photography Techniques
    • Natural looking flash
    • Flash + Ambient light
    • Dragging the shutter
    • Bouncing your flash
    • On-camera flash outdoors
    • Exposure metering
    • Flash exposure compensation
    • Bounce flash examples
    • Which is the best flashgun?
    • Flash brackets
    • Off-camera flash photography
    • Flash photography basics
    • Using video lights
    • Flash photography tips
  • • Photography workshops NJ / NYC
    • Models @ photography workshops
tutorials:
flash photography
Photography
Workshops

All rights reserved. Copyright © Neil van Niekerk 2025 · Customization by The Traveling Designer

Copyright © 2025 · NvN on Genesis Framework · WordPress · Log in