using two video lights for photography
Video lights as a way of lighting still photography portraits is something that I’ve mentioned more often on this blog of late. When the subject and setting is such that a more dramatic way of lighting would work, then I quite often use video lights.
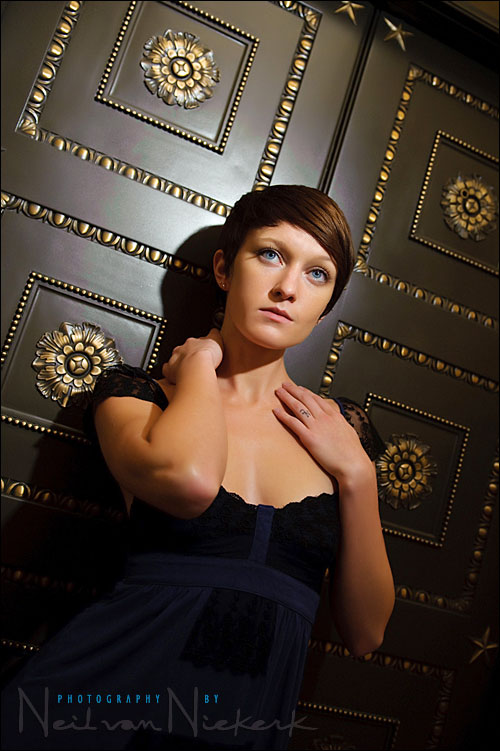
This image is from the recent workshop in Philadelphia, and someone held a single video light to the right and above me. The angle that the light should be held at, is guided by how I want the shadow under her nose to appear. I prefer the shadow to appear as loop lighting or as butterfly lighting, instead of having the shadow of her nose fall across her cheek or mouth.
It looks dramatic and beautiful. In this case, with Nikiya standing so close to the background – an elevator door – we can get away with a single light. Similarly, if we had positioned her so that she is against an out-of-focus background with some color and detail, then a single light would also work. Then the background would be light enough to create separation so that the model pops out. I positioned myself so that the hot-spot on the metallic doors created a natural halo around her.
But when there is a background that would appear dark or even black, with no separation, then we need to make another plan. In this case, another video light to throw some light pattern on the background …
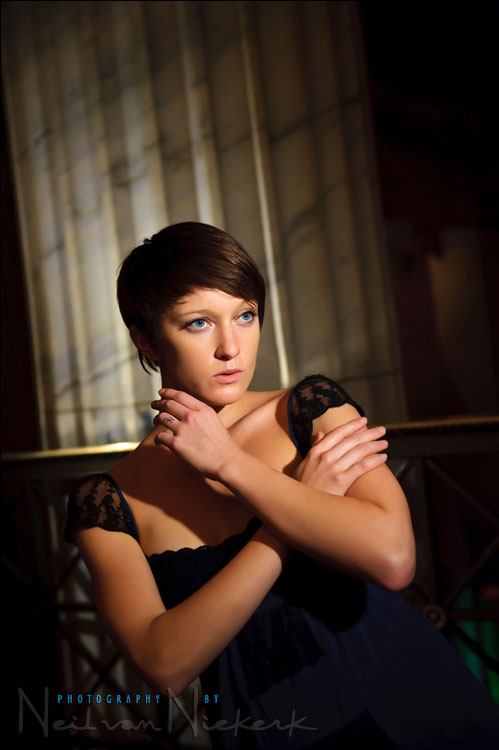
Here the second video light was held to camera left, and flagged with barn doors so that the light didn’t fall on our model.
Camera settings:
1/160 @ f3.2 @ 1250 ISO for the top image, and
1/125 @ f3.2 @ 1250 ISO for the second image.
White balance was Incandescent / Tungsten, adjusted a little bit as part of RAW workflow.
With these settings, similar results could be achieved at f1.8 or f2 and a lower ISO if you are using a camera that doesn’t have great high-ISO capabilities.
Details and spec of the actual video lights that were used.
The beauty of the video light again is that with the quick fall-off in light to the edges, it creates a pattern and not just a flood of even light. Then there is always the ability to use the barn-doors to flag the light even further to create a swathe of light or just a streak of light in the background. That light on the pillars there give enough separation between the model and the background, and still creates a natural vignette around her .. adding to the dramatic look of the image.
In your discussion on video lighting you commented on setting the ISO at 1250. It is difficult for anyone to talk me into setting it past 200 and you’ve gone 5 times beyound that. Care to comment on this and image quality?
Thanks for your continued selfless sharing of knowledge and experience Neil. I love reading what you’re up to. I’ve been using video lights for a few years now at each and every wedding I shoot. I always find a use for them. While I do own a pair of ID lights (the xlr connected battery versions) I get A LOT more mileage out of theses video lights: Sunpak Readylite 20
Cheap, light, put two in my pocket and I don’t need an assistant, I always find a place to put them on using little mini pods I’ve manufactured out of spare parts. They’re awesome. (I use the bases that come with my nikon speedlights on lightstands with swivel heads, quick, easy, light, no hassle)
They’re 20 watts, but very bright lovely light. I have FIVE of them so I don’t worry about the batteries dying.
Just to echo Bill’s sentiments, we also use the Sunpack video lights. In dark settings with low ambient light the Sunpacks are awesome.
The batteries that come with the unit last about 20 min. We were able to buy some more powerful batteries at Batteries Plus that last 40 minutes. Cheap, efficient, small and light.
I also have the Lowel ID light. I like it but I find it to be a bit more awkward to carry around for wedding work.
For portrait and engagement work I also like to use my $30 deer lights from Wal-mart that come with colored gels. They are a lot heavier and the bright spot in the center needs to be diffused with a piece of velum, but they make a great cheap and versatile light source.
The photo linked below actually uses two dear lights (one gelled blue from behind, one on her feet) and the Lowel ID light on her face.
I like the idea of video lights, but I can’t get past the hard shadows they create. Since the time I first picked up a camera, everything I read was “hard shadows are bad”, “get the flash off the camera and diffuse it to avoid hard shadows”, blah, blah, blah. It seems as though there is a trend these days to forgo soft the shadow transitions that everyone was “told” was the way to go and back to the hard shadows produced by small light sources that we desperately tried to get rid of. It seems like everyone is using unmodified speedlights off camera.
I have seen lots of work done at receptions with bare speedlights placed in opposite corners of the venue. While some of the photos work a great many of them have nasty shadows everywhere and over exposure of things closer to the lights. The only difference between them and the shadows produced by on camera flash is their direction. Does that make them any less obtrusive? Are these photos going to be dated when people start saying “hey, look at all these nasty, hard shadows everywhere” and go back to attempting to soften them? Are all these techniques cyclical? Are we just giddy over the quality and ease of speedlights these days and just using them like this because we can and not because we should?
I dunno…it is hard for me to undo the “brainwashing” that hard shadows are evil that occurred when I was in my early and impressionable days of photography :-(
Mac .. we have to agree that the way shadows and shading appear hugely influences an image’s success. We need that interplay between light and shade to help give us form, shape and dimension to our subject or scene.
So while some images benefit from flat lighting, most do better with directional light.
Now, how soft that light appears might just be a matter of taste and preference.
I do have a distinct preference for soft lighting. However, if you look at the way the old Hollywood masters such as George Hurrell, CS Bull and Laszlo Willinger lit the classic portraits of the movie stars, there are distinct shadows.
They had a dramatic way of lighting their portraits, with specific use of light and shade … and if you delve in that way of lighting, you’ll see that the the style is intentionally dramatic and glamorous. The use of video light isn’t too far removed from that.
Back to the topic of hard shadows though .. the one shadow I really try and avoid where I can, is the hard shadow from an on-camera flash. That generally is just ugly, especially if the camera is turned side-ways.
But shadows cast from directional off-camera lighting isn’t something that need to be avoided .. and as shown in the Hollywood style of lighting, is something to be embraced.
Yes, Neil…I have one of those books. I love the old Hollywood lighting :-) I agree with you that a hard shadow from a directional, off-camera light source is indeed “better” than one from on-camera. I just need to get my head out of my rear end about hard shadows being “bad”. I wish I hadn’t read so much in my early days or paid any attention to those negatively critiquing photos with hard shadows regardless of how they are produced. The internet can be a tool for good as well as evil ;-)
Daniel Sawrie sent me this image he took at the recent Atlanta workshop. We also used two video lights here – one to light our model, and the other to brighten our background.
what kind of video lights on this shot?
Lowel ID Light
Hollywood Portraits, by Roger Hicks and Christopher Nisperos is a great book. Nice heads up Neil. For those interested, here is a link to a fairly extended preview of the book:
https://books.google.com/books?id=7GfsKp7StwcC&printsec=frontcover&source=gbs_navlinks_s&hl=en#v=onepage&q=&f=false
Hi Neil,
Nice shots as always.
In the second shot of the model, is that image slightly blurred? The model’s eyes aren’t quite sharp and her arms seem blurred. The blurring is very subtle at the web image resolution. Either that or the lighting is playing tricks on me. :-)
Like you said in past blog posts, even if there is slight blurring or noise in the image, your clients don’t notice it, because they are too busy admiring the wonderful shot you took.
–Stephen
Neil: I hope you’ve had a great weekend and Thanks for your comment on my ISO question. You’re making me think differently about ISO settings vs image quality and this week I’ll be checking this out. One final question on the subject; In shooting with a high ISO with your D3 does the 24.5 megapixels have any markeable affect on the image vs the D300 with 12.5 megapixels shooting in with a high ISO? I wouldn’t think it makes any difference; but your the man with the D3 and I’m curious if the pixels have an impact.
Nico
hi neil,
great shots, those video lights really have a special touch. again, i love your colors ans specialy the skin-tones to me are just perfect and natural.
may i ask what color space you work with. i whant to check the colors with PS and tried to load one of your fotos in Photoshop. but working with AdobeRGB or sRGB the colors don’t fit and the skin is more red. never get the same result i see in the web-browser.
do you have any idea?
thanks a lot and best regards,
thomas
Neil: When I began reading your description about using high ISO settings and seeing your test images on your walk around Time Square earlier in the year: shooting at ISO 3200 in available Time Square lighting I was totally blown away in the quality of these images. I dowloaded the tech sheets from the D700 and D3 and compared them to the D300 and sure enough the 12.1 Megapixel FX format CMOS sensor is the “kicker” in this whole discussion. It totally changes the dynamics of ISO ratings due to the increase in size of the new sensors. But I suppose CANON had this type of sensor all along.
My reference to 24.5 megapixels featured in the D3X offers even more latitude due to the 35.9×24 sensor size combined with the EXPEED processing but I think the D3 posesses all the practical features required of a Professional Camera. Well, I’m on my way to the camera shop. . . .