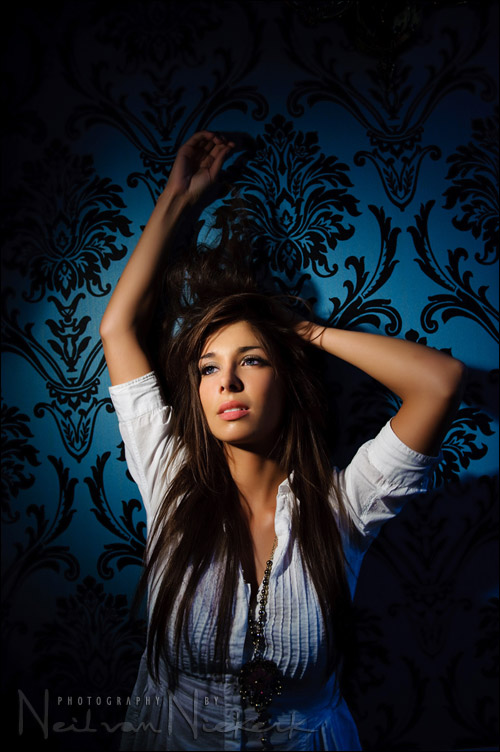
A portrait of Amy, one of our models at the recent workshop in Brighton, UK. Here we used a single video light on her.
I love the dramatic quality the light imparts, and how you can flag the light with the barn-doors to create a specific fall-off to the light in the background. The strong vignetting helps in giving it that dramatic look.
In figuring out the direction of light, and how to place the video lighting, I am largely guided by way the shadow of the subject’s nose is falling across her face. I then direct the model and the person who holds the light, to move slightly if needed. I usually don’t want the nose to cast a shadow across the cheek that blends into the other shadow areas.
As you can see from the shadow of her nose, the video light was to the camera left. In looking at this photo now in editing it, I think it might have been improved if the video light had moved slightly more to the camera’s point of view, so that the shadow of her nose is even less obvious. Then the way the left side of her face is shaded would’ve been less steep as well.
It’s in this analysis afterward of a photograph that we learn how to improve the lighting and composition and posing for the next time!
It looks pretty good to me, Neil. The video lighting was one of my favourite parts of the day. I love the dramatic quality of the light, and how it is so flexible.
Hi Neil,
I love the way the vido lighting comes out in a shot. I have a Nikon D200 would this light work with this camera? It’s not like the Nikon D3 or D700 with ability to work with the high ISO.
Where there 2 lights used? Or rather, what did you do to make the wall blue, without interfering with the main light.
Neil,
What lens were you using?
I love it Neil….very dramatic look. Wouldn’t change a thing!
Dave
Hi Neil,
Thank you for your kind words and for displaying the edited version, I’m pleased you like my retouch, after reading your comments I thought I would try and make it look as if an extra low powered fill-in light had been used.
To try and achieve this effect I lightened most of the important shadow areas on Amy, the side of her nose (as you mentioned) under her nose and bottom lip, down the side of her face, her neck and lastly her arms.
It’s a shame its not possible to do a roll over before and after. Wait! What am I saying, just remembered this is your photography blog not my image manipulation blog (not that I have one!) :-)
Also if it is helpful for others. Instead of Photoshop I used GIMP portable (open source software) it’s almost as powerful as Photoshop but is free for anyone to download and use plus it doesn’t need to be installed.
Kind regards,
David
Neil,
Once again great shots! I also own a Lowell ID video light but for some reason the KV temperature of my light and its quality of light does not look anything like yours. Did you gel and or modified your light in some way? In addition, how do you deal with mixed lighting situations when dealing with your video light? I was thinking maybe changing my bulb out.
Thanks,
Lafayette
Neil,
I love this shot of yours. The lighting is perfect and the pose is great. I remember our workshop here in Austin but do you ever have to direct your models?
-Brian
Beautiful work as always, Neil!
I have both a 5D and a 40D; I prefer to shoot with the 5D. When shooting I usually shot in almost any WB mode because I’m shooting in raw; unless I am gelled. Is this a mistake on my part? Below is a link to a photo I shot while practicing. Notice how reddish his skin tone is, this is not what I am looking for.
I have both a 5D and a 40D; I prefer to shoot with the 5D. When shooting I usually shot in almost any WB mode because I’m shooting in raw; unless I am gelled. Is this a mistake on my part?
For those that may not be able to afford the Lowel I use a Paglight C6 with a 30watt bulb, cost £200 for light, 2 bulbs and battery pack with belt clasp.
Why these things always come up in editing ? :-)
I had always problem with this kind of things. I feel like I`ve had closed eyes through the photo shoot and then opened them in editing :-)