Wedding photography – Style, technique & choice of gear
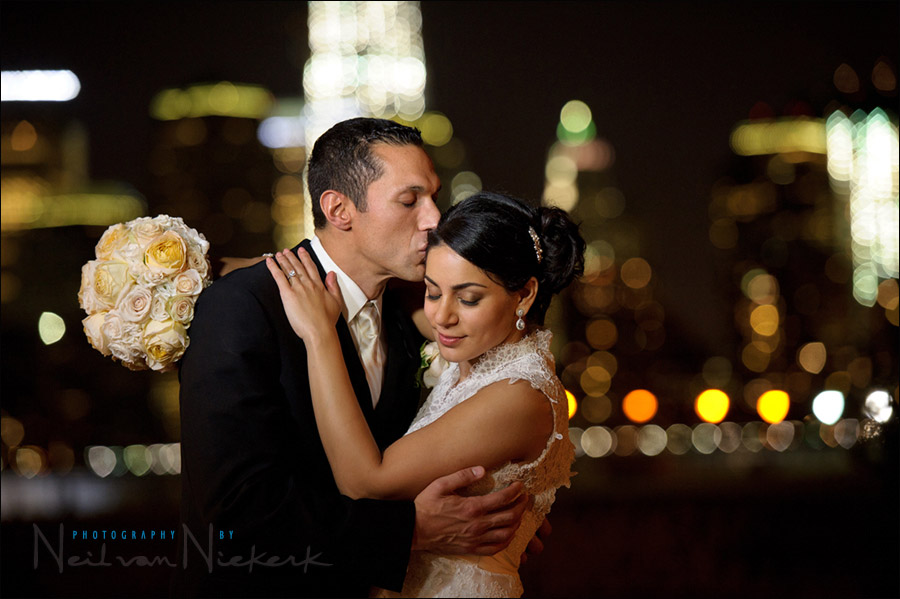
With Manhattan as a back-drop, I wanted a cinematic look for the photograph of Nima and Peter. A magnificent view behind them as they snuggle in. While I approach wedding photography with my eye on telling the story of the day, for me, where a photographer really reveals a specific style, is in the portraits of the bride and groom.
I wanted a romantic look to this sequence of images, so there were specific choices to be made in terms of equipment, camera settings and the lighting. So let’s run through the thought-process.
Since the out-of-focus city scene would be crucial to the mood of the photograph, my camera settings and lens choice had to be specific for this.
We were on the other side of the Hudson, so I needed a long focal length to compress the perspective. I used a 70-200mm f2.8 zoom lens with image stabilization / vibration reduction. I used the Nikon 70-200mm f2.8 AF-S VR II (affiliate), to be specific, but the Canon EF 70-200mm f/2.8L IS II (affiliate), is just as beautiful a lens. The reason why Image Stabilization (IS) or Vibration Reduction (VR) is essential, is that I don’t like using a tripod. It’s too static. It allows me one composition. With a stabilized lens, I can move my position and change my perspective and background, without clumsily shifting a tripod around, and move the camera up and down.
It was cold outside, so I needed to do my homework before I took the couple outside. I had to have everything ready beforehand. A few test shots gave me my exposure that was necessary – 1/25 @ f3.2 @ 2000 ISO
These settings had very little wriggle room there. We’re at a very slow shutter speed. We’re (nearly) wide-open on the zoom lens. 2000 ISO is getting to be “up there” on the ISO scale.

My choice of WB was also of importance. I knew I wanted to use video light as lighting for the photographs. Because they are very portable and easy to use, I always have an LED video light (affiliate) in my camera roller case. The beauty of this LED video light is that you can adjust it between Daylight all the way to Tungsten / Incandescent, to match the color balance of whatever situation you find yourself in.
Here are two of the test shots to see what the city scene would look like at the two WB settings:
On the left-hand side, Cloudy WB, and on the right-hand side, my initial WB choice, Incandescent.
The Incandescent WB setting on my camera, turned the city scene too cool. Too blue. I like warm. Especially with the romantic portraits of the couple, the warm tones would look great.
Therefore I knew I’d use the two LED video lights without the gel, and set my camera’s WB to Cloudy. Of course, I have to shoot in RAW to allow the most flexibility in adjusting my WB afterwards. This way I could have good skin tones and the warmer tones for the city lights. But I could equally well have settled for the colder tones of the cityscape behind them.
Choice of camera settings
Next – the choice of camera settings: 1/25 @ f3.2 @ 2000 ISO
I could only get away with these extreme settings, because:
1. I use high-quality professional optics. Using the Nikon 70-200mm f2.8 AF-S VR II (affiliate) or the Canon EF 70-200mm f/2.8L IS II (affiliate), at f2.8 or f3.2 is no concern. The images are crisp!
2. Both those lenses have aggressive IS / VR, which means the lens can be successfully hand-held at impressively low shutter speeds. To sway success in my favor, I also use machine-gunning as a technique, to make sure there are enough images to choose from that I am assured of a few crisply sharp images. Since the LED video light is continuous light, and not flash, there is no chance of burning out the light like you could with a flash. Also, there isn’t the annoying barrage of flashes going off. So definitely fire the camera’s shutter in short bursts.
3. I really like using top-of-the-line cameras. Their responsiveness makes shooting events a pleasure. And then the high-ISO noise is also a huge factor. Here I used the Nikon D3S (affiliate). For cameras of this calibre, an ISO as high as 2000 is no problem at all.
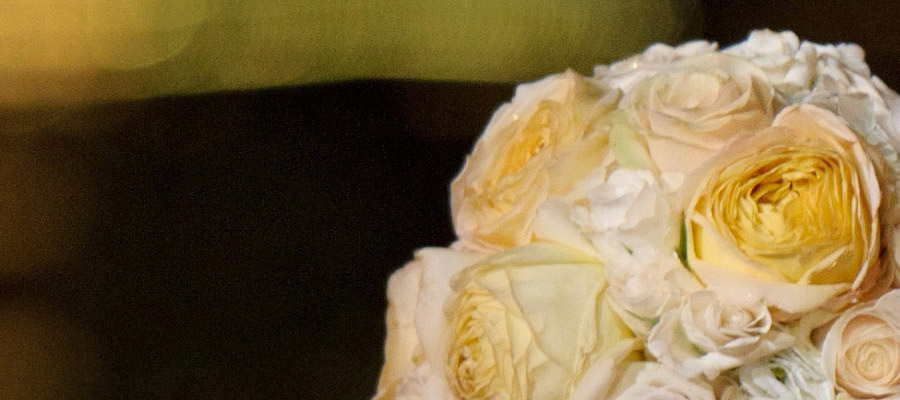
Here is a 100% screengrab of part of the image above … with NO noise-reduction at all. Just the RAW file adjusted for color and white balance. The Noise Reduction was set to zero. It looks quite incredible. The only noise I could really discern was in that specific shade of yellow-green of the out-of-focus highlights.
The images from these cameras hold detail very well at high ISOs, and in the image at the top, there is no noise visible in the skin tones.
Summary
All of these decisions where made before taking the couple outside into the cold night air. I had my exposure figured out. I had the angle figured out. The background. Everything ready.
I also wanted to use two LED video lights to help give a more broad spread of light. I had the kind help of the fiancé of the maid-of-honor who held the video lights up for me. (Thanks, Brendan!) I did have to turn the dimmer on both video lights to bring the brightness down to match the light in the background. This had to be a visual assessment right there, and again when I shot a few frames.
With a little bit of preparation, and a specific idea in mind, and with great equipment … and a couple that is very photogenic, it all came together. That exhilirating point where technique, style & choice of camera gear converge to give images that make your clients and their friends gasp.
This brings me back to another topic which bothers me – the age-old debate over equipment vs artistic ability. Inevitably there’s a camp who sneers at the idea that top-quality equipment is important or even affects the quality and style of work. For any out there that truly believes it is the photographer and not the equipment that is important … make no mistake, the equipment *is* important.
Related articles
- Bride & groom portraits with video light (Alli & Scott)
- Other articles on wedding photography
- Using video light for photography
Photo gear (or equivalents) used during this photo session
- Nikon D3S
- Nikon 70-200mm f2.8 AF-S VR II / Canon EF 70-200mm f/2.8L IS II
- recommended LED video light
- an assistant to hold the video light up
Its the usual with you Neil……GREAT……….same old GREAT stuff. Now you said two LED lights and one assistant? are both lights together?? ty
Neil, beautiful photo. The emotion was so beautifully portrayed with your choice in lighting and camera settings in addition to the posing and composition. I LOVE these blog posts where you explain not only what you did, but why. The thought process behind things is very helpful to some of us less experienced photographers. Thank you once again for sharing and educating.
I stumbled onto your blog last week, and so far I’ve enjoyed almost every post. I appreciate you keeping it easy to read, simple yet detailed…VERY practical.
Love the equipment links at the end of each post. Also appreciate your comment on the equipment vs artistry. I think it just depends on why you are shooting. Shooting to post is one thing. Shooting to present to a paying client in quite another.
As always Neil, GREAT article!! Love your work and it’s wonderful how much you’re willing to share your tips and techniques.
I’ve been looking at LED video lights a bit and your article has made me want to try some even more.
Just wondering, I see a HUGE difference in price in some units I found on Amazon vs the Litepanels you listed as the ones you use. Like $400 vs $45. Are these the same types of lights or am I missing something here and looking at the wrong thing?
Thanks so much for giving back and sharing!!!
Neil,
You make a great point about equipment. On one hand, it’s important not to use equipment as an excuse. One needs to learn excel with the hardware at hand. However, one’s equipment can enable or prevent certain compositions and techniques.
I shoot high school football using a D300s and a 70-200. I do this under the dim glow of Friday nights. I can get good shots but there is nothing I can do as a photographer the get the shots I could with a D3s and a 400mm. The angle, D0F and perspective of the 400mm (or 300mm on a crop body) cannot be replicated with a shorter lens. In addition, I cannot get usable images above ISO 3200, but on the D3s, I can shoot at ISO 6400 with virtual impunity. This give me the ability to run a faster shutter and (more importantly) get the right mix of flash, ambient and shutter speed.
I don’t have $15k to spend on HS football, so I make do as best as I can.
Neil, I just completed my first two family portrait shoots and I wanted to say thanks for your sharing your techniques through Tangents. I have learnt from you and put your techniques to use. As you did I figured out my exposures early and had no qualms shooting at ISO1000 – something I would dream of not too long ago – to ensure the background (beach sea and sky) were exposed they way I wanted. I still believe a good photographer can make a good photograph with cheap/less capable equipment if he knows how to use it properly, but the right equipment for the job makes a lot of difference.
Neil, great photograph. Why did you choose the MicroPro LED light panel instead of a flash with a 1/2 cut CTO gel? Thanks, Lee
Neil, when I saw the side-by-side close-ups of the background I thought cloudy WB was waaay too orange, but the end result just works. Did you try daylight WB (with or without the gel)?
Is the D3S your new camera or is it on loan? I inferred from paragraph 3 that it was the latter.
Great blog Neil. Thank you.
I’m using a monopod. It is very convenient for changing the shooting positions and there is no pain in my shoulder with 70-200 attached any more.
Hi Neil,
In the first picture, taking into account the opening of the lens, f/3.2, where you placed your focus point for both faces remain in focus?
Thank you again.