using neutral density (ND) filters with flash to control depth of field
Working in bright light, the limitation of having a maximum flash sync speed forces a small aperture on us. That small aperture means more depth of field than we might like.
There are two ways to force a high shutter speed / wide aperture combination:
– go to high speed sync (HSS) mode.
– use a neutral density (ND) filter.
Using HSS dramatically cuts down our power of our flash, so if we’re working in very bright light, we might be past the edge of what our flash is capable of. Then we need to bring it back to maximum flash sync speed, but force the wider aperture with a neutral density filter instead.
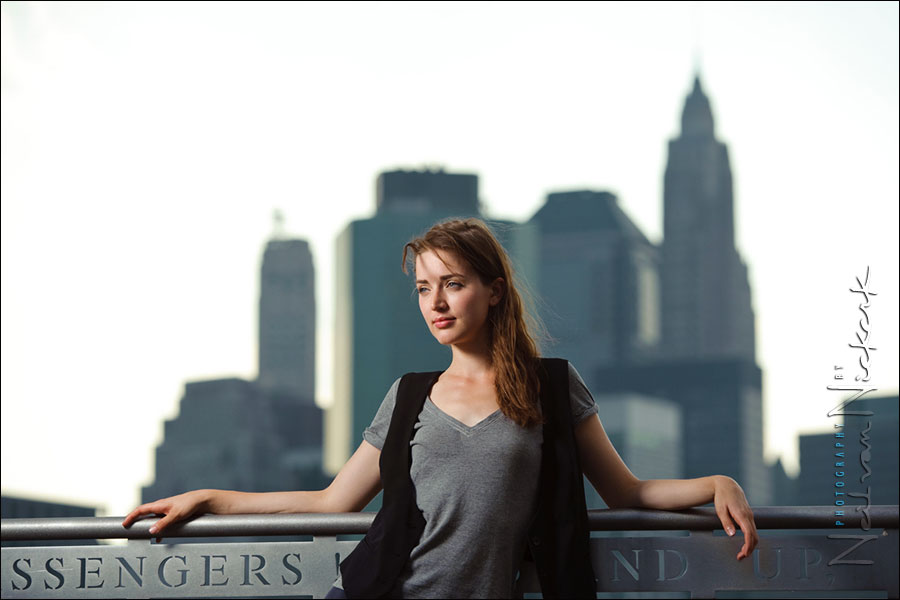
The photo at the top of this article was taken at 1/250 @ f4 @ 200 ISO; which is 3 stops below the actual exposure of this image here.
Instead of 1/250 @ f11 @ 200 ISO, I was able to go to a much wider aperture (3 stops) by adding an 8x Neutral Density filter:B+W 0.9 (3 stop) ND Neutral Density 77mm MRC 110M Filter (Amazon) The 8x means a 3 stop reduction in light. You can see the difference in depth of field, even on this 600px wide image. (Click on the photos for larger images.)
Just to explain how the numerical value of 8x relates to 3 stops of light. One full ‘stop’ in shutter speed or aperture or ISO value means a doubling or halving of the amount of light. Therefore 2 stops means a 4 times increase, or 1/4 value. (2 to the power of 2 equals 4.) If we increase or decrease our exposure by another stop, we double or halve the 4x or 1/4 value, and that would get us to the 8x reduction in light. Three stops. This means that f11 becomes f4
With this next image, I wanted to show how the flash’s output is reduced by going to high-speed sync. For all these images, I had the flash set to maximum power, shooting with Manual Flash. Keeping the flash (in a softbox) to the same distance, you can see how shooting at 1/2000 @ f4 @ 200 ISO, reduced the flash power. By going over maximum flash sync speed, the flash goes into HSS mode, and changes it output from a high energy burst of light, into a very short period of continuous light. That is how high-speed flash sync works. The flash’s output is dissipated over a brief period as continuous light, thereby allowing the entire frame to receive equal flash exposure. But this means the flash’s output is reduced considerably.
The immediate question that will be asked is, won’t the ND filter cut down the flash’s output? Yes, it will. But it will cut the ambient light and flash by equal amounts. So you don’t lose flash power in comparison to the available light. The balance stays the same, unlike if you had decided to use high-speed flash sync.
To compensate for the loss of output by going to HSS, we would’ve had to move the flash closer, which isn’t always an option, depending on our composition of the photo. Adding multiple speedlights are an option, but in comparison, it is a simpler matter of adding a ND filter.
photo gear (and equivalents) used in this photo session
- Nikon D3
- Nikon 70-200mm f2.8 AF-S VR II (Amazon) / Canon EF 70-200mm f/2.8L IS II (Amazon)
- Nikon SB-910 Speedlight (Amazon) / Canon 600EX-RT Speedlite (Amazon)
- Nikon SD-9 battery pack (Amazon) / Canon CP-E4 battery pack (Amazon)
- Lastolite EZYBOX 24×24″ softbox (Amazon)
Hi Neil,
excellent article as always. In terms of flash power loss using a ND filter maybe it’s easy to say that for the same shutter speed and iso the flash output power needs to be the same for the pictures taken with or without the ND filter attached (here F11). Personally i found that it is needed a grey card after that to balance the color shift of the ND filter, ok mine is not perfect, is the cheaper one, and i use it for the same reason. The Singh-Ray filter is awesome but too expensive so i will save to money for the next year.
Have a great day. Marius
Good stuff Neil.
Just received a Hoya Pro1 ND4 couple of days ago with such situations in mind.
Hi Neil,
Noticing that the sky is still blown and looking at the buildings, was it a bright, cloudy, flat light day?
Reading that the D3 and D700 have around 3 stops of light recovery, how much higher ND filter would you have needed to prevent the sky blowing, did you already do any recovery while developing the RAW files?
Thank you.
David
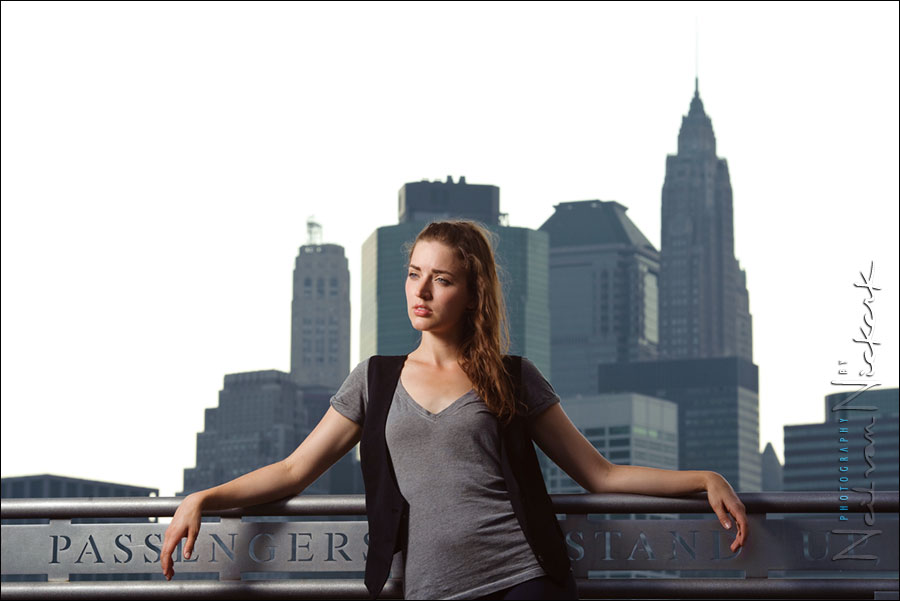
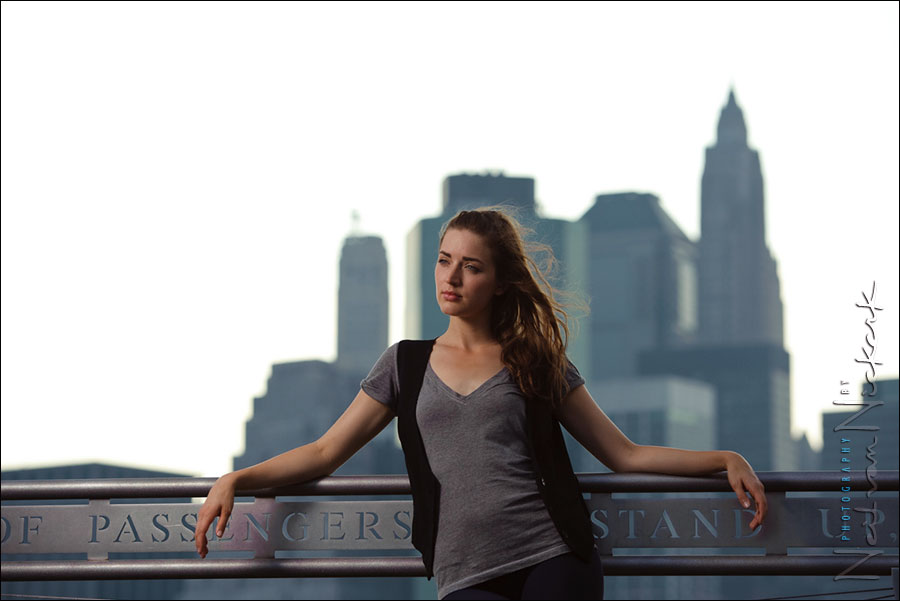
Both these were taken with the Nikon 24-70mm f2.8
The 1st photo above was at 32mm, and the 2nd image below was at 32mm
The 1st photo: 1/250 @ f11 @ 200 ISO (ie, without the ND filter)
The 2nd image below: 1/250 @ f5.6 @ 200 ISO (which means I used the ND filter)
Great article, Neil. Readers of this post may be curious to know the exact efficiency gain of an ND filter vs. high speed sync. Based on my tests and calculations, the gain is slightly more than 2 stops, and the effective range with an ND filter is slightly more than double. Supporting calculations here: http://betterfamilyphotos.blogspot.com/2010/05/improving-flash-efficiency-with-nd.html
Best regards,
Michael
Wow Neil,
Loving the first two shots of your reply (I can see why you waited for the sky) I like your PP work.
I understand that it is not always possible, so I would just like to say, thank you for taking time to give a detailed reply and also the extra photos, it is also interesting to see the last two shots, showing how you were positioned for the shoot, very much appreciated!
For the first two shots (of your reply) looking at the field of view change, did you switch lenses to your 24-70 f/2.8 and shoot closer to the model at around 35mm, or were you shooting at 70mm with your 70-200 f/2.8?
Thank you,
David
Neil,
how you get that 1/2000th sync speed?
are you saying that high sync speed kills the speedlight power, while the ND filter doesnt?
thanx
Thanks for this informative post. I have been thinking about using ND filters as an alternative to HSS as well. My concern has been on the ability and accuracy of focusing once the ND is on the lens.
Can you comment on how much an 8X ND would effect focusing?
Hi Neil,
used to follow your blog from algeria..think i was the only Algerian doing so :)
for some reason, i like the portrait shot where the background is sharper (f11)…just think that for some backgrounds, it’s an interesting approach to have a deep DOF. it adds more things to look at without really diverting the attention from main subject…no?
cheers,
KM
Hi Neil, fantastic pics, on your usual standards.I like all of them,but specially the last ones with the “glamour” look [of course,having Anelisa as a model always helps ;)].Know what?.You always seem to do things different to other photographers.Some shoot in Aperture outdoors….you always go manual; some tend to a lower ISO even indoors…you very seldomly shoot under 400 ISO; some always rely on TTL to do the trick….you only sometimes.Maybe,those “strange” things is what makes so cool this website!!
Thanks for your patience with us!
Gorka.
PS: Spain won the Soccer Cup [yeah],maybe you did follow it as a Southafrican born citizen ;-)
Glad I found this site, lots of usual information and great photos.
Someone on Flickr posted a link to your site, that’s how I got here :)
I like flash and I like wide open apertures, that’s why I’m often using the ND filters. Looking at the three different photos, my personal preference is the first one, so I guess I made the right choice using those filters. :)
One question though: I read that you often shoot with TTL. Something I’ve never done before because it never seems to give me the results I can achieve manually. But.. I’d love to be able to work with TTL and get the same results I have now (or better :), because I lose so much time shooting manual. What am I doing wrong? How do you do it? Let’s say a simple setup with one external flash behind a softbox, a 24-70mm lens at f/2.8 and the flash on TTL. In my case, I would have had to use Nikon CLS, because my simple El-Skyport triggers don’t support TTL. Can you point me in the right direction?
Many thanks.
-Kris
Great article. Deserves going to Tangent’s flash techniques content list (I mean, as a new chapter). Thanks again!
Glad you posted this article up, haven’t been to your site in a while and yesterday I had my family at the beach and was struggling big time to get the flash and ambient light to look good in the photos. I was using a canon 50d with my 24-70 f2.8L lense, shooting in manual mode and flash set to TTL. Shutter set to 250 speed, I under exposed the wife and kids by a stop but that required a much higher aperture than I wanted, I really wanted the background blurred out. Switched to HSS and couldn’t get enough light to get rid of the shadows on top of all that it was windy and my wife and daughter both have long hair which was blowing over their faces. Not a good day/experience but glad this happened with family and not a paid client.
Will a Tiffen Circular Polarizer have the same effect as a neutral density (ND) filter? And in my situation above with out a filter what could I have done differently to get a blurred background and not blow out the sky and ocean?
Sorry, just saw where you say a polarizer will reduce the ambient light by around 2 stops.
My apologies for three straight posts but I have one more question – What are you setting your camera’s exposure on while in manual mode, the model or background?
In my situation above I exposed for the blue skies then took the photo of family with flash.
This post saved me from buy additional speedlights and HSS-capable triggers! Thanks!
I think arguments can be made that jacking up the shutter speed, as opposed to using an ND filter, is better, for three reasons.
(1) When you need high shutter speed to freeze action: my micro four thirds has x-speed of only 1/160, which is not fast enough to freeze action on certain types of moving subjects – e.g., kids. In this case, I have to go to HSS sync.
(2) Auto-focus: you mentioned it already.
(3) A filter is another piece of glass that may undermine the quality of your lens. I have a fairly high-grade 3-stop ND filter from B+W. Still, I see purplish tint, especially in white.
Reasons (1) and (2) are almost irrelevant in your set-up above – a standing model.
But in other circumstances, wouldn’t HSS sync be a better alternative?
Hi Neil.
Thank you for the time you find for us and write detailed articles like this.
I would like to point out something that you just mentioned and not elaborated in detail, as you normally do. It is about using CPL filter and flash (at the same time). From my personal experience it is almost impossible.
Yes, CPL filter reduces ambient light for about 2 LV, but at the same time eliminates the reflected light (which is the main purpose of this filter). This means that eliminates the flash light reflected from the model face. Do a simple test: Do the same three portraits in manual mode, with manual flash value, but with a different rotation of the filter.
You’ll get three entirely different portrait, like the model is illuminated from three different angles. This is because the CPL filter did not reduces equally all reflected light, but only one part, which depends on the rotation of the filter, and shape of objects from which the light is reflected (in this case, the model). This leads to very unpredictable results, even when using the modeling light.
Although I have no experience with the Vari ND filter, I guess that’s two joined CPL filters and because it is unreliable for use with flash.
Best regards and sorry for my clumsy English.
Hi Neil, first of all I want to thank you for the tangets website and your awesome 3 books! I’ve been shooting OCF with speedlites for about a year and I’m getting ready to purchase my first powerful strobe.. I have nothing but fast lenses and as you can imagine, I love shallow DOF.. With my Canon flashes I have always been able to use HSS, but like you know it comes with a price to pay which is losing a significant amount of power.. I want to buy an ND filter to shoot wide apertures but I would like to know if you have a preference when it comes to ND filters? My biggest concern is image quality.. I want the best image quality possible, and I don’t care if I have to pay big $$$ as long as I get the best ND filter.. Any suggestions? Thank you Neil! :)
It seems to me that your conclusion here contradicts your findings in your “flash sync” article. There, you describe a linear behavior and specifically state that with HSS, the exposure time reduces flash in the same way as ambient light. This linear behavior is the same of course for an ND filter.
Example:
Compare two shots at 1/200 and 1/800 at the same ambient light level (and assume a flash at its limits). The shot at 1/800 will have 1/4 of the ambient light and 1/4 of the flash light. This is the same what an ND with the factor 4 would do at 1/200.
Check the article on high-speed flash sync again – that linear behavior of the flash only starts after you’ve lost 1 or 2 stops of light from your flash. So you are still ahead in this game if you use a Neutral Density filter.
Here is a follow-up article on the use of an ND filter to control the DoF when using flash in bright light.