Tangents

photography tutorials, reviews & workshops

tangents photography blog
learn : discuss : share
  • Tangents
  • Tutorials
    • Flash Photography
    • Wedding Photography
    • Studio Photography
    • Posing People
    • Understanding Your Camera
    • Exposure metering
    • BFT
    • Best Photo Books
  • Reviews
    • Sony
    • Nikon
    • Canon
    • Fuji
    • Profoto
    • lighting gear
  • Workshops
    • Info: Workshops
    • In-person
      tutoring sessions
    • Online
      tutoring sessions
    • Workshops in
      New Jersey (NJ)
    • Workshops in
      New York (NYC)
    • Photo walks in NYC
    • Studio Workshop
    • Video tutorials
    • Workshop results
  • Books
    • On-Camera Flash (revised ed.)
    • Direction & Quality of Light
    • Off-Camera Flash Photography
    • Lighting & Design
    • On-Camera Flash (1st ed.)
  • Projects
    • Two Perspectives
    • B&W Infrared
    • Vintage lenses
    • Time-lapse photography
  • Info
    • About
    • Contact
    • My Photo Gear
    • Books by NvN
    • Join us on Facebook
    • Acclaim
    • Success Stories

video light as fill-light for wedding portraits

March 28, 2011 Neil vN 17 Comments

using video light as fill-light for the romantic wedding portraits

Having just photographed my first wedding of 2011, I’m back in the groove of things. Keeping to the recent theme of showing how video lights are used for photography, I’d like to show a small selection of images of Cherryl and Jim’s wedding where I used a video light to enhance the existing incandescent lighting at the reception venue …

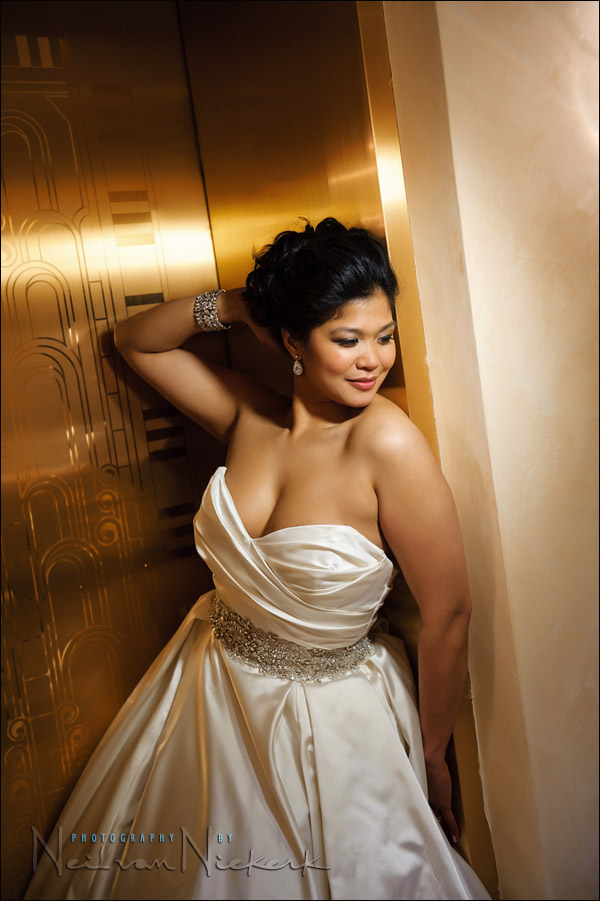
The bridal portrait above of Cherryl was shot in a closed elevator door.

I used the Nikon 24-70mm f2.8G on a D3 body.
Camera settings: 1/125 @ f2.8 @ 1250 ISO

There was already a lot of light around from the various light sources, but to make sure that I get great light on her face, I added the video light. I used the Litepanels MicroPro, my usual go-to video light at weddings. For this image, I had my assistant hold it up for me. (Here’s the pull-back shot.) But for the other two image shown here, I had the Litepanels LED light on a light-stand. This was to free Jessica up to shoot some video on the Canon 5D mk2. We’ll get a video clip up later this week of Cherryl and Jim’s wedding day.

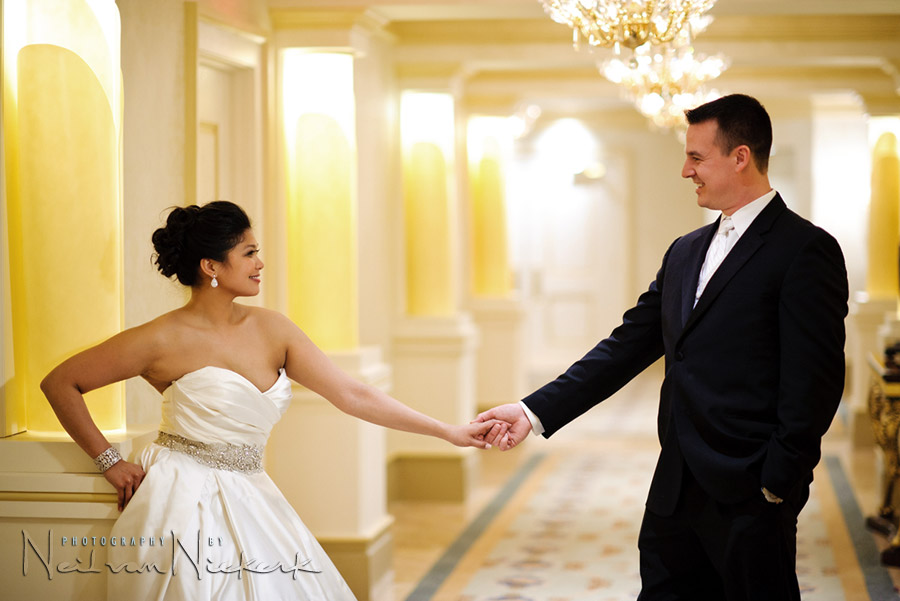
Nikon D3; Nikon 70-200mm f2.8 AF-S VR II (B&H)
camera settings: 1/60 @ f2.8 @ 1250 ISO

Nikon D3; Nikon 85mm f1.4G (B&H)
camera settings: 1/250 @ f1.6 @ 1000 ISO

With these images, the video light wasn’t the dominant light source as in other examples I’ve shown before in various articles. Instead, I used the video light here to enhance the existing incandescent light. The video light I used here is an LED light which has to have a filter placed over it to change it from a daylight-balanced light source, to an incandescent-balanced light source.

In all the images, the video light was to my right-hand side, adding a fill-light to the bride’s face. Just enough to light up her face and clean up any shadows that might have been there from the existing light.

  • more articles about the use of video light for photography

Filed Under: lighting, technique, Uncategorized, video light, wedding photography Tagged With: New Jersey wedding photographer, video light for photography


Help support this website

If you find these articles of value, please help support this website by using these B&H and Amazon affiliate links to order your photo gear.

I also offer photography workshops and tutoring sessions, whether in person, or via online video tutoring sessions.

Please follow me on Instagram for more.

You can also join our thriving photo community in the Tangents group on Facebook, where we show our photos and discuss all things photography.

Thank you,

Neil vN

Books by Neil van Niekerk


17 Comments, Add Your Own

  1. 1Brian Carey says

    March 28, 2011 at 7:06 pm

    Hey Neil are you worried about have a good dof when you shoot a couple with the 85m at f1.6?

    Reply
  2. 2Neil vN says

    March 28, 2011 at 7:19 pm

    Brian … with such a shallow DoF, any focusing error or movement (either by yourself or your subject), will instantly show. So you just have to focus carefully, time your shots … and shoot a lot. Picking the sharpest image as part of the post-production workflow is just part of shooting with fast lenses.

    Neil vN

    Reply
  3. 3Brian Carey says

    March 28, 2011 at 7:23 pm

    Thanks Neil, great work as usual!

    Reply
  4. 4Neil vN says

    March 28, 2011 at 7:27 pm

    Brian .. thanks!

    I should add, that the wafer-thin DoF is very much part of the look that we want when we use fast lenses. So we just adapt our photographic compositions to incorporate that.

    With portraits, you usually just need your subject’s eyes in focus, or the eye closest to the camera. Having the eye(s) sharp is usually sufficient in holding the viewer’s interest, if the rest of the image holds up.

    Neil vN

    Reply
  5. 5Sheri J says

    March 28, 2011 at 7:32 pm

    very nice images, thank you for sharing everything that you do, it is always such a blessing :)

    Reply
  6. 6Bart says

    March 28, 2011 at 9:12 pm

    in above shoots did you shoot first with no extra light to get the right background and then you added LED lights?

    Reply
  7. 7Neil vN says

    March 28, 2011 at 10:36 pm

    Bart … I set up the pose, and added the video light .. and then shot. No test shots first. There simply wasn’t enough time. Weddings are tight on time like that for photography. You have to have an idea in mind before you take the bride and groom to a few spots to do these kind of images. I scouted before-hand with Jessica, so I had a clear idea in my mind what poses and angles would work.

    Neil vN

    Reply
  8. 8Ricardo Carvalho says

    March 28, 2011 at 11:31 pm

    Oi Neil!
    Este é um post interessante sobre luz de video. Parabéns!
    Vejo que você também tem usado nos seus casamentos.
    Eu também tenho usado bastante a luz de video (led). A grande vantagem é que sei como vai ficar o resultado e me agrada bastante.
    Estou resolvendo comprar um kit de 500 led

    mas aqui no Brazil não tem.

    Uso também um kit de luz halogena de 1000 wats com 2 difusores para filtrar a luz nos casamentos, mas confesso que esquenta um pouco e tenho a preoculpação de colocar um pouco distante.
    Segue o link do kit de luz halogena.

    Fazendo minhas visitas nesse blog de um grande fotografo brasileiro, vi que uma impresa brasileira lançou um led super potente. Achei interessante.
    Segue o link

    Confesso de deixei o flash um pouco de lado. A tecnologia led, tem ajudado bastante.
    Abraço,
    Ricardo Carvalho – Fotografia de Casamento
    Ilha Grande – Piauí – Brazil

    Reply
  9. 9Neil vN says

    March 28, 2011 at 11:37 pm

    via a Google translation:

    Hi Neil!
    This is an interesting post about the video light. Congratulations!
    I see that you also have used in their weddings.
    I have also used a lot of video light (LED). The big advantage is that I know how it goes the
    and the result pleases me greatly.
    I’m resolving to buy this kit with 500 LED
    But here in Brazil has not.

    I also use a halogen light kit for 1000 watts with 2 diffusers to filter light in weddings,
    but I confess that heats up a little and I worry a little put off.
    Follow the link to the halogen light kit.

    Making my visits this blog from a Brazilian great photographer, I saw a printed
    Brazil launched a super power LED. I found it interesting.
    Follow the link

    I confess I left the flash in a little while. The LED technology has helped a lot.
    Regards,
    Ricardo Carvalho – Wedding Photography
    Ilha Grande – Piauí – Brazil

    Reply
  10. 10Neil vN says

    March 28, 2011 at 11:39 pm

    Ricardo, thank you for the links.

    The work by Viniascus Matos is exceptional.

    Neil vN

    Reply
  11. 11William Ng says

    March 29, 2011 at 4:47 am

    Neil, I guess that your work flow is to adjust your settings in manual mode after you have set up the pose to ensure the ambient is correct ? Then you turn on your video light on the bride’s face to put enough light (either stronger or weaker light or move the LED closer or further) to take out the shadow ?

    Your light is so perfect on the third pic where the couple is holding hands that I can’t tell you used video light at all !

    Thanks for sharing.

    Reply
  12. 12Neil vN says

    March 30, 2011 at 8:26 pm

    William .. check my comment #7

    I don’t check my settings before setting up the light. I check my settings before firing the shot.

    This is the beauty of video light – you can see the effect as you position and adjust the light. Very little guess work.

    Neil vN

    Reply
  13. 13Wes E says

    March 30, 2011 at 10:14 pm

    Hi Neil, great work as always. You said that you gelled the video light for incandescent. What gel did you use..e.g. color temp from B&H?

    Wes E

    Reply
  14. 14Neil vN says

    March 30, 2011 at 10:23 pm

    Wes, the LED video lights already come with a hard amber filter that clips onto the front.

    Neil vN

    Reply
  15. 15Amy J says

    February 29, 2012 at 3:43 pm

    Hi Neil! Just discovered your Tangents blog and am loving it! Thanks so much for all your hard work to teach others. Quick question, just wanted to confirm you had used no other light other than ambient and the video LED light? I think that’s what I’m getting from your #7 post above. I’m completely new to flash photography and excited to learn from you as you continue to share your skills! Thanks again, Neil!

    Reply
  16. 16Neil vN says

    March 1, 2012 at 4:16 pm

    Amy … it was just the video light and ambient light. No flash.

    Neil vN

    Reply
  17. 17Keith infokus says

    March 2, 2012 at 4:31 pm

    I found this a very useful lesson that I learned on your course in Dublin.

    Reply

Leave a Reply Cancel reply

Your email address will not be published. Required fields are marked *

categories

Articles & Tutorials

  • • About myself & this site
    • Books by Neil vN
    • Best photography books
    • Black foamie thing
    • Photographers’ success stories
  • • Flash Photography Techniques
    • Natural looking flash
    • Flash + Ambient light
    • Dragging the shutter
    • Bouncing your flash
    • On-camera flash outdoors
    • Exposure metering
    • Flash exposure compensation
    • Bounce flash examples
    • Which is the best flashgun?
    • Flash brackets
    • Off-camera flash photography
    • Flash photography basics
    • Using video lights
    • Flash photography tips
  • • Photography workshops NJ / NYC
    • Models @ photography workshops
tutorials:
flash photography
Photography
Workshops

All rights reserved. Copyright © Neil van Niekerk 2025 · Customization by The Traveling Designer

Copyright © 2025 · NvN on Genesis Framework · WordPress · Log in