
Flash photography basics
In teaching workshops on flash photography, I frequently encounter newer photographers who are overwhelmed by flash photography. Overwhelmed to the extent that they fear their flash, and would rather not deal with flash photography at all. Instead, they adopt the idea that they will only specialize in available light photography. Now, that kind of thinking is an artistic dead-end. As a photographer that aspires to truly being creative, you need to understand light, regardless of how it is supplied to us.
I do feel that flash photography is one of those subjects which start to make sense once you grasp a bunch-of-things simultaneously. From the outside, it can look intimidating and complex. But how to explain it all at once so that it makes sense?
A multitude of things need to be grasped – Camera settings: Aperture & ISO & Shutter speed. Manual flash vs TTL flash. Exposure metering for flash. Metering for flash and ambient light.
But where do we even start? And that’s the thing – we just have to start. We just have to take those first photos!
We can spend too much time caught up in first trying to understand all the technical aspects and all the nuances of lighting. We can be too intimidated by all that to actually use a flash … when all we need to do as a start, is to actually start using the flash!
- Under-expose the ambient light a bit
- Set your flash to TTL
- Take a photo.
- Adjust to taste.
- Take the photo again and check.
It’s that simple.
Learning the rest will come with time. But we can’t wait for complete understanding before venturing out. It will only hinder us from growing as photographers if we don’t get out there and shoot. Avoiding something because it is perceived as being difficult, will just hold us back.
Over time we will get to grips with all the aspects of flash photography and lighting. But we have to start somewhere, and we have to start now! Right here.
It is from this simple instruction – just start taking photographs – that any new photographer can be empowered start using flash, or may have been too intimidated to actually use a flash.
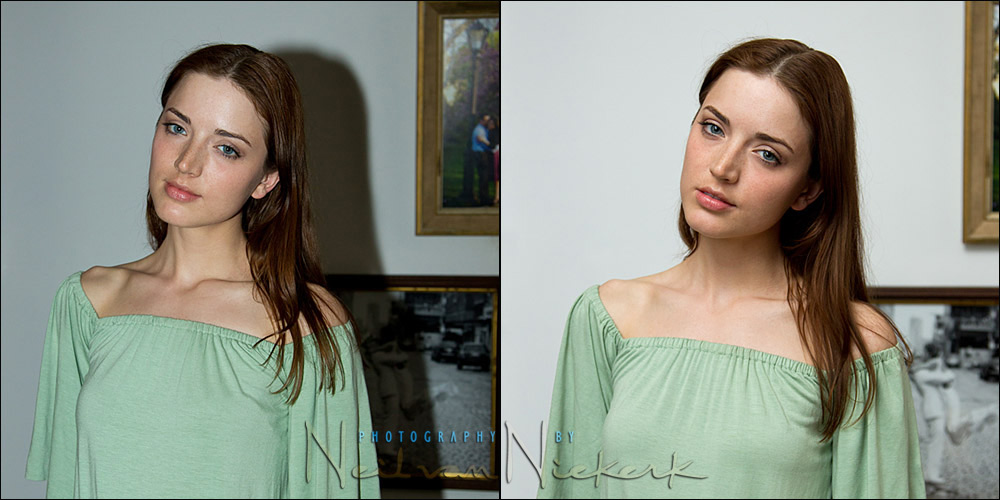
The two images above were shot during the practical demonstration. They’re not art, nor artistic. In a sense the image on the right which has the better, cleaner light, is just a snapshot. But the light looks just great! And that is the entire point here.
The flash photography method is simple:
1. We under-exposed the available light to a certain extent.
My settings weren’t specific. I just needed the ambient exposure on her to be under. My settings were 1/250 @ f4.5 @ 500 ISO. Middle of the road settings. I did this on purpose, because I wanted to show everyone that the settings here were attainable by everyone with a camera and a speedlight. We don’t need those f1.4 optics or fast zooms yet. But we do need a speedlight which allows us to bounce the flash off the wall and ceiling behind us.
So the settings didn’t matter all that much. We just needed to under-expose our subject to an extent. Someone standing next to me would’ve chosen different settings, and it would’ve worked too. But we have to be realistic … we’re not going to be able to bounce flash at f11 or such small apertures.
2. We need correct exposure from our flash.
The simplest for now, is to rely on TTL flash. Allow the technology to help you get correct flash exposure. And if the camera under- or over-exposes, then nudge it in the right direction with the flash exposure button. Make the decision and take a little bit of control. It’s still not scary.
3. We need soft, flattering light from our flash.
Direct on-camera flash will give us harsh shadows and unflattering results. We need soft, flattering light. By turning the flash’s head around and bouncing the flash off the wall and ceiling behind you, you just created a much larger light source. This will give you softer, more diffuse light that looks so much better.
Here is the comparison between hard direct on-camera flash, and the bounce flash with softer light:
Don’t fear your flash
The idea that I wanted to push through here is that it is very simple – and very accessible – to get such quality of light with your on-camera flash.
From this point on, we can continue to learn more about flash photography and lighting over time. But we can at the very least, take cool photos right now with great light from our flash. Then it is up to us to find those essential moments, and finesse our composition. But the flash part is an easy start. We can have fun with our photography now, and not let our flash stress us out.
It’s an easy place to start from, and it’s a great start.
Further articles
- Bouncing your flash behind you
- How to bounce your flash
- Which flashgun should I get?
- Balancing flash and ambient exposure (model: Anelisa)
- Flash photography tutorial
- Video clip – using the black foamie thing
From what I caught of the webinar today (thanks to a very loud 1 yr old!), there’s good info in there! Can’t wait to get some quiet time to really pay attention.
Dear Neil, how did you bounce your flash such that you got no drop shadow at all from the model in such a small room? Was the light straight-on such that she completely blocked her shadow? Many thanks in advance.
Thanks again, Neil. It was a great presentation and this is such a helpful follow up post.
Hi Neil,
Thanks so much for doing the webinar today! I am new to photography and after watching today I finally put the speedlight on my camera and pressed the “on” button. It’s definitely a start.
Hi Neil, thank you for spending your free time helping others. It is greatly appreciated. I’m sure you are a busy person.
I know a bit off topic, but kinda on topic (to do with flash) I’m rather a beginner. I understand the basic concepts of exposure. I understand the relationship between ISO, Aperture, and Shutter Speed. I realize that if i start off with a correct exposure but want to control my depth of field, and want a larger aperture, that I need to compensate for opening the aperture by either having a faster shutter speed or lower iso (assuming my iso can go lower)
I was reading your site earlier and I think I had my first “aha” moment. Well two of them actually but within minutes of each other.
The two articles I was reading was the one where you broke down flash exposure really basically with the model in central park against the buildings and the sky. That was the first time I really truely understood that there were two seperate events going on, even though I knew enough about my equipment to fiddle with the numbers and get a decent looking exposure.
Then I read the “how to expose for a brides white dress article” I toyed around with that by using my wifes wedding dress from the closet (shhhhh don’t tell her I took it out while she was at work….) and put it against a window to test fire shots while exposing for the dress, and not the whole scene (meaning dress, window, and dark areas by either side of the window) even though the window blew out.. i got decent results by exposing for the dress zoomed up super close and checking my histogram to make sure the zoomed up portion was good, to heck with the overall picture histogram (for now)
So I guess my question is, would I be correct to state the following things.
1.) When exposing for a brides white dress, I more or less want to expose up close on the dress like I did before, to keep the details. Then doctor the window (or whatever other) highlights in post processing?
2.) I know this one is relative to what youre trying to achieve, but overall, to expose some good fill light on a model outdoors, typically speaking i’d want to expose for how i wish my background to look with the ambient light, with my model not in the scene at all, (this would leave my model under exposed) then let the flash work it’s magic and dial my flash compensation up or down depending how it comes out from TTL the first try?
3.) The same would basically go for indoors (regarding exposing for ambient – assuming I had enough ambient, proper white balance, etc) but I’d probably be bouncing instead unless I had some nice softbox equipment?
4.) I’m using Nikon CLS, I only own one 50mm lens at the moment.. would I be correct in stating that most of my flash over exposures are seemingly coming from the fact that in order to keep my flashgun within line of sight of my camera, that ultimately I’m having to be too close to my subject and the flashgun, getting too much power somehow?
5.) In order to get a better flash exposure, as opposed to the 50mm prime, I’d be better with a longer mid range zoom so I could back up but zoom in on the flash effects on the model?
If I’m mistaken on any count, guidance would be appreciated. Thanks in advance :)
AJ
also should have mentioned along with that 50mm that I’m shooting with a D700 (not sure if that makes a difference to you in deciphering my jibber jabber)
You know whats funny? I absolutely love the first image without the flash! Even though I’m an avid strobist, the natural light falling onto her face and body has this profound warmth and mystery to the image. Pull down the blacks around her in the post-production, and you have your art!
You make everything so simple, sometimes I must analyze and still not making so simple.
I must say that you are really good at explaining how everything works! Even if I know how to get a certain light, thanks to many of your earlier posts, it’s not easy to explain it to others. Keep up with the great educational and informative posts. :)
@Jinu Joseph: not to take away anything from Neil fine art, but I suspect that what you observe is more correlated to the beauty of Anelisa; she’s absolutely gorgeous. Luckily, Neil spoiled us with lots of her shots. :-)
Can’t be explained simplier I think :)
What amazes me is that for most of the people, on-camera flash equals straight on light. People seem to forget (ignore) that most of the flash heads are pivotable.
I loved the webinar! I found it to be so very informational and helpful. I learn from reading but there is nothing like learning from watching. Probably the biggest take-away for me was just learning how to properly bounce. I have always bounced from the ceiling directly above which explains why I always get raccoon eyes. I can’t wait to put what I learned into action. And by the way I’m going out to buy some black foam. Thanks so much!
Hi Neil!
The webinar was so amazing! I’ve heard nothing but rave reviews. Thank you so much for such great work. Your knowledge and teaching style cannot be beat! You have created a revolution of ClickinMoms who are not afraid to use their flash :) We can’t wait for the next installment!
Kendra
Neil , thanks so much for answering my questions :)
re: the dress against the window thing, yes definitely was using flash lol. I exposed for the dress up close so that while taking a close up photo of the dress, i could see it clearly and properly exposed with good details, perhaps a third or max 2/3 of a stop underexposed. Then the flash nicely did the rest while stepping back the window was blown out.
Was nice stuff :)
Hey Neil,
Unfortunately, I was not available to catch the webinar today. Perhaps the next time.
I do have you your book and I must say it is excellent. I finally went to Michaels today and bought some black foam paper for the ‘black foamie thing’ It was pretty funny since I was not exactly sure what I was looking for. I had 2 sales ladies scouring the store. All I could tell them is that I was looking for the black foamie thing. Anyway…it was a success! I can’t wait to start using it.
Thanks again.
BTW….I saw you in NYC last Thursday. They did a good job but I learn alot more right here on your website!
Patty
Neil……I was the one who gave you a ‘hello’ from a few rows back at the flash bus tour…It was kind of crazy in there. I believe the stunning lady in orange was Jess!! Am I right?
I think teaching flash technique is a challenge, especially when you don’t have an audience that is required to meet a prerequisite (must have a working knowledge of manual exposure, etc.). But, you’re absolutely right, you can at least get some info out there, and people should at least “start.” Depending on what a person already knows about photography, some might have that “aha!” moment, and others might eventually come to it after a few more tutorials, books, practice, and experimentation.
So, where ever you are with your understanding of flash, keep learning, you’ll get it with the help of people like Neil!
Neil, I just finished watching the replay of your webinar- thank you so much for this- it was so very interesting and informative! I have one question that I can’t seem to find an answer for- which flash setting do you use? (ie: front-curtain?)
I think you hit the nail on the head by saying: “We just have to start”! The biggest problem I find with new photographers is that they seem afraid to just get out and shoot. They read books and websites ad infinitum and don’t just get out there and try out what they are trying to achieve. I think it may be part of our general culture of feeling we need to be fully educated before we can do anything and that we need to be perfect right from the word “go”. For me the best way to learn anything new, photography included, is to not be afraid to fail. Education can only take you so far and then it becomes a process of trial and error, failure and success until we are mostly successful, keeping in mind that even the best have crummy shots they would rather not share with others, even you Neil! :-) Thanks so much for sharing your knowledge with us, it is an invaluable resource and inspiration. Have a great 2013!