Nikon D700 camera settings – custom settings
The Nikon D700 has the same remarkable image quality that the Nikon D3 has, but in a smaller more affordable camera. This makes sit an excellent alternative to the top-rated Nikon D3. And of course the multitude of camera settings and custom settings make the D700 a camera which can be configured in a highly personal way, depending on your shooting style and needs.
Here is an overview of my preferences for the D700, and the settings that I changed immediately upon getting the camera out of the box.
Playback Menu:
Display mode – Highlights enabled.
It is absolutely essential to have the highlights enabled as part of an exposure metering method.
Image Review – On
Shooting Menu:
File naming
I need all my cameras to have a unique file name. It makes post-production workflow simpler if the images already have a unique name directly out of the camera.
Image Quality – RAW
Simply put, JPG isn’t an option for me. While there are some photographers who would argue the entire RAW vs JPG debate, it really is a trivial one, since the answer is RAW.
NEF (RAW) recording
– Lossless compressed RAW
– 12-bit depth
I chose 12-bit depth over 14 bits (for now), even though some tests (such as this thoughtful consideration by Bob Johnson) show that using 14 bits give slightly better shadow detail.
My Menu:
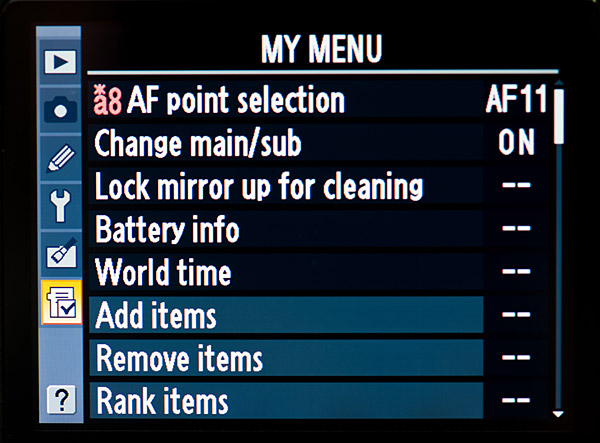
- custom function a8 – AF point selection
I constantly flip between the 51 point and 11 point selection, although I most often keep the camera to 11 points selection.
- change main / sub
After so many years of shooting with Canon D-SLRs, I have a hard time adapting to having the shutter dial on the rear, and the aperture on the front. So for more instinctive shooting habits right now, I have the shutter dial and aperture dials swapped around from the Nikon default.
- Lock mirror up for cleaning
- Battery info
- World time
These are just general house-keeping settings that I like having grouped together.
Custom Settings Menu:
a1 .. AF-C priority selection
AF-C is the Continuous Focusing mode, where the shutter can be tripped whether the subject is in focus or not, ie, Release Priority. With this setting, you can turn AF-C into Focus Priority.
default : Release button (ie, FPS is maintained),
my preference : default
With this custom setting the photographer now has a very powerful option – to change the usual behaviour of AF-C mode in only tripping the shutter when the subject is in focus. Although I’m not sure that is how most photographers would want to use Continuous Focusing, I find it reassuring that the camera will only trip once the subject is in focus.
more info on Nikon focusing modes – Nikon D300 / D700 / D3
a3 .. Dynamic AF area
With this setting the number of AF points can be selected.
default : 9 points,
my preference : 51 points (3D-tracking).
The 51 point, 3-D tracking mode works amazingly well in tracking moving objects when shooting in AF-C (servo mode), and setting the Auto Focus mode to Dynamic Area (the center selection).
more info on Nikon focusing modes – Nikon D300 / D700 / D3
a8 .. AF point selection
This option allows you to choose either 51 or 11 AF points for manual focus-point selection.
default : 51 points,
my preference : both.
I flip between the two selections, so have this custom function accessible in the My Menu option.
a9 .. Built-in AF assist illuminator
This option controls whether the auto-focus assist light comes on in low light to help auto-focus latch onto the subject.
default : ON,
my preference : OFF.
The bright lamp light can be annoying and intrusive at inopportune moments, so I keep it switched off.
b1 .. ISO sensitivity step value – 1/3rd stop increments
b2 .. EV steps for exposure control – 1/3rd stop increments
b3 .. Exposure comp / fine tune – 1/3rd stop increments
Keeping your exposure controls in 1/3rd stop increments allow for finer tuning of exposure.
c4 .. Monitor Off
With this setting you control how long the LCD display stays up.
default : 20 secs,
my preference : 1 min.
I’m an incorrigible chimper. I like seeing what I just photographed, and also, the histogram and blinking highlights are indispensable tools. Therefore I *need* to chimp. Having a much longer LCD display time helps.
d1 .. Beep
This controls how loud / soft the camera beeps … or not, when acquiring focus or when using the self-timer. It is also used for a low shutter speed warning.
default : high,
my preference : off.
Personal preference again, but I prefer my camera to be quiet.
d8 .. LCD illumination
This option controls whether the LCD lights up only when the power switch is rotated to the lamp position, or when any button is pressed.
default : Off
my preference : On
I most often work in dim areas, and I want to be able to read my LCD without having to precisely select the Lamp button. With this function selected, the LCD will light up whenever I hit any of the D700 camera controls. It just makes it easier for me when the LCD lights up as soon as I handle the camera – then it doesn’t become an extra control that I have to push.
e1 .. Flash sync speed
This option controls whether Auto FP (High-Speed Flash Sync) is automatically enabled for shutter speeds over max sync speed.
default : 1/250th
my preference : 1/250th Auto FP
I do know that the flash’s range is halved by going into Auto FP mode, and therefore stay at 1/250th or below if I need the most output from my speedlight. But I also like the option of not hitting that ceiling of 1/250th if for some reason I need to go to a higher shutter speed while using an on-camera speedlight.
e3 .. Flash control for built-in flash
This option controls which mode the built-in flash will use.
default : TTL
my recommendation : Commander mode.
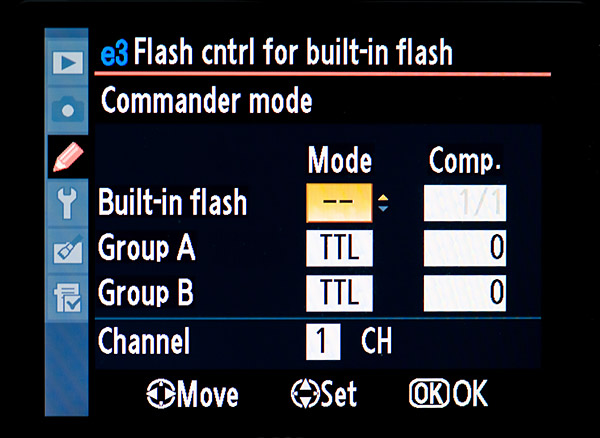
Your decision here will rest on whether you need your built-in flash as the main flash or fill-flash (and then TTL would usually make the most sense), or whether you want to use the strobe as the Commander strobe to control a Slave flashgun (a remotely triggered SB-600 / SB-800).
My recommendation would be to keep it to the Commander mode. Since the built-in flash is about the worst kind of way to use flash, you really should be using a larger external strobe to give you more options in using flash.
With the built-in flash set to Commander mode, you can use your external Nikon strobe, and when you need wireless TTL flash, you can simply remove your Nikon Speedlight and you are immediately set to control the Nikon Speedlight in Commander mode.
f2 .. Multi selector center button
With this custom function, the operation of the center button of the multi-selector is defined for the Shooting Mode and Playback Mode.
Shooting Mode :
default : Select center AF point,
my preference : default
I like the default here over the other choice (Illuminate AF area), since this allows me to instantly re-select the center autofocus sensor if I have been using another focusing sensor instead.
Playback Mode :
default : Thumbnail on/off,
my preference : Zoom on/off.
I really like to be able to see a higher magnification of the image. And with the way the joystick works of the multi-selector, it is easy enough to move to any part of the image. Sweet!
f5 .. Assign FUNC. button
This option allows a variety of functions to be assigned to the FUNC button. It is in settings like this, that helps make the D700 shine as a powerful tool for the photographer.
FUNC button press
– default : none
– my preference : Flash Off (the Speedlight is disabled
This setting is entirely personal preference, since there are a variety of options here that could be put to great use by different photographers. I like the idea of instantaneously being able to disable the flash by pressing the FUNC button, instead of having to pull my eye away from the viewfinder to switch the Speedlight off.
f6 .. Assign preview button
With this control, you set what the action that preview button will perform. It has a similar set of possibilities as the FUNC button.
Preview button press
– my preference : Spot-metering
f7 .. Assign AE-L / AF-L button
Similarly here, with this button you set whether the AE-L / AF-L button performs the default function of locking exposure and focus, or any of the other options, similar to that of the FUNC button.
I use this button to disable my flash. Originally I used the Func button, but it gave me an akward hold on the camera when I used my ring finger to keep the button in. Much easier for me now is to use the AE-L / AF-L button to disable the flash.
f11 .. No memory card ?
This option disables the shutter release if there is no CF card.
default : Enable release,
my recommendation : Release locked.
Changing away from default makes a lot of sense. You really don’t want to get in to a situation where you think you are capturing images, but in fact aren’t. Of course, if you shoot tethered, this might be an option for you.
f12 .. Reverse indicators
With this custom setting, the direction of the exposure meter display in the camera can be changed.
default: + —0— –
my preference: – —0— +
This has long bugged me that the Nikon metering displays are non-intuitive about their direction. I know the intention is that the metering display shows the way the controls should be turned, but it still makes more sense to have the + on the right-hand side for display. That’s the way we are trained to see an increase, or a plus.
Some great tips here! I just bought a D700 and these will be real help – thanks
Thank you, thank you …. I’ve been waiting to compare your custom settings to mine and others.
Thank You!! I just upgraded to the D700 & have been afraid to change the factory settings!
Just changed from Canon , went with the D700 as one of the bodies the switch over came with a big learning curve, I got more clear and simple “setting up the camera ” from your information and direction, Thank you so much.I even got a CD to assist the move, but your
instruction was so much clearer.
Thanks again
Jeff Gerald.
Good day Neil,
Well I really like your settings(the fact of giving them away is cool).
I have a question as I was reading your flash photography techniques.
I currently use D700 + SB900 and I would like to clear some issues as I was a canon user before.
My situation is when I use my sb 900 outside(in an outside event where there is light).
Settings:
Camera: D700 M mode 1/60s @ f2.8 @ ISO 1,600
Flash: Sb900 iTTL, pattern std , flash orientation 90 degrees straight on as I have no possibility of bouncing, flash exposure…this is where I have issues!!!!
Distance
Problem:
Mainly, if I use the above settings I seem to over power ( I seem to get good exposure on ambiant light but my flash seems to strong).
So this is what I do
1- If I increase shuter to 1/125 I loose ambient and get black background
2- If I put negative decrease flash exposure by -3.0 I do not seem to have any change ( Note this is what really gets to me….flash does not seem to go lower!)
3- If I decrease fstop I get less ambient…but it is the only thing that seems to have an ok impact on flash power.
4- If I decrease ISO (same thing as shutter speed)
What do you recommend.
Thank you for your advice, very appreciated…love your work!!!! Wish I would do 1/10 of what you do.!
Your tutorials on Flash are great—thanks. I’m a Canon user who just bought a D700 and am having trouble getting my head around the differences in TTL between Canon & Nikon. In Canon land, I’m used to using flash in aperture priority and any EC only changes the ambient exposure and FEC also works as I expect. In Nikon’s thinking, EC affects the flash exposure as well. Do you have to explicitly counteract a negative EC, for example, with a positive FEC? In my experimentation, sometimes a negative EC makes the flash exposure go down too, but other times, it seems like the flash (SB-800 or built-in) continues to expose the foreground properly, despite my EC fiddlings. Perhaps this is a difference between TTL and TTL BL? I find that often, I’m fighting the flash to do what I want but I clearly don’t yet understand WHY. Furthermore, in Manual exposure, if you underexpose the ambient on purpose, does a TTL BL-set flash properly compensate for this? Your flash writing has been really helpful but I haven’t seen these basic questions answered by you or anywhere else. I would appreciate the benefit of your experience.
Many thanks. I figured that M and TTL were an easier combo to manage. Would you ever use TTL BL indoors? Is there a point to doing that? Thanks again.
Never mind—I found what you wrote on that subject.
I have the Nikon D-700 and I can’t get the beeper to work. Help Thanks, Bill
I am so thankful that I found your website. You have a gift for teaching. I’ve had so many “AHA” moments that I’ve stopped counting. I’ve adjusted my D700 to some of your settings, as they absolutely make more sense. Thank you so much for devoting time to helping others.
Thank you Neil for being so generous with your knowledge and time. Your settings make so much sense, your a great teacher.
One question….. I really want to set my Func button to ‘flash off’ can you help? I cant work it out :(.
Thanks
Ale
Thank you so much Neil, Im a silly girl I only saw a few options in the f5 i didnt realise there were many more options when you scroll up drrrrrrrrrr do I feel sheepish.
thanks again,
Ale
Hi Neil,
I just got my hands on a D700. I notice that for the D700, you do not mention certain settings in this blog entry as you did for the D300. For example, b5 (center-metering diameter) was mentioned under the D300, but not the D700. In fact, the D700’s default center metering is 12mm while the D300 default is 8mm.
If you don’t explicitly mention something here, is it safe to say that your preferred D300 settings carry over to the D700? Thanks.
Hi Neil,
Thanks for the response. Actually, I’m glad that you are only mentioning camera settings that you feel directly affect the camera’s handling. That helps people like me from getting fixated on the tech issues. :-)
With the D700, my 24-70mm f2.8 and 70-200mm f2.8 can be used at their full optical potential. My wife now inherits the D300. :-)
Neil!
This level of thoroughness in explanation of these settings just made my day!
I have a silly question that I cant figure out what i am doing wrong. On my D700 I have it in Manual Mode and I am trying to take some pictures using some strobe lights. However although I am in Manual and I set my own Shutter and Apperture they still seem to be metering and changing with each shot.
What am I doing wrong?
Thank you for this post! I just changed over to Nikon from Canon. Setting up the Nikon has been really arduous, but WOW, there’s a lot that can be customized. I’ll have a heck of a time if I ever have to shoot with anyone else’s camera.
Hi Neil
great suggestions!
on page 26 (your On-camera flash book) you speak about “anticipating settings”; what about ISO 100 (L 0.1) with D700? is it a good selection or are there some troubles? According to Sunny 16 rule, with shutter speed 1/250 (max flash-sync) and ISO 200 (default, there are forums suggesting not to set it lower with D700 too..) I set aperture f/16 but in wedding photo usually this isn’t my best aperture: do you change ISO to L0.1? do you use filters?
thanks!
Hi Neil:
I hope this is not already answered, I’ve looked around your site.
Do you have your camera set on sRGB or Adobe RGB?
Thanks.
Oh Ok thanks. I do shoot RAW. But camera has, as you know, choice of SRGB or A RGB. I have set to sRGB. I was not aware that in RAW it doesn’t matter what color space camera is set to. Thanks very much.
Neil when would you use the 1/320th Auto FP setting
Neil,
First, as so many have said, Thank You for your insight and sharing of information. I’m getting back into photography after a 15-year hiatus and it’s a different world. Your site has helped me tremendously.
Here’s my situation: for my D700 I currently have the new Nikkor 50mm/1.8G and 85/1.8G lenses. These are amazing lenses and I’m getting very confident using them. However, I’ve been asked to shoot a wedding for some friends and after reading your experiences feel I’ll need at least one good zoom lens. I’m considering the 24-120 f/4, but it’s not in the budget yet. My questions are, 1) should I take on this wedding shoot w/o a zoom and, 2) what is your opinion of the 24-120 f/4? I like the range of the 24-120, but the f/4 concerns me in low light.
Neil,
Thanks for the response. I’ll give BorrowLenses a try. I have considered renting before, but in the area I live the only shop that does so is very limited, and slow to deliver. Funds are available to rent, just not to drop $1k on a new lens at the moment. Maybe in another month. Thanks also for the opinion of the 24-120 F/4. I suspected it was a bit too slow for weddings, but due to its range I really wanted it to work. This brings me to another question (if you don’t mind). When shooting receptions and weddings, do you keep the 24-70 and 70-200 on seperate bodies and carry them both with you, or do you swap lenses? I tend to prefer swapping lenses rather than carrying two bodies, but of course this has cost me some great shots ; ) Thanks again for your time.
WHY DO YOU PREFER THIS SETTING
Assign preview button
With this control, you set what the action that preview button will perform. It has a similar set of possibilities as the FUNC button.
Preview button press
– my preference : Spot-metering
Thank you! I always used focus and recompose with the AF-on button locking my focus. I stupidly changed it to try BBF and now can’t seem to get my original settings back! Can you please advise how you get the AF-on to lock the focus?
thank you!!!
I shoot w/ D700 and a D3s. I often, while shooting sports find I need the flash in the gym to shoot the award portion of the event. I put the flash on the camera and often find my background goes dark and my subject is sufficiently illuminated. I can’t seen to get the light to cast beyond my subject or properly expose the background while using the flash. Help!!
You have homework: Flash photography techniques
Thank you for all the great tips on this website! I have a question about the best settings for darker skin tones. Ive had to do a lot of editing in the past and I want to get done at the shot. Here is what happens: I either get a blow out background or a silhouetted faces.
Thank you for the help and support!
Donna .. when you have your subject in a shaded area (or indoors), and your background is much brighter, then that is the result. Without additional lighting, you can’t expose correctly for two areas with such different levels of light.
This implies that you will have to light your subject with flash, one way or another.
Here is a tutorial on balancing flash and ambient light. There are links to other articles too.
How do I set continuous auto focus also using the intervalometer on a D700? I can find no instructions online, the instruction book only describes what they do, not how to set them together. I am desperate…. I need to shoot some self portraits with my birds…. up a creek.
Thank you
bonnie
Bonnie, the focus setting (AF-S / AF-C / manual), is entirely not connected to the intervalometer. Just set the camera to AF-C, and set the intervalometer. Do a test. It should just work.
Pls am just getting Nikon d700…. Am not fully enjoyed the sharpness…pla what is the solution
Ademola — there are several factors which would influence sharpness.
It isn’t possible to say from your short description what the actual problem is, but the solution is in here somewhere:
1. The most likely culprit — too slow a shutter speed for your cameras to be handheld.
2. Too slow a shutter speed for your subject’s movement.
3. Not enough depth of field.
4. Focusing errors because either the lens or the camera isn’t calibrated.
If this is the more likely problem, send the camera in to Nikon to be adjusted.
5. Poor quality lens.
6. Poor quality filter, or a dirty filter.
You should have mentioned how poor the D700 is in low light to keep keep people from making the same mistake I did by buying one. Tons of noise at iso 1600.
… and yet, it looked fine to me.
https://neilvn.com/tangents/nikon-d700/