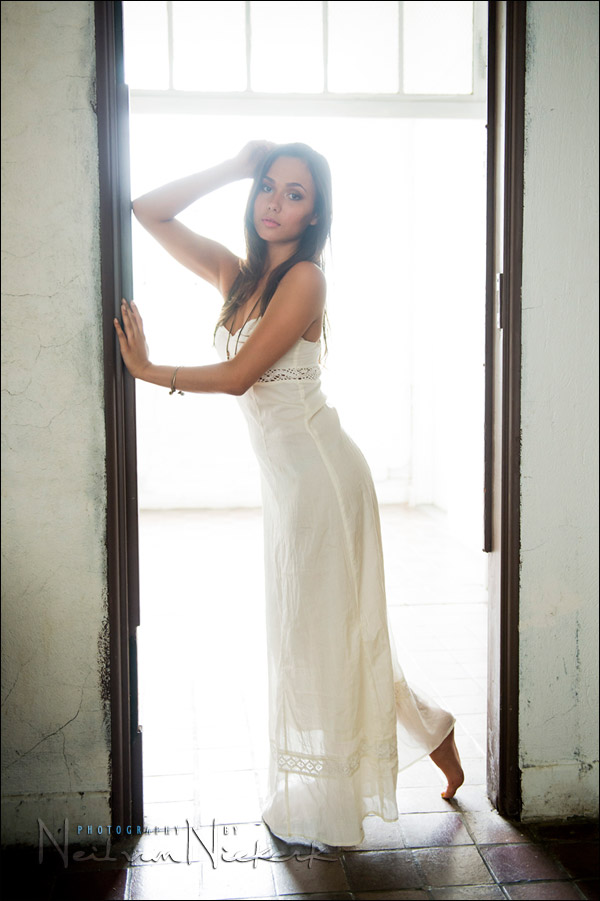
Exposure metering for a backlit subject, using the histogram
When our subject is backlit, we have a number of options:
- expose for the background, and then either:
— go for a (semi) silhouette,
— add light to your subject to balance their exposure with that of the background. - expose carefully for our subject, and let the background blow out. This is the “ambient-light-only” option.
- anything somewhere inbetween those two choices, where *we* decide how we want to balance the exposure between our subject and background.
Exposing for our subject, very often gives us this kind of ethereal look as the strong light from the background causes internal lens flare.
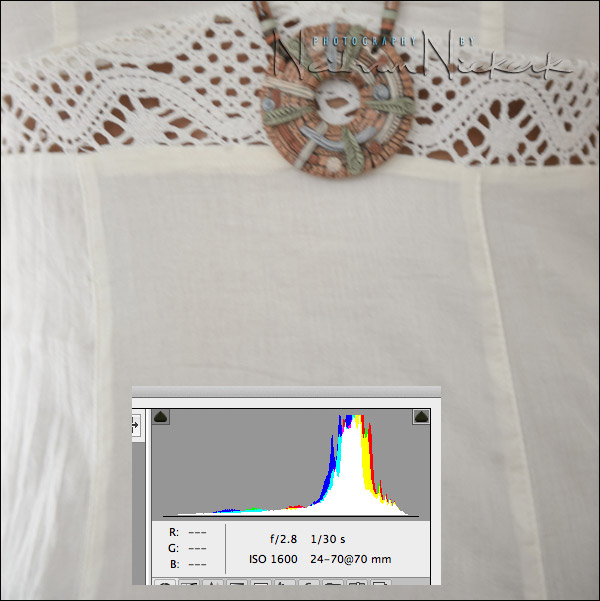
Exposure metering using the camera’s histogram, is a fairly simple way of working. But you have to meter just for your subject, and not have any part of the background show. The super-bright background will just influence your meter and cause under-exposure. When you meter off a white tone, then you have to accordingly adjust your camera’s meter reading. This article on using the histogram to determine exposure explains it in more detail.
The screen capture there of the histogram as it appeared in Photoshop, shows what we’re trying to do with the brightest relevant tone (ie, white) of your subject – we’re pushing it to the edge of the histogram.
This gives us a baseline correct exposure. But we’ll still have to adjust the image in post-processing:
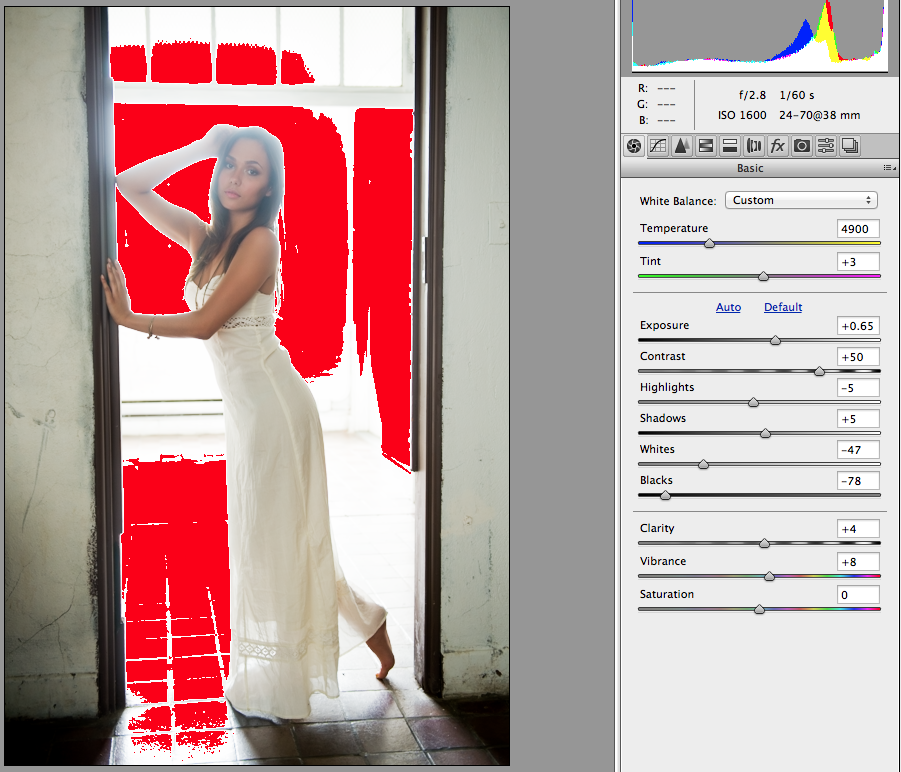
The image can look washed out on your camera’s preview. Actually, it will look washed out on your camera. We therefore need to increase the contrast and add more punch to the image. The two controls I adjust first, would be the Blacks slider, and the Contrast slider. From there I would adjust the rest, according to taste. The Whites slider is also pulled down to control how much of the image is washed out.
All of the changes to these settings, will make the image appear darker. So it might be necessary to pull the Exposure slider up a bit.
And there’s the basic RAW file, with various adjustments. The photograph (as a JPG), was then sweetened a bit further in Photoshop.
Even though I had to adjust the Exposure of the RAW file, getting to a good basic in-camera exposure for the strongly backlit image, was the best starting point.
Photo gear (or equivalents) used in this photo session
- Nikon D4
- Nikon 24-70mm f2.8G AF-S / Canon 24-70mm f/2.8L II
Related articles
- Exposure metering for the bride & the bride’s dress
- Exposure metering tutorials
- Expose for your subject – (model: Anelisa)
- Using the histogram to determine exposure
- What should I meter off with the in-camera light meter? (model: Anelisa)
Hi Neil!
In your Gear used, you mention a speedlight. But don’t mention useing it in your write-up?
Wouldn’t a light meter been quicker than useing the Histogram? I only ask because I always carry my light meter with me.
Oops .. you’re correct. No flash with this photo.
I often start writing an article with only a rough idea, and then meander to a different result. And the flash gear mentioned there was a left-over from where I originally thought the article would go.
LIKE THE LESSON BUT LOVE THE MODEL!!! WOW! SHE IS GORGEOUS
Great article !
I notice that you never seem to use a light meter. Would its use have been beneficial in this scenario ?
A light-meter would’ve made the process easier. There’s something else to learn though in using a different method than just holding a light-meter up, for now we have to consider the actual tones of our subject, and place the brightest relevant tone accordingly.
Neil vN
Solid lesson, showing other methods as most don’t really need a meter. Despite not using or having a meter I know our eyes and experience with bracketing works best in most situations. Looking at light fall off and what we have in mind. Kind of like shooting in “M” mode truely selecting the exposure, depth of field and freeze factor to your subject not what the camera metering tells you is correct. In your example we are controling the exposure and our creativity, not a meter telling us what is correct and that is always best.
Hi Neil,
A good lesson. One question, can you explain your exif. Why do you need such a high ISO and wide ap and slow shutter? Wasn’t the back light strong enough? Will these method work if the back light was very strong such as direct sun light?
Thanks
In this, and the related articles linked at the bottom, the idea is accentuated that you’d normally expose for your subject. In this specific case, the light levels there was really low. We were relying on the light from some other window.
With that, the bright light in the background has no real bearing on what is happening here. If I had used additional lighting (whether off-camera flash or video light) to give more light on her, I could’ve used meter reading for the background to affect the overall exposure. (I hope this makes sense.) But here, there was only the existing light, and we had to expose correctly for our model.
Neil,
When shooting in low light indoors you said you use 800 ISO and low shutter speed. If not getting sharp shots would it be better to up the ISO and shutter speed?
I’m having problems shooting outside at night wanting to get the ambient look I want. Usually I set the shutter to 1/200. Aperture to where I want dof then use ISO to bring the ambient background up or down. This works with TTL for me.
I get confused on where to set my ISO I know 100 is best no noise. But then it’s all flash.
When shooting TTL the flash is still within the constraints of the flashes power right? What I mean is does TTL flash have more flexibility to shoot lower then the manual powers 128 for instance.
When I go to manual to try to create it I have either background to dark or other issues. I think my problem is the ISO. I should leave the shutter speed alone and just use ISO to brighten background and if that has too much noise lower my shutter speed and ISO right?
Keano … You would have to read this section in context:
“When shooting in low light indoors you said you use 800 ISO and low shutter speed.”
I am sure if you find where I possibly said this, that it is in relation to using flash with ambient light. But I tend to go towards higher shutter speeds anyway, even when using flash.
For example, here:
https://neilvn.com/tangents/using-flash-with-incandescent-tungsten-light/
So where I have said that I use slow shutter speeds, read it in context.
Now, in this specific article, we are just looking at exposure metering. Flash doesn’t come in to it.
To answer your questions about using ISO – yes, raise your ISO as high as you are comfortable with, to allow more ambient light in.
A setting of 100 ISO, while giving you the best image quality, might not give you the best image. These are decisions you have to balance for yourself. In the end, remember that the moment trumps technical perfection … and the moment is often within context of the surroundings.