My friend Chuck Arlund is a Fashion Photographer whose elegant photography is something I always admire. Chuck’s previous guest spots here have been well received. His article on simple on-location lighting techniques using a reflector & flash, was especially popular. Therefore I’m really glad that Chuck is graciously sharing with us how he came to shoot this stunning photograph for Parasuco.
Fashion photo shoot, using multiple lights
a guest post by Chuck Arlund
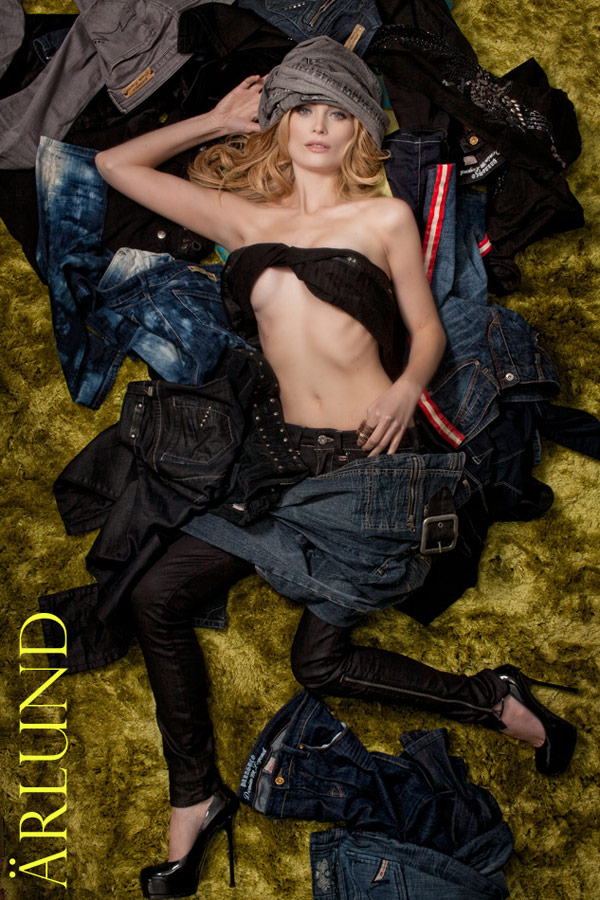
Hey there everyone! I have been working with a celebrity stylist and we have shot a few fun projects together. Just for our books. She uses Parasuco a lot for her clients, like Bon Jovi. One of the images we shot was pretty cool of the model wearing some of their jeans. She sent it to them to show what she was doing. They loved it.
A few weeks later the MUA of the original shoot wanted to do some beauty shots. Parasuco had sent some stuff to the stylist for us to shoot and see how it looked. During the beauty shoot we did some shots for Parasuco. After I had processed a few we sent them to the company. They really loved them and ended up purchasing a year license to use this image. It will be a billboard in the airport in Berlin and trade show magazine adverts.
Here is the tutorial explaining the setup for this shot. I used multiple lights …
The setup:
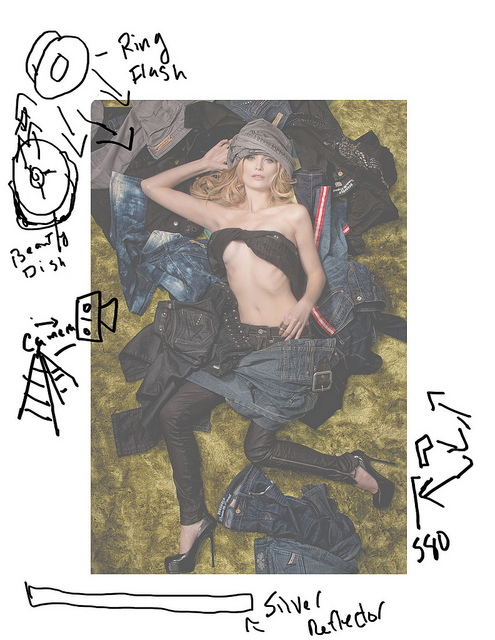
This image was photographed in a small apartment. A green fuzzy rug was used as the backdrop.
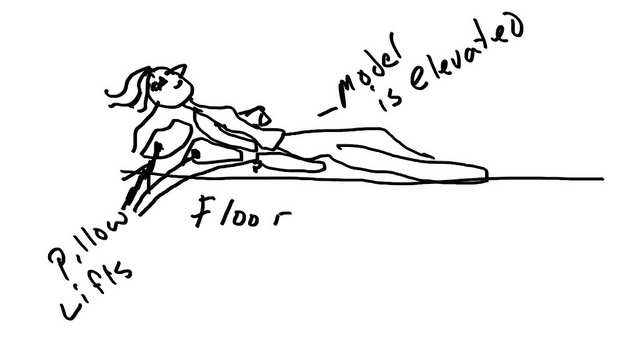
The model is actually laying on an angle to elevate her head to make her look more natural. See illustration 1
Equipment used:
- 1 Alien bee 800 with beauty dish
- 1 Alien bee 800 Ringflash
- 1 Canon 580 EX2
- 1 Silver reflector
- Triggers: Radiopopper Jr Studio.
The Ringflash was positioned from the point of view as a main light-source so that the shadow under her nose would be a nice loop/flat just to her right..
The Beauty dish is pointed towards the ceiling of the apartment providing a nice full coverage of the scene
The 580 is positioned at her feet on the opposite side from the main lights. This is also pointed at the wall providing a slight rim and additional light source to illuminate the bottom of the scene where there was some falloff.
I also was using a medium silver reflector at the base of the shot just for additional added fill.
The main light (beauty dish) was metered at f/13 the Ringflash was metered at f/11 – not much difference but enough to give her face slight definition
The 580 was there to give a little fill to the back side. The jeans were really getting dark without it.
Chuck Arlund
Here is a short video illustration of the shoot:
Great guest post! Very helpful with the video to actually see how he was working it.
Also, interesting insight to how he first did the shoot and then submitted the end result to the company – worth keeping in mind…
By the way, the link to his site is broken. You left off the “h” in http.
Cheers!
Brian
Looking at the lighting diagrams, I thought I was looking at Joe McNally’s diagrams. :-)
On a serious note, I would not have guessed that 4 lights were used in this shoot. That is a lot of lights!
I’ve always known, I guess, that lighting for shots like this can be complicated, but I wouldn’t have suspected so much was really going on to get just this look.
It’s fascinating to see, but even more so to have an explanation for why things are done the way they are. Even something so simple as having the model’s head elevated.
Great stuff to see and know.
Thanks for the lighting diagrams and the thoughts that go into using them for this shot.
But, that is the coolest ceiling fan I’ve ever scene! You can see it in the video behind Mr. Arlund!
Is this a case where the beauty dish pointing at the ceiling works so why worry about what it actually is? I’ve never seen a dish pointed anywhere other than AT the model. Perhaps I should get out more?
I’ve had the pleasure of shooting with Chuckie at a couple of After Darks. It’s always fun and adventurous with him; you never know what to expect (other than beautiful images as an end result).
Loved the illustrations and the video. Thanks!