Headshot photography – Clam-shell lighting setup
There isn’t only one correct way of lighting portraits or headshots. There are numerous ways to attractively light your subject. My favorite go-to lighting setup involved the large Profoto 5′ Octa Softbox, which allowed me fine control over the contrast, by having my subject move slightly forward or back, or rotating slightly. (The linked article explains more.) Using the 5′ Octabox though, meant that I had to shoot around the massive light modifier.
A simpler way of shooting, which allows me slightly more freedom in how I moved, would be a clam-shell lighting setup. With a clam-shell lighting setup, there is the main light directly above your subject, and a fill light below. The fill-light can be from a reflector or a smaller softbox. For the reflector, I prefer the Westcott Eyelighter (B&H / Amazon). As explained in this article – Headshot lighting – Westcott Eyelighter – it is a versatile reflector in how you can rotate it to give more or less fill to one side of your subject’s face.
With that, I decided to change a few things around in my studio, and change my default way of shooting headshots, going for a less contrasty lighting setup with this variation of clam-shell lighting:
Lighting setup & gear used
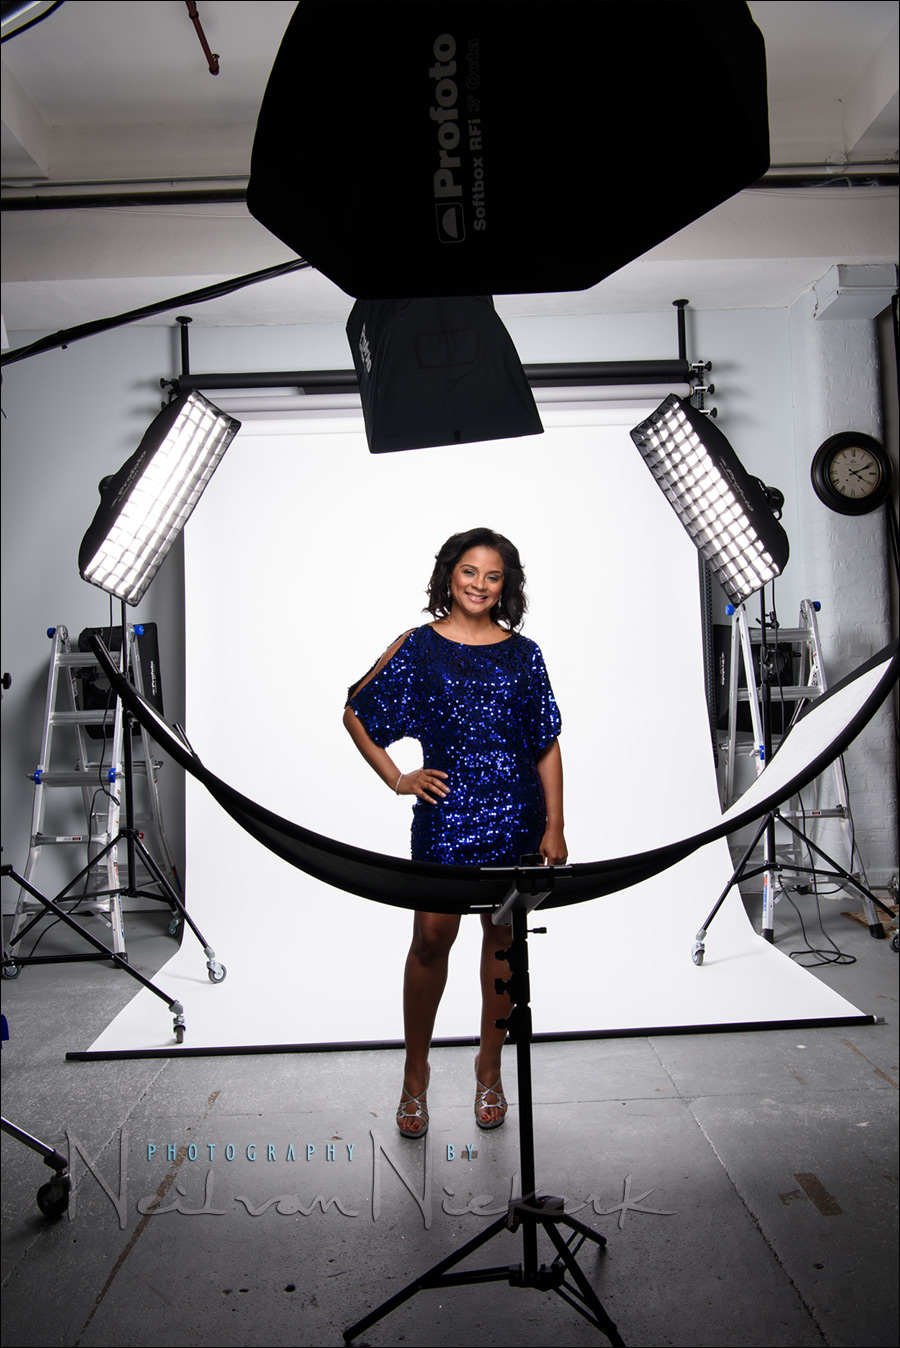
There were four studio flashes used – all Profoto D1 Air 500 Ws studio lights (affiliate).
The main light is the Profoto 3.0’ Octa Softbox (affiliate), on a Manfrotto 025BS boom w/ stand & casters. The boom helps immensely in shooting with the light above the camera. Otherwise, a light-stand would be in the way.
The fill-light is from underneath via the Westcott Eyelighter (affiliate). It is fairly easy to position. You stand in the same spot as your subject, and then you can see how the main light reflects in it – and then you can move the Eyelighter closer or higher up, or as needed.
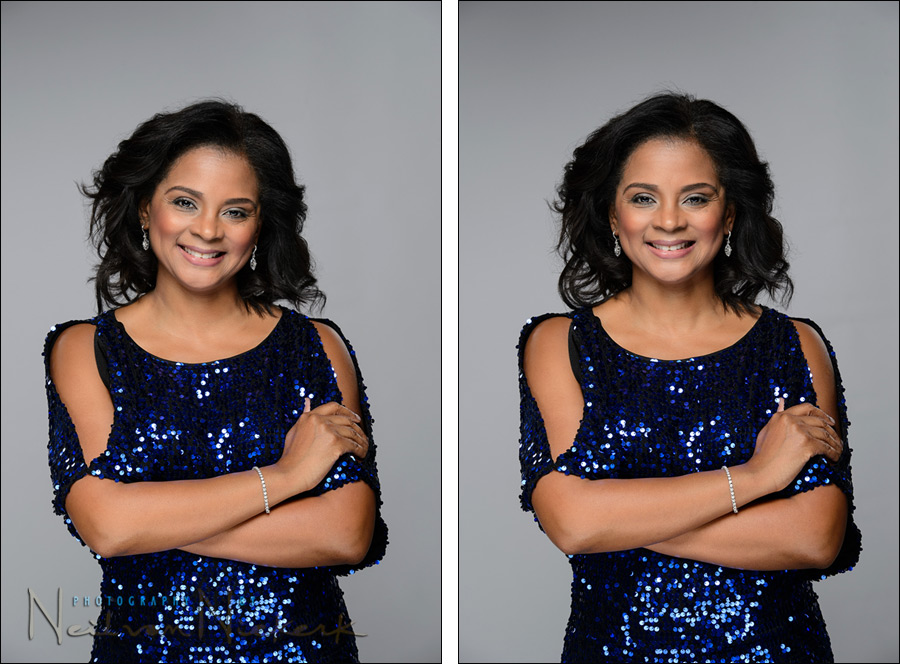
I added two gridded Profoto 1’×3’ softboxes (affiliate) on either side to help with definition of my subject. You can see the subtle side-lighting on Mechelle’s arms. I didn’t really push the amount of light from these two gridded stripboxes, because I didn’t want strong rim-lighting in her hair.
Then there was a fourth light (also on a boom), splashing light evenly on the white paper backdrop. For the initial sequence of photos of Mechelle, we went for a white background. I got there by having the flash-head set to maximum, and then adjusting my aperture until the background was blowing out a little bit according to the histogram. From there, I added the other lights for correct exposure.
Butterfly lighting vs Clamshell lighting
Butterfly lighting is one of the basic lighting patterns, typified by the shadow of the nose creating a butterfly like shadow below the nose. There is a symmetry to the shadow. Loop lighting has the shadow of the nose creating a ‘loop’ to the one side.
Clamshell lighting is a variation of Butterfly lighting. The proper technical way of lighting with a Clamshell configuration is with two light sources – the main light from slightly above, pointing down, and a second light source from below, pointing up. So it could be argued that the lighting setup showed here isn’t proper Clamshell lighting, but instead is Butterfly lighting with a reflector. This hinges on the idea whether the reflector is an actual second light source, or not. I count it as a second light source. Opinions on this might vary.
Studio lighting workshop
If you are interested in learning more about studio lighting, including lighting for headshots, I offer workshops on studio lighting. The workshops will be held at my studio space in NJ, and it has a wide range of studio lighting gear to play with!
Related links
- What makes for good head shots?
- Headshot photography lighting – Westcott Eyelighter
- Studio photography – Working with a large Octa Softbox
- Photo gear & logistics: Corporate headshots
- Studio Photography Workshops
- More articles on Headshot Photography
- Headshot photographer NJ
A little bit of homework
How did I change the background brightness from white to various shades of grey, without changing the paper backdrop?
By adjusting the intensity of the fourth light on the background.
Nice stuff Neal. Love that “Manfrotto” boom. But the price on that is just “boom” crazy! Yikes!
Buy the boom from Cowboy Studio. It is inexpensive and works well for me.
Great article Neil.
Turn off the background light and adjust your shutter speed to control the ambient on the background.
There isn’t much ambient – and the ambient light would be from the fluorescents above – not a good color.
There are still some shadows under her chin, maybe move the reflector further toward her so more light will reflect under her chin getting rid of the shadows?
There is a soft shadow under her chin. Not necessarily a bad thing, but I could’ve reduced this by lifting the Eyelighter higher, or bringing it closer to her.
The two photos I show here where part of a sequence where she wanted half-length portraits, so I had to drop the Eyelighter out of shot – and that made the shadows more pronounced here.
Move the subject close to the background for white background and move the subject farther away from the background for grey(ish) background. Inverse square law. :)
Matt .. you are overlooking the light that is in place solely to light the background. I can range the power up and down on this to give me pure white … or shades of gray. Much simpler than moving gear around.
Nice article, I’ve always just shot used loop lighting, really should vary with clam-shell and butterfly lighting – thanks for the reminder!