Photo gear & logistics: Corporate headshots
With any professional shoot, forethought and planning is a necessity. For personal photography there’s always place for serendipity. But relying on luck with a professional shoot isn’t going to go all that far. The same goes for photographing on-location headshots – planning is essential.
With the on-location corporate headshots described in a previous article, I aimed for efficiency and speed. I set up various speedlights and soft boxes around the office place for environmental headshots. This way I could step each person through the various spots and get similar photos of everyone. But there was a certain flexibility in the final look that was okay with those portraits. Still, the setups were done beforehand. I also worked on my own, so I put some thought into how to do the logistics single-handedly.
I was approached by a large law firm in New York to do their headshots – more than 200 people that I had to take headshots of partners and personnel. The company needed corporate headshots that had a specific look to them, with a specific value to the grey background – all in a way to create a consistency with the photos, online and in printed material. With more than 200 people that need to be photographed over the course of two months on various days, there had to be a way to ensure repeatability. The look wasn’t environmental, but more conservative and traditional.
I decided to go with studio lighting gear, instead of speedlights. More power, larger light modifiers, and faster recycling times. The Profoto lights are also known for a more consistent color balance. Ideal to speed up my workflow afterwards when editing the photos. With the environmental headshots, the speedlights were sufficient because I was shooting at wider apertures and higher ISO settings to bring in the ambient light. With these more traditional headshots, the ambient light wasn’t a consideration at all and I wanted more juice than a speedlight.
This did mean carting most of my studio gear on location. I did a test setup when I first met the PR team to discuss this. This gave me an idea of the logistics. Just the logistics of getting all that gear out of the car and into the building, and setting up fast, meant I had to reconsider a few things. Then of course, at the end of each day, all this had to be done in reverse. And repeated over a number of days. Keep in mind that this is Manhattan where finding parking in front of a building to load and unload can be a real hassle. There’s just no time to unload a lot of bags.
With the test run, I had a large hand cart that I strapped bag and cases onto. But this was a bit too clumsy. It took a bit too much time to unpack the car on the sidewalk and load the hand cart. Then, navigating elevators were also not as smooth as I wanted it all to be.
More than struggling, I hate the appearance of struggling. There’s a real appeal in not looking clumsy in front of a client. Clearly it is just so much better to appear professional, well-organized and efficient.
This then is a description of just how I did that on the subsequent days where we did the headshots – rolling in looking slick and proficient and setting up fast!
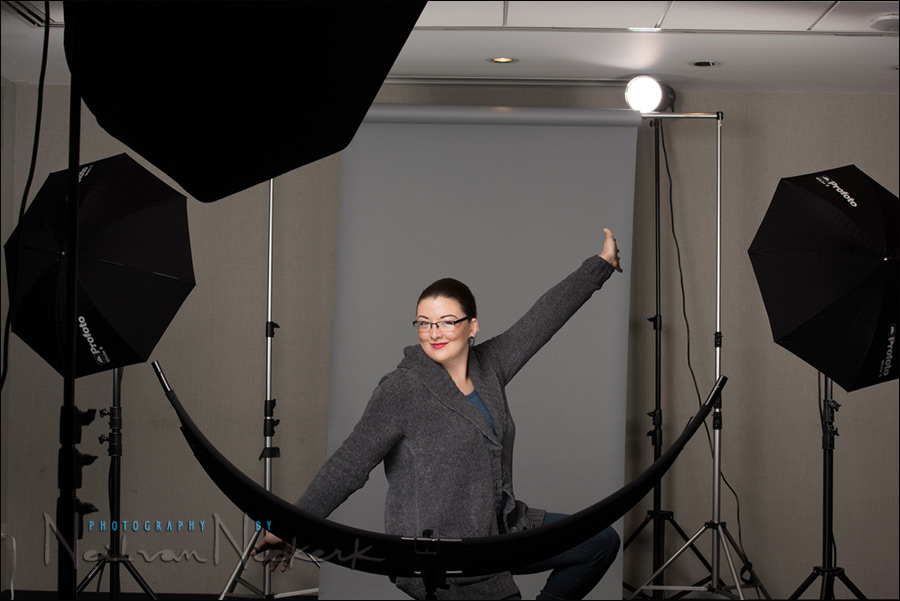
When I posted an iPhone shot of the setup to Facebook, there were a lot of questions and interest in the setup, so I thought it might make for an longer discussion here. Oh, the crazy person at the top is my assistant on this shoot, Presley Ann. Before any of the company’s people sit down for their headshots, I need to be completely ready, and she sat in for the test shots.

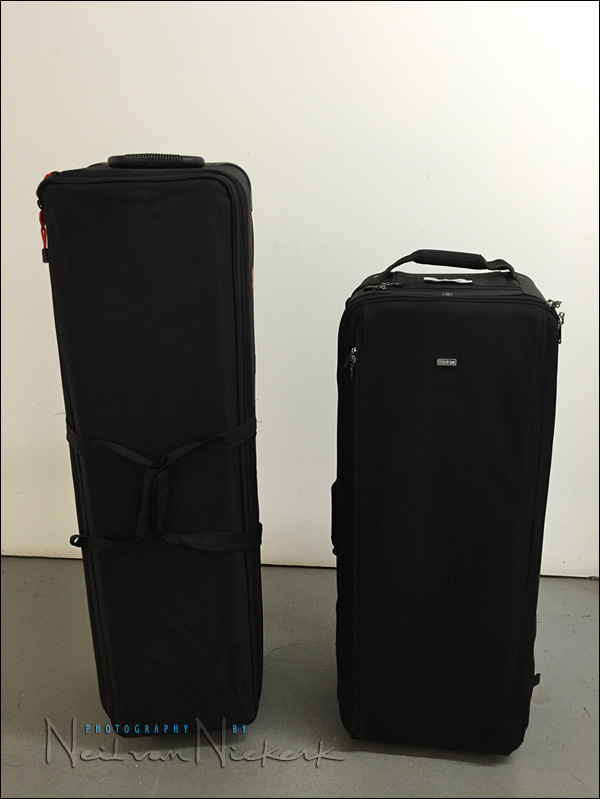
Here’s what we rolled in with – two large roller cases containing everything you see in the photo at the top, as well as a bunch of other gear just out of shot.
The taller bag is the Photoflex Transpac roller case (B&H) / Amazon) from which I stripped out all the dividers so I can more easily fill it up with light-stands and umbrellas. The interior of this roller case is 46″ / 116 cm tall, so anything that is tall goes in this bag.
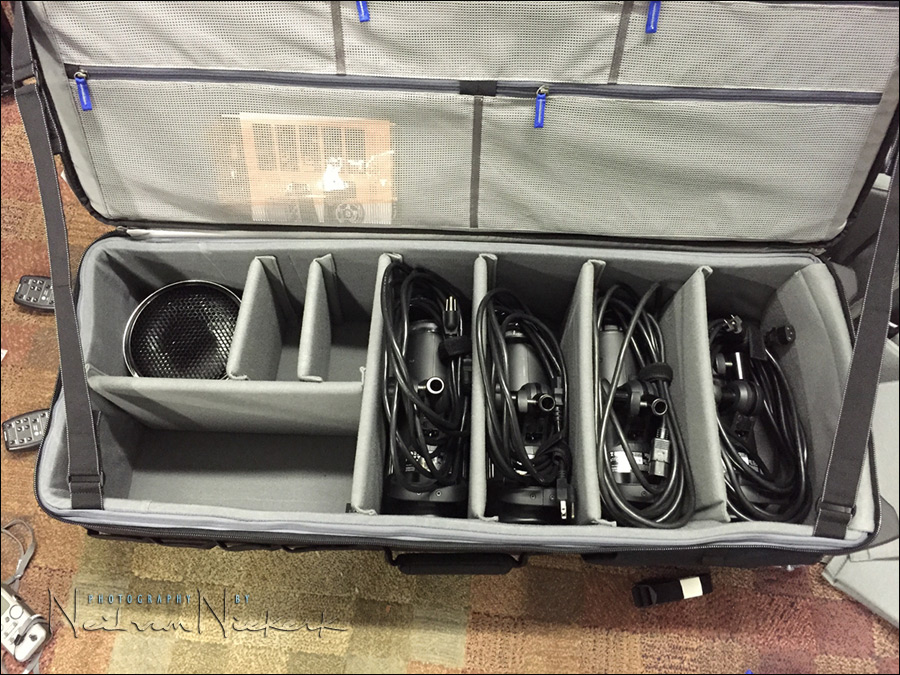
The shorter bag there is the Think Tank Production Manager 40 which is a high-capacity rolling gear case specifically designed for lighting gear. What first caught my attention when I saw Think Tank’s newsletter about this bag, is that the promotional photo showed it taking four Profoto D1 heads … exactly what I have. So this bag then was the ideal solution to cart my studio lights around with. With Think Tank’s renowned quality, I knew this would be very sturdy, well-padded, with wheels that just glide.
This is just the start of packing it …
The taller bag is the Photoflex Transpac Dual Kit Case (affiliate), which is a tall roller case that can take (folded) stands up to 46″ in height. All the soft boxes and light-stands and back-drop stands went into this case.
There was just another smaller camera bag – the Think Tank Retrospective 20 (affiliate) on my shoulder. I kept the main camera and lens (a 70-200mm f/2.8) in this bag, as well as some personal items.
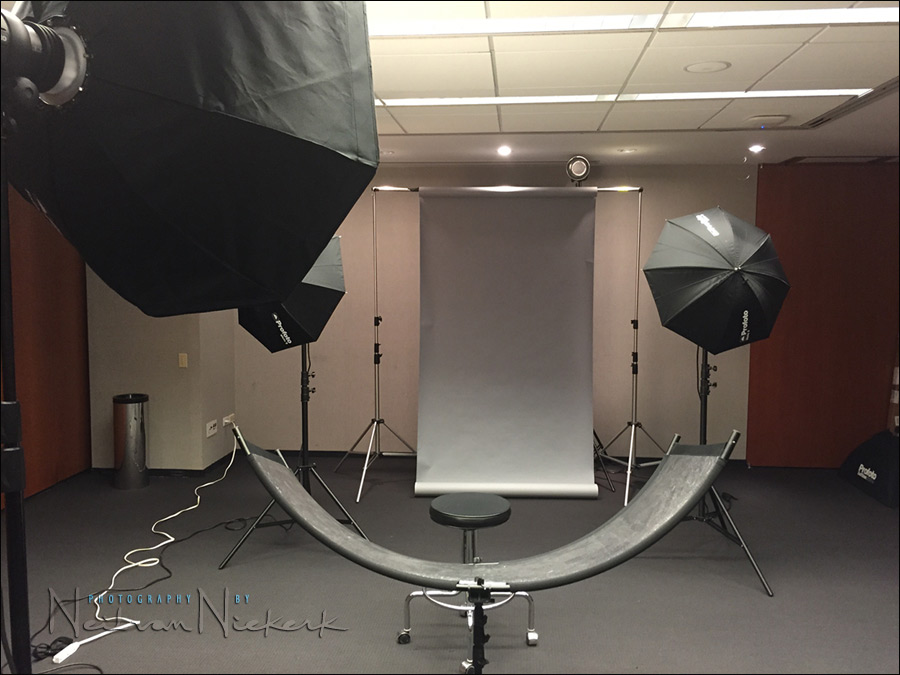
The lighting setup
The lighting setup is very similar to that described here:
- Studio photography – Working with a large Octa Softbox
- Headshot photography lighting – Westcott Eyelighter
Instead of the massive 5′ Octa softbox, I went with the more portable Profoto RFi 3.0′ Octa Softbox (affiliate).
The two smaller umbrellas in the background were there to spread the light evenly on the backdrop. I really wanted the color as flat as possible on the backdrop, with no gradient if possible. I metered with a light-meter across the backdrop, left-to-right, and up-and-down to make sure the exposure was very even and shadowless. The light with the gridded reflector (peeking above the backdrop), gave a bit of hair-light where needed.
The curved reflector in the foreground was adjusted a little bit, depending on the height of every person. I also had to tilt it differently and swivel it, for the times where someone had reflective glasses that were convex and showed the curved reflection. I had my assistant tilt and hold the reflector as needed then.

Summary
With just those two large roller cases (and a smaller shoulder bag), unloading the car was quick and efficient. Getting all the gear into the building, up an escalator, and then into an elevator, was quick and efficient. Setting up was fast since we had already figured out the positions during the initial meeting with the company’s PR team. We blocked positions with small pieces of gaffer tape where we could. I took note of the height of the light-stands as well. I also took a few photos with my camera phone rom various positions, for quick reference just in case.
This measured approach gave me repeatable results, day to day over the two months that we’re shooting the headshots. And then of course, figuring out the logistics and packing all the gear in just two roller cases, made it an efficient operation. Of course, there are other ways that all this could’ve been d0ne too. I’d love to hear about your approach.
Photo gear (or equivalents) used during this photo session
- (4x) Profoto D1 Air 500Ws studio lights
- Profoto RFi 3.0′ Octa Softbox
- Westcott Eye-lighter
- Manfrotto 1051BAC – compact light-stand
- (2x) Manfrotto 1004BAC – tall light-stand
- (2x) backdrop stands
- Manfrotto 2983 Adjustable Background Holder Crossbar
Related articles
- Portrait & headshot photography: studio lighting – review: Westcott Eyelighter
- On-location corporate headshots – aiming for efficiency and speed
- On-location headshots and promotional portraits (Jonathan)
- Headshot photography: what makes for good head shots?
- all other articles on Tangents about headshot photography
- NJ headshot photography

Neil, how did you deal with overhead room lights? Did you turn those off during the captures to reduce/eliminate color casts?
With camera settings of 1/160 @ f/10 @ 100 ISO, the room lights just don’t register at all.
There is that tiny hotspot there at the top of the paper backdrop, that you can see in the top-most photo. But the effect of that ceiling light dissipates very quickly. Think in terms of the Inverse Square Law.
What was your main intention for using the 70-200 vs a prime lens in this shoot?
The field of view of the 85mm lens is too wide. And for a tight headshot, there is still some spatial distortion.
So I used the 70-200mm lens, set to 135mm.
(And re your comment on FB: The choice of lens has absolutely nothing to do with bokeh. Besides, with a grey background, you’d never notice whether a lens has good or bad bokeh.)
How do you pose them? What are your top 5 poses for corporate shots? Are they meant to be smiling/grinning or serious?
For corporate headshots, the expression is just a friendly one. Not too smiley; not too serious. Friendly and approachable.
Here are links to the on-going series of articles that cover the two topics:
– headshot photography,
– posing.
I have three questions, if you don’t mind:
1. For cameras and lenses, wouldn’t a hard case, like Pelican, be more secure than a soft one?
2. If you are there for such a long time, why didn’t the client dedicate a room for the project, so you didn’t have to move everything (other than your cameras) every day?
3. How do you price a project as this? By the amount of photos taken, or the time you spend?
Thank you for all the time and energy you take to instruct neophytes like us :)
I don’t need Pelican-like indestructibility. The equipment never leaves my presence. Pelican cases also tend to be overly bulky because of their intention. I wanted that perfect intersection between security and ease-of-use and compactness.
The Think Tank Production Manager case is *exactly* what I needed. So I’m happy.
I’m not there on sequential days. It’s a day on this week, and two days a next week, etc. Spread over nearly-2 months. It made it easier to make the logistics of this shoot something I deal with.
Also, I need my studio gear on other days.
This shoot is in NYC. My studio is in NJ.
I have rates for on-location headshots. Due to the volume though, I priced this at a NYC day-rate. It made my pricing more attractive so that I could get the gig.
Thank you!
Wouldn’t it have been easier (not necessarily cheaper) to rent the gear and leave it set up in the same place for the two months?
There is no secure office to lock this up in.
Also keep in mind that total setup time is about 25 minutes. So this isn’t a particularly arduous task when it is well planned.
When u made small adjustments (e.g. height or angle) to the main light due to the different height of the subjects, did it cause the grey background value to change a bit? How do you prevent this problem? Thank you.
Sorry if I missed this–in this case, where consistency of output is key, do you bring along some kind of monitor to compare with the last shoot to be sure you have consistency ? Blocking with tape and writing down settings and distances is fairly straightforward, but it seems to me there are so many variables that one could easily forget one of them.
Yup, even in taking care during the actual shooting, at some point Photoshop will have to come in to play to get that exact match between images.
That’s going to be one heavy bag… those dividers must be strong!
Hi Neil:
What a great gig.
-How much time do you allot for each person?
-Do you meter for each person or do the settings remain the same for the day, or even for the two months, once you set them?
It’s a straight-forward single headshot that we want. So 15 minutes per person is more than enough time allotted.
The next question – call it A Little Bit Of Homework – but this is something you will have to figure out for yourself with the info provided in this article. It’s all there.
Perfect timing. I just completed a corporate headshot session for a major bank here in Canada on Friday and opened this page today to discover this article today. Just my luck. However I was pleased to read that most of what you are commenting on and recommending was similar to my experience with a few exceptions. I did use my speedlights as I usually find them fast enough and I was only shooting one branch of the bank so less than a dozen people and therefore recycling time was less of an issue. The struggle I had was the venue. I have shot for this bank on 4 previous occassions and generally been able to find a board room or common area large enough to accomodate a wide, seamless paper bacground and a 3 light setup. this time the largest room was a small meeting room that was so small that despite up ending the conference table I still had to shoot with my back against a wall and my background stand out the doorway. I did not have the room for a hair or background light.
Any suggestions on what to do in this type of situation? I am generally pleased with the results as is the client but wondering if you have encountered similar scenario where you are forced to shoot under these confined quarters but still need to produce professional quality, studio like results.
Thanks Neil,
Ross
Ross … I wouldn’t count a hair-light as all that essential. With balding men, I switch it off to avoid glare spots. Those hot spots are too time-consuming to edit.
So in your case, go with what is optimal under the scenario you are presented with, and don’t sweat it that you can’t finesse it to the point you might have wanted.
I’ve had the same deal as well – standing on tip-toes with my back against a wall for some shooting distance.
Great article Neil. I look forward to seeing the results. One thing that has helped me in regards to the width of the seamless paper background is to buy a 9 foot roll and cut it to fit the length of the background cross bar. An extra 2 feet goes along way in framing especially when you have to move your subject further away in order to light the background. I have also just cut and taped the seamless background to the wall when space was at a premium. This also works with wider shots as you can turn the direction of the seamless paper to run horizontally, then add another piece below that if needed.
I agree with you to take home the setup. I never leave my equipment set up at a business when doing an extended shoot. For one they don’t want it there either they have to use the area for their daily business. I make diagrams with measurements for everything plus iPhone pictures. I also set up days before in my living room to test different distances especially minimum distance scenarios.
I look forward to the second part of your article.
Regards,
Michael Mowery
Hi there Michael
In the end there isn’t a specific follow-up article,
but an on-going series of articles that cover the two topics:
– headshot photography,
– posing.
Well I just realized I was responding to an article that was 3 years old. I did not have my coffee yet. In any case I always enjoy reading your reviews and tutorials. Thank you Neil.
Michael Mowery
Still, I like to keep the articles up-to-date and relevant.
Hello Neil,
I realize, this article was posted awhile back. Luck would have it, I come across it today! Thank you for all the information. Could you share where to get the grey back drop that you have in your set up? It seems to be a material that is thick and sturdy. The backdrops I have, are made of a lighter material, almost sheetlike (from a bed).
That paper backdrop is by a company called Savage – very well known manufacturer, and (nearly) every camera store should stock it. Alternately, it can be ordered online.
I now use a collapsible background by Lastolite though, as shown in this article: What’s in my bag – lighting gear for headshots on location. It is easier to set up, and easier to transport.