
photography: mixing different light sources in the studio
While playing around in the studio late this evening with a group of attendees at the Treehaven workshop, someone challenged us each to come up with an idea, using any of the lighting equipment there …
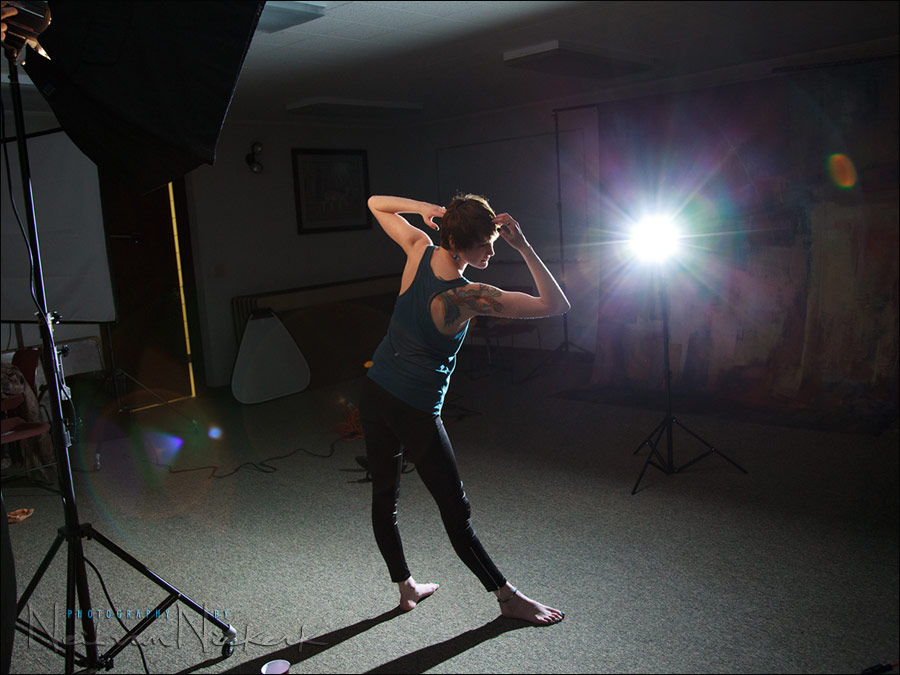
I decided to rim-light our model, Amy, with a studio flash behind her. The main light on her is the modeling light in the large softbox that everyone else was using. I preferred to disable the studio light’s output, and just use the modeling light on her as the light from the camera’s point of view.
The modeling light, which is a continuous light source, and is quite warm. I expected it to be close to Tungsten / Incandescent, but it wasn’t quite as warm. Still much warmer than the ‘cold’ light from the studio flashes … or the speedlight I eventually used as a rim lighting.
I intentionally under-exposed her, wanting the rim-light to etch her against the out-of-focus (and darker) backdrops. In the first shot I took of her in this pose, I liked the light, but the gridded light on the floor behind her, cast too much light on her chin from beneath, causing too large an area to blow out. Overall, the image looked good, but it needed to be fine-tuned.
The fine-tuning took place as I replaced the gridded light on the floor with a speedlight on a light-stand directly behind her. In carefully positing myself and Amy and the light-stand with the speedlight, I was able to completely hide it behind her. No editing in Photoshop needed to remove any part of the back-light. I didn’t gel the speedlight behind her, since I wanted the rim-light to be more blue than the light from the front.
About the exposure:
There is no one specific “correct exposure” here. It is just whatever looks good … or is preferred. And I liked it like this. So even though it is technically “under-exposed”, the rim-light is what defines her. The light on her from the modeling light inside the large softbox is just there for a touch of detail. It could’ve been brighter or less bright. It’s a matter of taste then. It is the rim-light that does all the work here.
The speedlight was set to 1/16th power. It doesn’t quite matter though. Since the rim light is there to blow out the very edges of her form in this photograph, the flash’s brightness can vary, and it would still look great. As such, it need not be correctly metered.
camera settings: 1/125 @ f4 @ 1600 ISO
More about the choice of white balance:
This image is very warm. Again, intentionally so. I used Daylight WB, knowing that the light on her would go quite warm as a result. I liked that bit of a red glow the light at this exposure and chosen White Balance.
This brings us back to the idea about things needing to be “correct”. Just as the exposure here is a matter of choice, the White Balance too, is a matter of preference. What supersedes the idea of “correct”, is the need that the image looks good. I’d rather have pleasant WB than correct WB. (Although it is easier to get to a pleasant WB if you have correct or near-correct WB.) Someone else might have chosen a much cooler WB, but I have a preference for warmth.
In that sense, this article ties in with the current series on different situations where the difference in White Balance in the image was used for effect.
Equipment used with this photo session:
Canon 5D mk II (B&H); Canon 70-200mm f2.8L IS II (B&H)
Canon 580EX II Speedlite (B&H);
Canon ST-E2 Speedlite Transmitter (B&H)
Radio Poppers
Photogenic studio light
The wise wonder of using 1600 iso with flash. While most would people boast down to 50 or 100 iso, you turn that upside down with a more thoughtful approach… a modeling light.
Keep it up :)
Sean
Neil really knows how to maximize any equipment on site. Is he the MacGuyver of photography? :-)
It’s good to re-emphasize that there is more than one “correct” exposure. The exposure numbers in and of themselves is not the most important thing in the photograph.
Neil, Ive tried rimlighting a subject with a bare speedlight but can never get the coverage you did, regardless of zoom settings. Also, and this is probably related, but when I take a picture of a bare flash going off, it never looks like a round ball of light like in you pull back shot. It is always just a bright square of light, the exact shape of the speedlight itself. Is this an aperture difference?
Radio Poppers?
Simply amazing to watch this happen!
Neil,
What a Sweet pic.
Than you again, had a great week with you at Treeheaven, and for all the “aha” moments. Learned a ton this week. …Thanks for all your knowledge and sharing it. Truelly honored to have met you.
Keep up the great work…always look forward for you next post and learn from the master.
Audry