In blending flash with available light, I am often after that delicate balance where the flash is just barely perceptible. This can be with flash as an equal partner to the available light, or with flash as a subtle fill-flash.
But what I’ve found with my Nikon D3 bodies, when used with the SB-900, that the fill-flash flash is still too much, even when turned down -3EV on the flash exposure compensation. I’ve found similar with the various Nikon D300 and Nikon D700 bodies that attendees to my workshops use. In other words, this isn’t just my cameras – this is repeatable with other cameras too.
Here’s the set-up:
With the model close to a window, and positioning her so that we have the typical window-lit portrait, our light is great. No flash needed.
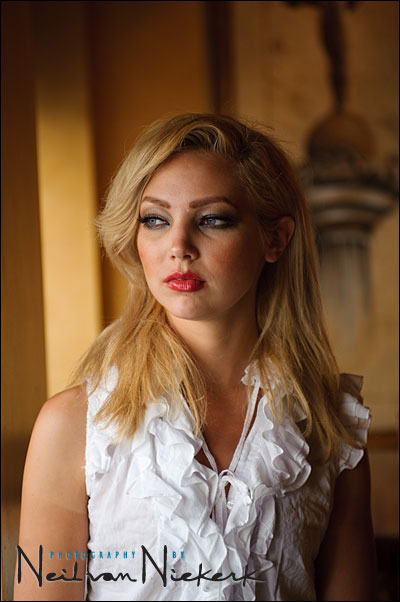
[ Nikon D3; Nikon 24-70mm f2.8 AF-S; no flash ]
.
Now, the moment our subject looks at the camera, we have strong contrast, with one side of her face being much darker. If the room was less bright and reflected less light on her, the difference would be more stark. The image here isn’t too contrasty, so it will still work .. but I would still prefer a touch less contrast and more light on the shadow side.
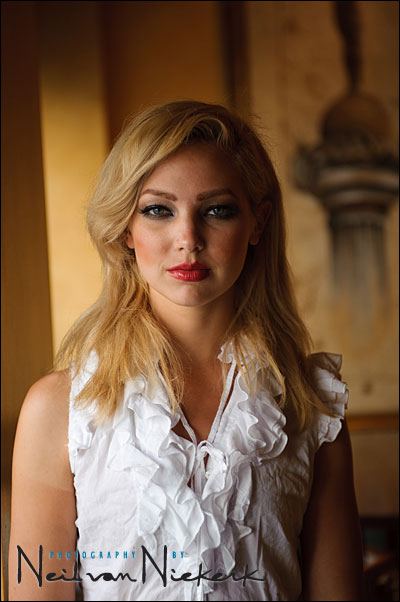
[ Nikon D3; Nikon 24-70mm f2.8 AF-S; no flash ]
.
I can now control the contrast with flash …
I do this by bouncing flash into the large room. No specific wall or ceiling really – just into the room behind me and to my right. I can control how much flash by adjusting the flash exposure compensation. (FEC). Ideally I want just a touch of flash … so here I dialed down the flash as low as I could on the speedlight itself.
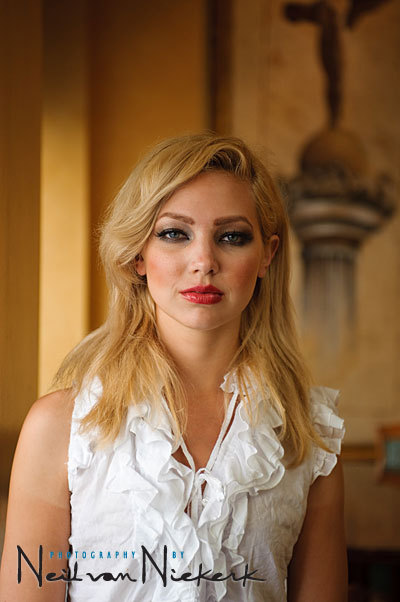
[ Nikon D3; Nikon 24-70mm f2.8 AF-S; SB-900; FEC -3EV]
This looks good, but is in my opinion too much flash for what should be a minimum .. ie, the flash (imho) should’ve been barely perceptible at a FEC value of -3EV.
So how to pull the TTL flash exposure down even more?
Here’s the trick … exposure compensation on the Nikon bodies are cumulative.
With the Nikon D700, D300, D200, etc .. where you have flash exposure compensation on the body (that little button to the left of the prism), and you have flash exposure compensation on the speedlight .. you can double-dial the FEC down.
So it is now possible for you to dial down say, -2EV FEC on the body, and then an additional variable amount on the speedlight. So you can now reach -5 EV (or less) .. but around -5EV on the Nikons are were I feel the flash is barely perceptible.
With the Nikon D3 and D2x, it is a little trickier. That the pro bodies don’t have flash exposure compensation on the body itself, is a huge oversight in the design of these wonderful machines. The work-around that I have, relies on the fact that I only shoot in manual exposure mode on the camera. So I can now turn down my overall exposure compensation (which does affect my camera’s light meter while in manual exposure mode!), and then turn down my flash exposure compensation on my speedlight.
This way I was able to get to -5EV FEC on the following image:
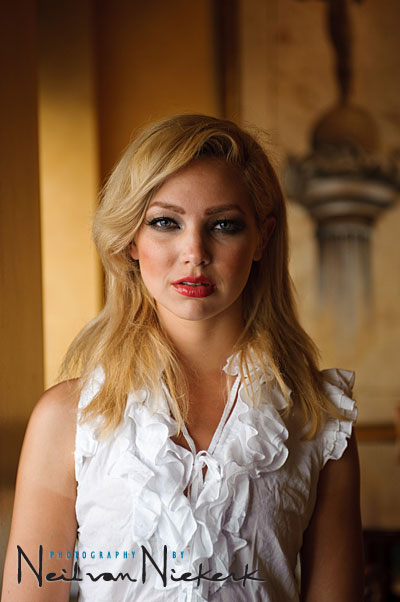
[ Nikon D3; Nikon 24-70mm f2.8 AF-S; SB-900; FEC -5EV]
This for me is a good starting point if I wanted to play around and find my preference for fill-flash in this scenario.
How did I arrive at -5EV as a base? That’s part of the next blog entry on how Canon and Nikon’s TTL flash metering differs.
Hang in there .. this gets interesting.
I tried this with D90/SB-600 and it works as well: camera set to -2EV and flash to -3EV results in -5EV on the final image. camera +1EV and flash +3EV gives us a total of +4EV. Every combination between should work.
Very interesting. I’m a Canon shooter, so I’m curious to understand how the two systems differ in terms of EV and FEC controls. In Joe McNally’s new book, he describes his preference for shooting in AV mode most of the time and using EV and FEC controls to get the overall exposure where he wants. His use of AV mode surprised me as I’d have guessed he would simply dial in the base scene exposure manually and then ride the FEC to taste rather than have to juggle both EV and FEC. But you say you still use both when in manual mode? AFAIK, Canon does not have EV adjustment options when in manual…or am I showing my ignorance? If so it won’t be the first time, nor the last;)
Neil have used Nikon D3 with SB900, it finally went kapoosh giving me ‘Warning’ on screen and just won’t work! Looking for a much cheaper non-Nikon replacement… any suggestions? Or is there a simple fix with the SB900… like a capacitor replacement? Much appreciated, Greg in Ladner, BC??
Greg — I don’t know what the repair cost would be. But I wonder if at this point a used SB-900 wouldn’t be a cheaper option. Best would be to get a quote from Nikon to see if it is economically feasible to repair.
This is a great article and demonstration, but I’m missing something from the final part of the story.
If you turn down the overall exposure compensation by 2 EV, that will impact the entire image, not just the portion lit by the flash.
Since the images shown all look like they have the same overall exposure, you must have overexposed the final image by 2 EV in manual mode to overcome the exposure compensation for the ambient lit portion of the image while still allowing it to reduce the flash exposure by an additional 2 EV. Am I right?
I’m shoot Canon so it will be interesting to hear how the two systems differ. I’ve really never tried to do anything like you describe.
As an aside, I find the second image two light, but the third one still a bit dark. I would probably prefer the image at -4 EV instead. I’m sure everyone would have a different opinion for that though…
Hi Neil,
I’m not familiar with the lingo, “little button to the left of the prism.” Does prism mean lens or something else? I found the Flash Exposure Compensation (FEC) button below the Flash Pop-Up button on the left side of the lens mount area. The FEC button is button with a lightning bolt icon with a +/- symbol above it. That is the button you are referring to, correct?
–Stephen
Adam, I do agree the top image looks best. But keep in mind that this was a technical exercise done for comparison.
Here’s the companion article – the common wisdom: Canon’s TTL flash vs Nikon’s TTL flash.
FWIW, I like the top photo (without flash, model’s head toward window) the best. Thanks for the EV tip though. It could definitely come in handy in a more contrasty situation.
Neil,
Thanks for the info, very useful and something I wouldn’t have thought to try. I just traded up to the D700 and I am noticing this as well. I am also noticing that the blinking highlights on the D700s’s LCD display don’t always agree with those in Adobe Camera Raw. This concerns me, especially when it comes to skin tones. I can usually correct this by sliding the recovery slider over a touch but I’d rather get it right in camera. Are you finding similar results?
Brian
“So I can now turn down my overall exposure compensation (which does affect my camera’s light meter while in manual exposure mode!), ”
Does, or doesn’t affect? I’m still pretty new to photography, but I thought exposure compensation didn’t have an effect in Manual Exposure (M)?
Great site by the way.
I was just thinking that you have one other possible alternative to try and that would be to set the flash ( SB800 & SB900 only ) to AA or auto mode to have the flash meter for the subject separately from the camera meter. It would be interesting to see if the SB900 exposure is still on the high side.
I think this can be done????
thanks for your explanations.
i´m looking fwd to your next blog post.
canon vs. nikon*g*
with my olympus system i have the choice between
1) flash coupled with exposure comp.
or
2) flash separatly “FEC” and separatly Exposure Compensation.
but only (of course ) when shooting in mode “A”, “S” or “P”.
also the display will change e.g when i dial down in lets say “A” mode.
you will also see a change of points of the FEC.
normaly i shoot in “M”- mode.
so my setting is
2) flash not coupled , means i use FEC for its own and normal EC is done via shutter or aperture (to go up or down with the exposure)
a bit tricky is the “starting point” of -FEC, to estimate the correct amount or power of Flash.
grts
peter
Hi Neil!
First of all, the photo and the model are really beautifull. Nice makup, mood, etc…
What about the Raw developement? With ACR, I suppose?
What are your settings? Contrast? Saturation? Color T°?
The photo looks sharp, did you use clarity ?
With the SB900 you can choose the flash width + zoom mm. When you bounce flash, what do you set these to?
Hey Neil,
Great thread. Also follow your input on DWF.
Wondering if the settings you use here- your default – will yield the same results with the D700? It’s the same sensor isn’t it? Or have you found that the 700 actually give visible differences with the same settings / exposure?
I tend to use the flash much like you do – decide how much ambient I want and bring the flash up to where I want it. I always have the camera in manual mode – except in fast moving bright sunlight situations.