Night-time photo session using off-camera flash
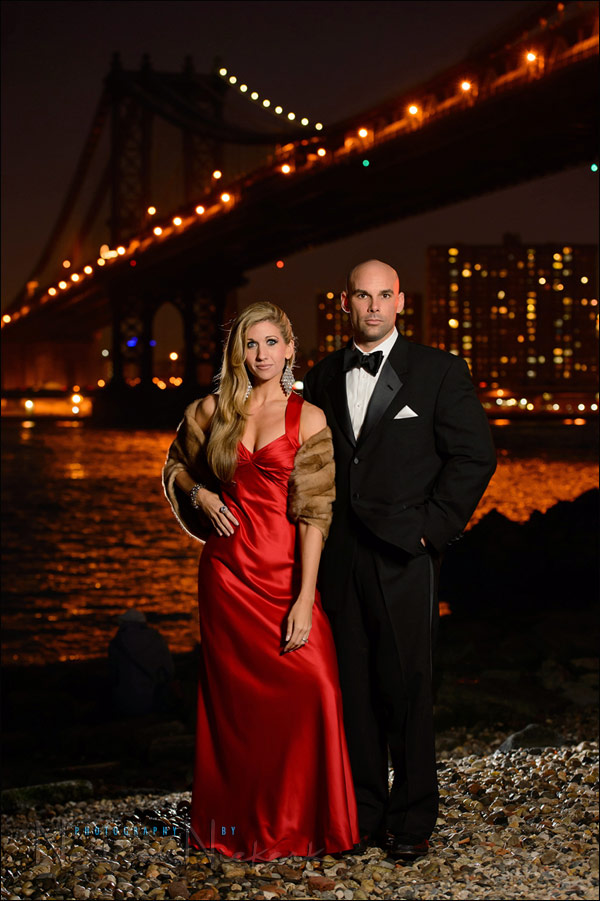
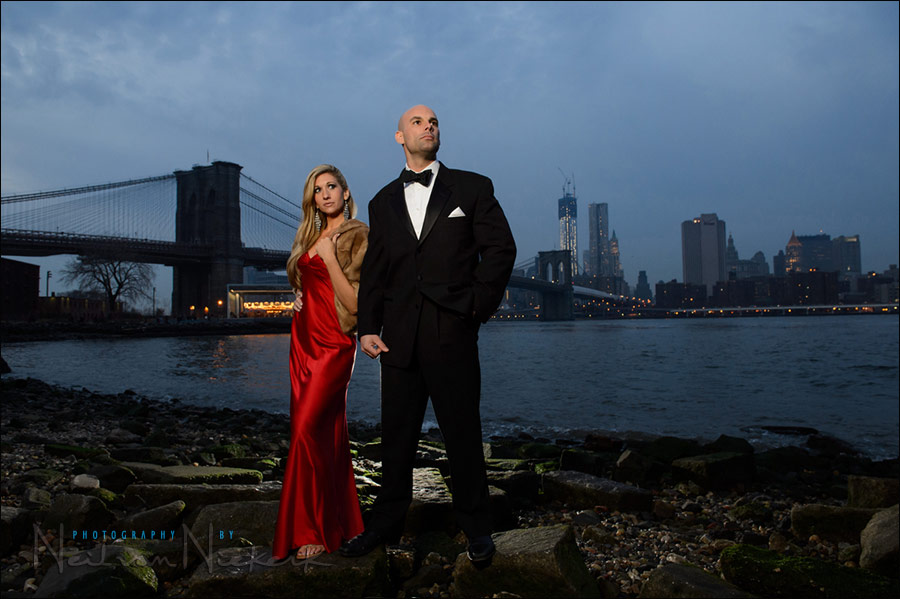
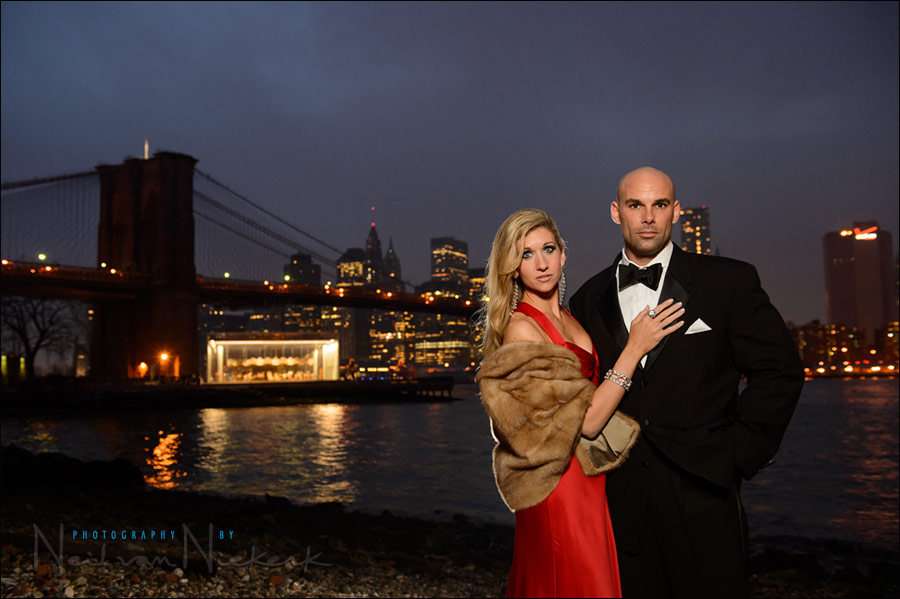
Sarah and Mark were in New York, dressed to the nines, to attend the Rockettes show. And while they were dressed up, and with some time before the show they were attending, we did a photo session. You might remember them as the couple in my book, off-camera flash. I’ve also photographed Sarah on other occasions. I thought that the New York skyline at dusk would work as a perfect backdrop to how stylish they were dressed. (I did ask Mark if he felt like James Bond, all suited up like that in his tux.)
The lighting setup was straight-forward. The main light was a speedlight in the Lastolite EZYBOX 24×24″ softbox (affiliate). The rim-light was another speedlight behind them, with the plastic diffuser cup on so that the light would spread wider.
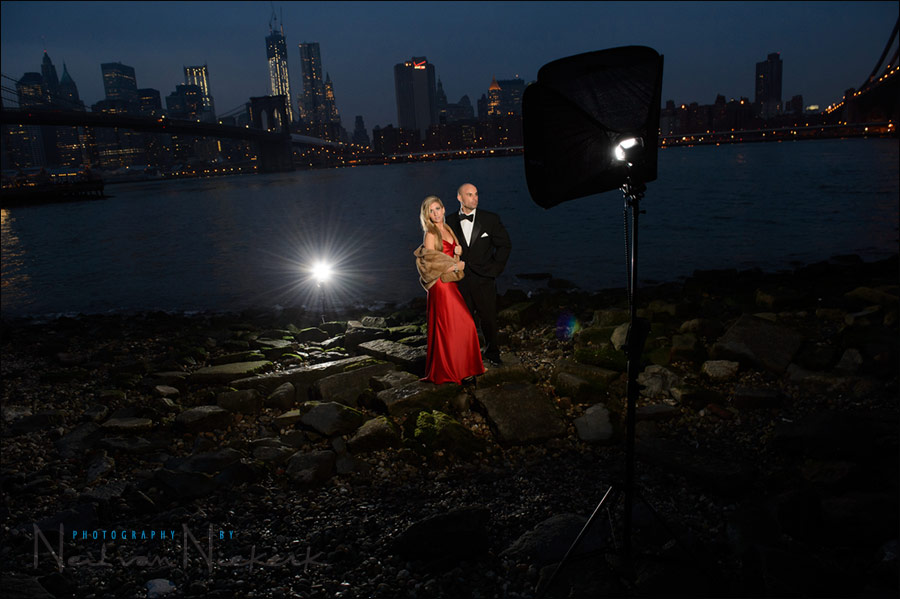
You can see from this photo that I angled the softbox upward, to force light fall-off to the bottom of the frame. I didn’t want to light up the ground. I also didn’t really need their legs and lower body to be lit up as well as their face. So this way I was able to accentuate their upper body and face.
The flashguns / speedlites were controlled manually. TTL flash would just have been hard work here. TTL flash would’ve meant constant controlling the flash exposure compensation for each shot because of the large areas of dark tones. So manual flash it had to be.
I didn’t meter for the flash. From experience, I have an idea of what the speedlight’s output is when used in that specific softbox. The rim-light was also adjusted by eye. I know, I know … it goes against solid principles to do it this way, but the images work. I controlled the speedlights’ output from my camera, via the PocketWizard AC3 Zone Controller (affiliate) on top of the PocketWizard FlexTT5 transceiver (affiliate). Each speedlight had its own PocketWizard FlexTT5 transceiver (affiliate) controlled manually from the AC3 on my camera.
As we were shooting, the ambient light was fast fading. Therefore you’ll see the background gradually going darker. I adjusted my shutter speed a little bit. Then at some point, I opened up my settings a lot more to allow more of the city lights in. None of the flashes were gelled.
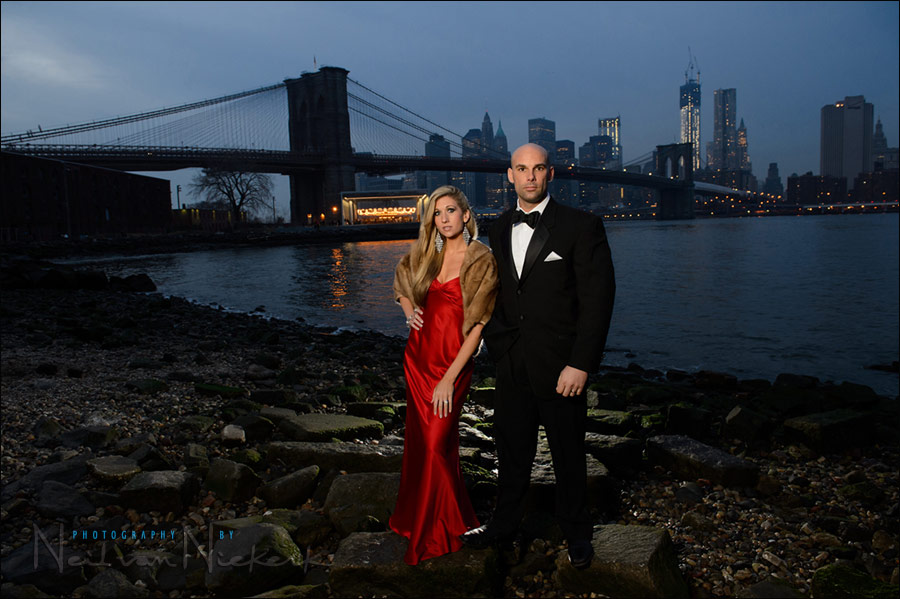
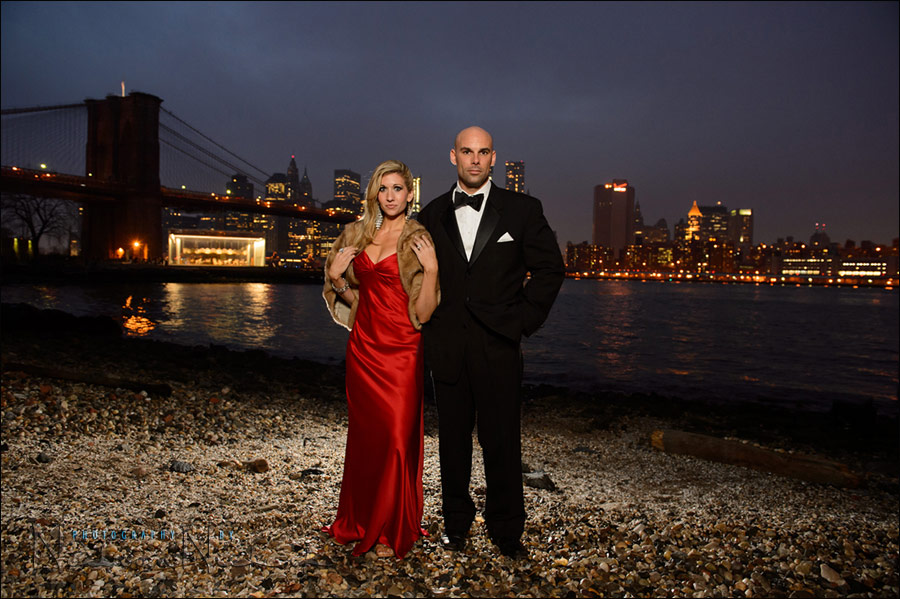
The image at the top, was shot last, with the Manhattan Bridge as the background.
This is the only image shown here which was shot with the longer zoom, Nikon 70-200mm f2.8 AF-S VR II (affiliate). All other images were shot with the Nikon 24-70mm f2.8G AF-S (affiliate).
camera settings for the image at the top:
1/15 @ f/4 @ 800 ISO; flash not gelled.
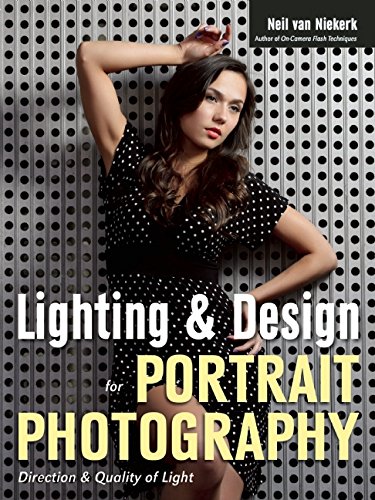
Lighting & Design for Portrait Photography
Lighting & Design is a follow-up of sorts to Direction & Quality of Light. It’s a slightly eclectic mix, discussing the thought-process with various scenarios shooting portraits. The examples use available light, bounce flash, off-camera flash as well as studio lighting.
The idea is that in every one of the 60 sections, there is something to be learnt and applied, regardless of your level as a photographer or where you shoot – all shaped to form a cohesive narrative arc throughout the book.
You can either purchase a copy via Amazon USA or Amazon UK. The book will also available on the Apple iBook Store, and Amazon Kindle.
Photo gear (or equivalents) used during this photo session
- Nikon D4
- Nikon 24-70mm f2.8G AF-S / Canon 24-70mm f/2.8L II
- Nikon SB-910 Speedlight controlled by PocketWizard FlexTT5 & AC3 Controller
or alternately, the Canon 600EX-RT Speedlite controlled by Canon ST-E3 Transmitter - Lastolite EZYBOX 24×24″ softbox
- Manfrotto 1051BAC light-stand for rim-light flash;
- the taller Manfrotto 1004BAC for the softbox.
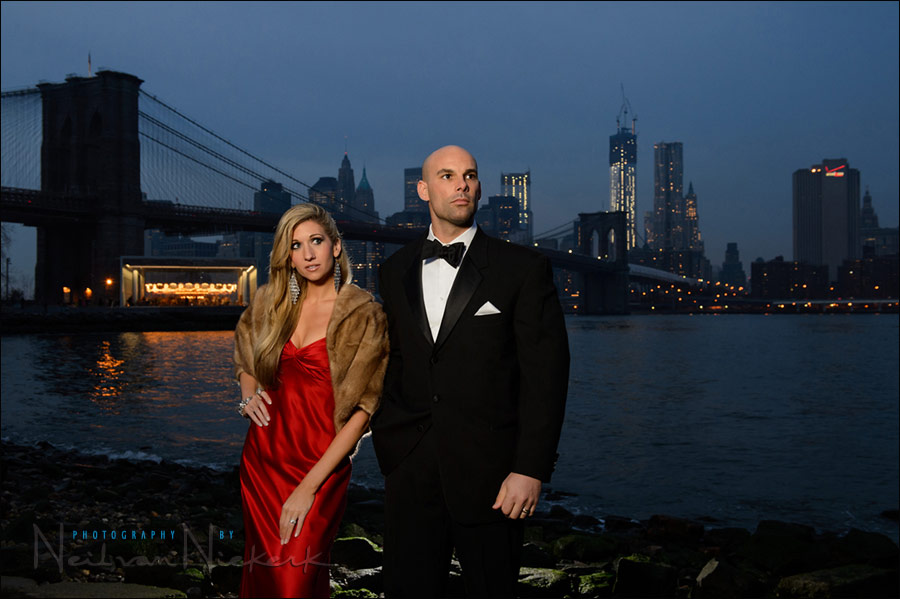
camera settings: 1/60 @ f/5.6 @ 800 ISO; flash not gelled
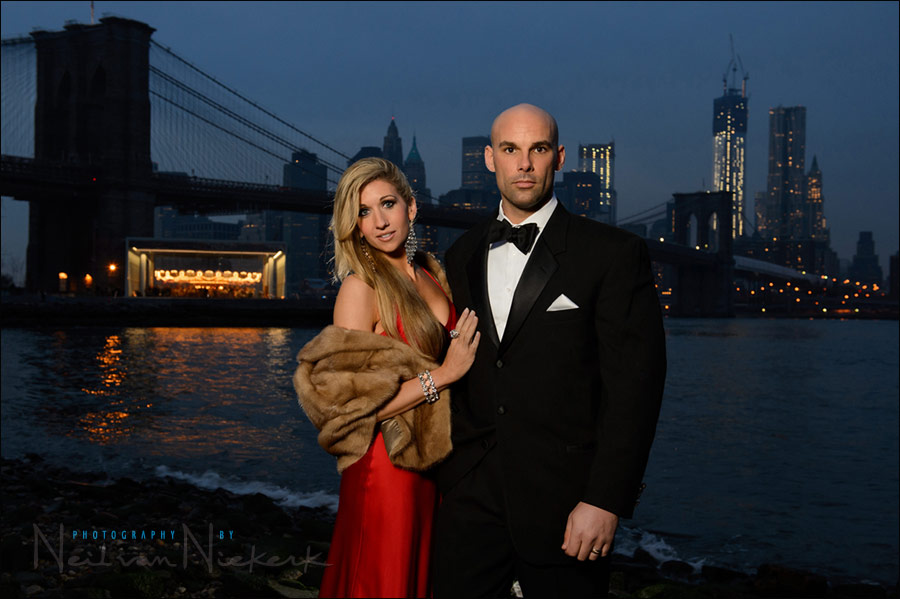
camera settings: 1/30 @ f/5.6 @ 800 ISO
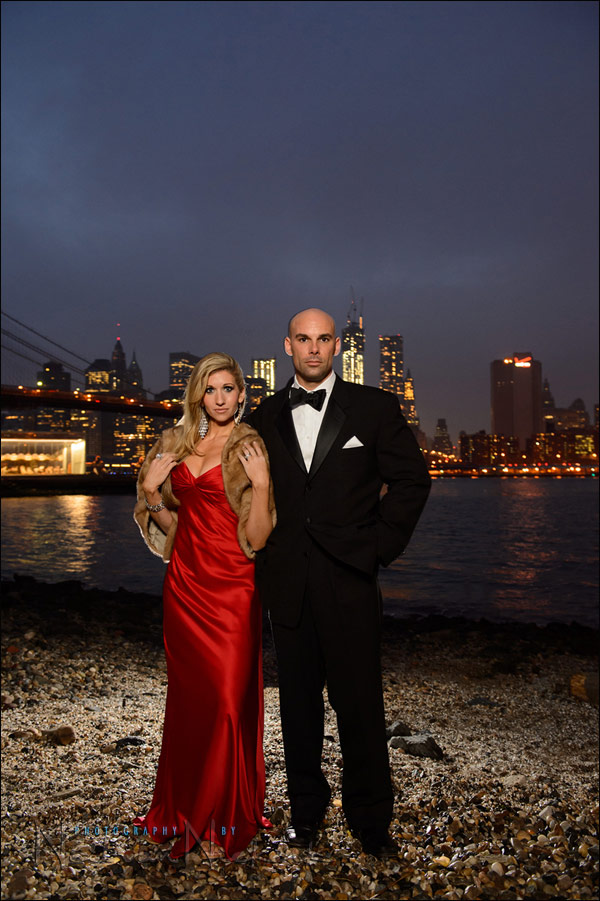
camera settings: 1/50 @ f/5.6 @ 800 ISO
camera settings: 1/50 @ f/5.6 @ 800 ISO
camera settings: 1/13 @ f/4 @ 800 ISO; flash not gelled.
camera settings: 1/13 @ f/4 @ 800 ISO
camera settings: 1/13 @ f/4 @ 800 ISO

One of the very first images we shot as a test, is this one. I do like the way the pebbled shoreline of the East River showed up with the flash behind them. I worked the image a bit though.
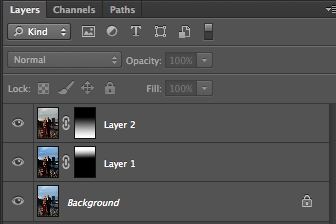
The comparison below shows the straight JPG-from-RAW file, on the left. The right-hand photo is the image at the top as I edited it. The edited image consists of a combination of 3 versions of the photo, that I very quickly combined in Photoshop using the gradient tool.

thanx for the post! if u did this again would u use iso 1600 with a faster shutterspeed or were the shots still sharp due to the flash “Freeze”.
I could’ve shot at 1600 ISO, but was comfortable here that flash would freeze the action.
I’ll post one of the images where my camera moved, and you can see the background blur, but the couple is crisply sharp … except for softness on the edges of their body and face, where the ambient smear moved into the flash-frozen part of the image.
Here is a crop of one photograph where I moved the camera accidentally during exposure. As you can see they look crisp enough, while the background shows blur.
Neil vN
Neil, one thing I’ve always wondered about your location shoots – how do you control the crowds? Aren’t there people milling about that intrude on your shots?
Great article (as usual)!
Question about using gradients to combine photos…I have never heard of this before. Can you point me in the direction of a tutorial on your blog by chance?
Neil, why did you use a plastic diffuser on the rim light? As you mentioned you don’t want to light alot of the stones – and rimlight from that angle is hard, isn’t it?
Terrific work, Neil, nicely crafted light. The Speedlites have really opened up so many possibilities. When I was last in New York I went to Hoboken (because Sinatra was born there) and thought I could find a location looking back at the City rather like yours. Of course, the river is pretty wide there and I should have gone to the other side of Manhattan for my tourist photos. Could you tell me where you took the shots on the shoreline please? I’ll try to get there if I ever make it to New York again (I would live there if I could afford it, it’s my favourite city)
Awesome as per usual…curious though how do you think the exposure would have looked using 2nd curtain? The reason I ask I might actually end up having to do something like this for a client (not my typical thing-but client is king right) and i would like for the water to be a little “smoother”, thinking too i’d use an ND filter – i would be using a tripod for this. Any feedback from either yourself or others for that matter would be appreciated.
Thanx.
Hi Neil, awesome work as usual. I wanted to ask you how do you mount your speedlight on the flex TT5 on the Lastolite Ezybox, I have heard that this softbox don’t fit that setup? And for triggering the flash you should use a sync cord and only fire it manually loosing the advantage of the AC3 controller for controlling the output from the camera.
I Ma interest in buying this softbox but I haven’t because of that. Any advice I will appreciate it.
Thanks for your educational posts!!!
Mauricio
Beautiful work.
Charles, that’s a nabe in Brooklyn called Dumbo (Down Under Manhattan Bridge Overpass). It’s btw the Brooklyn and Manhattan Bridges.
The setup of your lighting really made this photo spectacular. The rim light created a perfect separation of the subjects and background giving a real 3D appearance. Very nice.
When i saw the first photo I first thought that the rim of the fur of the lady’s right arm was a horrendous photoshop job. But then I understood that it was the fluffiness of the fur that was lit up through an off camera flash. Not that this helps in any way, but I just thought I’d share. Maybe I am the only one who had that thought.
The images are awesome. Why did you choose not to gel the flashes. My first instinct would have been to gel the flashes. My first question probably should have been about the white balance setting.
Hi Niel,
You mentioned that your speedlites were manually controlled via the Pocket Wizard AC3 zone controller, set to manual mode I suppose. Could you tell me what you set your speedlites to; (manual, TTL etc)? And if you set them to manual, at what power setting would you start out with? Do the in-camera commander settings have any effect over the results using pocket wizards, if so, what should I set them to?
Many thanks, Bernard.
Don’t get me wrong–these look great. I just think ISO 1600 with a stop faster shutterspeed would have been a better choice. Why risk movement blur when you don’t really have to ?
Hi Niel,
Fantastic shots! What focal length are you using? If you shot below 50mm, how do get around the distortion issue?
Suraj
Durban, South Africa.
Great shots!!
I’m still amazed how you would be able to steady your shots with such low shutter speed. I wonder why you didn’t use larger aperture to decrease iso though.
How big are the prints?
Regards,
Agung, Bali