recap: photography workshop – New Jersey and NYC
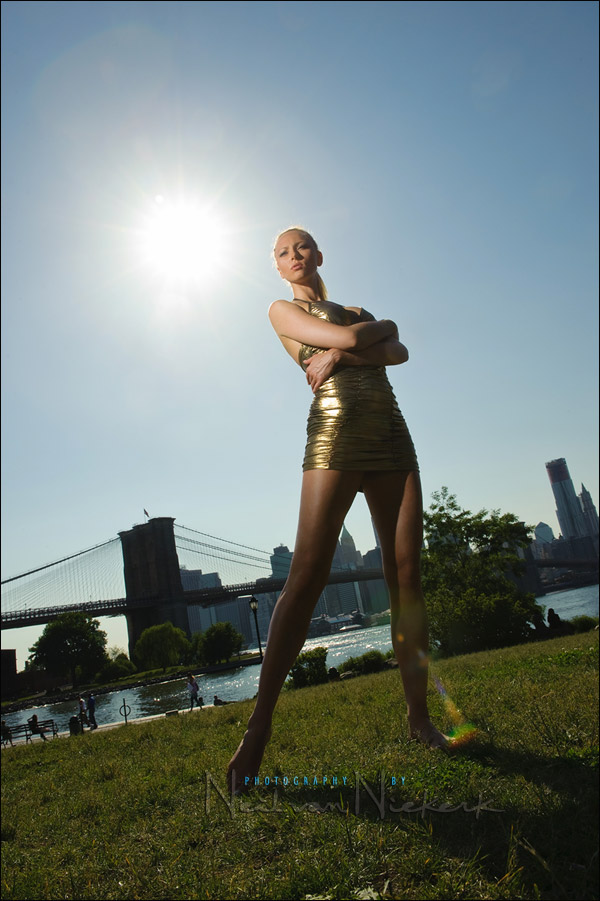
Aleona was one of our striking models at the recent 2-day long flash photography workshop held in Jersey City and New York City. The setting in this photo is the DUMBO area of Brooklyn, with Manhattan in the background. The challenge was to overcome the hard sunlight with a small speedlight … and still make it look good.
The flash photography workshops have undergone certain changes over time – the material and sequence of material are always honed over time. The biggest recent change is that the workshop has expanded with an optional 2nd day where we play around further with on-location lighting. The first day is still the intensive workshop – the combination of seminar and practical sessions where we cover everything thoroughly. The first day takes place in a hotel in Jersey City with a magnificent view of Manhattan.
The second day is where we have fun, and walk around with two models, and try different backgrounds and lighting scenarios while we apply what we learnt during the first day’s intensive 10 hour workshop.
Thank you to everyone who attended and made it a success. And a big thank you to our four models.
Two more images from the workshop:


Photography workshops
- More info about upcoming photography workshops.
- Recap of previous photography workshops.
Guys! You’ve gotta attend Neil’s workshop in person. I have photographing weddings for 6 years and read all Neil’s material online. It somehow just put everything together nicely for me after the workshop at Jersey City this time! It’s definitely worth it!
Neil,
sou naturalizado Brasileiro.
meu trabalho evolui muito…deste o dia que comecei a fazer visitas no seu site. Aprendi muito com suas ótimas dicas.
Uma pergunta; “a primeira foto foi feita a medição no centro do céu”?
Meu muito obrigado!
Abraços
Hi there Ricardo .. You’re going to have to help me then. I can’t speak Portugese. I have to rely on Google’s translation. But since you’re a naturalized Brazilian, I assume you can speak / write in English? That’d be a help. ;)
My settings were: 1/250th @ f22 @ 100 ISO
camera and lens: Nikon D3; Nikon 24-70mm f2.8 AF-S
I didn’t specifically meter off any part of the sky. Based on the Sunny 16 Rule, I knew I needed a small aperture of f16 … or smaller for the bright light. I set the speedlight to full power in manual. At that distance it gave me f22 for 100 ISO. I knew that would give me a dramatic effect, with Manhattan as a silhouette.
Neil,
Striking photograph of a very striking model. Was that small speedlight on a stand? Handheld by an assistant? Fired directly or shot into an umbrella? Or have I learned enough to work it out for myself? Perhaps if you had all of the equipment with you, you would experiment until you got the result you wanted?
I can’t believe you manage to find time to post every day. But we all owe you a big thanks. John
John .. it is bare flash from an off-camera speedlight.
Everyone in the workshop took turns in figuring out the settings, and holding the light, and getting to a final set of images that work well.
Here is a photo I snapped with my iPhone to upload to Facebook. This is from a little earlier when we were still right at the river’s edge. The image at the top of this post was taken when we had moved up the grassy hill for a higher viewpoint.
But we used the same equipment – a speedlight on a monopod, triggered with a pocketwizard. The frame you see there is the speedring on which we had attached a softbox earlier on in the day. (Here is a listing of some of the equipment used.)
Thanks for the swift response, Neil. Everything makes so much sense – love the iPhone shot. I also like the small amount of flare. It’s practically unavoidable so why do anything about it? The shot looks all the more natural with it.
Can you give a little 411 on how you got your settings for the featured image of this tangent? DId you spot meter your sky to get an underexposed F-stop setting based on 1/250?…. and then how did you get the settings on your speedlight?
SORRY SORRY… I overlooked your explanation you already gave…. :)
You need to concentrate there in the back of the class! ;)
Great shot Neil. Love the lighting on her face.
One question on using small apertures (f22). At some point diffraction issues will become noticable, especially on high pixel density sensors (7D or 50D come to mind). Do you have any comment on how this might affect the IQ on larger prints, or do you not worry about it (I realise you are not using the above cameras). From my perspective, diffraction becomes noticable on my 7D at about f11 when viewed at 100%, but I usually don’t worry about it as I tend not to print that equivalent size in reality (around 11×17 at 300ppi).
Anthony, I do see lesser image quality when I shoot at f22 compared to how sharp images are at f8
However, in this case the small aperture is forced on me by a combination of:
– very bright ambient light,
– the limitation of max flash sync speed.
I could go to high-speed flash sync, but I would need additional flashguns to overcome the reduction in flash power. And I don’t have a flash tree like Joe McNally. Not yet.