Tangents

photography tutorials, reviews & workshops

tangents photography blog
learn : discuss : share
  • Tangents
  • Tutorials
    • Flash Photography
    • Wedding Photography
    • Studio Photography
    • Posing People
    • Understanding Your Camera
    • Exposure metering
    • BFT
    • Best Photo Books
  • Reviews
    • Sony
    • Nikon
    • Canon
    • Fuji
    • Profoto
    • lighting gear
  • Workshops
    • Info: Workshops
    • In-person
      tutoring sessions
    • Online
      tutoring sessions
    • Workshops in
      New Jersey (NJ)
    • Workshops in
      New York (NYC)
    • Photo walks in NYC
    • Studio Workshop
    • Video tutorials
    • Workshop results
  • Books
    • On-Camera Flash (revised ed.)
    • Direction & Quality of Light
    • Off-Camera Flash Photography
    • Lighting & Design
    • On-Camera Flash (1st ed.)
  • Projects
    • Two Perspectives
    • B&W Infrared
    • Vintage lenses
    • Time-lapse photography
  • Info
    • About
    • Contact
    • My Photo Gear
    • Books by NvN
    • Join us on Facebook
    • Acclaim
    • Success Stories

pin-up photography

September 23, 2010 Neil vN 21 Comments

pin-up photography – white on white

I had the great pleasure last night of attending a meeting by the Hudson Valley Click – a lighting and photography group in the Hudson Valley area of NY. The motive behind their meetings and photo shoots is to bring photographers, models, makeup artists, hairstylists and fashion designers together on monthly themed events. All designed for learning and portfolio building.

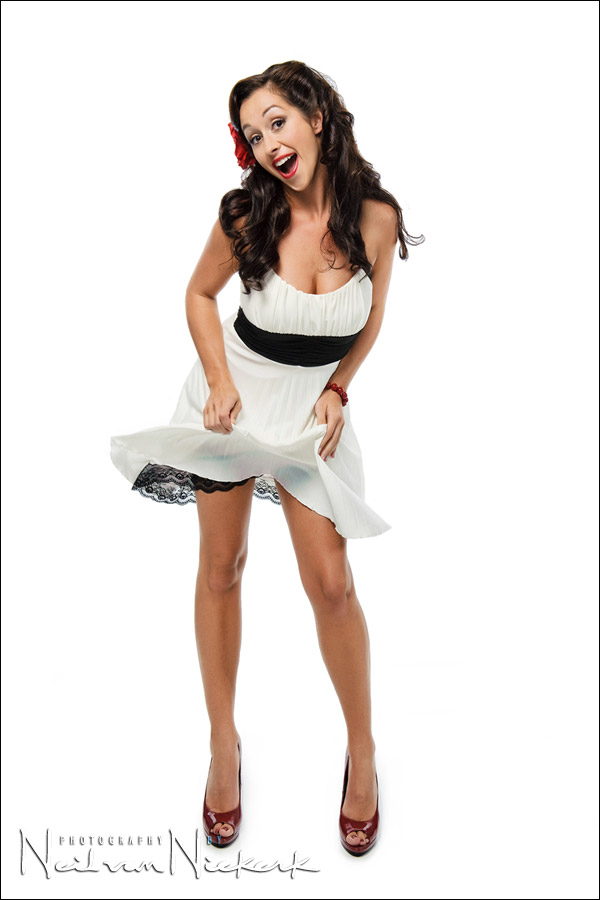
My friend Peter Salo invited me to the 50’s style pin-up photography session that was held last night in Sandy O’Shea’s studio.  (Sandy, thanks for allowing us to create havoc.)  There were four models, and there were make-up artists and hair stylists.

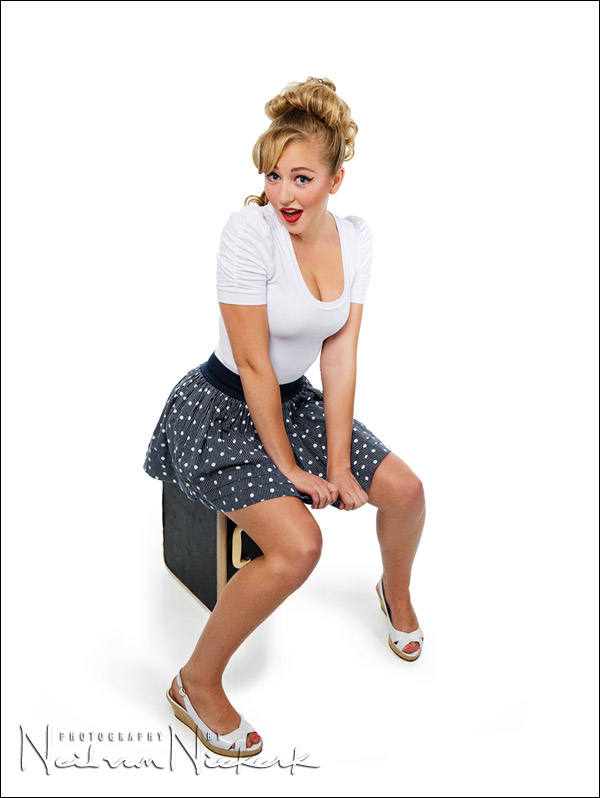
Along with the photos of two of the models shown here, there is also this pull-back shot of how I set up the lighting for these images …

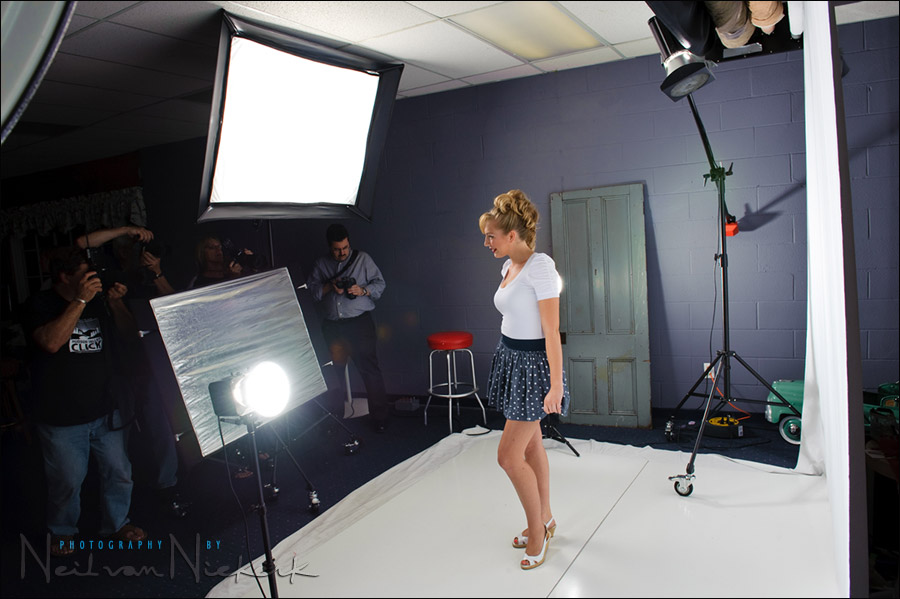
The lighting was quite similar to how I had set up the lighting for the recent pinup photo sessions with my assistant Jessica .. except for the addition of the reflector in front of the photographer.  The idea here was to create as even light as possible on our models, with the 3×4 softbox above the photographer. Two Alien Bee units pushed light onto the white background. They were feathered out slightly so that there wasn’t any direct light on the model.  That’s it … three lights and a reflector.  The softbox is a Larson softbox I think, but I can’t remember what the main flash unit was.

camera settings: 1/160 @ f10 @ 200 ISO
lens: 24-70mm f2.8

The post-processing of the images is very similar to the post-processing for portraits that I showed in a previous article.  I did mask out the background in both the images shown here with the Quick Selection Tool. I then erased the background selectively so that a layer of white underneath would be the background in the final images.

Thank you again to Nuby and Peter and Sandy for hosting this event.  Great times!  If you are in the Hudson Valley, NY area, do check their schedule out.

Filed Under: flash photography, Hudson Valley Click, photo shoot, pinup photography, studio photography Tagged With: pin-up photography, pinup photography


Help support this website

If you find these articles of value, please help support this website by using these B&H and Amazon affiliate links to order your photo gear.

I also offer photography workshops and tutoring sessions, whether in person, or via online video tutoring sessions.

Please follow me on Instagram for more.

You can also join our thriving photo community in the Tangents group on Facebook, where we show our photos and discuss all things photography.

Thank you,

Neil vN

Books by Neil van Niekerk


21 Comments, Add Your Own

  1. 1Robbie Pallasch says

    September 23, 2010 at 2:44 pm

    Great event idea and splendid photography!

    Reply
  2. 2Danté Bell says

    September 23, 2010 at 10:00 pm

    Hi Neil,

    I’m curious about shooting the model with the white sweater against the white background. Do you think the dark walls of the studio helped in making more definition of the white-on-white? I think I’ve seen this with black standups on both sides of the model.

    Thanks! Danté

    Reply
  3. 3Neil vN says

    September 23, 2010 at 10:15 pm

    Dante .. that most likely did have an effect as a way of subtracting light like you mention.

    Neil vN

    Reply
  4. 4Derek Johnson says

    September 23, 2010 at 10:18 pm

    Hello Neil,

    I continue to be amazed at how you utilize so little space yet seemingly get no flare or spill on the model from the background lights. Is it good lighting ratio between model light and background light or is it a lens that doesn’t flare as much. Another stupid question – For the full length shots did you have to move the reflector from in front?

    Thanks again for all you do.

    Reply
  5. 5Neil vN says

    September 23, 2010 at 10:35 pm

    Derek, I set the background lights so that the histogram was right on the edge for the white background. In a few places the blinking highlights showed. So it is right on the edge of blowing out completely, but not so bright that will will cause much flare.

    The Nikon 24-70mmm f2.8 is quite flare resistant anyway. (When it does flare though, it looks quite ugly. It doesn’t give a pleasant flare pattern or shapes.)

    For the full-length shot, I did drop the reflector lower.

    Neil vN

    Reply
  6. 6Duncan Stott says

    September 24, 2010 at 7:40 am

    Neil,

    Any chance that you could explain a little more as to how you created such an even white background with your PP method?
    When i do these similar set-up shots i always seem to suffer from hot spots on the background and an almost too obvious amount of light fall-off, especially around the feet.

    Cheers,

    Duncan.

    Reply
  7. 7Neil vN says

    September 24, 2010 at 8:30 am

    Duncan, as mentioned in the text, I used the Quick Selection Tool in Photoshop to select the brightest parts of the image. I then erased it so that it was transparent in those areas .. ie, the background. I did have to take my time brushing back the edges or anywhere the Quick Selection Tool selected areas of my subject.

    Then I created another layer that I filled with pure white. This then becomes the background.

    ie, except for the bit of shade around her feet, the entire background is created in Photoshop with an extra layer underneath the transparent areas.

    Neil vN

    Reply
  8. 8Rob Dunbar says

    September 24, 2010 at 8:40 am

    I too am amazed that there is no spill onto the model from the white background.

    Reply
  9. 9Briand says

    September 24, 2010 at 9:09 am

    it’s wonderful how you can make this whole white image in a very small space.

    it’s very hard for me to get a decent clean image like this in my 4x4m studio. i always get light spilling from the bg to my subject.

    this is very inspiring, im gonna have to try this again.

    thanx for sharing

    Reply
  10. 10Peter Salo says

    September 24, 2010 at 1:06 pm

    Hey Neil, That was lots of fun and it was great to have you at our shoot out. Your advice is always welcome and I hope you can make it to some of our other upcoming events.

    Thanks for helping me and so many others to become better photographers!

    A whole bunch of us are looking forward to your “On-Camera Flash” presentation at the Talent Exchange Program on Nov. 8th at the Hudson Valley Professional Photographers of New York in Newburgh, NY. *FYI to Neil’s readers – The program is open to all, so if your in the area…

    BTW – Nice pin-up shots! :)

    Reply
  11. 11Tom K. says

    September 24, 2010 at 1:11 pm

    I have been a big fan of white backgrounds since the Richard Avadon days. Your work here is tremendous.

    Reply
  12. 12Neil vN says

    September 24, 2010 at 3:39 pm

    Tom, thanks! But the big difference is that the white background here is created / enhanced in Photoshop.

    Neil vN

    Reply
  13. 13Renata Brittes says

    September 24, 2010 at 7:57 pm

    Hi, love your tips!

    Could tell us more how did you mask out the background?

    Thanks!

    Reply
  14. 14Neil vN says

    September 26, 2010 at 11:33 pm

    Renata … as mentioned, I used the Quick Selection Tool in Photoshop to select the brightest areas, ie, the background. I then erased this.

    But it did mean I had to use the History Brush, and also bring in some detail from the duplicate later beneath that one, to bring back the detail on the edges. It does take time.

    Neil vN

    Reply
  15. 15Budi says

    October 3, 2010 at 1:42 pm

    Hi Neil,

    I am wondering how do you make the colors pop out of the white backround. Whenever I shoot a model on a white background, I just can’t seem to get the model to pop out. I see that your pictures here has got some 3d effect to it.
    If you can, please help us by elaborating a bit about the pp process other than the skin retouching. Thanks

    Reply
  16. 16Neil vN says

    November 5, 2010 at 1:35 am

    Budi .. here is the description of my Photoshop retouching techniques.

    Neil vN

    Reply
  17. 17Hisham/Egypt says

    March 9, 2011 at 5:00 pm

    Hi Neil, I am newbie, reading a lot through your site. Question pls:

    camera settings: 1/160 @ f10 @ 200 ISO
    lens: 24-70mm f2.8

    f10 is aperture of Camera, but f2.8 aperture of Lens, when the lens fixed on camera, and shooting through two different apertures (like here), how the camera supposed to see? or does the camera unite the f stop for both?

    Then .. is “pin-up photography” is what called “high key photography”?

    Reply
  18. 18Neil vN says

    March 12, 2011 at 1:42 pm

    Hisham … even though you’ve set f10 and the camera meters for f10, it will remain at f2.8 viewing aperture until the moment the shutter is tripped. This is called ‘open-aperture metering’.

    The style here, pin-up photography, has more to do with the posing and make-up and styling, rather than the specific lighting technique.

    Reply
  19. 19Kirk says

    November 11, 2011 at 5:11 am

    Just “LOVE” the pose and jester on your first image. Love it.

    Reply
  20. 20Angelo says

    April 7, 2012 at 5:50 pm

    Hi Neil

    In the pull back shot, your model is standing on a sheet or flat board, white in color.
    Can you please indicate what this is, purpose and where to purchase.

    Cheers

    Angelo
    Australia

    Reply
  21. 21Neil vN says

    April 7, 2012 at 5:57 pm

    White plexiglass so that the area under her is reflective.

    Neil vN

    Reply

Leave a Reply Cancel reply

Your email address will not be published. Required fields are marked *

categories

Articles & Tutorials

  • • About myself & this site
    • Books by Neil vN
    • Best photography books
    • Black foamie thing
    • Photographers’ success stories
  • • Flash Photography Techniques
    • Natural looking flash
    • Flash + Ambient light
    • Dragging the shutter
    • Bouncing your flash
    • On-camera flash outdoors
    • Exposure metering
    • Flash exposure compensation
    • Bounce flash examples
    • Which is the best flashgun?
    • Flash brackets
    • Off-camera flash photography
    • Flash photography basics
    • Using video lights
    • Flash photography tips
  • • Photography workshops NJ / NYC
    • Models @ photography workshops
tutorials:
flash photography
Photography
Workshops

All rights reserved. Copyright © Neil van Niekerk 2025 · Customization by The Traveling Designer

Copyright © 2025 · NvN on Genesis Framework · WordPress · Log in