
taking photos in hard sunlight / mid-day sun
A recent post on using off-camera flash, the question came up about how I work when I’m on my own and don’t have an assistant holding up a softbox. Using off-camera lighting does make your options easier in how you position your subject, since it is much easier to have great portrait lighting on your subject. By adding light to your subject with the flash & softbox combination, you have the freedom to be less concerned about perfect light on your subject.
When I work on my own, I approach things differently. I now have to not only consider how I place my subjects in relation to the background, but also consistently look at the light on my subject.
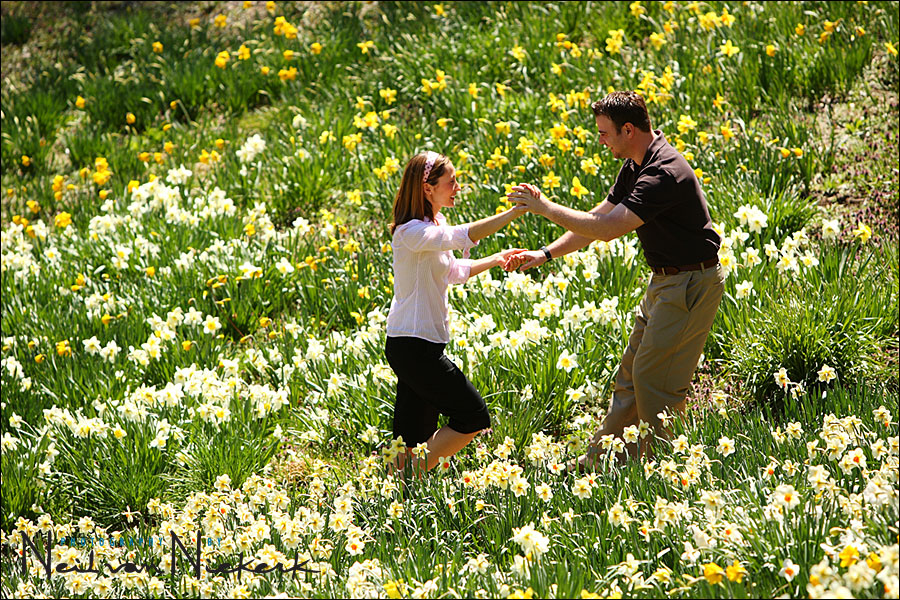
With an on-location portrait shoot a while back, the session was for 1:30 – 3pm while the sun was overhead. And from experience we all know that with the sun overhead that it isn’t the most ideal conditions to take photos under, especially portraits ..You may well wonder why I had scheduled a photo session for that time of day. It was all due to a misunderstanding between myself and my client – she was under the impression that we needed bright sunlight, and I was under the impression this was the only time they were available for the photo session on the day. When I arrived at the gardens of the estate, my heart sank … the sun was harsh, with very little place to hide from the sun. But I had to do better than just cope, and come up with great photographs for my clients in less-than-ideal light.
It just meant I had to work harder in how I positioned them for the photos. I usually take particular care about the backgrounds in my images, but I am also particular about having even and flattering light on my subject’s faces. The simplest approach here is to have your subject turn their backs to the sun, and have even (shaded) light on their face, and if possible, find some way to shield the hard sun falling on them.
It does imply that I let go of some scenes which would’ve made great images on other occasions –
– either with softer available light (whether shooting later in the day. (Much earlier in the day isn’t an option for a night-owl like me),
– or by using additional off-camera lighting.
But not this time. I had to deal with hard sunlight and as mentioned, I had to find interesting or neutral backgrounds, and then place my subject in relation to that … and still make sure the available light falling on them is flattering.
With the sun high up like that, and to their backs, it does give a rim-light effect. In this case though, it isn’t a subtle effect, and does mean that certain parts (shoulders and top of their heads) will be blown out. But I can accept that as long as the light falling on their faces looks good. In the image at the top, I did use some of the dappled light from the blossoming trees to help break the light falling on them from above. But I also had them lean slightly forward to help reduce the amount of direct sunlight falling on their shoulders and the top of their heads.
I do use a touch of fill-flash often in situations like this, using direct flash but dialing my TTL flash exposure down to around -3EV (or maybe as low as -5EV with the Nikon SB-900 speedlight.)
It might be a simple approach, but it is harder work than using off-camera lighting to help you out in this case.
Hi Neil, great work again.If I may ask, how far were you from your subjects in such harsh conditions?
I almost don’t go anywhere without a speed light and softbox/umbrella for this very reason – I need to have control over the light. I am terrified to leave home without light now when I shoot portraits :-) I don’t know what I’d do if I had to shoot them with just available light. Apparently it can be done though :-)
Hi Neil,
Thanks for sharing. I always have big problem when dealing with fill flash outdoor under bright sunlight. Given the first photo above, I wonder if you were going above max sync speed. The shallow DOF told me it was wide open. But you did say there was a little fill flash. Could you elaborate more on this point?
JK
JK .. when I use flash only as fill, then I don’t hesitate in going over max sync speed (into HSS mode) when I want a shallower depth of field. It is only when I want the most efficiency from my flash that I keep to max sync speed.
Neil, I am curious also, do you use reflectors at all ? in the blossom pic above, if you placed them facing away from the sunlight as you did but put a big white reflector on the floor in of them and had them lean as you did would you not get a similar result ? – loving your book by the way – arrived from amazon uk last week
dp
Hi Neil, I had this happen to me near the end of Summer. My client wanted beach shots but could only make it at 1:00 pm on a Saturday because this was the only time her daughter was home. Wow, was the light strong. I wound up using two SB800’s on stands and crosslighting them. I underexposed the ambient by two stops and it worked well. But I also work alone a great deal and rely heavily on off-camera flash.
Thanks for the great work and posting. I frequent your site and enjoy your work.
Bob
Years ago, with my film camera’s, I only used the standard lightmeter. The manual mode was the only available preset. Sinds moving to digital the camere is on auto all the time. Thanks showing me the way again to manual. So much more possiblity’s!
My camera is on M 98% of the time now. The other 2% for shots where I have to be very quick. Like grabbing the camera and shooting that deer wich is crossing my way. Learming a lot from your site. Wedding photographers are so underestimated in Holland.
Robert
Hey Neil,
It was great seeing you at the Photo expo on Saturday. Thanks for your amazing blog!
Koitz
Hi Neil,
I have just found your site and what a great site it is, My question is, would you ever consider using flash diffusers outdoors when you are working alone? I have heard so much about the Gary Fong diffusers but many photographers say using diffusers outdoors is a waste of time. Just wondered what your thoughts about this are.
many thanks
Phil.