Tangents

photography tutorials, reviews & workshops

tangents photography blog
learn : discuss : share
  • Tangents
  • Tutorials
    • Flash Photography
    • Wedding Photography
    • Studio Photography
    • Posing People
    • Understanding Your Camera
    • Exposure metering
    • BFT
    • Best Photo Books
  • Reviews
    • Sony
    • Nikon
    • Canon
    • Fuji
    • Profoto
    • lighting gear
  • Workshops
    • Info: Workshops
    • In-person
      tutoring sessions
    • Online
      tutoring sessions
    • Workshops in
      New Jersey (NJ)
    • Workshops in
      New York (NYC)
    • Photo walks in NYC
    • Studio Workshop
    • Video tutorials
    • Workshop results
  • Books
    • On-Camera Flash (revised ed.)
    • Direction & Quality of Light
    • Off-Camera Flash Photography
    • Lighting & Design
    • On-Camera Flash (1st ed.)
  • Projects
    • Two Perspectives
    • B&W Infrared
    • Vintage lenses
    • Time-lapse photography
  • Info
    • About
    • Contact
    • My Photo Gear
    • Books by NvN
    • Join us on Facebook
    • Acclaim
    • Success Stories

when your flash fails to fire ..

August 27, 2009 Neil vN 22 Comments


[ click on the image to see a larger version ]

What do you do with an image that is under-exposed but there is a certain moment that you love?

Well, perhaps you get lucky that when you convert it to B&W and crank up the exposure and embrace the noise / digital grain … and all this adds to the mood and in this case even poignancy of the moment.

Here is the original unedited image of the bride dancing with her dad …

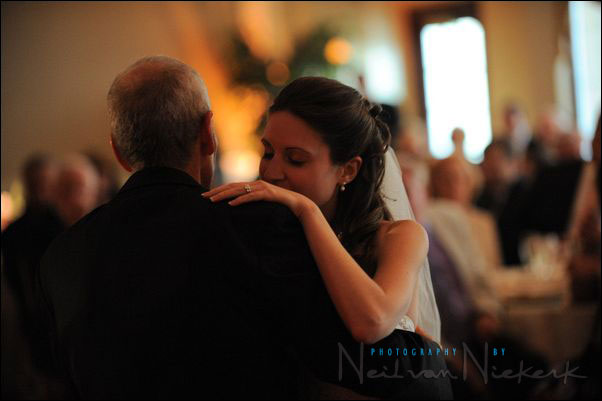
I was shooting a little too fast for my flash to keep up, and got the occasional under-exposed frame when the flash didn’t fire.  As I often do, I try to keep the ambient light 2 stops or so under, and then use TTL  flash to bring up the exposure on my subject.

Even though I did get lucky here, I did help it in my favor by how I position myself in relation to my subject and the background.  I do try to place myself so that I can use some background light to give a sense of place, and help giving the image depth as well.  Doing so helped here in creating a lighter background when I pulled up the exposure by 2 stops to give “correct exposure” on the image.  With the background now blowing out, it gives an ethereal look to the image, which for me, enhances it.

For us gear-heads:
Nikon D3;   70-200mm f2.8 AF-S
1/60th @ f2.8 @ 2500 ISO

At such a high ISO, under-exposed by two stops .. the digital grain / noise will be there.  But really, the noise?  Does anyone even notice the noise here?  Look at the photograph again … and feel it instead. The mood and the moment. It’s all there.

Filed Under: digital imaging, flash photography, Uncategorized, wedding photography


Help support this website

If you find these articles of value, please help support this website by using these B&H and Amazon affiliate links to order your photo gear.

I also offer photography workshops and tutoring sessions, whether in person, or via online video tutoring sessions.

Please follow me on Instagram for more.

You can also join our thriving photo community in the Tangents group on Facebook, where we show our photos and discuss all things photography.

Thank you,

Neil vN

Books by Neil van Niekerk


22 Comments, Add Your Own

  1. 1Diana says

    August 28, 2009 at 4:27 am

    Neil,

    Photo is magnificent! Just out of curiosity, were you using the Nikon SD-9 pack or maybe the Quantum Turbo SC with your flash? I know you’ve used both. Do you notice a difference between the two? Can you clip the Quantum to your belt?

    Many thanks,
    Diana

    Reply
  2. 2Neil says

    August 28, 2009 at 5:09 am

    Diana .. I have both the Nikon SD-9 battery pack and Quantum SC, (B&H). This time I used the SD-9 since I have problems at times with the Quantum staying connected with the speedlight. It seems like the speedlight and Quantum don’t see each other at times, and then the speedlight only charges from the 4 AA batteries on-board.

    You can clip the SC to your belt, and it is probably easier to carry it like that.

    Neil vN

    Reply
  3. 3Andrew says

    August 28, 2009 at 5:38 am

    I agree, great image. Interestingly, if I’ve read your post right it sounds like you’ve gone from the background being ~2 stops under to being (at a guess) ~1 – 1.5 stops over. It would be interesting to see one of the shots where the flash did fire to compare the two effects.

    Great shot – definite accidental keeper!

    Reply
  4. 4Neil says

    August 28, 2009 at 6:27 am

    Andrew, in this case I was referring to my subject being around 2 stops under-exposed. Not my background. With a background that varies so much in brightness comparing the window areas and areas where people are seated, it just doesn’t make much sense to talk so specifically about the background brightness.

    Here is a comparative image where the flash did fire, and the photo came out exactly like I wanted. The groom dancing with his mom ..

    Neil vN

    Reply
  5. 5Martin Burri says

    August 28, 2009 at 7:08 am

    It seems that you use quite often the 70-200 f/2.8 AF-S. I had the opportunity to rent the lens for 3 days about two weeks ago. And I really felt in love with that lens (as far as one can love material ;-)). Funny enough to mention here, I had a stage shooting with very low light conditions and encountered about the same problem that some images were underexposed by a stop or two. And I came to the same solution to go black and white. It’s impressing how well b&w images can go away with fairly high ISO noise.

    Reply
  6. 6Neil says

    August 28, 2009 at 8:31 am

    Martin, I think the 70-200mm f2.8 lens, whether the Nikon lens, or the Canon lens, is an essential optic for pretty much any kind of photography.

    Neil vN

    Reply
  7. 7Mac Swift says

    August 28, 2009 at 10:25 am

    I think the only people that fret about noise are pixel peeping photographers – the rest of the world doesn’t notice or doesn’t care. I too would like to see the next frame where the flash did fire.

    Reply
  8. 8Daniel says

    August 28, 2009 at 12:36 pm

    I find that the resort to B&W is also great when you’ve really OVER-exposed a photo, and can’t get much of it back even from a RAW format file. Using Aperture, you can recover highlights and save enough of the detail to make some really impressive photos.

    For ppl like Mac Swift, I guess you haven’t considered making large prints to sizes like 24×36 and up. Dialing back the noise can make a BIG difference in perceived quality. The Noiseware plugin by Imagenomic has saved my butt any number of times for large prints, and small. Their Portraiture plugin can do amazing thing for model shoots, and if you actually want more grain, their RealGrain plugin can emulate just about every one of ppl’s fav. film types.

    Neil, I know post-processing isn’t one of your favorite things. I, too, try to get it right straight from the camera, but I find the extra nudge you can get from these processes makes the world of difference when you want to save that perfect photo, or get artistic and take some to extremes.

    Reply
  9. 9Neil says

    August 28, 2009 at 12:47 pm

    Daniel .. thanks! I do agree that if you need it, that plug-ins like Noiseware, Noise Ninja or Neat Image can make all the difference.

    But where did you get the idea that I’m averse to post-processing? :)

    Neil vN

    Reply
  10. 10Andrew says

    August 28, 2009 at 1:04 pm

    Nice save, and the picture really works well in B&W. No, I didn’t notice the grain until you asked if I noticed the grain.

    Reply
  11. 11Mark Andrew Higgins says

    August 28, 2009 at 1:49 pm

    You can feel the moment and I think it works better in B&W. Who gives a crap about the noise. Your clients aren’t going to care and they are the ones with the check book. It’s a timeless shot and it would look beautiful printed and matted with a plain black frame. That’s just me.

    Reply
  12. 12Stephen says

    August 28, 2009 at 2:36 pm

    Neil,
    Nice B&W conversion!

    Although, I have to agree with Andrew that I initially read “ambient light 2 stops under” as the background being 2 stops under (with the subject being even more underexposed). Is “ambient light exposure” always referring to the exposure of the subject?

    Reply
  13. 13Neil says

    August 28, 2009 at 3:01 pm

    “Is “ambient light exposure” always referring to the exposure of the subject?”

    I would say yes.
    Pretty much every time you refer to the ambient exposure, you’re referring to the light on your subject.

    But this again is one of those things where I would suggest not turning it into a Rule Of Photography. Just make it work. :)

    Neil vN

    Reply
  14. 14eburn says

    August 28, 2009 at 3:21 pm

    Neil,

    Do you dial down the -2stops on your camera or on flash? The exposure compensation button is not active when working in manual camera mode.

    Reply
  15. 15Neil says

    August 28, 2009 at 3:26 pm

    You have to distinguish here between ambient exposure and (intended) flash exposure. I was referring to the ambient exposure being under by about 2 stops. I do that by how I much light I allow in by choosing my camera settings – shutter speed, aperture, ISO.

    And the intention was then to have TTL flash take up the slack and give me correct exposure. Exactly as described in this post on ambient exposure metering and adding flash to it.

    Neil vN

    Reply
  16. 16Mac Swift says

    August 28, 2009 at 4:03 pm

    Neil…how do you get such good, directional light on the subject’s faces while bouncing? I am really trying to learn this technique, but when I bounce behind and to the side me it seems like more often than not the whole room lights up. Are you darkening the backgrounds down in post?

    Reply
  17. 17Leon says

    August 28, 2009 at 4:33 pm

    Hi Neil

    Did you push the iso to 2500 to increase flash distance because of your chosen focal distance with the 70-200mm?

    Hope that makes sense :-/

    Leon

    Reply
  18. 18Neil says

    August 28, 2009 at 5:09 pm

    Leon … the raise in ISO wasn’t to compensate for distance, but to allow as much ambient light in as I could to give a sense of place. I didn’t want the background to go black. And in this case, I didn’t want to use additional flashguns either to light up the background.

    Since I was already at a slow shutter speed (1/60th) and the widest aperture on that lens (f2.8), all that remained to increase my available light exposure was to bump up the ISO.

    Neil vN

    Reply
  19. 19Max says

    August 30, 2009 at 1:02 pm

    Sorry, I hope it’s not too silly a question to ask…

    How do you determine ambient exposure is 2 stops under?
    and am I right to assume that TTL flash will always try to correct the exposure?

    Thank you,
    Max

    Reply
  20. 20Neil says

    August 30, 2009 at 5:26 pm

    Max .. it’s by a combination of checking my camera’s meter and making a few test shots and then checking my LCD preview.

    And yes, TTL flash (with certain limitations), will attempt to give you what the camera deems to be correct exposure.
    Which implies (to a large extent), that you have a wide latitude in what you could use as settings … and the TTL flash technology will take up the slack for you.

    Neil vN

    Reply
  21. 21Brian says

    September 19, 2009 at 3:14 pm

    Neil,

    Can I expect similar performance from a Nikon SD-9A as compared to the Quantum Turbo SC. I just read the comment above about the Turbo losing communication with the SB900..
    I notiticed this as well on the last two weddings I did and I’m not sure I am OK with this. As a result I have given some consideration to the SD-9A, I’m just not sure how long the Nikon pack will last throughout the day..

    Thanks,
    Brian

    Reply
  22. 22Neil says

    September 20, 2009 at 4:42 pm

    Brian .. I do prefer the SD-9A (or with Canon, the CP-E4) over the Quantum SC because, as I had mentioned, the flash seems to lose connection with the SC at times. This doesn’t happen with the SD-9A / CP-E4. The electronics of the battery pack and speedlights seem to be better integrated.

    I quite often shoot an entire wedding with the two SD-9A / CP-E4 battery packs without needing to put new batteries in or reverting to an SC. But that does depend on a few things, so it would make sense to have extra batteries for the battery pack, or an SC.

    Neil vN

    Reply

Leave a Reply to Andrew Cancel reply

Your email address will not be published. Required fields are marked *

categories

Articles & Tutorials

  • • About myself & this site
    • Books by Neil vN
    • Best photography books
    • Black foamie thing
    • Photographers’ success stories
  • • Flash Photography Techniques
    • Natural looking flash
    • Flash + Ambient light
    • Dragging the shutter
    • Bouncing your flash
    • On-camera flash outdoors
    • Exposure metering
    • Flash exposure compensation
    • Bounce flash examples
    • Which is the best flashgun?
    • Flash brackets
    • Off-camera flash photography
    • Flash photography basics
    • Using video lights
    • Flash photography tips
  • • Photography workshops NJ / NYC
    • Models @ photography workshops
tutorials:
flash photography
Photography
Workshops

All rights reserved. Copyright © Neil van Niekerk 2025 · Customization by The Traveling Designer

Copyright © 2025 · NvN on Genesis Framework · WordPress · Log in