tutorial: Maximum flash sync speed
In previous postings I have mentioned that the specific settings for a photo aren’t often of direct value to us in figuring out the method of exposure. But the one setting that is of huge importance when using flash, is your camera’s maximum flash sync speed.
When the ambient light levels are low, then your shutter speed can vary appropriately, depending on what you want to achieve. But once you work in bright conditions, or have your subject against a bright background, then most often it just makes the best sense to work at maximum flash sync speed, as in that image above.
There is something very sweet happening at that point, and I believe it is imperative for every photographer that use flash, to know what is happening, and why. I would venture as far as saying that this blog posting contains some of the most essential information I can give you about flash photography.
So let’s work through some of the basics …
Let’s work through a hypothetical scenario where our subject is in shade, and our background is much brighter.
For the following tutorial, get your camera and speedlight so that we can go through some of the settings.
Let’s say our background exposure is 1/60th @ f11 @ 200 ISO
Now, it should be obvious that the following are all the same exposures:
- 1/60th @ f11 @ 200 ISO
- 1/125th @ f8 @ 200 ISO
- 1/250th @ f5.6 @ 200 ISO
- 1/500th @ f4.0 @ 200 ISO
- 1/1000th @ f2.8 @ 200 ISO
If this isn’t immediately clear, then check out this posting on photography basics you need to know.
Let’s go ahead:
Step 1.
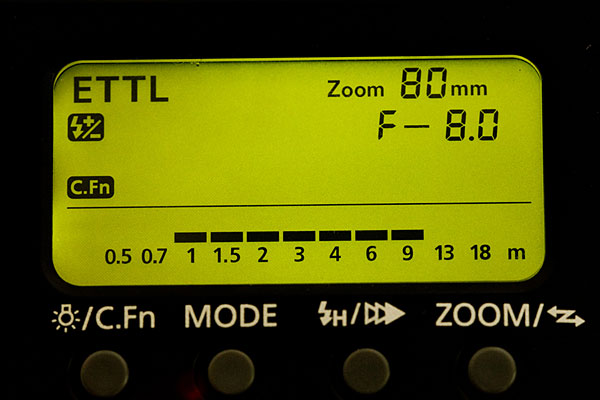
Switch your Speedlight on, and take it out of bounce position. The reason for this is that I want you to be able to see the distance scale on the LCD display. Put your flash-head directly forward. The distance scale disappears in the bounce position, since your camera and flash then have no idea of the distance you’re going to bounce your flash off.
The Nikon SB-800 scale looks like this:

.
.. and the Canon 580EX scale looks like this:
.
The distance scale shown on the back of the speedlight, shows the range in which the Speedlight can give correct exposure. The maximum distance is how far your camera has calculated you will still get correct exposure for the ISO and aperture settings you’ve chosen.
Some speedlights like the Nikon Sb-600 and Canon 430EX don’t show the distance scale. Sorry, you’re out of luck there, but please follow the rest of the explanation anyway. There is a certain logic and consistency here, and hopefully it will all make sense in the end.
Step 2:
Switch on your camera and set your camera to manual exposure mode.
If you are using a Nikon D-SLR, set your exposure compensation on your camera body to zero.
Step 3:
Set your flash to TTL exposure, or whatever flavor of TTL your camera spouts, whether E-TTL or E-TTL2 or i-TTL or D-TTL. It’s all pretty much the same.
Step4:
Set your flash exposure compensation on the camera body and on the back of the speedlight to zero.
Step 5:
For the purposes of this explanation, disable high-speed sync on your camera / flash.
If you don’t know what is meant by this step, then good. Hang in there. This will make sense in the end. :)
For Canon users, High-Speed Sync (HSS) is set on the back of the Speedlight. It is that little H button with the lightning symbol. Push it so that HSS is disabled, ie no H and arrow shows on the LCD display.
For Nikon users, this is usually custom function E1. Set it the default, ie, not on Auto FP.
Step 6:
Not so much a step, but a reminder that shutter speed has no (direct) effect on flash exposure. This little snippet of info is hugely important. If you’re not sure of this, or haven’t seen this in practice yet, just make a mental bookmark .. we’ll come back to it again. But for now, just remember, shutter speed has NO effect on FLASH exposure.
Step 7:
Let’s see what the distance scale says on the back of our speedlight for that series of settings mentioned earlier:
- 1/60th @ f11 @ 200 ISO
- 1/125th @ f8 @ 200 ISO
- 1/250th @ f5.6 @ 200 ISO
- 1/500th @ f4.0 @ 200 ISO
- 1/1000th @ f2.8 @ 200 ISO
Now, as much as we had said that shutter speed has no effect on flash exposure, for this example, let’s just change the shutter speed settings as well. For ambient light, there is a direct correlation between shutter speed and aperture. They work in tandem. In that sense, shutter speed has an indirect effect on flash exposure, since it affects our aperture .. and aperture (and ISO) has direct effect on flash exposure. (Check this post if you’re unsure about this – TTL flash vs manual flash.)
Now set your camera to 1/60th @ f11 @ 200 ISO with your speedlight on, and pointing directly forward. Your distance scale should read something along the lines of having a maximum distance of 20 ft. Within this range, your speedlight should give you correct exposure for your subject. (And here we are working with the hypothetical scenario where our subject is in deep shade against a background that is 1/60th @ f11 bright.
Step 8:
Now change your camera settings to 1/125th @ f8 and notice how your speedlight’s range increases as you open your aperture from f11 to f8
Step 9:
For the next step, set 1/250th @ f5.6 .. but note that some cameras will be limited to 1/200th or 1/180th. The Canon 5D for example won’t go higher than 1/200th now with the speedlight on. (Hang on there, we’ll get to the explanation of why.)
Step 10:
Set your camera to 1/500th @ f4 … and note that the moment you touch your shutter button and activate your camera’s meter, the shutter speed limits again to 1/250th (or 1/200th or such)
Here’s why you can’t set your camera’s shutter speed over a certain value when you have your speedlight switched on (and have HSS disabled):
As can be seen in this explanatory diagram, the light from your flashgun is dissipated as an instantaneous burst of light. It is somewhere in the order of 1/2000th of a second. Fast! It is hugely important to realise here that the light from your speedlight isn’t continuous light, but instantaneous. (Or rather, near-instantaneous, for the pedantic ones reading this.)
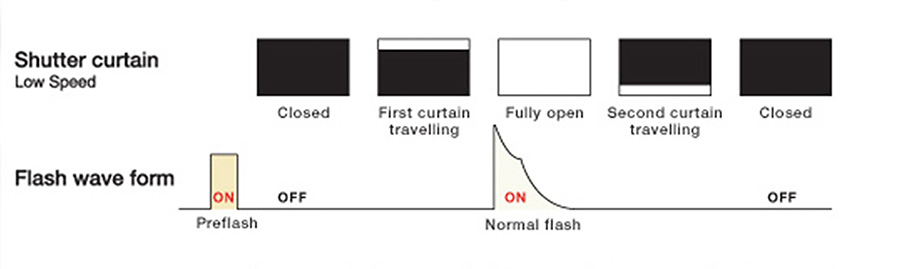
Your shutter consists of two curtains that travel across your sensor (or film gate). So for flash to be exposed over the entire frame, your shutter speed needs to be low enough that the first curtain has completely cleared the sensor area (ie, the sensor is fully open), BEFORE the second curtain starts moving. In that moment, the flash is discharged, and the entire frame is exposed.
If we work in a dark enough area such as a studio that is completely dark, then we can get correct flash exposure at shutter speeds like 1/8th or 1/15th or 1/60th … the shutter speed has no effect on flash exposure … while we remain below maximum sync speed.
So maximum sync speed, is the highest shutter speed at which the entire frame is still open for flash to expose for the entire frame (whether a digital sensor or piece of film).
If we go over maximum sync speed, we’ll get one of the shutter curtains blocking the flash exposure, such as in this example:

The image on the left had the shutter speed at 1/60th, and the image on the right had the shutter speed at 1/320th. That dark area on the right is the shadow of the one shutter curtain obscuring the light from the flash.
Step 11:
So we’ve now hit a ceiling – the highest shutter speed that we can set on our cameras, with the speedlights switched on. This is also the highest shutter speed at which you could work with studio lights. But for studio work, you would most often use a shutter speed lower than maximum sync speed. This is because there is often propagation delay, causing the flash to be triggered a touch later, and you end up seeing the edge of the shutter curtain. So most wise studio photographers will work at a shutter speed like 1/125th, which is well below maximum sync speed, avoiding propagation delay.
However, we’re working with on-camera speedlights, and can comfortably work at maximum sync speed. But … we’ve hit that ceiling. We can’t use flash at shutter speeds higher than max sync speed. However, this is only true for ‘old school technology’.
High-Speed Sync Flash
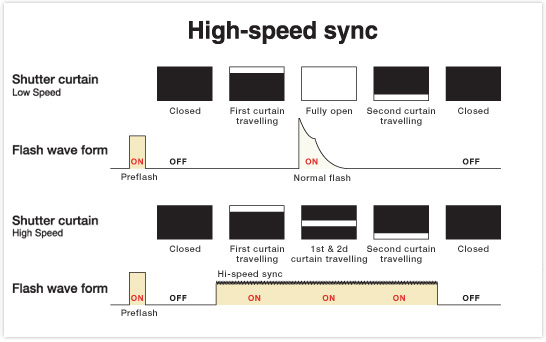
So with the older flash technology, flash is dissipated as that high-energy burst of light .. but camera manufacturers came up with the stunning adaptation of that technology, where they dissipate the energy from the flash as rapidly pulsed light. In effect, the flash now becomes continuous light over a very short period. The light from the flash is now dissipated even as the shutter curtains move across the frame. As that window between the two curtains move across the frame, the light from the camera’s speedlight is dissipated … exposing correctly for the entire frame. Remarkable technology!
But .. and yes, there is always a but … this comes at a price.
Instead of the energy from the flash being dissipated now as a high-energy burst, the light from the flash is now dissipated over a longer period. This means the effective power from our speedlights is reduced when we switch to high-speed sync mode, instead of the old-school way of triggering our flash as that high-energy burst of light.
Let’s confirm this:
Step 12: (This will vary for the different makes and models of cameras)
all Canon users (except for the 5D):
Select High-Speed Sync (HSS) on your speedlight by pressing that button on the back of your speedlight. Now set your camera to 1/250th @ f5.6 (as we had it in this example). Now lightly touch your shutter button to activate your camera’s meter … and while watching the distance display on the back of your speedlight, change your shutter speed from 1/250th to 1/320th. You should see an immediate drop in the effective range from your speedlight as your move from the high-energy mode of flash dissipation, over to HSS.
for Canon 5D users:
Switch HSS off. Now set your camera to 1/200th @ f5.6 (as we had it in this example). Now lightly touch your shutter button to activate your camera’s meter … and while watching the distance display on the back of your speedlight, hit the HSS button on the back of your speedlight. You should see an immediate drop in the effective range from your speedlight as your move from the high-energy mode of flash dissipation, over to HSS.
for all Nikon users
Enable Auto-FP on your camera. For most Nikon D-SLRs this is custom function E1. Auto FP is Nikon’s version of High-Speed Sync (HSS). For the purposes of this explanation, switch it to 1/250th Auto FP. Now set your camera to 1/250th @ f5.6 (as we had it in this example). Now lightly touch your shutter button to activate your camera’s meter … and while watching the distance display on the back of your speedlight, change your shutter speed from 1/250th to 1/320th. You should see an immediate drop in the effective range from your speedlight as your move from the high-energy mode of flash dissipation, over to HSS.
** the D700 with the SB-900 doesn’t quite follow the linear change in settings as explained here. I’m not sure why yet at the moment, but will try and figure it out.
So everyone should be able to see how switching to the High-Speed Sync mode, reduces our effective range by about half, or even more.
So where do we have the most range / effective power from our speedlights ?
At maximum sync speed!
For Canon 5D users, this would be 1/200th with HSS set off. For all other cameras that have HSS as a feature, maximum sync speed will be 1/250th or perhaps 1/180th or such.
For non-5D users .. the moment you go over the maximum sync speed, your camera will go into HSS mode, and your flash range will be reduced. For 5D users, the moment you set your camera to max sync speed (1/200th with the H on), your flash range will be reduced.
It becomes apparent that maximum sync speed is indeed a very sweet spot to work at when we work in bright conditions with flash. Or if we want the most range from our flash.
So let’s state the same thing in a few different ways, and see how it makes sense:
- At maximum sync speed I have my widest aperture (which is in fact what gives us the most range / effective power) from our flashguns … while still remaining in the non-HSS (ie, old school) way of dissipating flash.
- If I work at maximum sync speed, I have my widest aperture while remaining in the high-energy mode of dissipating flash, and hence my speedlight will recycle faster, and my battery pack work less hard.
- I will have the most effective power from my speedlight at maximum sync speed, because my aperture is wider.
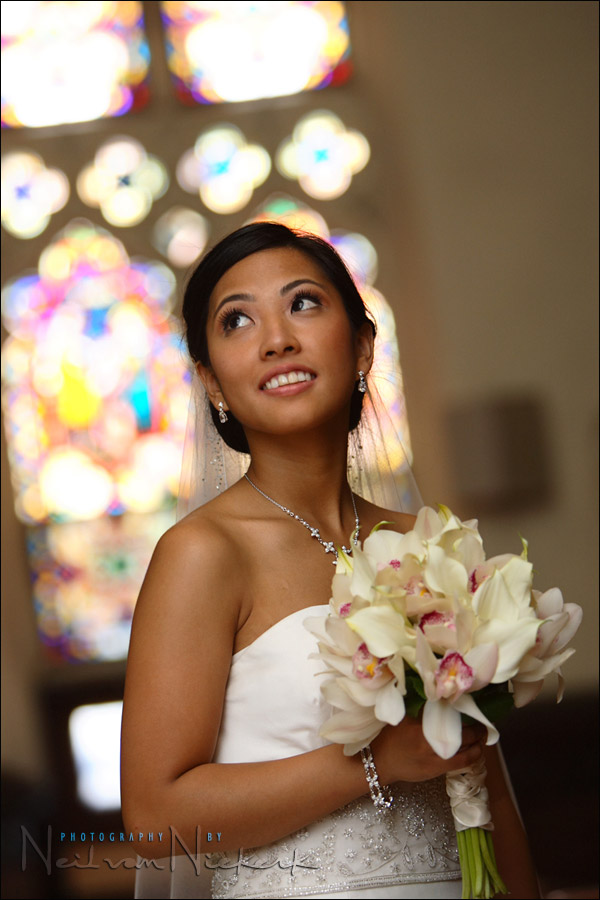
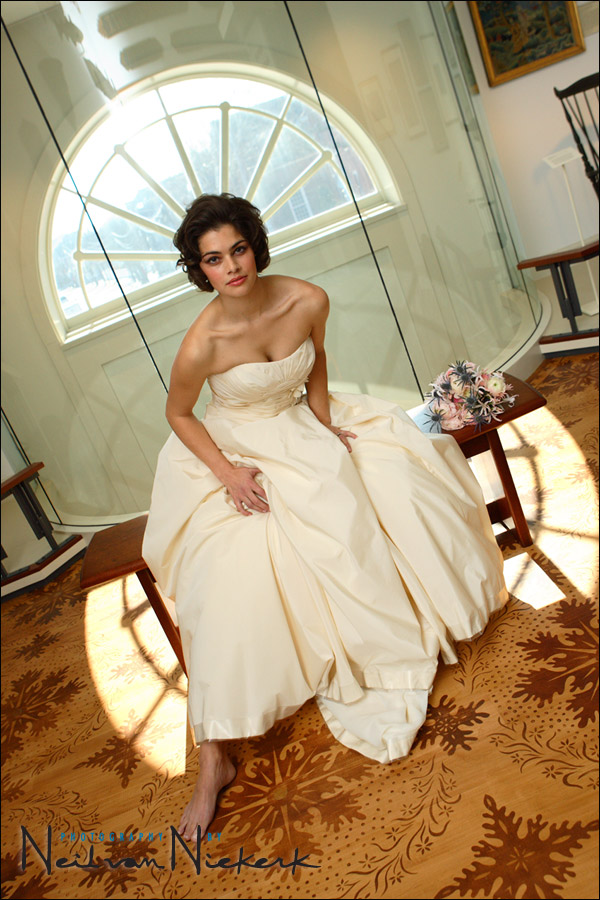
Let’s look at the opening image again:
settings: 1/250th @ f2.8 @ 400 ISO, with +1.0 flash exp comp
I bounced my flash behind me into the open church, in order to get soft light on my bride. Since I knew I would by dumping a lot of juice from my flash in the hope that enough light reflects back to expose correctly for her .. I immediately went to maximum sync speed.
If I can’t do it at 1/250th @ f2.8 @ 400 ISO .. then I won’t be able to do it at 1/125th @ f4 .. and especially not 1/60th @ f5.6 … and indeed, in this instance, I was actually at the very edge of what my speedlight could deliver. Hence the stained glass windows blowing out a touch. I would’ve preferred 1/250th @ f4 to get more saturation in the windows, but my flash couldn’t deliver that with the way I was bouncing flash. So I accepted the compromise of the stained glass windows being a little over-bright.
If I had used 1/250th @ f4 @ 800 ISO, then the balance between my ambient light (the stained glass windows behind her), my flash (the light on my bride), would’ve been the same. Bumping up my ISO affects both my flash exposure (or range), and my ambient light.
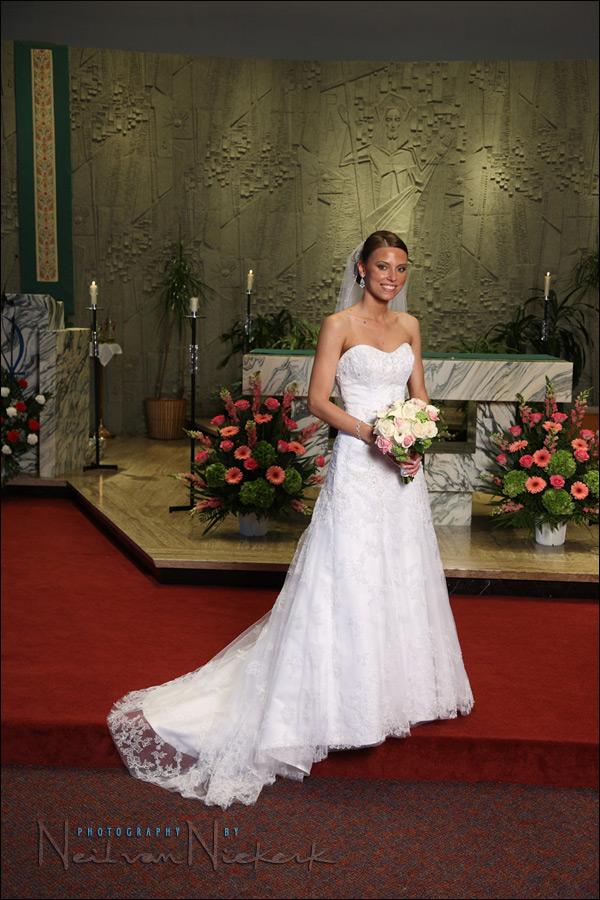
Another example:
settings: 1/250th @ f4.5 @ 400 ISO, with +1.0 flash exp comp
Once again, with this scenario – the model against a very bright background – I immediately went to maximum sync speed. Whatever my aperture and ISO settings are, they will see-saw around my choice of max sync speed.
Similar to our previous reasoning: 1/125th @ f6.3 would’ve given us the same ambient exposure, but my flash would’ve had to work twice as hard at 1 stop down. My speedlight would be slower to recycle, and I would’ve had to shoot slower. Using this smaller f-stop mean I would use up the speedlight’s batteries faster. My speedlight would also start overheating faster. And .. I might not even be able to push that much light from my speedlight if I am bouncing into a large room.
So it just makes sense in this kind of scenario, to immediately default to maximum sync speed.
Photographers using off-camera lighting in bright ambient light, will, for very similar reasons, work at (or very close to) maximum sync speed.
As I had mentioned earlier, there is something special happening at max sync speed, and we need to be aware of it … and use it.
related articles:
- tutorial: High-speed flash sync (HSS)
- Using a neutral density (ND) filter with flash
- Using multiple speedlights with high-speed flash sync
- Advantages of a higher max flash-sync speed
Hello Neil,
If I chose 1/250 as the shutter speed for the max sync speed, and I am in manual mode, how would I calculate the aperture and ISO? In manual mode, I can set the aperture, ISO, and shutter speed to whatever settings I want (even though the camera will indicate if the exposure is correct or not). I presume the settings you come up with in these photos are based on the histogram method, light meter method, experience, or another technique you have previously mentioned in the blog or workshop.
For example, if I know I want to shoot at 1/250 (max flash sync speed) and at 400 ISO, then I would use the histogram method or light meter to inform me about the aperture that would give me the correct exposure.
This is great if you are using a Canon or a camera other than a Nikon ( or if you want to use your Nikon in TTL mode ). This is basically the algorithms that come in to play when setting a Nikon flash to TTL-BL ( eg; Bright background vs darker lit subject ).
Could you not just switch your camera mode to “P” mode and your flash to TTL_BL , if you were pressed for time, and capture this image in the same way as long as the bride is in the centre of the frame? Would the fact that the flash was not direct and bounced instead affect the BL mode?
Thank you for blogging this great information. You have taught me much about my flash that i would never have known otherwise.
Amazing post….thanks again, Neil!
Hi Neil,
Just when I think I’m getting this flash synch speed lark, my d300 throws up flash shutter speed! What’s the difference!?!
Nick
Great site by the way. Very infromative.
Neil,
I’ve just tried it on the camera. You’re right. Varying the aperature in aperature priority the shutter speed remained the same. What would be the point in that? This means that you are always better off shooting in manual mode.
Nick
Oh of course, it’s the minimum shutter speed. I see now. It makes sense now when you read articles on pros who always use manual with flash. Thanks again and thanks for your patience.
Nick
1/250th @ f4 @ 800 ISO would not produce the same result (as 1/[email protected] 400 ISO) – it would be great to see a side by side comparison of the difference in the future sometime. Obviously the bokeh would be different due to aperture but was wondering what other things would be different…..Great post!! Best darn explanation of sync I’ve seen….i’m very visual so the diagrams really helped. Thanks!!
Excellent explanation! Keep this up. Dwight
Hello Neil,
Thanks for the great information on this blog. In Custom Function E1, my D300 allows a max sync speed of “1/320 (Auto FP),” but it also gives a choice of using “1/250 (Auto FP).” Is there any reason I would use 1/250th instead of 1/320th as the max sync speed? Thanks.
You have shared so much very helpful information here. The great part is that it reinforces so much of how I shoot. I tend to do a lot of it just by instinct, however it is great to read why it works so well and how to grasp the concepts to intentionally get consistent results.
Hi Neil,
I just love your site, it’s great to see how’s all the magic is explained!
But in this chapter the situation is explained for a subject is in shade, and background is much brighter.
But what changes in the explanation above, when you use flash in a situation where background is darker (like a gala, or concert (with band on stage at the background) and subject is /has to be lit?
Can you tell us about this situation?
Hi Neil,
Thank you so much for all your posts on flash photography, most definitely the best I’ve found. I’m an enthusiastic amature, new to non-point-and-click photography, and have found your insights on Flash photography truly enlightening (pun most definitely intended).
This post on Max Sync Speed has been very insightful, and I ‘think’ I understand. If working against a brighter background keep the largest aperture needed to achieve your aim (max range/least drain), only going smaller if the required shutter speed for the background goes beyond your max sync speed. If you have to go smaller, your flash will have to work harder and your range will decrease.
I’m using a Vivitar 283 mounted on the hot-shoe of a Fuji Finepix S9600, and have no Max-Sync Button to press. To work out my max sync speed, would I simply keep taking pictures at faster and faster shutter speeds until there was a noticeable drop in exposure?
Thanks once again
Mark C.
Hi Neil. Can’t begin to tell you how much I am learning from your site. I am trying to replicate your range/max sync results with a D3 and SB900 but I start to have a falloff of range as soon as I exceed 1/125th. Is that what you were referring to when you mentioned the non-linear results on a D700? If so, have you come across an explanation? If this is not the same as the D700, any thoughts on what I may be doing wrong?
Thanks for inspiring all of us! When is the new book out?
Hi Neil. Just following up on the range falloff … You said it happened on the D700. On mine, it was the D3 with an SB900. My D3 with an SB800 does NOT have the problem. I’m curious – was your problem with the D700 associated with an SB900?
I sent a tech request to Nikon USA – they are perplexed and have asked Japan for help. I’ll keep you posted.
BTW your last comment left open the possibility that the LCD may have a reporting problem. I ran an exposure test and found actual power loss of about 1 stop when going from 1/125th to 1/250th. – Thats exactly what the LCD predicted.
Reading this blog for the first time. Thanks for your tips. But I am confused. To control the background exposure where bg is bright I have to :
1. Keep my shutter speed at the max sync speed of my camera
but I would
2. Also need to select appropriate aperture, & ISO so that my bg doesn’t blow out, isn’t it.
For example, let us say you have someone under shade on a tree with bright sunny situation behind the person. So if I need to properly expose the bg, I would use my max sync speed, i.e. 1/250 but I would also have to use something like ISO100 and f11 so that I don’t blow out my bg. I would prefer to shoot at wider apertures but restrcited by the lower max sync speed of cameras. In those situations, high speed sync can be nice option assuming you have enough flash power for your case.
Lindsay,
Not an expert. Own no Nikon gear to test with. Stuff below is conjecture.
Nikon advertises a t.5 time for the sb-900 of 1/880 sec, which is not the entire flash pulse. This corresponds roughly to a 3.33 ms (1/300) t.1 duration, which is (almost) the entire flash pulse.
Guesswork here : it takes perhaps 2 ms (1/500 sec) to move a shutter curtain across the sensor, so a 1/250 exposure goes something like this : at 0.0 ms start opening, at 2.0 ms fully open, at 4.0 ms start closing, at 6.0 ms done closing. This means the shutter may be fully open only 2 ms (1/500 sec) during a 4 ms (1/250 sec) exposure, which actually takes 6 ms to complete.
A 1/320 exposure would be more like 0.0 start opening, 2.0 fully open, 3.2 start closing, 5.2 closed, leaving 1.2 ms (= 3.2 – 2.0) fully open time.
The flash pulse must fit entirely within the time the shutter is fully open. So a full 3.3ms sb-900 discharge may or may not fit in a 1/250 exposure, but it does not fit in a 1/320 exposure. But a half-power pulse will fit in a 1/320 exposure. So setting your D300 (or D700) to sync at 1/320 instead of 1/250 is a tradeoff.
If you are photographing at a short flash-subject distance, at half flash power or less, then setting the custom function to give 1/320 flash sync makes sense, because the shorter sync will not only lower the ambient, but also reduce the ambient blur distance.
If your flash-subject distance is greater, or your ambient stronger, so that you need greater than 1/2 flash power, 1/250 sync will give you a stronger flash-to-ambient ratio, because it will allow (almost?) the full pulse in.
It may be difficult to judge 1/2 power during TTL use. You could shoot at 1/320 sync, and if you can’t get enough flash in there, switch to 1/250 sync.
Thank you Neil for giving so much,
David Graham
Awesome! This explains it so well… and I really like the additions of Vishi’s post, and your follow-up, which helped bring it all together. It’s really clear now, thank you (again)!
Hi Neil,
I’m a college student in Beijing and I have gone through both the Chinese and English version of the tutorials about on-camera-flash,they are just awesome!
Shall I paraphase the purpose of using the sync speed as acceptable exposure for the background(biggist aperture), hence more shots with the same four AA bateries, and shorter recycle time between two shots?
There aren’t many books about flash photography here in town. Thank you again for these posts!
Funny, I just found out the max sync speed of my 1DmkIII is 1/300 and not 1/250. Which means more range @max sync speed for Canon.
Anyway, I’ve learned a lot by reading your blog. Many thanks for your great work…
Ed
Hi Neil,
You mentioned:
” I would’ve preferred 1/250th @ f4 to get more saturation in the windows, but my flash couldn’t deliver that with the way I was bouncing flash. ”
Lets make an assumption that your flashgun is able to deliver the power, so you’ll be using 1/250th @ F4 ISO 400.
The meaning “to get more saturation” is it to prevent blown up (over exposed) windows by underexposing the ambient light (background) and let the flashgun work harder to properly expose the bride?
Many thanks for your awesome information.
Anggi
So if I’m starting to get this right, you could have used a large white reflector on your left shoulder (or in any other cases where the only available bounce wall is so far away that the flash power required is border line too high). This would have allowed to close the aperture to preserve the glass window details while requiring even less flash energy and still have the bride correctly lit. Does this makes sense? Would this lighting scenario have worked?
Amazing site Neil. Best regards.
Exactly that.
Hi Neil, Just to get clarification. For the opening image you said you bounced the flash behind you. I take it to mean that it was on camera flash, flash head was forward (not in bounce angle) but twisted backwards. Did i get it right?
Hallo neil
Baie dankie vir hierdie great artikel. I’m going to print it and work through it carefully over the weekend.
Groete,
Hi Neil,
Truly Wonderful article !!!
I have one quick question, using D300 in commander mode and a remote SB800/900,
is it possible to use FP mode on the remote flash(es)
unless i am completely missing the point, the max sync speed is more useful where the ambient light is otherwise going to overpower the light that could be output from the flash.
so, in a darker (ambient light) environment, there is no point in going to the max sync speed (unless you want to have a black background).
there is only a flash sync sweetspot when you are needing to balance bright ambient light with the flash.
I have your book and follow your blog religiously – thanks so much for sharing.
I am wondering which metering mode you use for the camera – evaluative, spot?
Allan
Neil,
I think that is the first time I’ve ever read a proper and consise explanation of the significance of max. flash synch. I find everything in photography is easy to understand – its just not explained well in a lot of cases.
Many thanks.
Steve
Hello Neil,
Firstly I would like to thank you for your in-depth description of using a camera mounted flash. I have read your book and been browsing your website over the past couple of weeks. I have a question about shooting a group photo indoors in a low light setting. There will probably be about 30 people in the group. The venue has a fairly low white ceiling and is lit with tungsten pot lights. Is it best to place my group in front of a bright wall, set my aperture to its maximum size, and set my shutter speed to my camera’s maximum flash sync speed? Should I also use a high ISO value to reduce the amount of work that my flash is required to perform? If I have two flash guns (one camera mounted) does it make sense to have them tilted towards the ceiling in front of me and each rotated at 45 degrees (each with a half-snoot to keep direct light from falling on the group)? Any advice you can share with me would be greatly appreciated.
Thanks,
Tom
First, the idea here with maximum flash sync speed giving you a sweet spot for your flash’s power, really only comes into play in bright conditions. Then you hit a situation where the light is so bright, that you are forced to use smaller aperture.
Then max flash sync speed will guarantee you the widest possible aperture for that bright light conditions.
The scenario you have here is indoors and sounds like light levels will be low. So there is no need for max sync speed.
In fact, I’d shoot at lower than max sync speed to get some available light in.
I’m not sure what you mean by setting your aperture to maximum size? Are you meaning f2.8 or f22 ?
Either wouldn’t be good. You’d probably need around f5.6 or f8 .. depending on the size of the group, and the size of your sensor.
I would set a higher ISO .. once again, depending on your camera, and the final use of the image, you’d be looking at at least 400 ISO, but probably closer to 800 ISO.
With two speedlights, and a wall behind you, you might even get away with bouncing the flash behind you, and flooding the place with light. But bouncing your flash towards the group (with a plastic light modifier on it), would be a good idea if you need more light on the group.
There’s a few things you need to consider here for the best results.
Hello Neil, I have become a fan of your work, I recently purchased your book and I am enjoying that along with your site. I am looking forward to possibly attending one of your one day seminars.
Hi Neil,
Great article! I’ve been reading up on all of your flash info as I have been asked to do more events lately. They are a huge help! You are quite the master with lighting. I do have one question…when you shoot with flash what kind of on camera metering do you use? I use on camera spot metering 100% of the time with great results. However I am wondering if I need to change to matrix for flash photography. Thanks!
Fascinating stuff
I’m about to try shooting race cars at night – there will be little or no background light and I will be 20-30 feet away from the cars as they slow for corners
In daylight I would be using a shutter speed of 1/320 or less (in shutter priority on D300 / D700) to get some wheel motion blur depending on the speed of the cars
I’m not ever sure where to start with the night-time photos – I have an SB600 and SB800
Can you offer some advice?
Hello Neil,
My question is a bit more about technique than sync so it’s a little out of place, but motivated by the discussion here. In your top photo, when you bounced the flash back over your shoulder, how did you balance flash direction against photographer position to avoid casting your own shadow onto the subject with the reflected light?
For the bride seated on the bench with bright window behind, you’ve impressively made it nearly impossible to discern the direction of the flash, and the only hint of a shadow is her right foot. Could you please describe your bounce method?
Regards,
Matt.
Wow this is fantastic! I’ve been experimenting with off camera flash for a little while now but I never REALLY understood it until I read your article. Thanks for writing!
Fascinating article Neil,
Added one more fan here.
I have a question. What if someone doesn’t have the luxury of expensive speedlites but have a cheap one like this:Bower SFD926N Nikon i-TTL Power Zoom Flash. How much good effect/sweetspot can we expect?
Thank you for your generous correspondence.
Sincerely,
R
Hi Neil,
Firstly this place rocks!. I own a manual flash and there is no distance scale on the actual flash but I do have the opportunity to zoom the flash with settings like 24-105. If I am bouncing the flash from the side or behind should I focus the flash to like the 105. I understand the focus settings kind of funnels the flash further for the longer settings and spread it on the shorter settings. It seams obvious to me that if I am bouncing from behind or the side and the walls are far away I would then focus the flash to get more power and direct the light off the wall rather than spreading it givingme less light because it wasn’t focused as much. It seams like that is the way to do but sometimes I just don’t know. Or do those numbers just represent focus lengths for my lens like if I was using a 50mm does that mean i should set that option to 50m. I am more confused now then before i asked the question. haha
Dear Neil,
You mentioned quite a few times of shooting at max sync speed setting and that you will wiggle your ISO and aperture around to match and get a correct exposure.
But instead of shooting at f./2.8 and 1/250 at ISO 400 couldnt you have shot at f.2/8 ( to stay easy on the power you require from your flash) at 1/60 at IS0 100 and thus having less grain?
Do you keep the shutterspeed that high ( well not going over the max sync speed) to avoid camera shake?
I find myself a lot of time shooting at f./2.8 at 1/60 at ISO 800 just because my ambient interior light requires me to shoot at this high of an ISO and this slow of a shutterspeed to obtain enough pretty background ( ambient light). I could change to my 85mm 1.2 ( and keep my ISO down a bit that way) but want to give myself a bit of leeway in depth of field which probably doesnt make sooo much sense.
Am I correct or would you do things differently?
That was a thorough explanation – thanks for that. Now to experiment!
In going through the exercise I found out that one of my SB-800’s (which I have been suspecting of impending failure for a while) only displays the distance scale when the head is in the upright position. Odd.
Which of the SB-700 or the SB-900 do you consider a better replacement for the 800?
I use my 2 800’s either in TTL (triggered by an SU-800), or in remote mode triggered by the flash from an sb-28 which is triggered by a PW Plus II on my D700.
Sometimes I will have the SU-800 on the D700 triggering the 800s and a 600 in TTL, AND the PW in the PC socket triggering the SB-28 which in turn triggers another one next to it on a tri-flash bracket.
My main business is real estate photography, and I really like the speedlights for setup and takedown and ease of moving them around.
Thanks for any advice.
Great article, thank Neil!
1) Concerning Vishi’s remark (someone in the shade under a tree on a bright sunny day – a situation I continuously have as a wedding photographer on the cote d’azur), the only option I’ve found is to use a ND filter. This would allow f2.8 (or lower) to be used, without going over the max sync speed of the flash. I haven’t tried this yet as I’m waiting for the ND filter to arrive. Do you have any thoughts on this setup?
2) Although slightly awkward, but possible (with smaller lenses): In some extreme cases I’ve used the flash (or even two) in my hand and bounced the flash off of the walls/ceiling. The flash was triggered with Nikon’s CLS system by using the camera’s flash (or another camera mounted flash). This gives slightly more flash.
3) How does the + flash exposure setting affect things? If you want maximum flash power, would setting it to +3 not help?
Thank you Neil for all the very useful postings, I’ve been around for awhile reading and reading .. honestly cannot stop it as one lesson would include relevant link to another useful subject, I am Graphic Designer with basic photography idea, over your site I learned a lot about camera, shooting settings, the comments are also of great benefits, shutter speeds/motion blur .. aperture/DOF .. ISO/graininess .. On&Off Flash/Bounce Flash .. FEC compensation .. Max Sync Speed for high ambient in relation to flash drop when exceeded, all of this I absorbed in detail through your wise method of explanation and logical sequence, this is an invitation to whatever relates to camera and photography world.. to post “Commercial Ads” on your site in your support to sustain, thank you .. you deserve all good.
Hi Neil,
in what way does bumping up your ISO not only,affect the range of your flash power, but also your ambient light?
Cheers,
Guido
Hello Neil, questing regarding a subject in the shade with bright background. You mention Metering for the bright background..so, I meter for the brighter background, but focus on my subject. The flash will bring the subject brightness equal to the background? I struggle with the statement ” meter for background or brighter areas”, when my subject is in the foreground!…Hope that makes sense to you?
Mario, you point your camera towards the background, and check your camera’s built-in meter. You have to selectively meter your background, or interpret your camera’s meter reading. This is best done by shooting in manual exposure mode.
If you’re stuck on exposure metering itself, then I would recommend Bryan Peterson’s book – Understanding Exposure, 3rd Edition: How to Shoot Great Photographs with Any Camera.
Hi Neil,
In the situation of the top picture…
To get enough range out of the flash for correct subject exposure would you increase ISO after exhausting use of aperture (e.g if you were unable to open aperture any wider or simply did not want to to retain DOF)?
I guess with experience you can quickly go to the correct ball park settings based on bounce distance and ambient light.
Thanks for all your amazing articles!!!
Scott
Increasing the ISO won’t help you in balancing your flash vs ambient ratio. The reason is that ISO affects flash and ambient equally.
The only thing that helps in changing that balance, is either adding more flash … or adjusting your shutter speed. Shutter speed if your only independent control of the ambient light …. while you don’t go over max sync speed.
Hi Neil,
Firstly, thanks for such an amazing blog with so much information that is clearly laid out and for the fantastic interlinking between articles. I’ve spent many hours reading through your site and learning a lot about flash photography.
I had a question in relation to how you can determine when your speedlight is maxed out and cannot output any more light. Do you get any feedback from the camera or the flash unit? I own a 430EX II, so I do not get a distance scale. I am a bit unsure of how I would know that I have reached the maximum capabilities of my flash head. Is there any simple or obvious way to know this, or would I have to try different permutations and look at the lack if improvements in the pictures to determine that I am pushing my flash head beyond its capabilities?
Thanks a lot!
Re Comment #75:
Thanks Neil, understood. Let me put my question another way….If for example you were at f2.8 @ ISO 200 (and you could not or did not want to go wider than f2.8) and your subject was still underexposed due to the distance you were trying to bounce flash, could you increase the ISO to get more reach in order to bring the subject to correct exposure (accepting that the background ambient will also blow out)?
Scott
@ Sudeep. If you have a 430EX II then you do have a maximum distance indicator! If you have a recent camera (digic 3 processor or better?), you can select it from your flash control > external flash c. fn setting menu. Custom function 14 toggles between aperture and maximum distance display, and custom function 00 toggles between metres and feet. If you have an older camera you’ll have to set it on the speedlite.
As a natural light shooter just getting into Flash work, I will be referring to this article a lot. Thanks for keeping it manageable!
Thank you so much for publishing this article. Having recently bought a Canon 580EX I have been misunderstanding the HSS and ignoring the Maximum sync speed. This article has given me a great big AH HA moment and I cant wait to go out and test this technique.
Um, Neil, just one technical thing: the SB-900 takes way longer than 1/2000s to discharge all light at full power.
If you don’t believe me, take a simple manual mode picture at full flash power at 1/200s and one at 1/250s and compare brightness. In the 1/250s picture the flash light will be about 1/2 stop less bright than in the 1/200s picture.
Why?
Because the flash takes roundabout 1/200s to emit all light at full power. So when using full flash power at 1/250s some of the light will be cut off (and I even guess the DSLR will send a “shutter closing now, stop light!”-Message to the flash).
Of course at half flash power or less it will work, the flash will be much faster if it has not to work at full power.
Hi Neil,
Would you still go to maximum sync speed in a moderately dim room? In this situation you would want to light the subject primarily with flash. It seems to me that under this kind of setting, our choice of shutter speed doesn’t really matter as long as we stay between a handholdable shutter speed (ie: 1/80) and max sync speed (1/250). Am I right to say that?
This is wonderful. For a little while now, I’ve been experimenting with off camera flash. Now, I understand it better after reading your article. Thank you.