Flash photography technique – Turning day into night
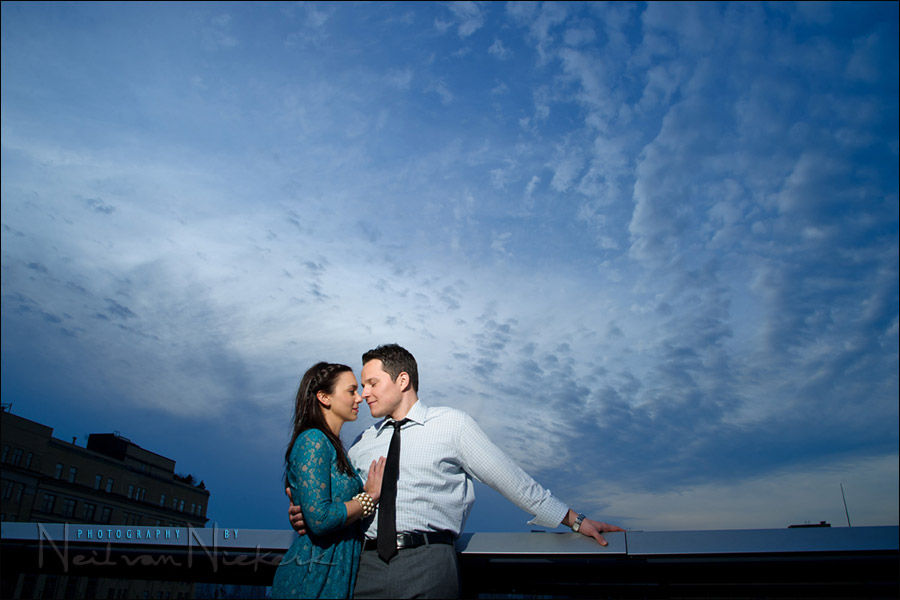
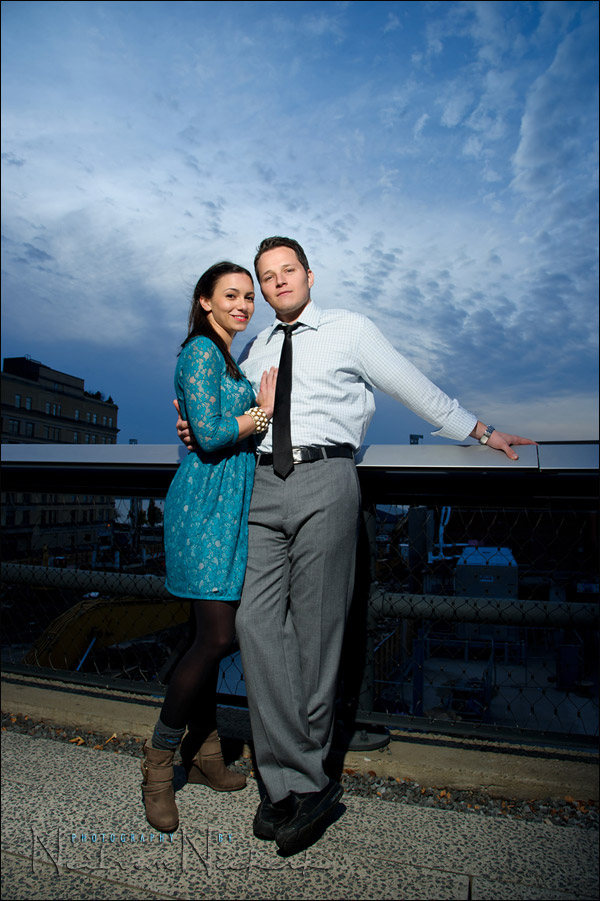
During the photo session with a couple, Laura & Todd, I wanted to add some variety to the images from the urban setting we were in. The sky had been overcast, but started to clear later on, leaving wispy clouds. Just perfect for a dramatic sky as the background. Of course, it is impossible to get your subject AND a bright sky equally well exposed without resorting to graduated filters or additional lighting, ie, flash. The technique with off-camera flash is quite straight-forward …

The first thing I did was get my basic exposure for the sky. Zeroing out the needle works fairly well unless the sun is in the frame. A test shot at 1/250 @ f11 @ 200 ISO showed that I had detail in the sky. Of course, there was a reason I was at max sync speed – it is our sweet spot when using flash in bright light.
The sky had a nice pattern to it, but the colors were too neutral. It needed something more. So I checked what the sky would look like if I set my WB to 3850K (knowing I could gel my speedlight with a 1/2 CTS gel).

Aah, now we’re getting somewhere.
Still working at 1/250 @ f11 @ 200 ISO, I knew that the single speedlight wouldn’t be able to push enough light out if diffused with a softbox. It had to be direct, undiffused, off-camera flash.
I had my assistant hold the light nearly above me, but to my right and behind me. The reason was so that the light on Laura’s face wouldn’t leave a hard shadow of her nose across her cheek or mouth.
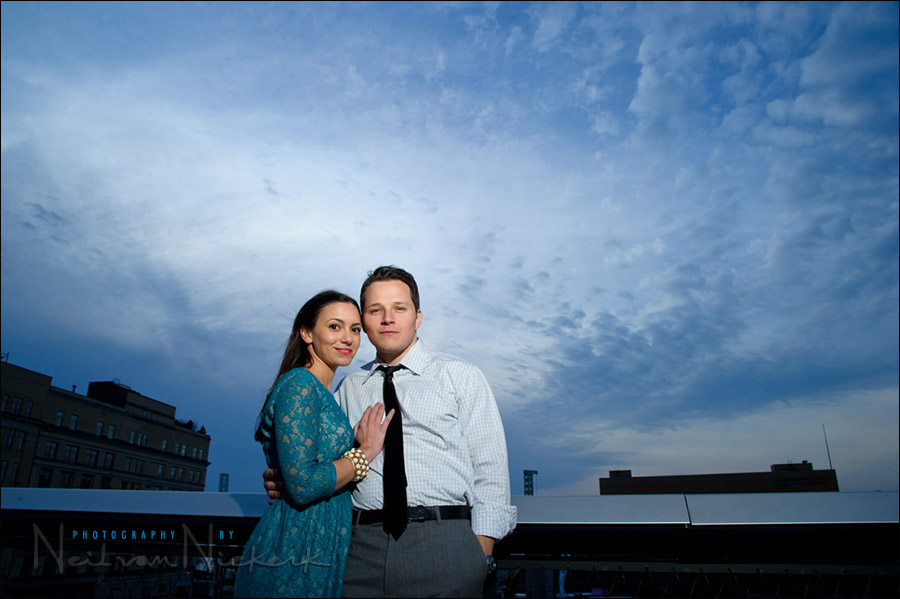
Since my exposure settings was chosen for me, by how I wanted the background exposed, I had to add f11 @ 200 ISO worth of flash on my subjects.
The simplest would be to use manual flash, and to use it at full power.
Using the distance shown on the back of the Nikon SB-900, I had my assistant hold the speedlight (up on a monopod) at about that distance. If I had used a Canon 580EX II, I would’ve placed the speedlight on my camera to see the distance scale. Slightly more cumbersome route, but the distance I need to hold the flash away from my subject, will be revealed.
For more on this: a tutorial on how manual flash exposure is affected by distance, and choice of settings.
Finally, I used the PocketWizard TT5 units and AC3 controller, to trigger the off-camera flash. I had the AC3 set to manual and full power.)
With the off-camera speedlight gelled with a 1/2 CTS gel, and my WB set to 3850K, the color balance for my couple was just fine, but the sky shifted to a more dramatic shade of blue.

A few easy & logical steps to get to the final sequence of images.
More images from this photo session in New York
Photo gear (or equivalents) used during this photo session
- Nikon D3S
- Nikon 24-120mm f/4 VR / Canon EF 24-105mm f/4L IS
- Nikon SB-910 Speedlight controlled by PocketWizard FlexTT5 & AC3 Controller
or alternately, the Canon 600EX-RT Speedlite controlled by Canon ST-E3 Transmitter
Neil, thanks again for a useful blog entry. Little details like this, “I had my assistant hold the light nearly above me, but to my right and behind me. The reason was so that the light on Laura’s face wouldn’t leave a hard shadow of her nose across her cheek or mouth.” make your explanations wonderfully useful.
I use this technique all the time with one main difference: I get the deeper blues by trying to underexpose the sky between 1-2 stops. During the mid day, it can be a challenge if I only have speedlights to work with. Your tip on using a cooler WB and a “zeroed” exposure for the sky would definitely be beneficial in gaining precious flash power.
Been following your blog for years, and I always seem to pick up a great tip! Thanks Neil!
At first, I thought a LED video light was being used. That light quality and pattern are great for undiffused flash.
Just found your blog for the first time and this is a technique I’ve used myself, but I haven’t seen it explained so clearly.
Please keep sharing as it can only help thank you
James
Wonderful Neil and at such ease
Thanks for sharing Neil. Tangents has become an important addition to my learning. your explanations are simple and they help me in getting better results as i practice more.
Praveen
Neil, bare flash on this?
Briand,
Yes, as in Neil’s description above, you must have missed it :) I knew that the single speedlight wouldn’t be able to push enough light out if diffused with a softbox. It had to be direct, undiffused, off-camera flash.
Hey Neil,
Outstanding! Something so obvious, and simple, that just wasn’t occurring to me to try. Duh!!! I simply love your explanation of separating the background and foreground lighting, and how to integrate them into one single image…
Awesome, to have two separate White Balances… wow, you just opened my eyes to something that’s now obvious to me!
Thanks so much! Mike
Till today i was trying to understand the HSS thing and couldn’t get it right, I had all my exposures right, flash power right but still couldn’t figure out how do I eliminate the dark strip at the botoom of the frame. And then after reading the HSS posts that you had put up made clear that there should be SYNC between your flash output and camera shutter. Duh me!!!.
Thank you so much for maintaining this site. Its like a ready reckoning book for us like its for any student :)
Nice review Neil. Love the arm out to match the leading lines of the clouds.
Great touch to gel the flash to fool the camera into making the background bluer.
Because of your book, we have lots of CTS gels. I am assuming that you didn’t use a soft-box on a a mono-pod for this one.
Thanks
wouldn’t it be easier to shoot a bit later so you have a lot less avaiable light, can use a “narrower dof” and the flash being relatively more powerful (due to the lower ambient light) could have been used with a softbox?
Neil I have never ever been interested in using speed lights until I found your site here! :)
Pompo .. that would be possible if this was the single idea I was chasing. But this was part of a longer photo session, and for that, I prefer having enough available light. It also depends on my clients’ schedule.
Here are more images from that photo-session.
I have just discovered your website and want to say Thank You for so much incredible info and the very easy to follow layout with all the links. It’s great. Julia
Thank you for opening up another dimension to my photography exposure! I had been trying hard to pick up off camera flash, but had not been successful (Going to be….).
Beautiful pictures, congratulations, it’s a very good technique, highly recommend
Talk about getting it done!! Wow!
Hi Neil
Lovely image, just off subject, I have recently purchased the Phottix Odin Triggers, I’m preferring them to the pocket wizards now, mainly because of the “Remote Zoom” facility, and that you can see the data on the control unit in the dark.
Best Regards Jon UK
thanx for the great post Neil! heres a wedding portrait i took a few years ago using this same technique, had an on camera sb910 at full power and an assistant holding an sb700 on a stand behind me to camera left, both gelled.
https://www.facebook.com/NaftoligoldgrabPhotography/photos/a.314804495260000.72170.286484681425315/343893589017757/?type=3&theater