Using Nikon’s built-in Time-lapse photography feature
Among the loads of features of Nikon and Canon’s latest cameras, is an item which is of specialized interest – Time-Lapse Photography. At the upper end of the spectrum, time-lapse photography is best done by shooting sequences of RAW files. More on that topic here: Camera settings for Time-lapse photography. However, the built-in Time-Lapse feature makes it really accessible. You can immediately see the footage you shot, in-camera. Wonderful to make adjustments to settings or composition or timing while on location.
With Time-Lapse photography, as with video, it just looks much more interesting if the camera moves as well. With movies too, the cinematography and how the camera moves, make all the difference. Last year some time, I stumbled on the Time-Lapse photography by MindRelic. The movement of the camera as the city scenes unfolded, blew my mind. This was done via a motorized dolly – specifically, the Dynamic Perception Stage Zero dolly. So of course, with no prior interest in Time-Lapse photography, I immediately bought a Stage Zero dolly. It all just looked that cool.
But then the winter approached and it was just too cold to venture outside at night to try out Time-Lapse photography. So the dolly lay dormant, still boxed, in my office. Until my Nikon D4 cameras arrived!
Time-lapse photography with the cameras
If there is any motion with time-lapse photography, the photographer previously had to figure out the number of frames, and exposure intervals, to calculate the duration of the final clip. The Nikon cameras’ built-in feature does this for you.
Even better – previously, with time-lapse photography, the photographer had to try and visualize how the movement of the camera, from the starting point to end point, would finally appear when the images are compiled as a movie clip. I can just imagine how frustrating it must have been to spend time setting something up, only to realize later on when compiling the clip, that the duration is too fast or too slow, or there was some kind of hiccup.
This is where the Nikon D4 and Nikon D800 shine – they compile the time-lapse sequences into a .mov file for you, in camera!
You shoot the sequence of images from start to end, and then hit playback on the camera, and the movie plays back for you. Right there! So if there are any changes you’d like to make in the sequence, and how the camera moves during the time-lapse sequence, you can adjust it right there and then. Beautifully elegant. This has to be very attractive to any photographer interested in time-lapse photography.
Setting it up is very easy. So easy that I was able to shoot the time-lapse sequences without referring to the manual.
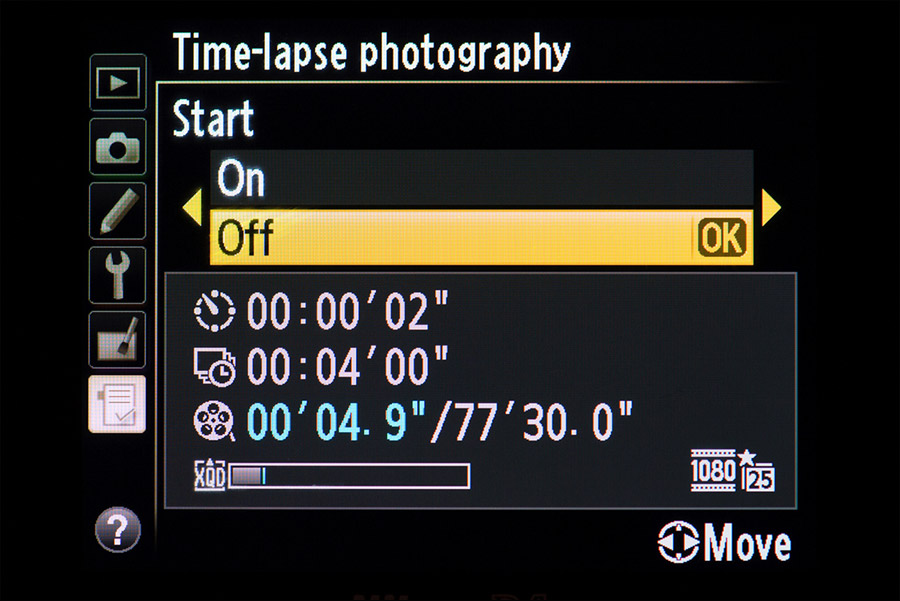
The time-lapse movie file is generated at the settings that you have for the camera’s video settings.
For quick access, I have this enabled in My Menu of the camera:
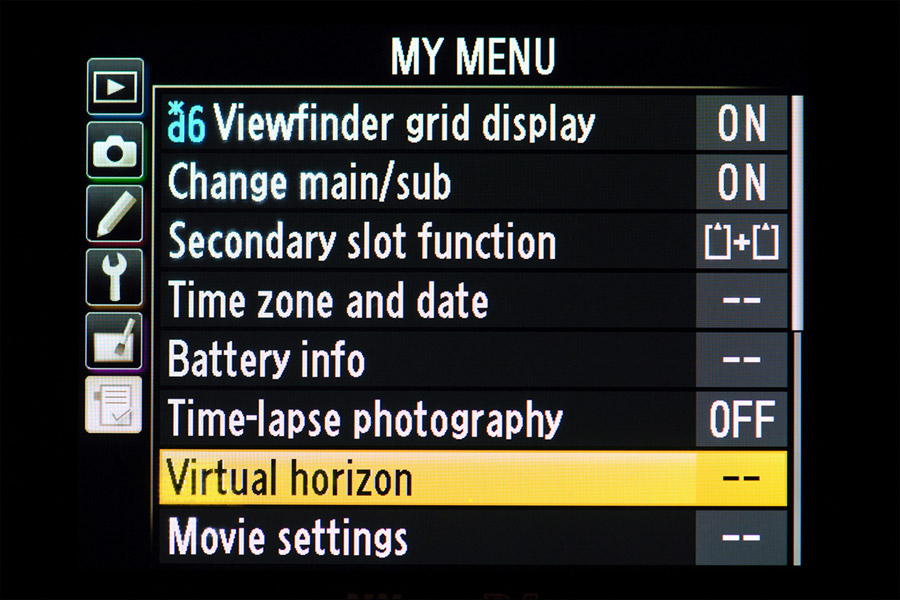
And in turn, to quickly access My Menu, I have the DoF preview button set to be the quick access to My Menu instead.
Shooting these time-lapse sequences
Erik Colonese and I went in to New York late last night to shoot time-lapse sequences to compile into a longer movie clip. A first attempt at this! In fact, a first attempt at time-lapse photography, aside from a test sequence in my garden to see how the Dynamic Perception dolly works.
We rained out at some point, and the traffic in Manhattan on a Saturday night is dreadfully slow. So between the rain and traffic hold-ups, we managed to shoot 7 sequences which looked good. The opening sequence there was our 2nd try on that 1st set-up. And then the rain came down and we scrambled for cover. When we played it back … wow! High-fives! I was stunned at how cinematic it looked.
I can see a few things I’d do differently now – two of the sequences need to be slower, for example. But as it is, I am very proud of this first attempt.
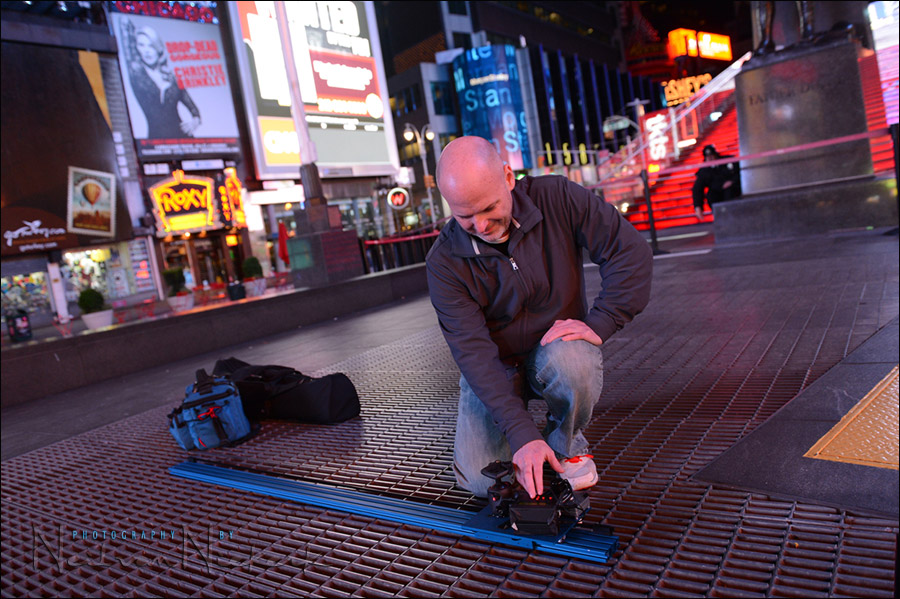
Here is Erik setting up the MX2 Motion Controller on the dolly. This sets the duration and speed with which the dolly would travel. We usually had the dolly up on two tripods. A few times we had the dolly at an angle with one tripod, and the one end of the dolly resting on the ground. For two of the sequences, we wanted the camera at this low an angle, and took the dolly off the tripods.
Since the Nikon cameras produce the .mov files in-camera already, compiling the multiple clips as a final video clip is a very simple matter, using iMovie.
Related articles on time-lapse photography
- Camera settings for Time-lapse photography
- More articles on Time-Lapse Photography
- Timelapse photography: project – commercial properties
Photo gear used to shoot the timelapse clip shown above:
- Nikon D4; Nikon 24-70mm f2.8G AF-S
- Manfrotto tripods & quick releases
- Dynamic Perception Stage Zero dolly
Everything you want to know about time-lapse photography
Timelapse photography – a complete introduction
There are several websites that are loaded with information – and then there is this thorough primer on the topic, written by Ryan Chilinski: Everything you want to know about Time-Lapse Photography. (Amazon)
Wow, love your work. Thanks for the info I plan on getting a Nikon D800 and I will put time-lapse photography on my list of wanta do…
Neil
it’s definitely early yet, but are you very pleased with the D800?
thanks
Michael
I have the D4 and this is the camera I used.
I included the D800 in the title because the two cameras offer exactly the same feature.
WOW! Neil,
I was very happy with my D3s till now. Thanks
Ray
Hello Neil,
I’m very happy.
The scors week I bought Nikon D4 0.24 to 70 2.8, 70-200 2.8 VRII, 85 1.4 fixed, and SB 910 are just crazy.
I can not wait to follow your advice on using this new camera.
A good job soon
Edy Trigona
Genoa, Italy
I have both the D4 and D800. I love the Time Lapse feature and did a quick setup (with D4) at a local motorcycle show recently. The D800 is a monster and renders incredible detail. It however dose need more light but will make a fantastic portrait/studio camera. Love your moving Time Lapse video Neil. I want a dolly but can’t justify the cost just for fun.
This is exciting. I’m loving these first sequences. I think the weather added to the mystique of some of the shots. Now I very much want to shoot a short film.
WOW! This time lapse video looks great! It gives an interesting view of New York city at night. It’s pleasing to look at. You’ve done a great job with this video – Nikon should get you to create promotional material for the “time lapse video feature” of their cameras. Hope they phone you soon!
My boys, ages 6 and 2, wanted to watch the video over and over again. Stunning video, even more so for your first attempt. The music is perfect, too! I love the use of the light on the model. Outstanding job! I think I want a dolly and a D4 now. :)
Hello Neil. I’m thoroughly impressed with your time-lapse video, but most particularly the sequence from 0:26 through 0:30. The appearance of the reflections remaining stationary while the rest of the scene moves is an exceptional capture. Well done!
Neil, excellent job on the video. I thought you might enjoy Vicente Sahuc’s video, New York 2008. This video was made with a Casio EX-F1 camera that captures video at 1200 frames per second. Keep up the great work on the blog, I follow it daily.
A truly awe inspiring movie, inspired me enough to consider buying one of these rigs. Regarding Adam’s comment, although its a little late, I’m sure that most have already heard of the diopter and focusing issues on the d800, mostly however isolated to the first batch apparently, perhaps this is what the rental shop in Tokyo was suggesting. Personally I’d prefer a lag in shipping if they are actually fixing these units discretely versus cough Canon cough who will just send out defective items and play dumb.
Hi Neil, what a great TL movie… job well done!
– Can you tell me what mode, f-stop, ISO and shutter speed you used (I’m assuming you were in manual mode)?
– I believe you said you set the camera time-lapse settings to fire every 1 second. Did you set that controller for the Dynamic Perception slider to shoot move shoot or just let it automate a movement – would be concerned about shooting while it is moving all the time.
– How long was the duration (total number of clicks before you traveled the length of the slider?
– Saw very little flickering… did you use a deflicker plugin in post?
Any help would be most appreciated. Just got a D4 and can’t wait to try out the TL features.
Thanks,
Paul
Paul .. everything was shot in Manual exposure mode on the camera.
Since the light levels didn’t change during any of the sequences, there was no need to change exposure settings.
The exposures were in the order of 0.5 to 1.5 seconds.
The Nikon D4 makes the calculations easy, since it will tell you how long the camera needs to be taking photos for .. which in this case means, how long the camera should be moving for.
It depends on whether you’re shooting 24 fps or 30 fps or 60 fps. But as I said, the camera does that calculation for you.
The camera will also tell you how long the final .mov file will be.
So now we just need to figure out how fast the dolly needs to move, to cover 5 feet during the duration the camera tells you.
The speed the dolly moves with, also depends on how steeply it is angled. The weight of the camera and lens will affect the speed that the dolly travels with, if you set the dolly up at an angle. So there is a bit of hit-and-miss involved there, and a dry run or two to get it all together.
So the number of photos is something the camera calculates for you. It really makes that side of Time-Lapse Photography a lot easier.
I didn’t use any deflickering software.
Re the fact that the dolly will be slightly moving during exposure … this doesn’t matter at all, since we will be watching a video clip at the end. And with video, there is movement within each frame. If you think about it, when you watch a movie or video, it doesn’t consist of 24 or 30 super-sharp crisp frames per second. It consists of 24 or 30 frames depicting the scene. And if there is movement within the scene, this is what we want in the end … that the Time-Lapse clip (or video for that matter), shows movement.
This a great feature in D4. Its easy to do and the results are predictable. I have shot a test time-lapse sequence from a moving car:
Hi Neil, I really enjoyed your timelapes of NY City, i Also love your photos and follow you frequently.
I would like to do a time-lapse of our office Monuments office sign/logo , at dusk as the sign lights up at 8pm and would like to capture some nignt as well, how would i handle the exposure as it is semi day turning into night. Greatly appreciated.
Thanks
Daniel
Daniel … follow the links to the TimeLapse forums and Q&A that I mention in the article.
Hi Neil, lovely stuff, I would love to chat further on this.
Cheers
Pete
Hi Neil,
I am using the D4
Time lapse: Static camera test
My question is: When setting the Shooting time say for example to 1hr, I take it this is the duration of the time lapse shoot? Ok so I set my Interval to 4 minutes does this mean every 4 minutes it will record for 4 minutes and lapse for 4 minutes
What if I want to record every 4 minutes for say 30 seconds?
Cheers
Peter
Peter … it doesn’t work like that. Fortunately.
The timelapse feature of the D4 / D800 calculates the length of the final timelapse clip, depending on:
– the interval that you set, and
– the total duration that the camera will shoot for, and
– your video settings’ frame rate (ie, 24 fps or 30 fps)
Any of those settings will change the length of the final timelapse clip.
Super easy.
Hi Neil.
Hope you are well. I just stumbled across this on Google as I was researching how to pull a still images from a D4 movie. Very cool indeed! I am going to try and get one of those Dollys!
Hello Neil,
Good job with your timelapsing, I was wondering, how do you connect your camera to the dolly mx2 engine?
Because if you shoot with the built-in intervalometer at some point you will shoot when the dolly is moving, getting few bad shots, especially in night time. I am now dealing with this connecting my D810 to the engine and it’s annoying, with Canon 7D it works brilliantly the connection with the dolly engine.
Thank you
Frank
I’ve since changed a number of things about how I shoot time-lapse.
I now use the digital controller – the Digital NMX Motion Controller.
It is much, much better than the analog MX2.
I also now shoot time-lapse like the grown-ups – individual RAW files.
Then there is much greater control over the final time-lapse sequence, since you can control the exposure, WB, Contrat (and local Contrast), etc. Better yet, you can now clone out sensor dust spots!
So I would only use the built-in time-lapse feature of these cameras when I have to generate something quickly.
Now, specifically about your question about camera movement during exposure – this doesn’t matter as much as you’d think at first. Keep in mind that video is about motion – not so much about individual frames being super-crisp. So if elements in the scene move, that’s exactly what we want. With that, the motion of the camera won’t be as apparent, as long as it is consistent.
Ideally though, you can set your time-lapse system and the camera to work on a Stop-Shoot-Move basis. Then the camera is momentarily static as the frame is shot … and then the camera moves again. This is controlled via the NMX controller tripping the shutter (for the series of individual frames.)
I hope this helps.