Flash Photography Techniques
Exposure metering ~ Flash exposure compensation ~ Bounce flash examples
![]()
Flash exposure compensation (FEC)
Before we get to flash exposure compensation specifically, we need to distinguish that there are two different kinds of exposure compensation :
1.) Overall exposure compensation
This is set on the camera body.
For Nikon, this affects BOTH ambient and flash exposure for Nikon;
(unless changed via a custom function on the newer Nikon cameras like the D4, D800 and D600.)
For Canon cameras, overall exposure compensation only affects the the ambient exposure.
Exposure compensation is used with the automatic metering modes, however …
with most Nikon cameras, dialing exposure comp in manual exposure mode will bias the meter.
With Canon, you can’t dial (overall) exposure compensation in manual exposure mode.
2.) Flash exposure compensation (FEC)
Setting flash exposure compensation affects the flash output only. Ambient exposure is unaffected.
This can always be set on the flashgun itself, but some cameras have a button on the camera body itself where the flash compensation can conveniently be set without taking your eye from the viewfinder.
Flash exposure compensation is used to compensate for the flash output when the flash is used in Auto or TTL mode. It obviously can’t be set when the flash is used in manual output. With manual flash, you’d just be dialing the actual power output up or down. With FEC (and TTL flash), you are telling the flash to give more (or less) flash output, relative to what the camera decides via its metering system.
1.) Exposure compensation
What many new photographers have trouble coming to grips with, is the concept of :
1. adding exposure compensation when the scene / subject is light in tone,
2. and decreasing exposure compensation when the scene in front of the lens is darker in tone.
The reason for doing so, is that your camera’s meter tries to expose for everything as a middle grey tone.
Hence, if you are using one of the auto modes (or Auto / TTL flash), the camera will expose any light toned scene as if it should be of an average tonality. In other words, the light toned subject / scene will be exposed as middle grey. Eg, someone in a white dress against a white wall, will appear under-exposed. So you need to bump the exposure compensation up for lighter toned scenes.
The same reasoning goes for darker toned scenes. A man in a dark suit against a dark brick wall, will have skin tones which over-expose if you left the camera to its own decision. The dark tones would fool the camera’s meter.
To make it even more clear, let’s think about this scenario:
We have a setting where the light is consistent and even. So there will be an exact combination of aperture / shutter speed / ISO settings which will give correct exposure for skin tones.
Now, if our subject dresses in all black or all white clothing, our meter reading will change … yet, the light didn’t change. In other words, we would still need the same exposure, regardless of the variation in our camera’s light meter reading.
If you use an automatic exposure mode, then you would have to use exposure compensation. And you would have to vary your exposure compensation depending on your composition – because the size of the light / dark patches of clothing and background will affect your meter reading.
The same reasoning goes with using Auto or TTL flash. You have to continually adjust your flash exposure compensation, dependent on the tonality of the scene in front of your lens. This is the reason why I use manual exposure mode nearly exclusively.
But then you may very well ask why I often use TTL flash (or Auto flash) instead of manual flash – the reason is that TTL flash is easier to control when I am constantly changing position in relation to my subject. And as I explained on this previous page, it is easier for me in these situations, to use the camera in manual exposure mode, and the flash in TTL / Auto mode. But this means that I have to constantly change my flash exposure compensation.
Which finally brings us to the rest of the discussion on this page …
2.) Flash exposure compensation (FEC)
There are, broadly speaking, two scenarios to consider when we think of how flash exposure compensation works:
1. FEC when the flash is mere fill-flash
2. FEC when the flash is the dominant light source.
Of course, there are many scenarios which fall somewhere inbetween that. But in understanding these two situations, we’ll get a much clearer view of what Flash Exposure Compensation does.
2.a) Flash exposure compensation when using fill-flash
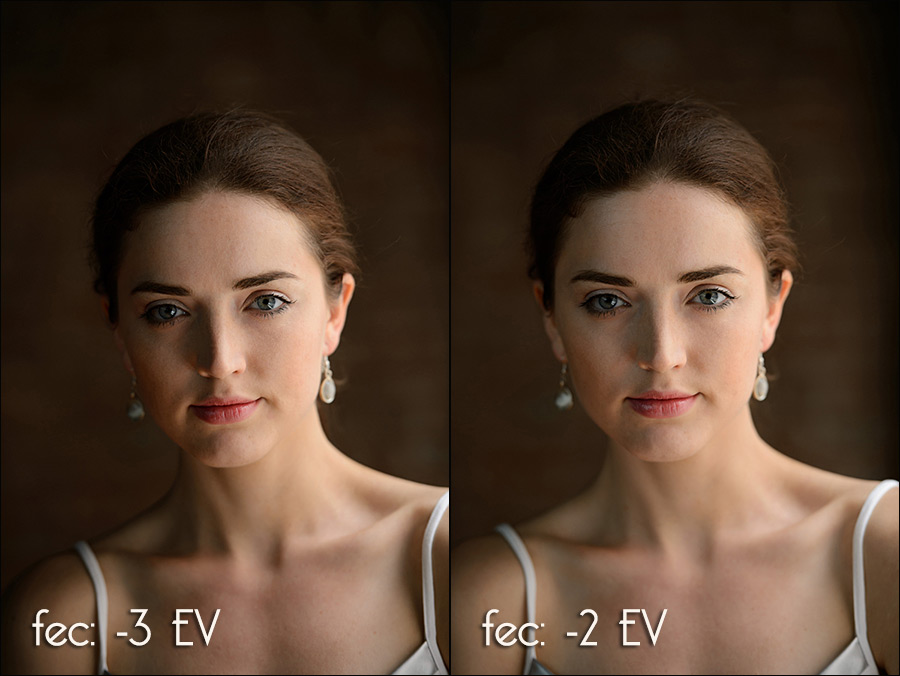
With fill-flash (using TTL or Auto flash), you will most often dial down your flash exposure compensation to give only a tiny bit of fill light. So in this case, your flash exposure compensation will be around -1 to -3 EV. (But it depends on the tonality of your subject as well.)
Let’s look at a specific example – a window-lit portrait of a model. In other words, she is lit by the available light coming through the window. We establish our exposure either with a hand-held meter, or by carefully using the histogram method for metering off her white dress. There is a follow-up article which also discusses exposure metering for the bride’s dress.
In the top two images, there are no flash. In the left-hand side image, with the way she is posed, the window light looks fantastic, with the way the light turns to shade across her cheek. Her eyes are lit and have a spark. Great.

But the moment she looks at the camera, the contrast is too much. Her eyes are shaded. While this might work as a moody portrait for some subjects (eg, a musician), it isn’t quite as flattering as a gentle portrait of a woman.
In the right-hand image, the exposure is still the same. That didn’t change. We couldn’t just add more light (by opening our aperture, or dropping our shutter speed), since this would cause over-exposure to the brighter side of her face.
We need to do something to bring in more light to the shaded side of her face. We could use a reflector … or, fill-flash. In this instance, I used on-camera bounce flash. I used TTL flash that I bounced into the room to the camera’s left.
Now I need to control the amount of light from the flash. I need to tell the camera to add only a certain amount of light, instead of the full output. Here are four examples at different FEC settings.
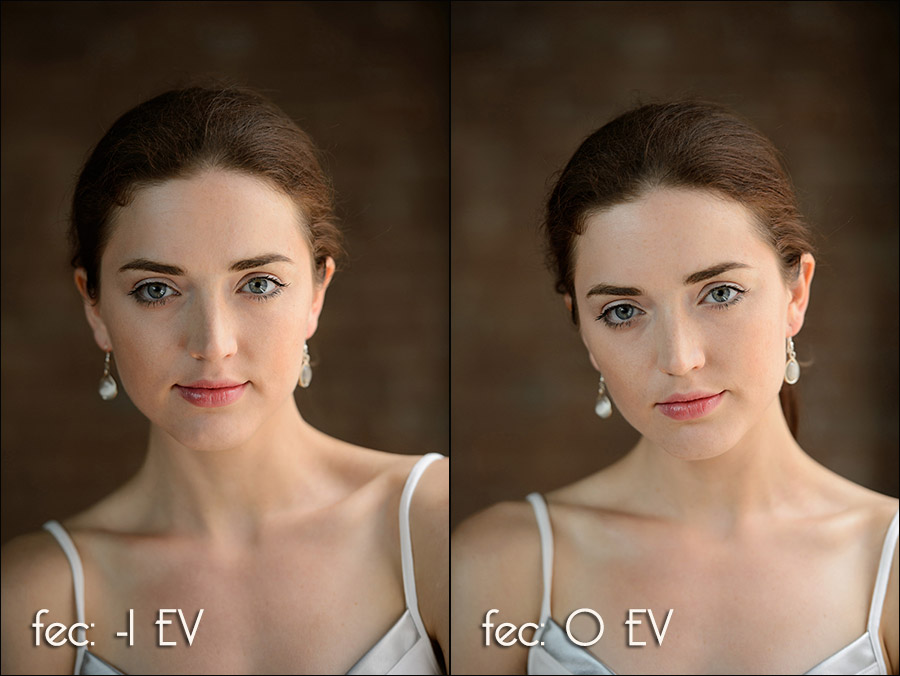
Note – there is no right or wrong here. Just personal preference. You need to decide what you like, at any point that you use fill-flash.
This is in essence what we do every time we use fill-flash, whether on-camera, or off-camera. We lift the shadow areas by brightening the darker parts. Fill-flash reduces the contrast.
2.b) When your flash is your main source of light
But when your flash is your main source of light, you will usually hover your flash exposure compensation around 0EV to +0.7 EV depending on the camera and camera system … and of course, the tonality of your subject and scene. So your flash exposure compensation could still range anywhere from around -2 EV to +2EV.
Once again I want to stress a particular point – there are no specific or fixed settings.
There are just too many variables for anyone to give specific ‘do-all’ settings.
Factors that will affect your choice of FEC
There are a number of factors which would affect how your camera and flash meters TTL flash, and would therefore affect how much flash exposure compensation needs to be dialed in:
– reflectivity of your subject,
– how much of your frame is filled by the subject, and
– how far the subject is from the background, and
– whether the subject is off-center or centered in the frame,
– the individual camera’s exposure algorithms that the camera designers came up with,
– available light – (this ties in with how the camera’s metering algorithms work),
– back-lighting – (strong back-lighting always require a lot more flash exposure compensation).
Therefore you have to juggle all this when figuring out how much flash exposure compensation to dial in. A seemingly tough task that gets easier with experience.
But here’s a hint – when your flash acts only as fill light, then the actual flash exposure compensation can vary a lot without affecting the quality of the final image much.
An example:
Flash exposure compensation of say -2 EV will look slightly different than -3 EV, but in the end the actual photo won’t be incorrectly exposed with either setting. If your flash was the main source of light, then a full stop incorrect exposure would be a lot and might very well mean the image is a flop in terms of exposure. But when the flash is just fill-flash, it is less crucial – although careful and subtle use of flash should always be the aim of course.
Nikon TTL vs TTL BL
With Nikon’s flash system however, you have the choice between TTL and TTL BL, (ie standard TTL and matrix TTL). With TTL BL, the camera and flash take into account the available light and will reduce the flash output accordingly. More subtle fill-flash is possible with TTL BL than TTL.
The conclusion here is that ultimately it is best to know how your specific camera and flash reacts in various scenarios and various lighting conditions. There is only so much that can be learnt outside of actual experience and continual practice. You have to know your own camera.
More detail in this article: Nikon’s flash settings – TTL vs TTL BL
Cumulative exposure compensation with Nikon cameras
Nikon cameras allow you to set overall exposure compensation even when you have your camera set to manual exposure mode. This allows you to bias the metering.
With Nikon, the overall exposure compensation and flash exposure compensation is cumulative .. to an extent. For example, if you were to dial in +1.0 exp comp and -1.0 flash comp, it would cancel each other – but only for this scenario where the ambient light is low, and your flash is your main source of light.
Where the ambient light levels dominate, and flash is used as fill-flash only, then different algorithms come into play, and you have other factors such as max sync speed and available apertures affecting the scenario as well .. and hence the flash and exposure compensation might affect ambient light exposure differently then.
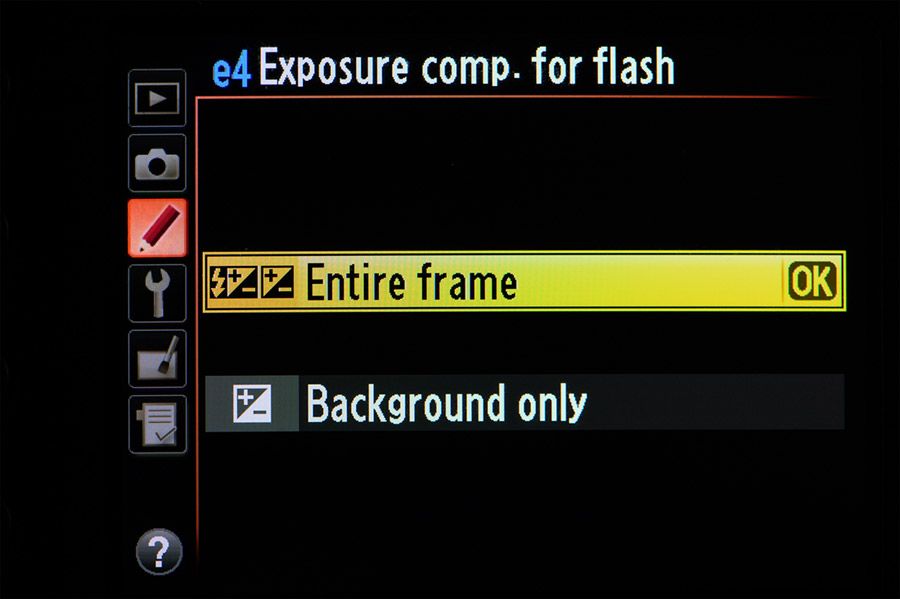
With the more recent Nikon bodies, (Nikon D4, D600), you can change a custom function so that the overall exposure compensation is disconnected from the FEC.
It is confusingly named as FEC for entire frame vs background only. By selecting custom function e4 (for the Nikon D4), to ‘Background only’, the overall exposure compensation has no effect on the flash exposure.
With Canon, flash exposure compensation and general exposure compensation aren’t linked, as they are with (most) Nikon cameras. So with Canon, in manual exposure mode, you can only set flash exposure compensation and not overall exposure compensation.
(It is no use asking me how it handles this in any of the auto exposure modes, since I use my cameras nearly exclusively in manual exposure mode. You’re on your own there.)
 okay, moving forward again : More bounce flash examples
Help support this website
If you find these articles of value, please support this website by using these Amazon and B&H affiliate links to order your photo gear.
I also offer photography workshops and tutoring sessions. There are also video tutorials, which are online workshops on photography.
Join us on the Tangents Facebook group for further discussions.
Neil vN

Books by Neil van Niekerk

Neil,
Love your site, it has been exceptionally helpful for me, thanks a bunch. Re Canon and exposure compensation, wanted to help folks be clear. You can always set both overall exposure compensation and flash exposure compensation, right from the camera, as these are separate settings. Of course, when for example decreasing overall exposure and then increasing flash exposure to compensate, you get an overall similar exposure, but now different parts of the scene are exposed at different levels, so it doesn’t look the same, nor would you want it to be. This allows for more creative control. One great thing about digital cameras is the opportunity to experiment all you want, and immediately see what you get, so that you can perfect a technique before going on a job. And last thing, you can always set exposure compensation in manual, using the same knob, by just increasing or decreasing exposure of the shot, by adjusting either apeture or shutter speed. We simply no longer call this “exposure compensation”, but its the same thing, as the shot is either overexposed or underexposed by the amount you dial in.
Neil,
‘Someone in a white dress against a white wall, will appear under-exposed. So you need to bump the exposure compensation up for lighter toned scenes.’
This is pretty much the same concept as the standard example ‘snow scene’ isn’t it? Snow fools the camera’s meter because it’s so bright and therefore the camera would adjust to a lower exposure turning the snow into grey vs. white (5% grey). If I remember correctly this scenario also requires a slight ‘overexposure’ (overall exposure compensation).
Anyways – hope i got this right and thought it may help to remember that the same concept appears to apply to flash exposure compensation.
Seb, that’s it. You have it correct there.
Just keep in mind that you are not in fact over-exposing the scene, but that you are exposing correctly for it by pushing the tonal values to where they should be.
Neil,
Your site is one of if not THE best learning resources for photography I’ve ever come across.
I just wanted to make sure I understood what you explaining here. I understand the “over/underexposure” necessary based on the tonality of the subject within the camera; riding the flash compensation might be confusing me. For example, I’m shooting portraits in a garden that has white statues arranged in it, and I choose to (in manual mode and using TTL, no BF) adjust my aperture/shutter/iso accordingly to render them as closer to white and not a middle gray. Now I’m also able to bounce my flash in this situation and use it as the main light on a model wearing a white suit. At this point the camera is set to record the scene accurately, and would also probably record the suit correctly, but the flash is still looking at the scene (white suit, statues) as if it were middle gray, correct? So now, in order for the flash to “see” the scene correctly, I’d give it some added compensation? Am I correct in that if I didn’t add compensation, the flash wouldn’t fire with enough output to appear as the main light?
Greg .. in your description you are giving correct exposure for the ambient, AND adding flash as main light. This isn’t really the way you’d go about it generally.
A more realistic scenario .. you are using your flash as your main source of light, and you’re shooting in TTL mode. Then you have to, in this case, add + FEC to have the statues / objects appear as white / light tonal values.
Hi!
Thanks a lot. this is the important part by using Nikon i-TTL.
And this is my main problem.
When shoud I use BL -i-TTL and what situation is the correct one for standard i-TTL?
I know the stuff BL is Fill light and standard i-TTL is if my subjekct is main lighted with the flash.
BUT:
If The sun is in front of me (backlight) it shoud be BL Mode. But if I reduce the ambilight (in M Mode by reducing ISO, The aperture or the shutter speed) don’t I have a TTL-situation?)
At which time I use which mode??
The problem I don’t understand is that:
In standard i-TTL mode. Is it right that the flash power is always set as strong as the ambilight would be very very dark?
So If I make the shutter longer (or the iso higher or the aperture wider open) I have to reuce the flash exposer?? This could not be becuase of TTL I thought.
BUT in i-TTL the flash ignores the ambilight. And when I make higher ISO, longer Time or bigger aperture there will fall ambilight on my subject even more and influencs the light on my subject too. And in standard TTL Mode in the manual there stands that the ambilight on my subjekct does not influence the flash power.
So what is true??
In i-TTL BL this situation should be solved (I thought). BUT (again)
very often the flash is to weak. so it knows when I make the exposere (the ambilight and ambilight on my subject) brighter but why often too dark the flash?
Thanks a lot for yout help
Ulf … as mentioned in my other replies to you …
for me, the choice between TTL and TTL BL revolves primarily around having a consistent method, rather than flipping between modes.
The scenarios you describe are too general for me to give specific advice. And ultimately I will have to revert back to this page I linked. You have to get used to how your camera and flash respond … and then adjust accordingly.
One can only analyze so much from thinking about it and theorizing about it. In the end we have to actually get out there and take meaningful photographs and have fun with it.
How would you need to use the flash exposure comp. when you have a bride all in white and the groom all in black. Would you just have to go with the in camera metering to get this exposure correctly?
Meredith .. this is one of those situations where you have to pre-judge, shoot, check & adjust.
And shoot in RAW.
How much white and how much black you see in the frame, will depend on your composition. And this is where TTL flash doesn’t fare as well as manual flash, since a change in your composition will heavily affect your exposure. And it becomes a pain to adjust the FEC for every shot where you change your composition.
How much FEC will also depend on how the camera’s matrix / evaluative metering system ‘decides’ to interpret the placement of black and white areas. Equal amounts of black and white? I’d try my flash at 0EV as a start.
“So with Canon, in manual exposure mode, you can only set flash exposure compensation and not overall exposure compensation.”
Your book states the same on page 38…
Are you saying that with the same shot with a Canon body/flash (in M mode) I can’t set both the exposure compensation and the flash compensation at the same time?
I must be missing something here, Neil, because I do that very thing routinely.
Clue me in so I can sleep tonight!
I can see the ambiguity there. Let me rephrase it:
The ambiguity falls away though when you realize that “flash exposure compensation” and “manual flash” are mutually exclusive.
Hi Neil,
Love this site sooo much and study it regularly plus purchased one of your books so far. Wondering if you could offer some advice for outdoor flash re when a subject is wearing glasses. Since i’m aiming straight at them (FEC dialed down) i’m going to get a glare mark on the glasses….any advice to avoid this?
thanks!
Jennifer :)
Off-camera flash, or ask them to remove their glasses.
Took me some time before I really figured out what you meant with ‘biasing the Nikon camera’s meter in M-mode’, until I was doing some testing few nights ago. I was shooting a white wall in P-mode to see the effect of bright objects on the camera’s meter, with a flash in TTL mode as the main source of light. Indeed I had to use exposure compensation to get the wall nearly white in the image.
Then I switched to M-mode, with FEC set to 0.0, and the same aperture and shutter speed as the image in P-mode. I was ready to use the FEC dial to again make my white wall appear white in the image, but was startled at first to see that the flash already pumped out enough power to make it so. The P-mode’s exposure compensation directly influenced the output of the flash, without even touching the FEC. Aha… now I get it. Dangerous stuff, if you’re unaware.
I own a 430ex flash for my canon 550d. I also own an omnibounce diffuser. I have read in a number of wedding photography books that using the diffuser outdoors set at a 45 degree angle is worthless and that I should be removing the diffuser and pointing the flash directly at my subjects yet on viewing a dvd recently of Denis Reggie (one of the world’s best wedding photographers) He was taking shots outside at a wedding with what looked like an omnibounce diffuser set at an angle of 45 degrees. Now which is right. It’s just confuses people when they come across contradictary ways to use flash outdoors. Please help.
Jeff … you have a camera and a flash and a diffuser cup …. and willing friends and family. Test this out for yourself and you’ll see then how the contradictions play out.
I could tell you one thing, and try to argue my point and show images …. but ultimately, this is easy enough to figure out for yourself. Then you’ll know without having to rely on others’ opinion … which is contradictory.
Oh, and remember to keep your flash’s distance scale in mind, as well as your necessary flash exposure compensation.
Hi Neil,
First of all i want to thank you for your 2 book, i get enough of knowledge from it, and i am loving it.
Can i ask a silly question here? Where is the Flash Exposure Compensation button on Nikon D700.
Your reader,
TJ
The FEC on the D700 is on the left of the prism if you’re holding the camera.
It’s marked with a lightning bolt.
Hi Neil, I’ve just read a recently updated (August 2011) article on Luminous Landscapes, written by Michael Reichmann about exposing-to-the-right. It suggests that you should still use this technique (ETTR) even when the scene is dark in tone. Only when shooting in RAW though.
Hey Neil, regarding the use of on camera flash with off center or way off center subjects. I’ve scanned the use of flash exposure lock “FEL” and was unable to find any mention of it on your site. Do you ever find the use of it or does the FEC adjustment always cover that for you?
An example: I was shooting from a kayak at dusk with some faint glow in the background sky. Another kayaker was placed off center. I’m shooting in manual with TTL flash. Being basically dark out my flash was blasting all it had for the subject was not close-up and off center. I dialed down the FEC all the way but that was not enough. Is FEL the only practical solution here other than manual settings on the flash? At the time I was using a Canon Rebel, center weighted metering, with center focus activated to which I locked on the subject then recomposed. Would setting to evaluative meter or in the case of my D700 which I mainly use, set to the matrix setting help in this situation?
Your advice, as always, is greatly appreciated. Thanks again.
John R
Flash Exposure Lock / Flash Value Lock is one of those things where I clearly see that it would be useful, but I don’t use it. Going by the camera’s preview and adjusting the FEC accordingly, is just how I use TTL flash.
The example where you use FEL to measure the flash for off-center subjects is definitely a scenario where using FEL would give you superior and more consistent results. (I may have to re-evaluate how I shoot, come to think of it.)
Just a short follow-up. I wish there was a custom function to link pressing half way down on the shutter button to include flash exposure evaluation and lock it with the focus. That would be so much more efficient.
I don’t think that would be entirely practical, because what you meter off, might very well not be where you want to focus. And ultimately, focus and metering are two separate things altogether.
Hi Neil,
I’m very happy that I would ask you some question.You’re really one of my favorite photographer.
Is there any difference in Nikon when the flash acts as fill light, using TTL:
overall exposure compensation -2EV, flash exposure compensation +1EV vs only flash exposure compensation -1EV. Is it the same?
(camera in M mode.)
Thank you for your great help.
Thanks,
Guy
In theory, yes. And every time I’ve shown this to someone it did work that way. But perhaps I got lucky, because we don’t quite know what algorithms the camera designers wrote into the camera & flash combo. So don’t be surprised if the practical results do vary from what you expect.
Hi Neil,
regarding exposure measurement for TTL flash: Do you use (with your Canon gear) Flash Exposure Lock (FEL)?
I understand it as some kind of “spot metering” and I have good results pointing the spot to the face of the subject …, then do the measurement and then focus and recomposing.
But actually, the results seem quite similar to center-weighted average…
best, Vicco
Hi
Thank you for a realy good site.
I tried on my Nikon D7000 in M to take a ok metered picture, after that i dial my overall exposure compesation to +3 took a picture and then to -3 took a picture, The +3 and -3 was shown in the viewfinder, but the pictures were all the same, no diference in exposure.
So on D7000 i looks like you can use overall exposure compensation in manuel mode.
But it have no effect
Best Frank
Frank,
by keeping Aperture, Shutter speed and ISO at constant value camera will get the same amount of light to the sensor from the same light source, regardless EC value you would dial in – everything is static. IF you allow at least one function to be control by camera ( keep manual mode constant Shutter speed and aperture, but let camera to control ISO settings, via AutoISO function. Then you would be able see the effect of EC in manual mode.
Frank,
If you didnt change your settings i would assume the image would be the same regardless of what you had dialed in on your exposure compensation.It only affects the exposure indicator. Shutter and aperature dont change, so your image wont. mike
Yes i found out how i works during the day :)
Frank, that’s exactly how Manual Exposure Mode should work – your settings remain fixed.
By dialing in Exposure Compensation though, you are biasing your camera’s light-meter.
I use the Exposure Compensation button on my Nikon D3 to affect my TTL flash exposure, since the D3 doesn’t have FEC on the camera body.
Thanks for answer.
.
And i think you also answered what i was about to ask you.
Yesterday i found out, that in M the exposure compensation button,could be used as Flash compensation button and because it is easier to use on my camera, i would hear if there is any disadvantages associated with this
Best Frank
No disadvantage except if you happen to *forget* you have dialed that in and next time wonder why the flash is giving too much or not enough power.
The other advantage with Nikon/Manual Mode and Exposure Compensation on the body is that it can be cumulative for Flash, ie: Dial in -2 on Flash itself and dial in -2 on camera body you get an equivalent -4 in total. Really cool in certain situations.
Remember to dial back body compensation to Zero when finished. Been there, done that. :(
Trev
Thanks for reply
Yes of cause, but it’s the same using the real FEC or the on Flash FEC.
I even think it will be easier to remember when using the Exposure Compensation button, because you will see next time you Light meter.
But of cause, cameras have so many buttons and wheels for many things, and sometimes you forget to reset :)
Frank.R
Two questions.
1. Ttl flash uses camera metering to determine flash output. Auto flash uses flash itself to determine flash output,and common before we had ttl flash. Would you recommend using auto flash with manual exposure?
2. Sb 900 can heat up quick if fired at full output. So I normally reduce it to 1/4 output, and raise iso to increase exposure globally and keep shutter at max sync speed, when shooting indoors and with mixed lighting . Is that a good idea?
So glad that I found your site, I have been trying so many times, that everytime I photo a subject that is very closed to a background wall, the picture always looks dark or underexposure. Would you please give me some tips on how to get the correct exposure. I’m using a Canon Rebel w/ kit lens. Thank you very much.
Tim .. you don’t give enough details for me to give specific advice.
However, your problem is a root problem regarding exposure metering.
Start here:
– Exposure Metering tutorial
– metering techniques
Amazingly beautiful model!
Neil, on the D4, there is a FEC button and a EC button. How do these work together with e4 “Exposure Compensation for Flash” setting?
Thanks in advance
Hi Neil – Thanks for the great web site. I’ve learned a lot here.
To throw another variable into the Nikon TTL flash equation – some Nikon bodies have a menu setting that separates flash from exposure compensation. On the D600 it’s menu setting e4 (I see Johan mentions it above). When this option is on exposure compensation does not change the flash. Of course Flash Exposure Compensation still does.
Another Nikon TTL flash trick is that FEC can be changed after locking the flash with FV Lock. In other words you can press FV Lock to get the cameras solution, take a shot, chimp the results, change the FEC setting, then shoot a series with consistent flash output.
This also works worh regular exposure compensation and the ambient exposure.
Bill & Johan, thank you for the heads-up. I’ve amended the article now to include that.
Great article Neil, thanks for all your descriptive explanation.
I didn’t fully understand the sentence regarding Canon Camera, you cannot use FEC?
I use canon 5d in manual with iso set anywhere but automatic and when I
I look through my view finder I can dial in FEC , please explain, I think I maybe mis- understanding?
Thanks for taking the time to read
Regards,
Mike A
“with Canon, in manual exposure mode, you can only set flash exposure compensation and not overall exposure compensation.”
This part? Make sure you distinguish between overall exposure compensation, and flash exposure compensation.
Thanks Neil, I’ll do some practicing and checking to confirm
Cheers
Mike A
Hi Neil,
With regard to the statement above, i.e. “With Nikon, the overall exposure compensation and flash exposure compensation is cumulative…,” I noticed some unexpected behavior on my D7000 and hot shoe-mounted SB-600.
FEC can be set by pressing the Flash button on the camera body and then rotating the sub-command dial, as well as pressing the +/- buttons on the back of the SB-600. What was unexpected is that FEC (total) = EC + FEC (camera) + FEC (flash). This can be verified by observing the EC and FEC values during image preview.
I would have expected that any FEC value set set directly on a hot shoe-mounted, CLS compatible flash would override whatever FEC value was set in camera. This appears to be an undocumented “feature,” which can lead to potentially unpredictable results.
Regards,
Ralph
Hi Neil, Thank-you for all your tips. I couldn’t have done my first two wedding shoots with out reading one of your book regarding the use of bounce flash! I’m about to do my 3rd wedding (this one is for a family) and the most daunting thing for me at the moment is the location of the ceremony. It’s inside a building with a very high, limited reflective ceiling and walls. To makes matters worst the bride and groom with be standing at a semi circle section of a building with windows and natural light coming throught directly behind them. I will be using a Nikon D700 attached to a 24-70mm f2.8 and SB-900. I have been there to try out various setting using TTL and dialing down FEC. Tried pointing the flash directly and bouncing it off the wall but not satisfied with the results. Any hint or tips would be much appreciated. Thank-you, Nuttee
It sounds to me like you’ll have to embrace this as an available-light / high ISO / wide aperture scenario, shooting with fast primes.
Alternately, direct flash, perhaps with a small softbox … but this will change the nature of what the scene looks like.
When there is nothing to bounce your flash off, then you have to improvise or accept the limitations of where you are.
Hi Neil!
Thanks for being so passionate about photography, and for sharing your knowledge of the subject with so many.
When I am shooting, I generally shoot in manual mode, and expose for the Highlights or shadows using the camera’s meter and typically use the AE lock to get it right. When I go to use flash, many times I will underexpose the image by 1-3 stops to add drama to the image, and then add the flash (sometimes in the same number of stops) to illuminate the subject. I generally have no issues when shooting off camera flash, but when i go to use on camera flash with bounce, I don’t seem to get the same results.
I guess my question is this: If you set the ae lock in manual mode, and adjust things to your liking (reducing the exposure, preparing it for the addition of flash), and then adjust your bounce flash adding flash compensation to light your subject, Does the flash exposure compensation work with the same spot you metered and hit exposure lock on, or does it do just average or evaluative metering across the whole image for calculating the correct flash exposure? I see in the settings on the camera (5dIII) that you can set flash metering to evaluative or average – is that what this is? If so, How do you account for this? It seems like you should be able to set the exposure level, and then the flash meters in the same way to make sure you are adjusting up or down the correct number of stops to get the balance between ambient and flash in the right ratios. I use the zone system to meter ambient light, but when I add on camera bounce flash, and then adjust my exposure for that, I seem to be not working on correct assumptions. You mention in this article that Nikon is additive FEC and EC, however Canon is not, is that what I am fighting?
Thanks!
I think perhaps I am just not on the same scale. Perhaps i should think about FEC as a 6 stop range, rather than -3 to +3. -3 I would guess still could be +1 in many lighting situations (depending on subject distance from what I am bouncing off of (and the distance to the object i am bouncing off. As an example this morning I metered off of a white paneled door for ambient light to +2 to get it in the correct zone. From there I subtracted 3 stops to give room for the flash in 3 stops for the subject to give the appearance of window light from the flash. When I did FEC at +3, I was over exposed, but when I backed it down to 0 (effectively +3 stops from -3, which may be 1 stop of light, depending on the situation), the effect was as I wanted. I still may be missing something, but at least it seems to be on the right track. In manual mode, I have between 1/128 and 1/1 power. How is 1/128 relative to -3 on exposure compensation? It is different, and 1/128 appears to be more power than -3 FEC, all other things remaining constant (which is surprising to me).
Ron … there’s a bunch of questions thrown in there. Let’s try and sift through some.
It has no direct comparison. The one is an absolute (manual) level, the other is relative to what the TTL metering thinks you should have for correct exposure.
Yes and no.
-3 FEC can be more subtle than 1/128 manual power, but this also depends on your distance, since with manual flash, the distance has a direct correlation.
Then it did exactly what you told it to do. It gave you a lot more light than it thought you needed, but you insisted on adding (approx) 3 stops more.
No, with Canon, the Overall EC is disabled in manual. It’s just not there. Nothing to fight.
I do understand your frustration in trying to come to grips with this and analyze it and dissect it. To an extent, this is possible – to get an overall understanding of how FEC works, or is supposed to work. But we also have no real idea of how the algorithms work that the camera manufacturers wrote. And these different from make to make, and model to model. And it differs for different light levels. It possibly differs for different metering modes. Maybe focused distance.
There’s a whole bunch of unknowns thrown in there, and we can only get a general idea of what is going on … and then we take awesome photos. And if needed, change the FEC a bit for the next shot, according to what we see on the camera’s preview. And that is ultimately our destination – awesome photos. Don’t lose sight of that.
I found it today strange (for me) thing.
I have Nikon d5100, and when I was in A mode, I turn my camera EC for +2 stops. Then I switch to M mode, I took couple of shots and I found out, that they were too bright. Here is the thing – when you switch to M mode, camera change EC to Flash EC +2 stops. So it is very important to make 0 EC in A mode, before you change to M mode.
I don`t know if I clearly explained this, but maybe people with entry level cameras will benefit from my little “discovery”
I spent whole day to figure this out – why my flash work so hard in M mode and that`s the answer.
It’s not ‘entry level’ cameras that are affected Baart, and for anyone else reading this, it’s the fact that on Nikons when you changed your camera’s Exposure Compensation to any value other than 0, then you use flash, that EC Camera Value is also taken into account, *only* when camera is in Manual Mode as you discovered when going to manual.
Body EC will have no affect on exposure on the shot when in Manual Mode, Manual is Manual, but the moment you put a flash on, it does affect the flash in TTL.
If you use flash and say have it on +1 but you also have the body’s EC on +2, it’s accumulative, that is your flash will now work trying to get a +3Ev compensation.
As I said, this only works in Manual Mode though, and that’s what happened to you Baart.
Then on the flip side, in Manual, you set Body EC to +2 but Flash to -2, you in effect cancel out the compensation and the flash will work as if in +0 ev.
I should also say this does not apply when using the Flash itself in Manual Mode. The flash in manual will only output what the power setting you set it to.
Set it 1/2 power that’s what it will output time and again regardless of exposure.
That`s right. I thought, that if I change from A to M mode, my settings are not affected.
My flash photography will improve ;-)
Thank you Neil, thank you Trev.
Neil,
Thanks so much for your reply. I know a good bit more now than when I posted, and I’m content with the test and adjust method when it comes to TTL metering and FEC. It seems like we would be able to spot meter and adjust to the appropriate zone of the subject, but there seems to be a lot more that TTL metering is doing in order to calculate the correct amount of flash to add – apparently taking an ambient reading, then independent flash group fires and readings and then calculates the appropriate power to send on each flash group by some type of split second voodoo.
If I am working in a studio, or in a controlled environment, I have been going into manual mode on the flashes more often than anything, just because i can get the light exactly the way I want with mutiple flashes going off. Out in the field, If I have more than 1 flash, I’m generally not using more than 2, so i can adjust things on the fly. Any other advice you might have on working with TTL on multiple flashes is greatly appreciated.
I think I saw you have a number of books on flash, and off camera flash – are multiple flash setup’s using TTL covered? It seems to me the best way to do it would be to take practice shots of the subject individually with each flash, then combine them at the end, but then I don’t know if TTL is cumulative on it’s calculations, knowing where light spillover will happen. It would seem that it could be adjust one, have to adjust another, then another….etc…
Again, thanks for what you do for photography.
Ron
Neil,
After doing a little more research, I think i’m finding what I want to use is Flash exposure lock on my 5d3, and then adjust Flash Exposure Compensation. According to Canon, the FEL is actually spot metering for flash. With that in mind, I believe i can use FEL, then adjust the FEC to be in the correct zone for the subject, or the whitest white, darkest black, whatever be the case. Do you use FEL? It seems like it’s the perfect solution for getting the correct exposure on your subject, and along with the exposure meter in the correct spot for the ambient background, you get everything you want in a Zone System world. I think I never used it because i thought it was still using the average or evaluative metering, which seems to be pointless to lock something in an averaged 18% world, rather than on a specific part of your subject, or background.
Let me know if i am missing something, but this seems ideal.
I really want to come to one of your classes, wish they were a bit closer to South Carolina. Thanks again.
Ron
Hi Niel,
Been reading so much on your site..thanks! My sister recently gave me two flash units. One is the 550 EX canon and the other is a digi Slave unit.
I tried so hard to get the slave to work in ratio with the on camera Canon. I’m having a hard time with it. I feel that it’s not working. When i put the Digi in manual mode, i did a sucession of flashes ranging from 1/1 all the way down to the other end. At one point the flash got brighter and brighter, then the next stop up, all of a sudden the whole image on LCD camera was super bright white. Like the entire room blew up. I could see barely hints of details.
Last night i went to a party and tried just the other one…the Canon 550EX and i had quirks with it too. It did that too once or twice and i’ll never remember why. For the most part it’s working right though. I think that it might have even messed up my camera (MARK II) a couple times, so i removed the battery of the camera and reset it. Talking about how the dialing of the different modes work…the Fstops and Shutter Speeds..seemed erratic.
Biggest question is do you know what that super bright white overexposed is from? I really want to learn this flash stuff. Spent the last 3 days almost non stop reading your blogs. Is a single off camera flash unit good enough instead of two units? I just use it for occasional parties..not weddings.
Thanks,
Pat
” i did a succession of flashes ranging from 1/1 all the way down ”
I am going to guess that the blown out image is where you shot at full manual power.
Start with TTL flash. It’s easier to immediately get good results than with manual flash where a bit more experience and understanding is necessary.
Thanks for answering Niel. I’ve read all about multiple flash units/a small light box off camera/and using a single on-camera flash (maybe using the l.black thingy for modifying occasionally..and bouncing).
I primarily go to these get togethers about every few months of the year (Valentine parties etc).
So, after much thinking (too much!), it seems that using a light meter-2 flash units-meausring outputs …it all just way too much for something like that. People want their pics on the spot. It would be impossible.
I’m thinking now, of a off camera single flash. Using a straight (not coil) flash sync chord)if i can find one. Along with a light box to cover the flash. And hold it about 6 feet away for single people and about 20 ft. for group pics.
I forgot……..would that still maintain TTL metering that way? I hope so! I have two Pocket Wizards/a Sektonic light meter given to me. I have not used them before…maybe I’ll sell them.
Can you give me your advice and what you think of this idea?
Thanks..Pat
Using TTL flash like that would work. Simple enough to shoot on the run, and get good results.
Neil,
I’m almost through reading your book “On Camera Flash” and the one thing that I have a question about is the FEC. In some settings your +.3 FEC, others +1 FEC, and even more…-1 FEC. So my question is…what do you use to determine the FEC value and are you only basing the FEC on a zeroed meter? The EV would only be adjusted to correct the tone of the scene based on ambient, right?
Best,
Kevin
Hi there Kevin ..
You can’t simply zero your camera’s meter.
– which exposure metering mode
– exposure metering techniques
Flash exposure compensation is adjusted according to:
– tonality of your subject,
– how much flash you actually want to add to the final image. Sometimes you want fill, sometimes you want flash to dominate … and sometimes you want something inbetween. Your choice .. which is also guided by the particular scenario you find yourself in.
Hello Mr. Niekerk.
Recently I’ve started photographing the events and found your website. I really love your website and follow step by step your ideas for photography. On Saturday night I had wedding photogrphy in a big reception. I followed all your recommends for everything and bouncing flash. I set my flash to TTL with +3 compensation. With test shot the light was good. But when I was doing the real shot and focusing on bride’s eyes, the flash light was so bright. First I want to know the reason and the solution please.
Another problem was: The flash light with TTL setting was good for wide shot but when I was closing up (with the same aparture in wide shot) the flash light wasn’t enough, and the face came up dark. Should I set the flash to manual, If not, why TTL doesn’t work in this cases.
My camera is Canon 70D and my flash is Canon 430
Thank you very much for your time
Regards
Mahnaz
Hi there Mahnaz
I’m curious – why did you push your FEC so high, all the way to +3 EV?
What is happening now, is that you are telling your flash to give 3 stops more light than it thinks you need – and this inevitably leads to the kind of gross overexposure you’re seeing.
Regarding your other question – this will depend on your camera settings, as well as the size of the room. Are you bouncing flash? And how are you bouncing it? And are you using a diffuser of some kind? Or are you shooting direct flash?
(I can’t think that I ever recommended that type of setting.)
I want to learn how to use a 550EX speedlight with my 5d Mark 2. All connected and turned on and ready to learn exposure compensation, the flash manual gives instructions I cannot get to work. I have mode set on camera to P and the flash screen says ETTL, a black icon with plus and minus. The manual says press sel/set but nothing happens no matter what I do. I am supposed to be able to hit either plus or minus to get exp comp. How can I reset both my camera and or flash to factory standard, and is there anyone who can give me a basic lesson?
I don’t have a 550EX on hand, so can’t give you specific advice, but that’s how the FEC should work. Hopefully someone can chime in with some advice here.
Hi Neil,
first of all: Thank you for this tutorial! It’s well-written, well-illustrated and well-explained!
There are, however, two things that aren’t quite clear to me:
1.) How does the camera determine the amount of light needed via e/i-TTL? I’m familiar with the technical aspects but I don’t know: does the flash output depend on the metering mode?
For example if we take the above sample picture. You dial in your ambient exposure manually, sure. But you still have some kind of metering mode applied: matrix, centre-weighted or spot. Will the flash output change if I change my metering mode? I assume that TTL-flash will also try to bring the exposure up to a middle grey, right?
2.) How does the reflectivity of the subject influence my FEC?
Lets take a far-away, middle-grey background for example and a badly lit face in the centre of the picture, so that the background does not interact greatly with metering and flash.
CASE A: Caucasian skin. The TTL-flash will probably try to bring up the exposure of the skin to middle-grey, right? Which in case of Caucasian skin would be too, dark so I dial in some +0.7 FEC or something.
CASE B: The subject has dark skin. The flash will make the skin too bright so I dial in a negative FEC, right? If so, then it is probably advisable to go with centre-weighted metering in order to let the flash make it’s TTL-metering for the face only, isn’t it? I imagine that if I had a dark background and matrix metering the flash wpuld try to bring up the whole picturw to middle-grey which would result in an overexposure of the skin, wouldn’t it?
–> I guess my basic confusion is about the TTL-metering of the flash and if the flash metering/output depends on the metering mode I have dialed in on the camera or not. <–
I'd greatly appreciate your answer! :) Happy New Year!
Kai
Your camera determines correct flash exposure in TTL mode, via a pre-flash which is emitted right before the main burst of light.
You can see the position of the pre-flash there, a low output burst of light from your speedlight. The camera senses how much of the light is returned, and from that will calculate the TTL flash exposure you should need.
Your specific camera may bring in different algorithms depending on the metering pattern selected. I generally just keep to Matrix / Evaluative Metering …. this way I get used to the way the camera handles flash exposure in general. It becomes slightly more predictable.
And yes, the reflectively of your subject most definitely does influence TTL flash exposure. Think white dress vs black tux. You have to adjust your FEC accordingly … usually with an educated guess, which becomes easier when you get used to your camera’s response.
Neil, you have some really great content here, and I thank you for all the time you spend helping your readers learn. If I may respectfully make a suggestion: I think it’s worth clarifying in your text above that when you say “man” you mean “white man” and when you say “woman” you mean “white woman”. It may be obvious to you that “man” means white, but it may not be clear to your readers, who may treat all “men in dark suits” the same, even those with dark skin. (especially your non-white readers, for whom the default “man” does not mean “white man”)
Lillian … I do mention this. For example:
“So in this case, your flash exposure compensation will be around -1 to -3 EV. (But it depends on the tonality of your subject as well.)”
Now, for the large majority of portraits across the Tangents blog, the person’s face isn’t the dominant part of the frame. Hence, the actual skin tone is only a smaller part of the frame, and therefore, not of that much consideration in terms of exposure metering.
In other words, I would treat the exposure metering (and FEC) for a dark-skinned woman in a white dress (i.e., a bride), the same as I would a fair skinned woman in a white dress.
As in this example: Exposure metering for the bride’s dress. Note how relatively small area her skin is in the entire frame. And here, I meter selectively for the white dress … and hence, the skin tones have even less play in my exposure metering.
In various articles on this website, I have people ask questions about metering off skin tones, and in every instance, I note that you can’t summarily meter off skin tones and zero the exposure’s meter … because (as you mentioned now), skin tones vary a lot.
In this article, I even explicitly state:
“You have to continually adjust your flash exposure compensation, dependent on the tonality of the scene in front of your lens.”
Regarding this specific article, where I mention …
“The same reasoning goes for darker toned scenes. A man in a dark suit against a dark brick wall, will have skin tones which over-expose if you left the camera to its own decision. The dark tones would fool the camera’s meter.”
… it is clear from my description that the dark wall and dark suit fill the majority of the frame – hence, the skin tones don’t matter as much.
Finally, about the images here of Anelisa, who is fair-skinned – the metering was done separately from her skin tone, whether it was off her white shirt, or using a handheld meter. The flash here is mere fill-flash. The lighter skin tone will then affect the TTL metering of the fill-flash. In this example though, the results remain the same in terms of the progression of the fill-flash.
I will amend the text to explain the metering prior to the use of flash. That might clarify things better. Thanks!
I’ve struggled to understand flash for a year – this website clarified it for me within half an hour. Thank you!!
Hello Neil,
I bought your On-Camera Flash book and am learning a great deal from it. I have a question — On my Olympus mirrorless camera (OMD EM1 MII), there is a menu option to disconnect the flash exposure compensation from the camera exposure compensation. And above, you’ve mentioned a similar feature on Nikon systems. However, I don’t quite understand the benefit of enabling this disconnection. Can you elaborate on this? Why would we want to disconnect the two?
Thank you very much for all this helpful information!
Shira
Keeping the EC and FEC disconnected, makes a lot more sense in one of the Auto modes.
Let’s say you are photographing a lighter toned subject and scene (where you might dial in +0.7 EC), and then you add TTL flash, and you want a mere touch of light from your flash (at -2.0 FEC). That would be one example.
Am I missing it or did the D800 not get this updated feature? E4 on my camera is modeling flash
It looks like this function is there from the Nikon D810 onwards.
Thanks for all your work Neil, much appreciated, love your blogs!!
Timeless information presented by a master. Thank you for sharing your knowledge and advice.
Hi Neil,
what a great site. At the moment I am reading all your articles about ttl flash. The reason? I thought I understood. But I did not!
I took a photograph of a couple in front of a yellow castle. Because of the hard sunlight I put the couple into the shade. I was in manual mode with off camera ttl flash. I wanted a bit of drama and underexposed the background by -1. The couple was correctly exposed with FEC at +3 (+1 because of the underexposure of the background and +2 because of the strong backlighting). And then … the big mistake. I tought of changing the angle to have a variety of photos out of one pose. I ended up with underexposed trees as background and an overexposed couple. As maximum sync speed is the sweet spot I had two options left for the ambient exposure: dial down the aperture value or raise the ISO. For the ttl flash I had to dial the FEC down.
The process of finding the correct exposure for both, ambient and flash, starts all over again every time the background changes. It was never that obvious to me.
What is your recipe to adjust your settings for the background and the ttl flash in reasonable time when you are in a hurry e.g. at an engagement shooting or wedding? Is it pure experience that accelerates things?
Cory … with flash as mere fill-flash, I work with TTL most often. But when flash is the dominant light source, then the specific exposure is more critical. It needs to be consistent from frame to frame. With fill-flash we are probably working around -2 FEC or -3 FEC on TTL … so the variance is less of a concern. However, when the flash is the main light (i.e., the dominant light source), then we need to remain at the correct flash exposure – hence, then manual flash.
The way you have it set up there leaves you vulnerable to exactly that kind of result – over-exposed couple due to the +3 FEC.
There’s no real magi recipe here for the scenario you are in. You need to switch over to manual flash here.
Hello Neil,
First, thank you for your time on with this site. I have a Nikon SB-600 flash which has suddenly started blinking two dashes after the “zoom” on the LCD – instead of giving the read out of the zoom ranges, which was previously the case. Do you know why this may be, perhaps?
Thank you,
Diana.
Diana, the user manual shows this as an error. If this simple reset doesn’t work, then the flash might be faulty?
Neil,
Thanks for your description on the Nikon flash exposure system. But I have one question: I do normally shoot in manual mode (M) and do never use the exposure compensation button on my Nikon, but instead adjust my shutter, aperture and iso all manually. This way I can handle the camera and my speedlite all independently, without both being cumulative etc., is that correct? It seems to me this way it works like the Canon flash system.
Kind regards
Hi there Daniela
There are two variables that you don’t specify – whether you are referring to manual flash or TTL flash.
The mention of cumulative exposure compensation, as mentioned in that article, relates to flash exp comp and overall exp comp being cumulative … for Nikon. It doesn’t work that way with Canon, since the overall exp comp is disabled in manual exposure mode on the camera.
So just make sure you have everything clearly defined there in your understanding, because this — “I can handle the camera and my speedlite all independently, without both being cumulative” — doesn’t quite make sense.
Hey Neil,
Thank you for your response and sorry for my wording! I am German and trying to give my best at explaining complicated photographic coherences in English. :-)
Anyway, I learnt flash techniques on the Canon system which I considered relatively easy. Now that I switched to Nikon I am trying to become familiar with the Nikon flash system which seems to be a little different.
I always stay in manual mode with my Nikon and adjust aperture, ISO and shutter manually and never use the button (+/-) for overall exposure compensation. When I then add flash by using an external speedlite in iTTL mode I was wondering whether I could simply use the flash compensation button on my speedlite to increase or decrease the output of flash? That seems easier to me than using the overall exposure compensation on the camera and influence both ambient light and flash. I rather want to leave the settings on the camera as they are and just change the flash output.
Daniela
With Nikon, if you work in manual exposure mode on your camera, then you can change either the overall exp comp, or the flash exp comp to affect the TTL flash exposure, (without affecting the ambient exposure.) So you have it correct there.
Thank you, Neil, for taking your time to answer my questions. That was very helpful! :)
Kind regards
Daniela
Thanks for all your information on this Blog. Very informative, I have learned a lot. You mentioned “”Going by the camera’s preview and adjusting the FEC accordingly, is just how I use TTL flash” Does this mean that the Flash Power itself can not be adjusted in TTL?
With TTL flash, the power isn’t directly adjusted as it is with manual flash. The power is controlled by the Flash Exposure Compensation … which is in relation to the TTL flash exposure the camera calculated.
Just stumbled upon your site, the best info’ I’ve found so far, your explanations are clear and concise not like most who tend to add a lot of window dressing to make a point. I also like the way you answer questions and give added information without being condescending to what sometimes must seem idiotic questions.
Thank you for sharing your knowledge, I’m checking the the books you have published.
Best Regards,
TK
I have a need for a shoot tonight outdoors and wish to use off camera flash for fill. I have a Canon system. All is fine except I am baffled by FEC! It seems it can be set on the camera (which works as expected) but neither changes the settings on the transmitter or flash itself) or on the transmitter or on the flash. What is the difference where this is set? I am using ETTL.
Thanks!
Hi there Bob
You didn’t say which camera you are using.
The way Canon implements FEC with the 600EX and ST-E3 controller, can be confusing.
Even with the flash set to Slave, you are somehow able to set the FEC on the flash itself … and this isn’t over-ridden automatically by the controller.
You could set -2 FEC on the remove flash, and +2 on the ST-E3 controller, and that would balance out as 0EV.
In the end, it is best to be consequent about things:
Start of by setting any remote flashes to 0EV on the flash, and then control the FEC of the individual remote flashes via the controller.
I have no better explanation than that. Best advice is to work in a non-complex way. Keep it simple and consistent.
Thanks for the reply. 5D IV and 1D-X.
The one possibility you did not mention is setting on the camera with 0 xmitter and 0 slave. I think easiest for me, but again, confuses me why I can set this in three places :)
It is odd, isn’t it Neil?
Thanks again.
~Bob
Great reference material.
Something I only recently figured out and that no one ever seems to talk about is flash value lock (FV Lock). For Nikon, at least, the exposure of the flash is determined by what is in the center of the frame when the shutter is released, regardless of what the focal point or exposure is locked to.
So, if you lock focus and exposure on the face/eye and then recompose so the face is no longer centered, the flash will not use the face/eye for its exposure. It will be using whatever is in the center of the frame! This can be corrected by using FV Lock along with AE-AF lock. When FV lock is pressed, the flash will fire to set its value, then when the shutter is released, it uses the pre-measured value, regardless of composition.
https://onlinemanual.nikonimglib.com/d6/en/14_on-camera_flash_photography_06.html