Best photography tips
There are numerous tips and ideas in photography that helped me improve as a photographer over the years. This came via magazines and books and other photographers. Many sources.
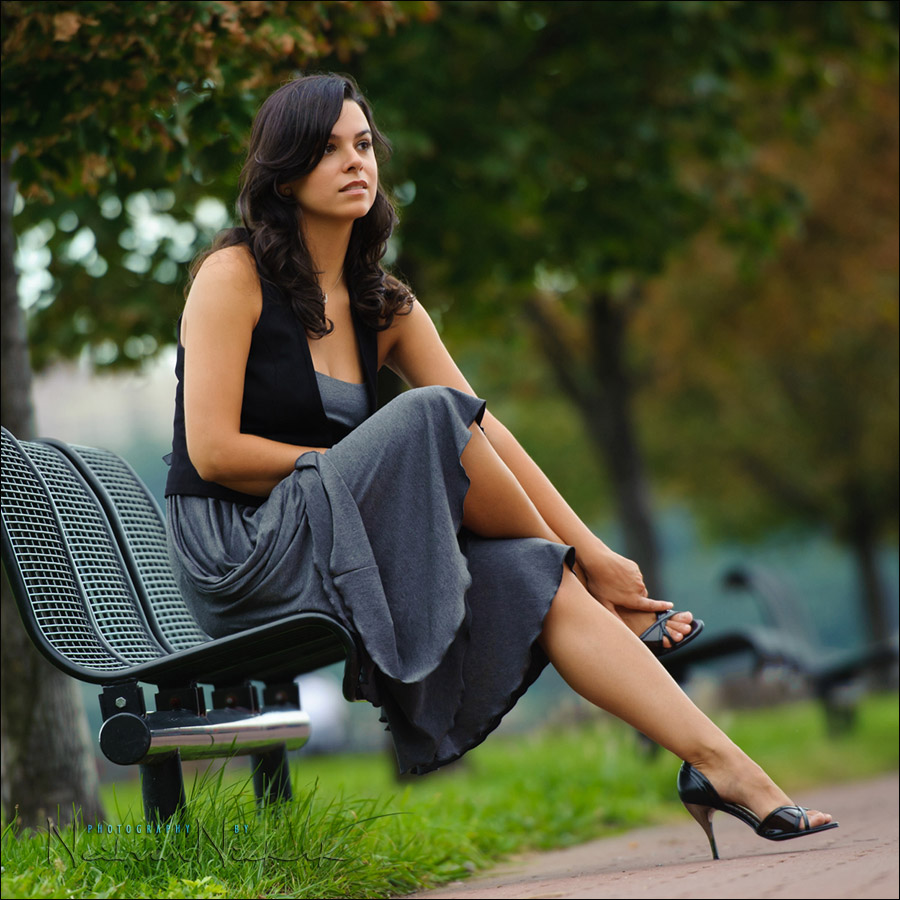
One of the best tips that helped me develop a style over time – when using a zoom lens, zoom to the longest focal length, and then frame your shot by walking forward or back, to where you have the composition that you want.
Doing so will result in the most compression in the image, helping to isolate my subject against an out-of-focus background. (Of course, using a long lens with a wide aperture makes the difference here.) I touched on this topic with a recent article: composition for full-length portraits – step back!
I would like to hear from other readers of the Tangents blog, what their best or favorite photography tips are.
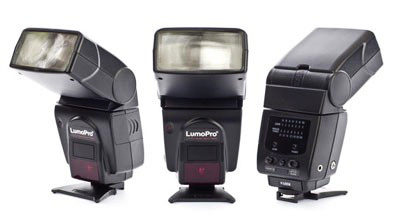
So to keep this interesting, here’s incentive – the best entry will win a LumoPro LP180 flash.
The Lumopro LP180 is a manual only flash, and is ideal for photographers who want a low-cost flash that has solid spec. If you like working with a light-stick – a speedlite on a light stand or monopod – then this flashgun will be well-suited to your needs.
The contest has now closed, but here are the rules for the contest:
1. Post your best photography tip that has made a difference to how you shoot and how your photos look. Any topic.
2. The best entry, as chosen on Monday, April 30th, wins the speedlite. Along with the advice from a few friends, I’ll pick the best entry then.
3. I have final say.
4. No whining allowed.
Entry #50, by Jim Schofield was picked as the winner.
I discuss the entries in my comment #190
The tip that has helped me the best is about framing a shot, anything in the frame that doesn’t add to the picture takes away from the picture.
When making images, always slow down and look before pressing the shutter. TAKE YOUR TIME. A single great image is better than 100 rushed images.
Don’t be afraid to play around and experiment – it’s a great way to learn. :)
More relevant, perhaps, now that I am shooting digitally (as opposed to good old film)is the fact that before I commence a shoot I can make an assessment of the light available to me and set both my cameras so that I have a base setting from which to start. This means (unless there are significant changes occurring in the light) I only need to occasionally tweak the camera/flash settings in order to maintain the consistency of my results, and I’m good to go from the start.
I think this is my best tip….move around. Don’t just take one shot, and repose the couple or person. Take at least three photos from different angles, or focal lenths. The pictures will all look totally different and you will get more shots.
The best tip is to watch out for the background, so not always mainly cleaning the foreground, but clean background for the head will not distract the face
actually for me it was the same as you mentioned about the zoom lens, but i have picked up a few others..
what improved my metering for outdoors in harsh light photography alot was a rule that i still use to this day. set base ISO, set max shutter sync speed for the flash and then youre left only with the aperture for metering. this will ensure that you get the largest possible aperture for your outdoor in harsh light shots and makes life simple for a beginner photographer since youre metering with only one dial.
This is from a CreativeLive seminar I watched awhile ago with Don Gianatti–“Be deliberate.” This has helped me in assessing what my needs are going to be before I start shooting so that I can visualize what I am going to need and what I am going to shoot before I even start shooting.
Best tip that changed the way I shoot – use off camera flash to create different looks. Even when the natural light looks great you can change the look by using off camera flash. I can recommend an amazing book if you want to learn more. wink wink!
The best tip regarding exposure that I learned is:
Overexpose, when it is bright
Underexpose, when it is dark. The camera is not smarter than you.
This tip has a huge impact on the way I see light now and expose for it.
So many tips over the years, but the tip that has helped me a lot is to be aware of how existing light is being cast on the subject(s). This makes me figure out if I can work with the light to compose the shot, reposition the subject, or modify the light with a reflector or a flash.
Get low, really low, then focus on your subject. The foreground (the ground or the grass) will be blurred out, creating a shallow DoF effect. You don’t need to shoot wide open, this works even when you are using f/8. Works with kit lens :D
With technology now, it is wonderful to have a memory card that can carry a large amount of gigabytes. (Great for trips, etc.) But when you’re looking to get the most creative and most satisfying results, use a card that has between a half gig and one gig of space. You will quickly run out of space on your camera, and you will be forced to delete some if you are going to keep on shooting. By the end of your session, you will only have very high quality photos. (Sort of like film with a delete button: 30-60ish photos)
The best tip I have ever heard and used was: “If you ever want to push your photography forward, you must understand artificial lighting. Whether is be bounce flash or off camera, no one looks good with the flash pointed directly at them from the same perspective as the lens. The only time someone is lit from the same perspective as your view is when A. They are being spotlighted by a flashlight when breaking into your house. Or B. when they are a deer in your headlights just before you run them over in your car at night. Neither is very flattering. TRUE…
My most helpful tip was from an instructor I had in college. He encouraged all of us in his class to study TV programs and movies as we watched the show. He wanted us to be aware of the camera angles, composition, lens compression, etc. He said these shooters are the best in the industry and we can learn a good bit by just observing their techniques.
The best photography tip that I have ever followed was to do everything in camera as much as possible so I won’t have to rely too much on post processing. Following this tip sped up and improved my workflow. It forced me to think more about the photograph and challenged my creativity. This also made me want to master the technical aspects of my gear.
The best camera is the one in your hand; the best tip is to keep on shooting – and review how to make the shots better (why didn’t it work? what made this shot good?)
This probably applies more to general photography than portrait (the answer is pretty obvious for a portrait). But thinking about the phrase, “what are you taking a photo of” before and during framing, I found helped a lot with cleaning up distracting elements and improving composition.
I suppose what has given me the most creative spontaneous shots over the few years I’ve been shooting is: hold your camera one handed at your waist or ground level (this requires a hand strap for security/control purposes), take your best guess at aiming at your subject and snap away. From my results, I usually get 3-4 focused on the background, 3-4 focused in the foreground, and 1-2 really sharp, creatively framed shots for every 10. This takes my anal retentive brain out of the shoot and gives me shots I wouldn’t have thought to take had I looked through the viewfinder. It also give a spontaneous perspective that would likely require time, positioning and live-view to focus on. My subjects tend to be dogs and children, and it’s worked great for me.
I would agree with an earlier poster Lynn, BE DELIBERATE. When I was shooting film you had to worry about film management. There were a finite number of exposures ob a roll of film 12, 24 or 36 exposures or if I was shooting with a view camera one exposure at a time. But I digress, the point is each shot was very deliberate I couldn’t mindlessly shoot and hope something was good. I had to think and plan my photographs. I did get caught up on the machine gun shooting that digital capture afforded me but in the end I was doing a lot more work after the fact.
SO BE DELIBERATE
Move away from eye level. Everybody is used to seeing the world from that perspective, so pictures taken at eye level tend to be less visually uninteresting. If you’re not squatting, kneeling or lying on the floor then you should be climbing up on something.
I’ve been playing around with lightning photography for a couple of years, now, and the #1 biggest improvement for me has come from planning my shooting better. Just like Gretzky talked about skating to where the puck was going to be, I’ve been working on putting myself in a position where I can frame a storm with something interesting in the shot. Lightning is cool by itself, but it tells a much better story when there’s a great context. When you’re out shooting, look for places that offer a good view of the sky with a point of interest in them, too. Bonus points if you can locate a dry, sheltered spot to shoot from. Then, when you see the right sort of weather coming in, get to one of your shooting spots ahead of time and get set up before the storm comes in so you can get that killer shot!
I was told a long time ago, and now tell anyone who will listen, the most helpful thing you can do to improve your photography is to learn everything there is to know about your equipment. That is your foundation and without that, everything can easily come crumbling down!
Best tip I’ve gotten is to stop looking for great backgrounds and start looking for great light. When I stopped worrying about my backgrounds and more about the light, I realized simple backgrounds are less distracting and great light = great photos. Who cares what the photo *isn’t* of?
Don’t be intimidated by off-camera flash. A simple, affordable two light setup using one gun and the sun produces much greater results.
Also, THE SHADE IS YOUR FRIEND!
Focus on the nearest eye when shooting portraits. Seems simple (because it is) and makes a world of difference on your captures.
The best tip I learned from Neil:
ambient exposure + flash exposure = correct exposure
Your camera, by itself, cannot expose everything in a photo correctly. You need to make the decision as to what you want to expose correctly. If you expose properly for your subject, then your background will probably blow out. If you expose for your background, then your subject will be underexposed, and you need flash to expose the subject correctly.
Before I learned this tip, I would just zero out the exposure needle in manual mode, but that didn’t produce a pleasing photograph. I would always wonder why things looked off-kilter. This tip helped me make better exposure decisions on my photos.
My tip would be not to follow just the tips and tutorials of Neil, but mix them up with some from the lesser Gods such as the Strobist, Joel L. or Big Joe M. and the like. A mix of seasoning goes a lot further than just plain salt.
No harm or pun intended.
The tip I picked up that finally gave me the control over flash photography that I’d been looking for was to “Stay SAAF”:
SAAF = Shutter Ambient, Aperture Flash
Use the shutter to control the ambient exposure.
Use the aperture to control the flash exposure.
I picked this up from Syl Arena’s Canon Speedliter’s Handbook
Things are more interesting if they are only partially lit.
My all time favorite photography tip is actually a quote by Jay Maisel – “Take a look at what you are looking at.” It’s easy to get wrapped up in the details. When I think of this quote, I immediately step back, take a breath, and take in the whole scene as it is meant to be seen.
My best photography tip is compose your picture in camera, don’t say I will crop it later because you may have to crop an important part of the picture. This is really critical when you want enlargements such as 8x10s and larger. Always leave space for the crop factor…
My best advice for improving your photography is to go out and learn to shoot in manual mode. It’s not scary. If you think it is scary, then you really MUST go out and shoot in manual mode!! :) You will be forced to select the settings that *you* need to create the image you are after. And it will give you a much deeper understanding of how aperture/shutter speed/iso interrelate. Scariness gone, hello freedom. And my other tip is read read read. Learn learn learn. Chase after those light bulb moments and enjoy the improved quality of pictures that will result.
My uncle advised me to take pictures at family parties with as many different combinations of people as possible — with a special focus on multi-generational pictures. Capturing special moments and relationships and stories in photographs is the heart of photography.
Learn light. Study light and everything you can about what makes great light and why. Not just how. Do this and you will become a better photographer.
The best tip I ever had about photography is to be mindful of the quality,character and direction of light in the scene as it affects the tones present in the scene EVEN before taking the camera to my eye to take an image. It is all about pre-visualization of the scene and mentally taking note of the tones present in the scene and be mindful of how the light affects each and every important tone with texture and detail. Once you have made a mental note of the important tones, you then restrict the important tones in the scene that you saw through exposure. In the film era, this was the old adage of ‘expose for the shadows,develop for the highlights’. This means you process your film for the amount of highlight density you want through the amount of tank agitation, developing time length and developer dilution.
In digital this means ‘expose for the highlights, process for the shadows’. Essentially this means exposing for the ‘texture highlights’ (Zone VII-VIII) and processing the shadows (either through the camera or RAW). The highlights are the most important tonality because they cannot be recovered in digital ever once they go white they are gone, you cannot get a texture out of them again while you can still recover the dark areas.
Finally this is all about ‘SEEING’ it first then EXPOSING specifically for it then PROCESSING for it.
“You’re a photographer, not an assassin.” RE: learning to frame the subject other than dead center.
My best photography tip is to impose constraints on yourself to crack open your untapped creativity. Do so by giving yourself a project, like a 365 project, with preset themes or other limitations. It’s amazing how liberating in a single constraint can be. Suddenly you’re taking photos you’d never otherwise take and overcoming obstacles along the way… be it composition, equipment, lighting, story telling, visual creativity, post-processing and more.
I started a year-long project with friends and learned more in 52 pictures than I could have ever foreseen. In that process, I applied the many of the tips I’ve read about but hadn’t put into practice. Step one to getting better is shooting, not reading (as much as I love this blog). Get out there but give yourself a few creative challenges along the way and see what happens.
Well, this is going to look like I’m sucking up but oh well. The Black Foamie Thing, by far, is the best tip I’ve learned that has improved my photography.
Not only has it improved my images by helping me shape and control my light, I’ve also found another use for it: (G+ photo) Yes, the “pillow” is my appropriately folded BFT.
Additionally, I’ve started using a WFT (w = white). Can’t tell you how many times I’ve been at a location with colored walls and ceilings too high to get a useful bounce. Enter the WFT, which I like better than an index card or the bounce card that comes with some flashes, because I can control the height and position to my liking.
So, I’m probably not going to win the contest, but that’s ok. The BFT tip makes up for that. Thanks, NvN!
To me, it’s a tie. My skills jumped a couple levels due to two pieces of advice that I received:
1. Using a prime lens to learn composition. I bought the Canon 50mm 1.8 a month after my buying my first DSLR and it taught me to appreciate perspective of certain focal lengths. I now look at scenes (particularly landscapes) and can say that this shot needs a 24mm or 85mm lens to get the shot I want. The framing lines are burnt into my vision like a rangefinder.
2. Bouncing flash with a direction in mind. Learning this technique on this website allowed me to create professional looking photos in seconds with minimal equipment. Even now, despite having multiple off camera strobes, I still bounce the on-camera flash for directional fill light while using another flash for the key. It’s a great tip for visualising light and a simple and nearly universal solution.
Long ago, a very good photographer said, “No man is as good as the simplest camera.” Stop chasing after the latest, greatest,
most expensive glass and bodies. The camera only records what you put in front of it. My tip: BE your camera. Use your
eyes, use your brain to make intelligent decisions about what to photograph, in what light, from what angle, how light or dark
or warm or cool to make your image. Yes, tools are important, but paint brushes don’t create masterpieces, only artists do.
Master your equipment, learn it inside and out, then use it to record the masterpiece you create through your thoughtful use of
composition, lighting, depth of field, choice of lens, etc.
As an amateur the best way to learn is to know your quipment and dont be afraid to experiment and make mistake weather you useding flash or natural light, go out and shoot and have fun!
Lately I’ve been learning a lot about posing from different sources. The best tip I have read thus far (in regards to women) is to try to create an “S” curve with their body. This means, no stiff joints, putting weight on one foot to push a hip further out, and to pose arms in a way that creates little windows between them and the body. I hope I made sense, I wish I could insert a diagram!
What I tell “struggling” photographers who want to improve – I found that the most important dials on the digital camera where the one that switched it from Full-Auto and the one that controlled Exposure Compensation. Knowing (and using) these, improved my understanding and the number of “keepers”.
To come up with a contest like this and to be able to read a collection of great tips has to be the best tip.
Sorry if the above sounds rude but kudos to Neil for coming up with this.
Over the years, I have (like a sponge) lapped up the advice of the world’s great photographers, always humbled by the extent to which they choose to share their knowledge. One tip that has stood out for me, has been how to USE a wide-angle lens. I bought a Nikon 14-24mm f/2.8 for a photographic safari to the Masai Mara, with preconceived ideas of how to use it, in my head.
Shooting with a wide angle means “to fit everything in”.
Yes?
Well, no, actually.
In fact, it’s the opposite of how you should compose a wide angle image. Landscapes aside, the best tip I’ve had for the 14-24mm is to “Move, get close to the action, get involved.” Some of the most dynamic shots I’ve taken have up close & dirty, where the action is, with a wide-angle right in the faces of the subjects. Try it.
The best tip I have found to improve my work, is to get soft, directional light, and flag a speedlite when using bounce flash (even if it is just a black piece of foam).
Everyone can make mistakes. Just ensure that you learn from them and do not make them again.
My favourite tip came from Bambi Cantrell, at a seminar several years ago. She said, “a good picture today beats a perfect picture tomorrow “. Get the shot and then improve on it. This advice has stood me in good stead over dozens of weddings.
Hi, the best advice I got was to shoot on manual and to make your compositions interesting by shooting through things to create natural frames and so on.
If you can’t beat them, join them. Useful for many things that seems to fail by taking photographs.
Harsh sunlight? There’s always shadow. Rain? You will be more creative!
There are no limits in photography and if you find something difficult, don’t give up untill you get the ‘aha-moment’. That makes you a stronger photographer.
The background is as important as the foreground or the subject. Sometimes its best to use a long lens and blur the background but a wider angle and a nice background can also give your photo more power. Don’t stick to one method, try them both and decide later which suits the best in this occasion.
I love contests! :]
Here is mine (out of many): take a moment to take in the scene (see with the eyes, shoot with the heart) and shoot less. Less is more! Be a seeker of light. But above all: never fear failure! Not sure if you count this as more than one tip :]
My first mentor had me start with an all film, all manual camera and shoot slide. So I had to learn light and find exposure, and focus on my own. And because slide is not forgiving like film I learned, eventually, to nail my exposure in camera.
Pay attention to the background! There is nothing worse than having a good picture ruined by something odd coming out of the subjects head.
Since nowadays a lot less people seem to be printing images I think you can really learn how to better compose and expose by doing some printing of your images, for example learn how much breathing space you need in your images to print at the most popular print sizes (like learning where the crop lines fall for 8 x 10). Sure there are new digital print sizes, but the framing companies are still selling the standard frame sizes more than digital sizes. Doing this you will also learn that you need good lighting techniques to create images that look good when they are printed. Another key to this process is calibrating your monitor and you might also use a lab that does color correction. All of these things have made a difference for me in recent years.
The best thing I ever did for my photography was learn how to read a histogram and use it to tweak exposure. I shoot in manual mode 99% of the time these days, and I always set and check exposure via the histogram. This helps me pull as much information as possible out of a shot without clipping highlights (unless the highlights are meant to be clipped).
Another great tip is to use the catchlights and reflections in the eyes to figure out how a photo was lit. I do this a lot when reverse-engineering a photo that I like.
This is so simple, but I use it all the time… When you want to find the best directional light, hold up your hand to see how the light/shadows are playing off each other… Works well indoors and out!!
Make the photo in my head and then manage camera and light to achieve the image.
So many…
Fill the frame
wait for the decisive moment
know each button on your camera without taking your eye from the viewfinder
slow down
don’t gun the shutter button (unless you shoot sports then fill your boots!)
get close
interact with your subjects
if you’ve got it, use it (high iso even on noisy camera bodies)
get a grainy sharp shot rather than an unintentional blurred but no noise shot (don’t then pass it off as art unless you think you’ll get away with it!)
and more
One of the tips that can improve your image is gelling your flash to match the ambient light. It will make your flash blend in with the ambient color for a more natural looking image.
Learn to shoot in manual and take control! This has been a revelation for me, I always shot in Av (don’t ask) and it was too easy to keep on shooting without watching how low the shutter was going. Add to this the consistency you get when post processing and your life just got a whole lot easier. I took the bullet last year and even shooting weddings (as 2nd shooter) it has worked a treat.
shoot from the hips!
Probably the main concept that drives my photography is keeping the subject simple. I’m not really sure when I learned it, probably from my dad when I was a kid. Simple, but not necessarily minimalistic, compositions lead me to strong, visually impactful photographs.
Look out for interesting LIGHT & SHADOWS
Express the MOOD & ATMOSPHERE
Tell a good STORY.
Before you even raise your camera to your eye, ask yourself “Why am I taking this picture”? It will help you compose the shot immensely. You can have all the best gear in the world, with all the lights in the right place, but without good composition, you’re shooting with blanks. It all starts with the reason for pushing the shutter release.
Bouncing light and the black foamy thing. Use it all the time….
when composing, don’t forget to watch your backgrounds, keep the trees from growing out of the subjects head
always defog your images in photoshop, makes them pop. unsharp mask, top box 20, middle box 60, bottom box 1
The single most common tip I give to people who ask my advice on photography was originally said by Robert Capa — If your photographs aren’t good enough, you’re not close enough.
I still take that advice to heart myself all the time.
Editing wise, I’m consistently amazed at how switching to shooting strictly RAW has given me so much flexibility with what I can do to put final touches on my photos in the digital darkroom.
And as I’m very new to flash photography, the most useful tip I’ve come across in all the reading and learning I’ve done is to really learn how to meter to ambient light and slowly add fill flash (hopefully less slowly as I learn my lightsources better) to create the perfect exposure.
Lastly has been just to challenge yourself with new objectives that take your shooting out of your comfort zone, and to shoot a LOT without worrying too much about the results.
Excercise your camera and practice what you learn.
By far, the best series of tips that improved my photography is how to bounce flash effectively to produce beautiful soft light. Being unafraid to use a flash, even outdoors in daylight, has vastly improved my photography.
Having extra light from a flash also allows me to increase shutter speed while hand holding and helps me eliminate blurry soft photos caused by camera shake.
After reading a book by Mr. Van Niekerk, it caused me to rethink and overhaul my philosophy , and the results are beautiful photos which keep getting better as I improve and practice the techniques.
The tip that has increased the number of compliments I get on my photos the most came from Peter Hurley – on how to direct people into giving genuine, interesting expressions. When photographing people, viewers will respond to a great *real* expression – even in spite of any other technical failures the picture may have (I’m not advocating poor technical performance). It’s all about building rapport and coaching. If they look confident and approachable, the photo is appealing.
It’s simple, but the best tip I have received so far was “Get closer.” Completely changed how my photos started to look.
Don’t always look at what is in front of you…turn around to explore differnt approaches and perspectives.
Just shoot it.
While you can have all the knowledge in the world, you still have to court serendipity. The best way to do this is to just shoot. You might have less than a minute and you might only have your bare bones rig. But, if it catches your eye, shoot it. That moment in time will never come back around again.
I usually shoot indoor events. One tip I learned – Noisy is better than blurred.
best tip…. ENJOY what you do!
The best tip that I’ve gotten is derived from some of David Hobby’s advice for shooting outside: Think of the sun as your main light; then you can stop the sun down with your shutter and build the exposure back up with off-camera lighting of your own design.
Shoot manual. Shooting in manual mode forces you to consider every factor that contributes to the quality of the image. Even OCF… shoot manual. You will have to understand, rather than abdicate to the computer.
Every great photograph begins 6 inches behind the viewfinder.
The best advice ever given to me was ANY advice given by a seasoned professional.
My favorite tip: Lie. And do it often. I’ll be the first to tell you I stink at posing people, so I don’t pose them at all. Instead, I lie. After a few awkward frames, I say, “Cool, we got the shot! Now, you guys just make out/goof off/do whatever couples do for a few seconds while I check a few things.” And that’s when I really start looking for the good shot.
Learn how to pose your subjects in flattering ways.
If you can nail this down, all the rest is easier.
My tip is simple. “Bring a camera everywhere (and use the thing).” I program for a living and I’ve become so accustomed to having my camera with me, that I feel naked if its weight isn’t on my shoulder.
Even if I can’t have my nice ‘spensive DSLR I’ll have my point and shoot, and failing that I have my cell phone.
Like any other shoots, start with the concept of the mood you want in the frame. Full length portrait can go in two ways: 1) details of the subject, and 2) juxtaposition of the subject in the environment.
For scenario 1, go long with telephoto lens to isolate the subject from the environment. Lighting options may be limited as you may not have access to as many options to light the subject at 30ft and beyond (no assistant, environmental restrictions, etc.).
For scenario 2, go short with wide angle lens to place the subject in the scene. Isolation can be achieved using lighting, subject placement, view angle, etc. Fill the frame with the subject just enough to avoid/emphasize distortion to their important features such as face and body shape.
In either case, the exposure priority goes to the subject – this is, after-all, a portrait. I’m excluding silhouette as I consider that a landscape/still life shot. :-P
This gives a framework to give pleasing portraiture – adjust composition, elements, and light to give wings to your creativity.
WHAT you photograph is more important than HOW you photograph.
So many really great tips listed already! I think my tip should be to bookmark this post and read all of the tips everyone has posted here! lol
If I had to pick my personal favorite I would have to go with something simple and say, take photos. Don’t get wrapped up in gear, technique, or anything else. If you are actively taking photos you will get better. Practice, practice, and when you’re done with that, practice some more.
Thanks for the post and thanks to everyone for posting their tips and making this a great resource!
Best tip that helped me was from Neil on:-
Bouncing on-camera flash with the “BFT”.
Before the above tip, I had been trying different flash modifiers without satisfactory results, but by following the tip, I could get studio quality light and hence studio quality look to my pictures with much ease and flexibility.
Will be happy to provide examples if needed.
Thanks Neil!
Ali Saadat
TIP of the Decade: The simplest and the best tip is learning from Neil the following. It made day & night difference for my flash photography
TIP: Keep the camera in manual spot metering and flash in TTL for indoor event flash photography
I have learned several ways to get the correct exposure: spot metering, compensating for light background, etc., but the most important thing I learned was to use the histogram to get the best possible exposure. Understanding what the histogram is supposed to look like in various situations will allow you to make slight adjustments to nail the exposure every time.
Best advice I’ve heard for Outdoor Portrait sessions using natural light is to follow these steps:
1. Light – Look for the best available “Light”
2. Background – Find the appropriate “Background” that compliments your subject and allows your subject to be in the good “Light”.
3. Add your subject – pose your subject with a flattering pose.
4. Compose the image- Compose the shot in the view finder.
5. Press the shutter.
Once I starting looking for the light first and the background second, my images improved dramatically.
Think of an exposure as a bucket full of water… A full bucket represents a perfectly exposed photo… Using the following terms below…
Full Bucket of water = perfectly exposed photo
Water = Light
Hose tip = Aperture
Time Hose takes to fill up Bucket = Exposure time.
Bucket opening = ISO
You can fill a bucket with water using a hose. The amount of time to fill up the bucket will depend on the opening of bucket, hose tip and bucket opening.
So, for example if it takes 2 minutes to fill a bucket (10 inch opening) from a hose opening (4 inch opening)
Changing only the hose opening (aperture) to 2 inch and keeping all the above constant, it take twice as long: 4 minutes.
Now lets apply this to the photography. You as a photographer can define the perfect exposure (bucket of water) is. You just need to know the basics and how to contorl them to get you that perfect exposure (bucket of water)… It could be a combination of multiple variables… But in the end you’ll get that exact bucket of water that you aimed for…
I know this definition above could be revised to read better hope I have put the simple analogy out there. Being a Math Major, does not get you a communication degree… :)
The best photography tip i can offer is to know your equipment. Know how to adapt when things go wrong on location. For an example, when my flash trigger were acting up on me on location, I did not let that stop me. I knew my equipment enough that i use my popup flash on camera to trigger my off camera speedlights and came away with some excellent shots. So knowing your equipment is very critical. Because there will be days when SNAFU(S) creep in on you.
Best tip for MACRO photography: Put your lens in 1:1 position and leave it that way. Than move with your camera untill your subject is sharp! Use ttl flash in TILT position.
The best tip I have learned was from this site on bouncing flash. I would always get stuck thinking I couldn’t bounce flash in some of the larger areas that I take pictures in. Then I read some of your articles about just bouncing off whatever is there. Even in large rooms bouncing off of a wall will give you some light that adds a lot to the picture you are taking.
Just because it wasnt mentioned above: The rule of reciprocity and crop factor.
There are no rules in Photography, just guides. To minimize camera shake when hand holding camera:
(Shutter Speed = 1 / Focal Length * Crop Factor)
It works for me. When I get a blurred picture this is usually the problem.
BUT, subject movement may also be responsible for the blur.
Photography tips that I use daily:
(1) Study Light. It really is all about the light.
(2) Create contrast in a photo when there is none.
(3) Tell the story! Shoot every detail of the event.
(4) Photograph the ones you love often. Memories fade – photos don’t.
Thank you for all that you do, Neil.
Best tips / advice I have ever received (they are always in my mind
Philosophy class, 1988: “He, O men, is the wisest, who, like Socrates, knows that his wisdom is in truth worth nothing?” Socrates.
Student Affairs / Residential Life: “Say what you do, do what you say, and when you don’t…admit it!” author unknown.
The combination of:
1. Learning the principle of on camera bounce flash from Neil.
2. The strong words from Cliff Mautner: “Get the damn flash off the camera”
3. The pocket wizard system give the solution. In my opinion the equipment which give you the biggest difference and freedom to your photography.
4. Neil’s soft box on a monopod – works perfectly with the PocketWizards
Don’t just look through the viewfinder, look at what’s “in it”.
A few that I have picked up about portraits, down the road:
1) If it’s not good enough, you were not close enough (or something very similar) – it was said by some great photographer I can’t remember right now. In other words, come as close as you can to your subject (tightly framing an 85mm/1.8 or photographing from 80cm distance with a 30mm/1.4, both will work great – I am an APSC shooter…) – it’s a privilege we have as “people with cameras”, and we should make the best out of it.
2) Diagonal framing looks more energetic (a.k.a less boring and static). 95% of my portraits are NOT framed straight – yet, for some reason, my subjects seem to auto-adjust to me holding the camera diagonally. Plus, you get to fit more in the frame ;-)
3) Keep smiling to your subjects, even if you don’t say a thing.
Keep in mind…when you frame your shot…your aim is to provide a different perspective..all the time.
Stick one eye in the viewfinder. Close the other eye. This is what you see.
Its a tip i made for myself. Really helps me focus on the image out of camera. i set my lighting up take a test shot, then just put my head to the camera and look at everything through that.
One tip that has helped me create the images that I want to make, is to first look at other photographers work and style that you like. Then you need to reverse engineer how the light on the subject was created. How many lights were used? Where were they placed? What is the quality of light and what kind of modifier do you think were used? Use what you discover in your next shoot to try and accomplish the look that you are after! If you don’t quite get it the first time, keep trying different lighting set ups and shoot shoot shoot!
First, I look for softer light, then I study the background carefully. Finally I place my subject(s) and help with posing. I prefer the upper body’s background to have negative space. I don’t like to have clutter so I use 70-200mm F2.8 IS to compress the background. I meter off their skin (mid tone 0) or clothing (white +1, dark -1) and fire away. Review the histogram and try different perspective.
One that was passed on to me a long time a go after taking a shot in a particular format – be it portrait or landscape – turn the camera, recompose and take a fresh one on the other format – portrait to landscape or vice versa.
This allows you to capture two very different shots of the same moment at maximum resolution. You can then decide which one is best during post-processing. You will be amazed how many of the second shots you decide to keep in the end.
Simplicity, really. For me, the biggest tip I ever received (and the biggest ah ha! moment) was when I learned that flash (on or off camera) allows you to compress the dynamic range presented to your camera, allowing you to better capture the details. It puts YOU in control of what is under exposed and blown out.
Simple.. shoot with intent and you will produce better photos in less shots. Don’t use digital as an excuse to take a million photos. Shooting with a specific reason and focusing on how to exemplify that reason can make the difference between dozens of ok shots or 5 fantastic shots!
Other then that, have FUN. Two most important things that I learned.
The best tip any of us can follow requires no new equipment, no expensive camera, nor an overflowing camera bag. It works with any subject at any location, in any weather. And I can prove it to you.
How many times has each of us come home from a shoot and downloaded images, eagerly spotlighting the one we just knew was THE SHOT when we had pressed the shutter button out there in the field … only to discover another, different one that we liked better? All of us. many times over. And why was that?
That leads to this invaluable tip: WORK THE SCENE. You have gone to the trouble of finding your subject and getting yourself there. Or you have stumbled upon a great opportunity by accident and captured a shot (or shots). Now, keep shooting. If you shot at eye level, next shoot from higher up. And from lower down. Take a series with different aperatures from that original. Shooting portrait mode? Now shoot landscape orientation. Move to your left. Move to your right. You already are there witht he subject you were looking for; don’t settle for one look.
The proof is your own experience: getting home and finding that killer shot wasn’t the one you first thought it would be. The real keeper may be an extra one, a different one that you thought was just going to be a throw-away. And if you hope to market your image, how do you know in advance that a client may not show up down the road who wishes you just would have shot that one as a portrait instead of a landscape? Or with a lot of depth of field instead of your shallow one?
Work the scene. All those other tips that you read and absorb and practice are combined in this one. You know something caught your eye when you first set out to capture an image. Don’t miss the killer shot because you gave up too soon with your first attempt.
I learned a long time ago while studying brain functioning, that the left brain and right brain control different processes.
The right brain has a greater impact on the creative processes.
The left eye is connected to the right brain.
Therefore, try to develop the skill of shooting with your left eye and letting your right brain control the outcome of the image and what you actually saw.
Good luck with this process.
Fred
I’ve done conventions, birthday parties and weddings and the best tip I read was
“F/8 and be there”
Spend a month with a point and shoot set it to green “auto mode”. Shoot what you love. Shoot what you hate. Nothing else. After a month, analyze what you shot, and you will start to find your voice as a photographer. Listen to it.
Know why you love or hate your subject, and then tell the world what you know with your photographs. Do this, and your pictures will be better than most.
The best tip given to me was ‘Walk the Arc” in other words after posing your subject be sure to walk around them as quite often you will find more flattering light and pose by YOU moving around your subject.
When taking gear on location, look at what you actually use, keep a list and bin the bits you don’t use, that way you will anly take what s really needed and save a lot of strain on the back lugging kit about that you really dont need.
When I was first starting out in photography, a friend of mine who was even at that time a seasoned pro gave me several tips. They have served me well.
The first, and most important, was about light. He held up his hand and made a fist. He told me to study the way that light falls on that 3 dimensional object. Where is the shadow line? Direction? Hard or soft? How much natural fill? Backlight? What happens if you move your hand this way or that? How does the light change? I learned to take a meter reading off the back of my hand and translate that to an exposure. Even today I am still holding up my fist and seeing how the light falls and quite often take a quick test shot of just my hand. Nail that skin tone and every thing else falls into place. Your hand is always with you so learn to read it in all types of light. This was his most important tip.
The second thing he told me was to study the masters. Look at a lot of photographs, especially in the subject area that interest you. Thirty years ago that required a little more work but now you can just go to flickr and type in any subject and get back thousands of pictures. When you come across one that you really like study it. Reverse engineer it. Figure out what kind of lens, what kind of light was used. Experiment with those ideas. By constantly exposing yourself to other peoples work you will be exposed to new ideas. If you are only looking at your own work you can get stuck in a rut and end up always doing what you have always done.
Learn to edit ruthlessly. Great photographers take a lot of lousy pictures, they just don’t show them to anybody. My general rule for myself is that if more than ten percent of my pictures are “good” I am not editing tight enough. You can learn a lot from the pictures you don’t select. Why didn’t that shot work? What should you have done differently?
The last thing he told me was to always, always use a strap. That tip has saved me a few expensive accidents over the years. Putting on the shoulder strap or hand strap is just second nature to me now, like putting on the seat belt in the car. Sometimes I use a hand strap but for walking around the Black Rapid system is hard to beat.
I hope that these tips prove useful. I have learned so much from so many, including this blog. Thanks for that and thanks for the opportunity to pass a little bit on.
regarding posing “if it bends bend it!” curl fingers slightly, elbows slightly bent one foot higher then the other to bend the knee etc
If at all possible, the light you add to a scene should be “motivated light.” In other words, the light should be there for a reason. Too many people start sticking speedlights all over the place because it’s easy to do so these days. If a non-photographer can glance at your photos and count the light sources without a second thought, you’re being too obvious with your lights.
Hide them well. Put them where light is already coming from in the scene. Gel them to emphasize the effect of a setting sun, a neon light, or an old desk lamp, even if none exist in the photo (or are only inferred as being there). Light shapes and creates the reality of the photo. It should blend into the story you are creating in order to help sell it to the viewer. Light should not be glaringly obvious and randomly placed.
Motivate your light. Give it reason, and purpose.
The best tip is; knowing your camera, how to change your shutter speed, aperture and ISO without removing your eye from the view finder, practice, practice, and practice.
Don’t make your black foamy thing with industrial strength velcro. (Riiiip.)
Fun reading everyone’s tips.
This isn’t really unique, I see others touching on this same sentiment.
The best photo’s are those that capture the emotion. Before shooting, feel the emotion, then use all the other tips and techniques to express whatever that emotion is – the granduer of a landscape, the expectation and nervousness before a wedding, the bubbling joy for life in a young child, the quiet and deep companionship and love in an older couple
A lot of other flaws can be tolerated – particularily by a client (less so by another photographer :) – but capturing the right expressions and the ‘feel’ of an occasion should be paramount. It is easy to get wrapped up in specific techniques, and miss the real ‘moments’. Of course the techniques are critical to the very communication of these emotions – DOF seperation to isolate and draw attention, Foreground to provide a sense of privacy, height of shooting to express character, lighting to focus attention and highlight beauty and expression, etc.
So I guess what I am saying is that my best photos are the ones where I have managed to take a ‘frozen memory’ of what can’t actually be seen by the eye alone – and the greatest progress that I can make as a photographer is learning how to achieve that consistently and deliberately.
Learn what different focal lengths to do exaggerate subject/background distances (perspective).
Once you figure out that a wide lens greatly exaggerates distance between foreground and background and that a telephoto compresses the same, you understand a lot about how to use that to good creative effect. Also, you get a better appreciation of why you want compression to make people look natural. Or not.
The way I learnt this was to shoot my kit lens (18-55, Nikon DX) at fixed focal lengths (1 week at 18, 1 week at 24, 1 week at 35, so on) and eventually moving to the telephoto lenses I have. Not only did this teach me about perspective, it also taught me about what focal lengths I’m comfortable with, and it gradually took me in a different direction from being a bokeh junkie.
Your tip on taking off the diffuser when bouncing a flash off the wall to better direct the light was very useful. I put it to use not long after reading it and it worked like a charm
I forgot where I read this tip: ” point your camera at something beautiful”
I have a very simple tip. sometimes you need to pull your eye away from the viewfinder while shooting to be able to observe and anticipate everything happening around you. you can miss a once in a lifetime moment because something is happening outside of your view finders field of view.
Interact with your subject. Do not merely observe light, don’t simply push a button. You have control over your image Content, Composition, Lighting, and the Moment of Capture. The first three can be static, repeatable; its the last that has real impact. Focus more on what’s in front of your camera, and the rest will take care of itself.
the principle of doubling/halving when dealing with aperture, shutter speed and iso was the most impactful tip for me early on……it is simple, fundamental yet was profound. i was like….”wow! ok…. so thats how this works!”
Do not be restricted by the thought of your gear suffering in the process of taking a beautiful shot. Cameras, lenses, flashes… they can be replaced. A missed shot, however, will always be one, and can only leave you with a wonderful memory of what has been.
That perfect one-of-a-kind moment… It will always be worth it.
Best tip … practice, practice, practice.
1. “The only subjects worth photographing are color, light or character.” – paraphrasing from one of McNally’s books.
2. “Don’t let good light ruin a photo.” – from David Hobby’s Lighting 101, and so applicable to me as a rookie trying to learn how to use flash.
I suppose it won’t hurt to add another, just for the sake of sharing it……. :)
A photo can only be appreciated at its fullest when you have it printed out: you won’t just “see” it, you get to “touch” and “feel” it as well. You know it’s really there, and that it is not confined behind the unrealities of a glass screen. For once it rests in your hands, not only your creation becomes tangible; it also becomes truly Real.
Mr. McGuire: I just want to say one word to you. Just one word.
Benjamin Braddock: Yes, sir.
Mr. McGuire: Are you listening?
Benjamin: Yes, I am.
Mr. McGuire: Plastics.
In order to cultivate a “style”, you must show consistency in your work so that it becomes easily recognized.
when you are doing on-location portraits (using available light)…place the subject in front of a dark background (buildings at a distance, etc..)..and let the light fall on the subject…now you have a pic where the subject pops off the background.
Check out a lot of Cliff Mautners pics for example.
Keep your composition simple, remove everything not needed in your frame.
Wow there are a ton of responses! I think mine is probably in there somewhere already but the simplest tip that improved my photography when I first started out was..
If you want to improve your photographs get closer to your subject. If you think you are close enough, get one step closer…
My best tip… Don’t forget to remove the lens cap!
All joking aside, my best tip.
The night before any shoot, make sure you have a memory card (or film) in your camera and all batteries (for camera, flash, any other devices used) are fully charged.
David
one tip i’ve found extremely useful is to use the AF ON and AEL button for focusing rather than the shutter release, this helps in quite a few ways, it is really good for sports or action photography because you can continue to focus while taking a shot rather than focus, shoot, then refocus again for the next shot, i also found this usefull while using speedlites because of how touchy the shutter release buttin is while using it to focus, many times i’ve prematurely tripped the shutter and then had to wait for the flashes to recycle and missed a few shots because of this, using the AEL or AF ON button for focusing can completly eliminate this type of error.
The best tip I have is “check your foreground and background!” so that distracting objects are not there. Usually a step to the side changes what’s in front (or back) of the subject, and makes a MUCH stronger photo with very little effort from the photographer.
This is the first thing I point out to people that have “EXIT” signs coming out of people’s heads, for example.
If you see a shot, DO NOT hesitate. If you hesitate doing any type of photography you will miss the image you want to capture, moments where you see an image you want to capture and freeze in time are very ephemeral – he who hesitates, loses, he who dares, will definitely WIN.
A fast 50 was good enough for HCB and it is good enough for you. Better actually than your sill 2 bodies, 7 lenses approach.
That vacation you just went on? Well you missed a bunch of shots because you were worrying about your gear. Or because you left it back at the hotel.
And the hundred images you showed everyone when you returned? Should have been edited down to 4 (I wide angle, 2 portraits, one detail shot).
Stop showing your crappy shots! Ansel took crappy shots too, he just didn’t show them to ppl!
The best tip I can give based on my own experience is to learn how to shoot using only prime lenses (I suppose you could also discipline yourself by staying at one focal length of a zoom). Working with a fixed focal length forced me to move in an alternate position to get the shot, which often turned out to be a better shot than what I would have achieved otherwise. It also required me to be much more aware of my subjects position, the background and foreground. It made me realize the latitude available for composition, and how the composition could change dramatically with a simple change of perspective. When working an event, I was forced to ‘work the room’, moving within a crowd to get my shot instead of standing on the sidelines and zooming in. This allowed me to practice blending in and becoming part of the event, instead of being only a spectator, and capture moments not possible from a distance. Some of my best photo opportunities have come from this realization. Taking advantage of the the inherent low light ability of primes has made me rely less on flash and more on available light, expanding my opportunities for creativity. In summary, using only prime lenses forced me out of my comfort zone(s),and in the process expanded my awareness, and ability, to become a much better photographer. (I apologize for the length).
Shoot what you love and aim for the heart.
Neil, I’m an event photographer in the Phoenix area. In order to produce a soft studio-quality loop lighting pattern on my subjects at events, I typically will shoot using a 30″ white shoot-thru umbrella with my Canon Speedlite flash mounted on a swivel bracket and handheld with my left hand. I use an Impact radio transmitter and receiver and Quantum Turbo SC battery pack to ensure the flash fires reliably every time. I hold my camera with my right hand to take the shots. It’s not uncommon for me to shoot in excess of 2,000 images throughout an entire day at events like weddings using this setup. I virtually never reject an image due to mis-focus or camera shake. Keep in mind though that I have an entire workout routine at the gym in which I build the endurance in my arms necessary to make this shooting style possible. I also use high quality image-stabilized lenses, which helps as well. I’ve found this shooting style differentiates my event photography from my competition because clients always appreciate the difference it makes versus using direct on-camera flash, or even various bounce flash techniques.
“Your best photos are the ones you haven’t taken yet” :)
In my early shooting days my images improved a lot when I switched to using spot focus, locked focus on eyes and recomposed.
study photos you love taken by professionals, reverse engineer it, then go out and try to duplicate it.
Shoot low if you have the ability to utilize a reflective surface…and most surfaces other than concrete and carpet are somewhat reflective.
Look at photography (other photographers work) everyday. You can learn and expand your artistic ability by looking at what other people have done.
Trying to determine your portrait subject’s “Chocolate Side”? Start with the side they part their hair on. It’s usually spot on.
allan
PS- Best tip I have ever got- Black Foamie Thing. No joke.
I always tell people that there are only 3 rules in photography:
1. Get to know your camera – know how your equipment behaves, its strong points and its limitations. This counts for lenses and all the accessories. Having a tool is one thing, knowing how to use it is another.
2. Learn the rules – Learn the basic accepted rules and principles, whether it’s composition, style or other.
3. Break the rules – Because there are no rules. This is art after all.
Keep your camera on and ready when you say you are done shooting. Sometimes the last shots are the most natural and genuine, or at least the most fun
This concept also applies when you are starting a shoot, and just tell the subjects you are setting up the light and “just relax”.
the one best tip…was to read these 152 comments and realize there is no one best tip. Lots of good info everybody!
The one tip that has stuck with me, and I can’t remember who said it is: When you think you’re close enough, move in closer. I’m all about filling the frame.
For me, Composition seems to be the hardest part of photography technique.. It’s art, not science.. By knowing the definition of the composition itself you could take a better photo. One definition that really matter was told by Bruce Barnbaum..
“Composition is the artist’s way of directing the viewers vision in a planned de-rondamized fashion” So you need to guide your’s viewers vision through good composition.. (by knowing Point Of Interst, distracting composition, lighting, DOF and so on..)
Know you gear and always have a “Plan B”. Had a beach session, and I usually shoot with my flash off camera using a softbox. It was so windy that I couldn’t even use a reflector. “Plan B” came into action without getting flustered. I used the Flash on top of my camera, but knew how to use the flash so my images did not look like there was a flash involved. Winning another flash would be devine!
E S P.
Expression Sells Portraits
Expensive gear, great locations and fancy techniques can never make up for a bad expression. People will purchase an “imperfect” photo with a good expression over a “perfect” photo with a bad expression.
For an image which holds a viewers attention, it has to make you ask more questions that it answers.
What is she looking at?
What mood does that expression mean?
Where are they?
I wonder what’s in that suitcase
Where is that path leading?
If it’s not intriguing then it may be just – that’s a nice pic – next…….
My tip would be to start off with a normal prime lens and leave zooms until later. Primes eliminate the variable of focal length from the camera settings so it makes the photographer move about and really think about composition which can make or break an image. Zooms sometimes make people lazy, primes constrain you to make sure you really choose what you want to shoot and how you want it to look in the final frame.
The tip was to learn how to see “flat.” Betty Edwards has a great exercise in her book, Drawing on the Right Side of the Brain, in which you hold a piece of glass or hard plastic on your finger tips and trace your foreshortened hand. That is one of the most difficult things to draw, but it’s done so easily when you trace it on the glass, or “picture plane” as she calls it. It’s a great way to instantly train yourself to recognize the shapes created by negative/positive space and the edges of the viewfinder, and understand how it will translate into a 2-D medium. DO THIS EXERCISE!!! You can’t help but improve your composition instantly.
Don’t just think about what you’re photographing — think about the why as well. What story are you telling? Any elements that don’t add to the story shouldn’t be there.
One of my top 10 (many covered here already:)) has to be , when using off camera flash shutter speed controls the amount of ambient light in the exposure. Once I understood this I was able to control my lighting to much better effect.
My best tip: Exposing to the right using your histogram.
Expose to the right. When I first got my DSLR, I was all over the place, as far as settings. I would seldom stray from Green fully auto or P mode. But as I read more, asked more questions, I eventually started using manual, A and T modes. One thing I had the biggest issue with was dark exposures. It was hard to use my tiny on camera LCD screen to see the shots. One day a friend of mine was helping me sort through some of my photos, when he showed me how to use my histogram to review proper exposure. Once I sorted this out. all my shots are properly exposed now. If they come out a little bright, I can easily crank it down in post, and this helps me not loose any detail. Now I religiously always check my histograms for each shot, making sure its up against the right. This in itself can get confusing sometimes, as some shots are meant to be dark, but as a general rule I always make sure my histogram is to the right. It is also handy when shooting manual with strobes and flashes. I use it when I set up a manual shot with off camera strobes. By checking my histogram, even with strobes, I can make the necessary adjustments for proper exposure.
Leave your ego at home. It’s that simple.
You should know your settings and gear so well that you don’t need to
think about what you’re doing, it should just be 2nd nature. So spend your
time making your client comfortable and make the photograph about them,
not about your ego or about how well you planned, exposed, or directed
the shot.
My best tip concerns “Working the Shoot.” What I mean is to move around, or what has been said on this blog, GOYA (Get Off Your A$$). Too many times I see myself, and others, glued to their seats of position, and not going for differing viewpoints. This is what is so interesting in reading some of the better ones like Tangents–you get that the photographers are looking, looking, looking around for “the” set of images. Only then do they start the technical dance of making the image.
Compose, create then shoot…..do not just point and click
My tip was learned from Creative Photo Workshops with Australian photographers Shelton Muller and Glynn Lavender. The tip is:
Find the light, put the subject in it, meter it, and shot the heck out of it.
This has helped focus and relax so I connect to the person or people I am photographing.
Many thanks!
The best tip that I have it to do your very best to get the image right IN camera. Don’t just assume that Photoshop or Lightroom can fix everything.Yes, there are some things that even PS or LR can’t fix. But even so, getting it right in camera will speed up your post processing time, which leaves you with more time to spend with your loved ones!
The best tip I got that improved my photography was to try to put the camera at a different vantage point other than standing up straight and shooting at eye height, because that is what is expected by the viewer. You can make the photograph more interesting by getting low, getting high, getting close, going far away, behind something, above or below something.
This approach has made my pictures stand out from the ones that guests would normally take at weddings despite them sometimes using gear as good as mine.
A few technical things made quite a difference:
1. A Nikon flash works beautifully in “Auto” on a Canon body. My first full digitally shot wedding was done on 20D bodies with SB28DX flashes. Got odd looks from people… Got great results as well.
2. Bounce! (not straight up dummy !) (here, on Tangents – Thanks Neil ! )
3. Use available light. Meaning : use every damn light that’s available to you. (McNally)
4. If the light’s great, don’t mess with it. (Strobist)
One shooting tip: Smile! If you do it, chances are the people in front of you will return the favour.
Oh! And : good, comfortable shoes WILL make a difference in your photography :-)
I have on occasion, not realized that I have my camera on 1600 ISO from a previous shoot. Not nice to have this in great lighting situations! So now I always check my camera’s setting AFTER every shoot, and put it back to my normal settings. That way,I’ll never make that unfortunate mistake again.
Tip for posing:
In short, if it bends, bend it!
Elbows, knees, neck, etc… This does not mean your subject has to be a contortionist, but the more curves the better.
Three of My Favorite Quick-Hitters:
1.) When shooting outdoors and your subjects are constantly in motion (like KIDS) just pick your f-stop then METER OFF THE GREEN GRASS. Great results!!! Five years of employing this “secret” and the ease of it still blows my mind.
2.) I wear a two-camera sling (like Black Rapid System). My 70-200 f2.8 zoom never leaves one side but I play around with what’s on the other side – sometimes a fish eye, sometimes my 85 1.2 prime, sometimes a safe 28-70 f2.8. This shooting style allows me my bread-and-butter telephoto images, plus something different and creative. The result: I save time minimizing lens changes yet get much-appreciated diversity.
3.) Tilt the camera to funny angles. Most clients pick an unusually angled image because it’s eye catching and looks different from everything they have at home.
A camera is just a box with a hole in it. You add the magic.
I have a few tips, I hope that they have not been mentioned before:
1. Don’t be afraid to shoot wide open with your lens, especially if you have a prime. A slightly soft image is better than a sharp one without the x-factor or that has been blurred off by camera shake or has been ruined by improper usage of flash.
2. Don’t be afraid to bump up the ISO when needed, a low-light picture that has great ambient light on it can be used as is or black and white, and it’s going to be better than a blurry picture or one taken with flash head-on.
3. Talk to your subjects, don’t make up excuses later on, that they havent done this and that, they’re not supposed to know what you want and a silent photographer is an uncomfortable one at that.
4. Stop wasting your precious intelectual time with review sites, go out and shoot and if you need gear tips try to listen to actual photographers, like Neil here.
5. Always shoot raw, always do PP, always use your manufacturer raw converter, it will be better than third party ones for sure. Don’t look for excuses when it comes to getting the best out of your picture. Also, try to take a good image at the time of shooting, chances are that a bad image can’t be made better with NX2 or Photoshop.
6. Invest in lenses and flashes, NOT in in the latest camera body.
7. You can improve many things during raw conversion but you can’t improve lighting, the light that the camera registers is the light you have to work with in PP, don’t be lazy when it comes to set up a lighting or inspect the direction and color of the ambient light, if that’s the case.
8. Attend as many workshops and photography meetings as you possibly can, they are the ones that will help you move forward.
9. Never be shy of smug about sharing your pictures, critique is constructive, even if the oppinions will not be the ones expected.
10. You’re never good enough as a photographer, and there is no one that will forever remain the best in a specific area of photography.
Sorry for the long post, I hope these will help.
Why re-invent the wheel? The best tip(s) are found at:
https://neilvn.com/tangents/
Always carry lots of medium sized flash cards as opposed to one very large one. That way, if you have card failure, you limit your losses in terms of pictures taken.
“People are VERTICAL; SHOOT THEM THAT WAY!!!!!!!” -Kevin Focht
He hates horizontals, unless there is a reason for the image being horizontal…and I ABSOLUTELY agree! SOO thankful I took his class.
One of the most important / influential pieces of advice that i was given when first starting out with Photography was to expose for the background (ambient) first and then expose for the subject (flash)…
this totally forced me to create photographs in a different way… it allowed me to really build a photograph because i could design the look (background) of the image, and then add in the subject (flash)…
Photograph with the imagination of a painter. Assume that every aspect of the image is, in some sense, under your control. Then figure out how to “make it so.”
I’ve come to this mindset in the course of transitioning from a strictly photojournalistic style to a lot of theater photography, and recently to headshots and other portraits -– which is to say controlling more and more of the elements. Theater photography has provided a helpful transition: though I don’t control costumes, stage lighting, and posing, I’ve joined a team that has shaped all those elements.
The portrait with which Neil opened this contest is rich in examples of a painterly approach:
* Rather than a full spectrum of colors, choose a narrower palette that will help to convey your message.
* When you find a visual element that you like, use it more than once, in slightly different ways. (The curling cascade of the model’s hair is echoed by the drape of her dress.)
* Put things into similar colors so as to invite the viewer to consider them as a group, but then, delight the eye by giving them interesting differences: The dress and the seats are in the same color-range, and have similar curves. But they contrast in numerous ways – hard/soft, rigid/flowing, geometric/”floral.”
* Identify your primary subject in multiple ways: lighter than the background, relatively untextured (her skin) against a more textured background (the woods), a thin white line of rim-light to heighten the subject-background boundary.
* Create mystery. (Is there a second person in the frame – there, out of focus, in the lower-right?)
* Tease the viewer’s eye into exploring the whole canvas. Do this with lines, straight or curving, such as the line drawn by the model’s exposed skin: up her right arm, across her face and chest, and down the remarkable long line of left arm, right leg, and left leg.
* Interrupt long lines, as is done by the “kneecaps” of her dress.
* Draw the eye to a single point of the image: the model’s left foot, shoe and spike heal.
* Create visual puzzles: The ball of the model’s left foot floats in air. How much weight is on that spike heel? Perhaps hardly any. Perhaps her weight is almost all carried by the seat – but its supports are masked by sprigs of grass. Maybe she responds to gravity’s pull as gently as does her dress?
* Dare to go beyond “good composition.” Aspire to take the viewer’s breath away.
The tip, once again:
Photograph with the imagination of a painter, then figure out how to shape a photograph that fulfills your vision.
This is specially true for landscapes, but I find it works fine on portraits too. Use a right-shift histogram for the exposure i.e. Expose as bright as possible without overexposing. Then bring the exposure back using software to create some very noise clean images.
When the building is on fire, the wedding party is in complete chaos, stereo mothers are past postal and you have to grab just one thing for your cvamera to keep shooting, grab your fast 50 and hold onto it for dear life. In my view there is no more important piece of kit in your bag nor anything more important to learn how to use.
There are so many great tips here! Some very specific for one area of photography, some for pros who shoot for a living, some for amateurs, some for beginners, some very general etc.
And there are so many, this could even make up for a small booklet!
So, here is the one that helped me most (for me taking photos is a hobby):
Before you go buying some new stuff, review your own pictures you took six months ago.
If the photos you took last week aren’t of any improvement, you sould spend your money on a seminar, not some fancy stuff!
In short: Invest in your abilities, not gear!
My tip: Ask yourself this question: “Where’s the action?” Then take your photo from that point. For example, imagine someone digging the garden. Where’s the action? The action is where the shovel hits the earth, so take your picture from the earth, looking up at the shovel. Another example: a golfer striking a ball. Where’s the action? At the golfball / golfclub interface. So take your photograph from there, either as the ball is about to fly away or as the ball is about to be struck. This simple question will give you ideas for some incredible shots.
Let go of an idea of it’s not working. Don’t be hard on yourself about it and don’t be scared to admit it. While shooting and post-processing. Right after my husband told me this, I recalled reading pretty much the same in this blog and then in a Joe McNally book in the same week. Helped me loads.
Here´s a tip I think most amateurs don´t know. When focusing, zoom your lens all the way, half press to focus on your desired spot and without letting the shutter go, recompose (zoom out if necessary) and shoot, if you don’t change your physical position focus will be perfect.
Early in my photographic journey I saw a professional always zooming in and out when taking a portrait and questioned myself why he did it, and discovered this secret. So here´s another tip, always be curios of why a professional does something in certain ways, there is always a reason.
trust the histogram; the little screen will lie to you
and ETTR – that is where the digital information is
One handy tip I use all the time, to handhold and get sharp images, your shutter speed should be equivalent to the distance in mm of the lens. For example, if you have your lens zoomed at 150mm, your shutter should be at least 1/150 of a second.
Keep in mind that this rule applied to old 35mm film cameras, so if you own an entry-level DSLR with a crop factor (not full frame), you need to do the math accordingly.
The following entries stood out for me:
4. More relevant, perhaps, now that I am shooting digitally (as opposed to good old film)is the fact that before I commence a shoot I can make an assessment of the light available to me and set both my cameras so that I have a base setting from which to start. This means (unless there are significant changes occurring in the light) I only need to occasionally tweak the camera/flash settings in order to maintain the consistency of my results, and I’m good to go from the start.
13. With technology now, it is wonderful to have a memory card that can carry a large amount of gigabytes. (Great for trips, etc.) But when you’re looking to get the most creative and most satisfying results, use a card that has between a half gig and one gig of space. You will quickly run out of space on your camera, and you will be forced to delete some if you are going to keep on shooting. By the end of your session, you will only have very high quality photos. (Sort of like film with a delete button: 30-60ish photos)
21. Move away from eye level. Everybody is used to seeing the world from that perspective, so pictures taken at eye level tend to be less visually uninteresting. If you’re not squatting, kneeling or lying on the floor then you should be climbing up on something.
I also really like this one! ; )
28. My tip would be not to follow just the tips and tutorials of Neil, but mix them up with some from the lesser Gods such as the Strobist, Joel L. or Big Joe M. and the like. A mix of seasoning goes a lot further than just plain salt.
32. My best photography tip is compose your picture in camera, don’t say I will crop it later because you may have to crop an important part of the picture. This is really critical when you want enlargements such as 8x10s and larger. Always leave space for the crop factor…
50. My favourite tip came from Bambi Cantrell, at a seminar several years ago. She said, “a good picture today beats a perfect picture tomorrow “. Get the shot and then improve on it. This advice has stood me in good stead over dozens of weddings.
70. always defog your images in photoshop, makes them pop. unsharp mask, top box 20, middle box 60, bottom box 1
75. The tip that has increased the number of compliments I get on my photos the most came from Peter Hurley – on how to direct people into giving genuine, interesting expressions. When photographing people, viewers will respond to a great *real* expression – even in spite of any other technical failures the picture may have (I’m not advocating poor technical performance). It’s all about building rapport and coaching. If they look confident and approachable, the photo is appealing.
78. Just shoot it. While you can have all the knowledge in the world, you still have to court serendipity. The best way to do this is to just shoot. You might have less than a minute and you might only have your bare bones rig. But, if it catches your eye, shoot it. That moment in time will never come back around again.
I really like this one. Thoughtful.
87. Like any other shoots, start with the concept of the mood you want in the frame. Full length portrait can go in two ways: 1) details of the subject, and 2) juxtaposition of the subject in the environment.
For scenario 1, go long with telephoto lens to isolate the subject from the environment. Lighting options may be limited as you may not have access to as many options to light the subject at 30ft and beyond (no assistant, environmental restrictions, etc.).
For scenario 2, go short with wide angle lens to place the subject in the scene. Isolation can be achieved using lighting, subject placement, view angle, etc. Fill the frame with the subject just enough to avoid/emphasize distortion to their important features such as face and body shape.
In either case, the exposure priority goes to the subject – this is, after-all, a portrait. I’m excluding silhouette as I consider that a landscape/still life shot.
This gives a framework to give pleasing portraiture – adjust composition, elements, and light to give wings to your creativity.
142. And the hundred images you showed everyone when you returned? Should have been edited down to 4 (I wide angle, 2 portraits, one detail shot). Stop showing your crappy shots! Ansel took crappy shots too, he just didn’t show them to ppl!
127. Interact with your subject. Do not merely observe light, don’t simply push a button. You have control over your image Content, Composition, Lighting, and the Moment of Capture. The first three can be static, repeatable; its the last that has real impact. Focus more on what’s in front of your camera, and the rest will take care of itself
That’s awesome! Great choice for the winner! Congratulations Jim!
Learn the rules of photography, practice them really well then go ahead and break these rules!
In facilitating the bringing together of so many tips Neil, from so many minds all over the world, you have created – in itself – a wonderful resource!
Congratulations, Jim. Great responses!
Required reading for photographers everywhere. Simply brilliant.
Sorry to see the contest is over. Thank you for being such a wonderful resource for photographers. By the way, I sent you a question about your photography services. Just posting here in case it went to spam.