Tangents

photography tutorials, reviews & workshops

tangents photography blog
learn : discuss : share
  • Tangents
  • Tutorials
    • Flash Photography
    • Wedding Photography
    • Studio Photography
    • Posing People
    • Understanding Your Camera
    • Exposure metering
    • BFT
    • Best Photo Books
  • Reviews
    • Sony
    • Nikon
    • Canon
    • Fuji
    • Profoto
    • lighting gear
  • Workshops
    • Info: Workshops
    • In-person
      tutoring sessions
    • Online
      tutoring sessions
    • Workshops in
      New Jersey (NJ)
    • Workshops in
      New York (NYC)
    • Photo walks in NYC
    • Studio Workshop
    • Video tutorials
    • Workshop results
  • Books
    • On-Camera Flash (revised ed.)
    • Direction & Quality of Light
    • Off-Camera Flash Photography
    • Lighting & Design
    • On-Camera Flash (1st ed.)
  • Projects
    • Two Perspectives
    • B&W Infrared
    • Vintage lenses
    • Time-lapse photography
  • Info
    • About
    • Contact
    • My Photo Gear
    • Books by NvN
    • Join us on Facebook
    • Acclaim
    • Success Stories

Bouncing on-camera flash off a brick wall

May 11, 2009 Neil vN 16 Comments

Bouncing flash off other surfaces

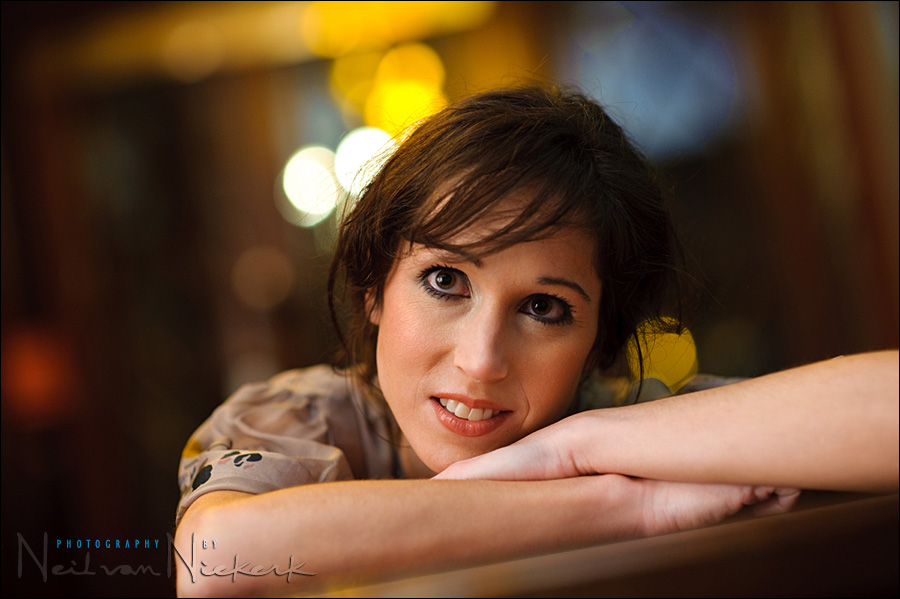
When I am stuck in an area where there aren’t any white or near-white surfaces to bounce my flash off, I will look around for alternate areas.  In the image above, I bounced off the wood paneling and brick walls in this large enclosed entrance area of a restaurant.

As most of you already know, the problem with the bounce flash technique, is that you will pick up the color cast of the area that you are bouncing your flash off.   When this color cast is slightly warm, it is often simple enough just to switch to a Daylight White Balance.  This slightly cold color will off-set the additional warmth from the off-white surface you bounced your flash off.

This image will give you an idea of the color of the brick and wood that I bounced my flash off.


When an area is painted green or blue, especially a darker hue of those colors, then you will have difficulty getting a good skin tone out of the resultant color cast because you will invariably have a discontinuous spectrum.   In other words, some of the colors that make up a variety of hues, will be missing.  And with blue and green light, you miss out on the warm colors that make up skin tones.

This then is less of a problem when you’re bouncing off wood (especially if the wood isn’t dark), or if you bounce flash off brick walls. (Also hopefully not too dark.)   The colour cast that you will get from doing so, is quite warm.  Warm enough that you can often just set your camera’s white balance to Tungsten.  Or around 3700K.  Or there-abouts.  You can dial in an approximate WB setting in Kelvin, and then fine-tune the colors as part of your usual post-processing of the RAW file.

With this kind of extreme color change, it is best that you shoot in RAW to have the data for such manipulation of your image.

Back to the image at the top .. I set my camera to Tungsten WB, which did mean the image straight out of the camera was quite close.  And then dragging the sliders in ACR, it wasn’t that difficult to get beautiful skin tones.  And in bouncing flash off to my left, flagging my flash with the usual Black Foamie Thing, it was just as simple to get soft directional light.

My settings where:  1/100th @ f1.8 @ 1000 ISO

So next time that you’re stumped for something to bounce your flash off, don’t be too timid to try bouncing off a warm-toned surface like wood or bricks.  You might just be surprised.


related articles

  • how to bounce flash
  • photographing the wedding processional with extreme bounce flash
  • bounce flash photography & white balance settings  (model: Roz)
  • bounce flash for bridal portraits  (bride: Christine)
  • using on-camera bounce flash outdoors at night  (wedding: Jen & Chris)

Filed Under: bounce flash photography, flash photography Tagged With: bounce flash photography tips, on-camera bounce flash


Help support this website

If you find these articles of value, please help support this website by using these B&H and Amazon affiliate links to order your photo gear.

I also offer photography workshops and tutoring sessions, whether in person, or via online video tutoring sessions.

Please follow me on Instagram for more.

You can also join our thriving photo community in the Tangents group on Facebook, where we show our photos and discuss all things photography.

Thank you,

Neil vN

Books by Neil van Niekerk


16 Comments, Add Your Own

  1. 1olympus_fotograph says

    May 12, 2009 at 3:19 am

    hey neil,
    thanks for sharing this.
    Q: Did you add. gel your Flash?
    I mean it makes no sense to add additional Color, because you getting some warm color from that walls.
    Or is gelling also required?
    thanx

    peter

    Reply
  2. 2Neil says

    May 12, 2009 at 3:20 am

    Nope, no additional gelling required this time. : )

    Neil vN

    Reply
  3. 3Rory Mole says

    May 12, 2009 at 3:26 am

    Hey there again Neil,

    Great post again Neil. Good to know that we don’t have to stick to bouncing off white surfaces. I’m going to give this a try asap.

    I presume to ask the following.

    I am on a quest to get the best possible skin tones in my images. I’ve also noticed that there are some photographers out there who have the L series lenses (Canon) with wide apertures and great clarity. My question is this… does a pro lense give a person the edge when it comes to skin tones and that sort of thing. There is nothing better than great skin tone, exceptional sharpness of detail and extremely shallow depth of field and fantastic lighting.

    Somehow, I’ve battled to get this combination using the middle of the range lenses. Is this true?

    Also, should we “play” around with the sliders in ACR to achieve the right skin tones?

    What amount of sharpening is permissable in Photoshop to enhace the clarity of an image without making it look obvious? Are there any tried and tested techniques that one could use besides just using the Unsharp Mask, High pass filter and the usual others?

    Thanks for the very valuable info you share with us… Keep them coming.

    Reply
  4. 4Neil says

    May 12, 2009 at 4:05 am

    Rory, the quality of your lenses have a huge impact on final image quality.

    I’ve seen the inane comments on the forums where someone will say, “with the quality of lenses today, you won’t see a difference between lenses.” … and with that they try and justify that cheap optics will give you similar results to the more serious glass. And that is pure nonsense .. you DO see the difference between poor quality lenses, and superb quality lenses.

    But it needn’t cost you a fortune.

    It does look like Jasmine Starr favors fast primes, if I go by the minimal depth-of-field and how her subjects pop from the background.

    As wonderful as the Canon 85mm f1.2 II (B&H) is, (and I do love mine), you could get results which are quite similar by using the more modestly priced Canon 85mm f1.8 (B&H) in terms of shallow DoF. Your lens need not have that red stripe to be a superb performer.

    But you simply won’t get that look with an f3.5-f5.6 amateur zoom.

    Skin tones .. that’s a tough one. I loved the skin tones I got from the Canon files, using Canon’s proprietary software, DPP.

    It took me a while to get great skin tones out of the Nikon D3, using ACR and Bridge CS4. What gave me the breakthrough, was in using Adobe’s Camera Portrait Profile. It made all the difference in the skin tones I got from the Nikon D3.

    But with Canon, I would still default to DPP. Those skin tones are hard to beat.

    Sharpening? That’s another wild ride of a topic.
    At the very basis of it, sharpen for the final use of your image.
    For web, I use sharpening in a fairly simplistic way with Smart Sharpen in Photoshop. But there are numerous sharpening actions available that do a great job. It is a matter of taste however as to how much you want to sharpen an image. Mine are probably under-sharpened compared to some.

    Neil vN

    Reply
  5. 5Ron says

    May 12, 2009 at 4:28 am

    While you can shoot RAW and fix in post, if time allows, why not use an Expodisc to get it correct in camera? I have found this works wonders in mixed lighting conditions.

    Reply
  6. 6Neil says

    May 12, 2009 at 4:34 am

    Ron .. I bounce off different surfaces, even when I am in a semi-static position in front of my subject. Also, with a wedding, while I am moving around in a room, I am bouncing off different surfaces. I would drive myself nuts getting a preset WB setting for every shot. Much simpler for me, to concentrate on getting the images I want, and then touch them up for pleasant WB as part of my usual raw workflow.

    But there are obviously different ways of approaching this.
    It’s the final image that counts. And if technique gets in your way instead of helping you .. then you need to finesse the technique. ; )

    Neil vN

    Reply
  7. 7Mark Quade says

    May 12, 2009 at 4:40 am

    And to think that I have been sh_t scared to bounce off bricks!! I will have to give this a go. Thanks Neil

    Reply
  8. 8Andrew says

    May 12, 2009 at 6:07 am

    Thanks for the post Neil. This was something I was actually wondering about.

    Here’s my question though. If you adjust the WB in post, do you not risk knocking the colours off for elements of the frame which aren’t lit by the colour-casted flash, i.e. the ambient?

    For the great image you give as an example that’s not too much of a problem as it looks like there’s quite a bit of tungsten in there anyway, it’s pretty dark tones and there’s not much detail to be picked out in the background. Maybe that’s the answer… this technique only works when all elements of the frame allow it?

    Thanks again for the words of wisdom!

    Reply
  9. 9Neil says

    May 12, 2009 at 8:27 am

    Andrew, you’re quite right. In doing it this way, I may very well alter the colors of my background. Usually this doesn’t present a problem though with an image such as this portrait. Pleasant skin tone becomes all-important then, and the shift in background colors a lesser concern.

    But I can see there might be situations where the unintended color shift in the background might be a bother.

    Neil vN

    Reply
  10. 10Laurie says

    May 12, 2009 at 11:56 am

    Bouncing off brick is one of my favorite things. It makes skin look so pretty in candlelight settings.

    Reply
  11. 11Jasmine* says

    May 12, 2009 at 3:36 pm

    What a wonderful post…so helpful! :)

    Reply
  12. 12Joshua Segraves says

    January 20, 2011 at 4:12 pm

    Great stuff, Neal. What would you do if you didn’t have a warm surface? The walls in our living room are green. :) Would you just use a more green WB? Would that cause a problem if the lights in the room were tungsten?

    Reply
  13. 13Neil vN says

    January 21, 2011 at 4:53 am

    Joshua … you have a camera, you have green walls, and you have RAW software. Try it and see.

    If the lights in the room were tungsten? Then I’d under-expose the ambient light to an extent and have the flash dominate as a light source.

    Neil vN

    Reply
  14. 14dro says

    August 27, 2011 at 11:13 pm

    howd u get the catchlights in her eyes on this shot with the black foamie?

    Reply
  15. 15Neil vN says

    August 27, 2011 at 11:49 pm

    Dro, if you bounce your flash with the mind-set of using studio lighting, then the catch-lights will be there in the eyes, nearly automatically.

    Neil vN

    Reply
  16. 16Brad Melton says

    August 14, 2013 at 6:45 pm

    I never would have even considered bouncing off brick or wood before, but now the wheels are spinning in my head trying to think of a location to try this. Thanks a million for the articles, Neil (even if I am a few years late to the party)! Great info, concise and to-the-point.

    Reply

Leave a Reply to Andrew Cancel reply

Your email address will not be published. Required fields are marked *

categories

Articles & Tutorials

  • • About myself & this site
    • Books by Neil vN
    • Best photography books
    • Black foamie thing
    • Photographers’ success stories
  • • Flash Photography Techniques
    • Natural looking flash
    • Flash + Ambient light
    • Dragging the shutter
    • Bouncing your flash
    • On-camera flash outdoors
    • Exposure metering
    • Flash exposure compensation
    • Bounce flash examples
    • Which is the best flashgun?
    • Flash brackets
    • Off-camera flash photography
    • Flash photography basics
    • Using video lights
    • Flash photography tips
  • • Photography workshops NJ / NYC
    • Models @ photography workshops
tutorials:
flash photography
Photography
Workshops

All rights reserved. Copyright © Neil van Niekerk 2025 · Customization by The Traveling Designer

Copyright © 2025 · NvN on Genesis Framework · WordPress · Log in