
Mauricio is a photographer in Costa Rica that has consistently posted photographs that got everyone’s attention in the Tangents Facebook group. One of the sessions was this engagement shoot – his lighting and post-processing are impeccable. But there’s more to photography than the gear and camera settings – there has to be a connection with your subjects, and in this case, clients. There has to be a spark that you, as the photographer, help elicit.
I asked Mauricio to share some of his magic through advice on how he connects with his clients as part of creating wonderful images that his clients will love. He does delve into equipment choice as well for complete information here. You can check more of work his website, or follow him on 500px or via Instagram for a gallery of images and contact information.
Oh, and don’t miss out on the behind-the-scenes video that Mauricio posted at the end of this article.
How to connect with your clients for better engagement photo sessions
a guest post By Mauricio A. Ureña G.
Website | Facebook | Instagram | 500px
Any time I got involved in a new project for a wedding, I start the journey by meeting the couple personally. The first impression is killer so you have to came up with some good ice-breaking techniques. Personally I meet with them in my home. I try always to stablished a good ambience because earning their trust from scratch is vital.
During the meeting I do my best to deeply explore the couple, how they interact with each other, what are their goals, dreams and what are the things that represent something special for them. All this information is going to supply what we need to start developing their engagement session.
After the meeting I create a Whatsapp group and tell them that I’ll be there to help anytime as well as my assistant. Once the date is set there are many things to establish with them – one thing I’ve found crucial is giving them a series of guidelines for how they should dress. It is very important that their clothes help with some visual connection between them. I always ask them to share us some images of the alternatives they are considering, to give them my opinion in order to see if the combinations works or not.
In this particular case Sofia and Jose decided to make their engagement session at the beach. Here in Costa Rica we are blessed to have either mountains or beaches in within less than an hour of driving. My country is very well know because of it’s natural beauty so we have many amazing backdrops to choose and shoot.

Now comes the logistical part of having a beach engagement shoot. Speaking of gear, I know in advance that we have to travel light since we will have to walk through the beach in order to get to the final location. I usually shoot with a three-light setup, but in this case I have to limit it for a two-light setup, so I take my Profoto B1 Location Kit to do the job. Then comes choosing the correct modifiers that fit the type of shoot we were doing, yet keeping the gear light in weight.
I have to tell how I love the Profoto OCF modifiers for its portability and quality. I take with me a Profoto 2.0 OCF Octo and the white Profoto Beauty Dish. At the very last moment for this photo session, I decided to take the white Westcott 7” Parabolic too, since it fits the light stand bag. Inside that same light-stand bag, I will also have 1 Manfrotto Light Stand and 1 monopod.
As for the camera and lens choice, I prefer to shoot this sessions with the Nikon D810 and D800. I simply love their resolution and their dynamic range. Speaking of lenses I always shoot 85% of my images with a 70-200 f/2.8 VR II. For this particular session I also bring the 105mm macro lens for the ring shot and a 24-70mm for more environmental portraits of the couple.
After a short walk through the beach and climbing a short hill to cross to the beautiful white sand beach we finally arrive to the location. Since I have shoot there before I was pretty sure about were exactly the spots were. In this type of e-sessions it is crucial to be aware about the direction of the sun since the sea and the beach is going to be mostly backdrop of your images. I knew that between 7:00am and 9:00am, the white sand area will be in shade since there is a big mountain that will block the sun from hitting the beach. So until then I will be able to use the sea as the backdrop and play around the sand without having any issues with direct sun hitting their faces. When my couples ask me to have a beach session I always told them that it should be very early in the morning because of this or late in the afternoon for taking advantage of the sunset. There is a big risk in shooting in the late afternoon, because in Costa Rica this is the season where there is a huge possibility of rain in the afternoon – so they decided to wake up early in the morning.
We started the session with some relaxed shots of them having fun, playing around to make them comfortable in front of the camera and letting them to be their selves, with less posing needed.
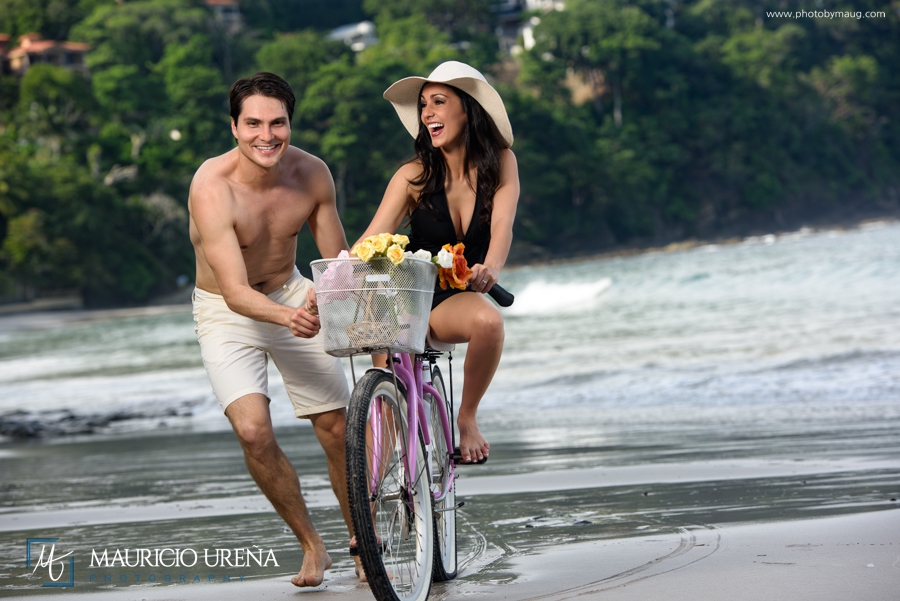
For this series of images I position my self far from them, racking up my lens to 200mm, and told them to just have fun. They decided to bring a vintage bicycle for the shoot so this was perfect to do that. As for the lightning I decided to mount the Profoto OCF 2.0’ and the White Beauty Dish on each B1.
Since these will be moving shots, I set the aperture to f/4, then the lowest ISO of my camera in this case ISO 64, the distance between the lights (which by the way were operate by two assistants) and then switch the control to TTL one light +0.5 brighter than the other and both of them in front of the couple.
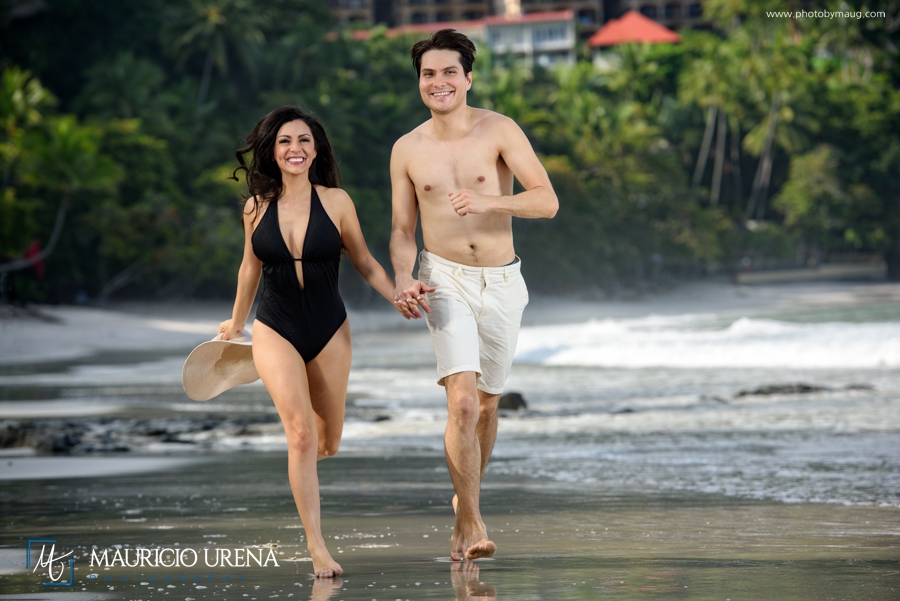
After being very satisfied with the results and showing them the back of the camera two or three of the keeper images, I asked them to change clothes for more romantic shots. Some people don’t like to show unretouched images but I have found this a very encouraging way to make the couple more excited about the next part of the shoot. They will cooperate more with me, paying more attention to instructions and be even more relaxed in front of the camera.

As they were ready I ask them to take a walk for an specific area, I took a quick shot of them walking for a detail shot with just on light acting as fill light coming from camera right.
Then I ask my assistant to bring a grid for mounting it to the B1 that has the OCF Octo because I was planning to use this light as a hair light I didn’t want any flare hitting my lens.
For the next sequence, I was looking for romance and happiness – and for this it is very important to have interaction between the couple, with much of their bodies touching. Take a look at how the hands are placed – you can see interaction in the hands that are on their hips; her hand in his neck and how they smile to each other. All of this giving a sense of the intimacy of the moment.

And from there on, I try to move around and play a little with them. If necessary, I ask my assistants to move as I instruct – not letting the couple move from the spot they are. Just small adjustments for the variety of the session.
For the next shot I switch to my 85mm and take and vantage point to shoot down to show more of the white sand as the background. And as you can notice, since this is an engagement session, the ring plays a big role in the entire shoot, so you have to had that in mind at every image. One thing that always work is to tell the couple to whisper something to each other, this brings many natural expressions on to the scene.

Now speaking about the ring itself, well it was time for another change in clothes, so I decided to take the ring shot. I brought my Nikon D800 and the 105mm macro for this. We started to looking for a nice place to put on the ring, and then my assistant came with a nice shell so I liked the way the lines leads the viewer’s gaze to the ring.

One thing I always tell my couples is to not use their favorite dress combination at the start of the shoot. At the beginning either them and me are warming up – so as long as the shoot progresses, the photographs are going to get better and better. If there is some point at which you run out of ideas, it is always good to have on your hand some Pinterest album for posing ideas – this can be very useful for the couples too since they are going to see the pose and mirror it.
For the next shot I ask the groom if he wants to make the proposal shot and immediately she said, “yes, of course”!
I saw her beautiful red dress and thought that it would be nice to use the blue sky as a background for the contrast – making the dress pop, and the couple as well. I found a nice spot between the rocks that were flat in order that they can pose easily. I decided to shoot this in HSS for the sky to look more blue and to keep the shallow depth-of-field. If I had exposed for them, the sky would’ve blown out. You can see both images below:
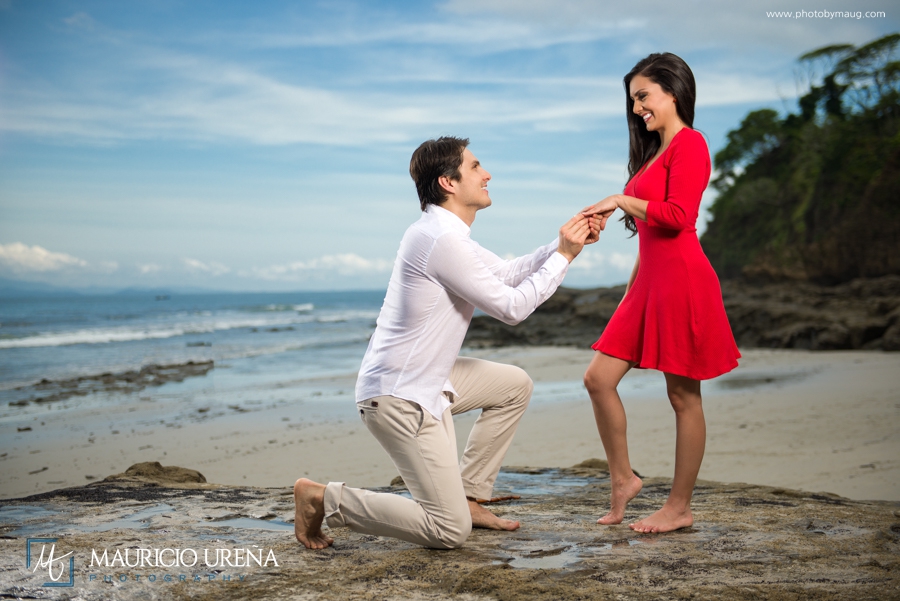
As of the lightning setup I ask one of my assistants to use the beauty dish as a front light above camera and a little to camera-right. The other light was used on the opposite side, to create separation between them and the background. You can see more of the effect in his back. I wish I could use another light for her side.
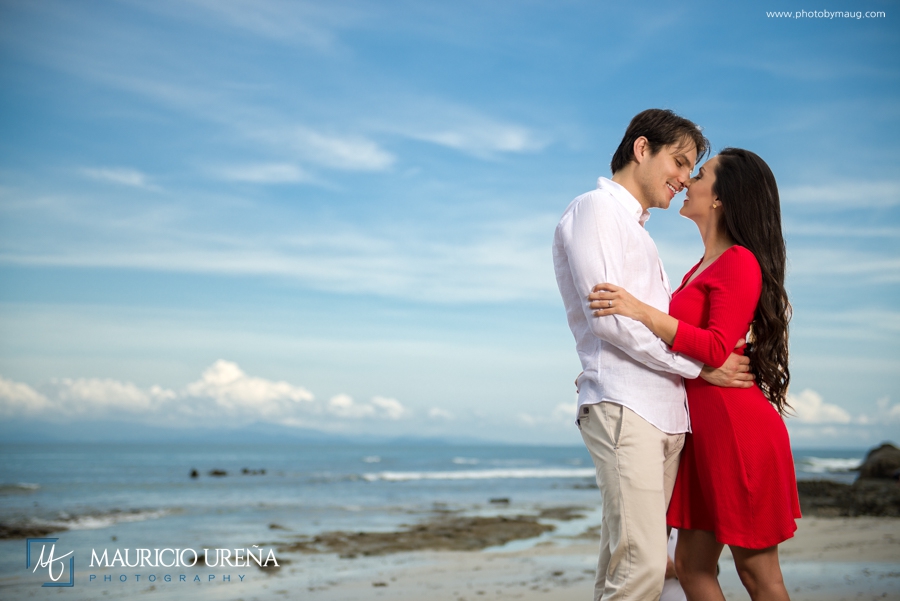
In the above image I use one of my favorite poses which is the “almost kiss”. Of course they may kiss, but you can find amazing reactions, both before and after the kiss – so be prepared to shoot quickly.
Here I would like to add another important note, always set up the lights and make sure of proper exposure before the start of any pose or scenario – because if you don’t, you can miss some good expressions through the process. If you are using the Profoto lights, try to use the TTL mode and the switch to manual and adjust at your taste.
For the hair light or separation light I prefer to set it as +1 on the TTL and then see on the back of the camera how the light show on the couple. Sometimes if I have the opportunity, I try to set each light individually. Then I would start by shooting only the underexposed background without any light to find to correct spot to start of painting with the lights – then I would set the hair light and then finally, the main light.
In this image above, I set a bare B1 behind them. You can see the light all over their faces coming from behind. This was easier since they were standing on top of the rocks, so my assistant can hide in the sand behind the rocks and extend the light stand as much as needed.
Now for the last part of the shoot I noticed that there were practically no wind and mostly cloudy conditions so I decided to bring out the Westcott 7” Parabollic White umbrella to do the above image trying the light to look as soft as possible. The setup was pretty easy, I ask my assistant to walk just behind me facing the couple. I use the 24-70mm lens for a more environmental shot and since the light has to be very close a longer lens wouldn’t have work.

After that image, the photo session was supposed to have ended, but I had two more shots in mind – more dramatic and a little crazy, since they would have to get wet and enjoy the moment.
They accepted the challenge and I was ready to capture the moment. Again I selected the Parabollic umbrella since there wasn’t any wind at all – even with that we were a little afraid of losing the umbrella if the wind suddenly picked up. Fortunately there were no accidents during the shoot.
For the first image I had in mind, I placed them near where the waves were hitting. I grabbed my D800 and the 24-70 lens; exposed first for the background, and then used TTL flash for the main light … while watching out with one eye for any sea water which might hit my camera. The rest was wait for the correct wave and hope to capture the precise moment, since getting wet is gonna only happen once.

Finally, we saved the best for last … the kiss shot! As they where wet I remember a scene from a movie in which the girl was on top of her man, kissing him. I asked Sofia and Jose to recreate the pose, in the same place we were before. I just turned around and let them go out a little in the sand where you can see a little bit reflection – the last shot of the day.
We were fortunate in many ways – everything went smoothly and we enjoy the day with them. Next, their wedding day! I am very sure this engagement photo session with them will pay off when photographing their wedding.
I hope you enjoyed the journey – I leave you with a little video of the day that we record using the DJI Osmo.
If you have any questions feel free to do them through the comments, I’ll be glad to answer them.
Best light for all of you,
Mauricio

Related articles
- Top 5 tips on shooting engagement photo sessions
- People skills for portrait & wedding photographers
- Engagement photo sessions: Posing, lighting & context
- Making your images pop with compressed perspective
Awesome photos! Thank you for giving such specific details on your choice of lens, light placement, and modifiers. Sometimes we get too happy with just one type of setup, and forget to switch the gear, as well as the poses and emotions. You nailed them all – resulting in a great variety. Any of these images you made could all easily be featured on a magazine cover. Super guest post, Mauricio!
Expecting to see a blog post from your next trip and portrait session in Costa Rica, Neil….. ;-)
Truly honoured with your comment Patti, and yes I agree….Neil has to come to do a portrait session in Costa Rica :)
Love the blog post and I stealing the idea of a ‘WhatsApp’ group for my clients, that is a great idea to stay in touch on a more personal level with technology.
You got it Andrew, we must have a close relationship with our clients and why not using the technology for that? Great to know you will keep this in your personal workflow!
Excellent post! – you definitely have that magic that brings out the emotion in the couple, together with all the technical aspects spot on as Niel mentioned.
Would love to see a follow-up post of their actual wedding as you’ve built a wonderful relationship with them.
Thank you so much Johan! I am waiting as well to make their wedding, the sad part is that we have to wait until January 2017 for that! I’ll post images of them on the Tangents Facebook group so stay tune…
Thank you Mauricio. Your work is spectacular and inspiring. Your guest column here is a real treat, thank you for taking us benind-the-scenes on this shoot. It was a fun read and you offered so much valuable advice and information, including really helpful technical and equipment-related info. I loved the video too. You certainly go all out for your clients! Lugging the bike all that way and through that terrain was funny and cute.
Thanks for the insight, the whatsapp group is such a good idea! Definitely something I’d be taking on board, thanks for sharing :)
Great images and great advice,thankyou
Wow, really beautiful work! Would be very helpful to see also the lightning setup you had there, and the flash/lamps used. I’m mostly using 4x YongNuos with the radio triggering; but it has no TTL so the first correct exposure is a bit cumbersome.
To get the sky even more blue (or blue when gray for that matter) I use a yellowish flash gel and then white-balance for it in PP: the sky gets blueish also when it was more grayish ;-).
Btw: the problem with WhatsUp is they use your address book to send spams to all your contacts; that’s why we use the GpsNose app, which helps also with coordinating shooting locations, uploading sample pics, community sharing etc.
I got one question, did b1 was use in ttl or manual?
Hi Rafal,
I usually start with the B1 on TTL for the test shot, from there I switch to manual and adjust the power higher or lower depending on what I saw on the back screen. In shots when there is some movement involved I stay on TTL and then in post adjust if it is necessary.
Any other question you have fire it away :)
Great how you use technical and non technical aspects together to make magic happen!
Beautiful work and great advice! Thank you.
Just found this post and the video — all the images look so fresh and compelling! Thanks to Neil for hosting the blog and to you for writing it… would you by any chance have a rough diagram of where you put the beauty dish and 2 feet octa, held by your assistants! As this all took place a long time ago that may not be possible — is there another location shoot where you have used the same kit and taken a pull back shot of you and your assistants in action? I love the bicycle. Who persuaded your clients to heave a bicycle up a cliff! Thank you.
Hi Simon, thank you very much for your comment and glad you found out the post! I actually do not have a diagram, but I have pullback shots with similar lighting setups that I can share. You can also check my Instagram account there is a BTS section on my stories in which you can see many examples from a behind the scenes perspective. And well they wanted a bicycle on their shoot so it was easy to persuaded them, the funny thing was that one of the tires arrived flat for the shoot, so that complicate a bit the handle lol but the shots went good enough!
Best,
Mauricio