Tangents

photography tutorials, reviews & workshops

tangents photography blog
learn : discuss : share
  • Tangents
  • Tutorials
    • Flash Photography
    • Wedding Photography
    • Studio Photography
    • Posing People
    • Understanding Your Camera
    • Exposure metering
    • BFT
    • Best Photo Books
  • Reviews
    • Sony
    • Nikon
    • Canon
    • Fuji
    • Profoto
    • lighting gear
  • Workshops
    • Info: Workshops
    • In-person
      tutoring sessions
    • Online
      tutoring sessions
    • Workshops in
      New Jersey (NJ)
    • Workshops in
      New York (NYC)
    • Photo walks in NYC
    • Studio Workshop
    • Video tutorials
    • Workshop results
  • Books
    • On-Camera Flash (revised ed.)
    • Direction & Quality of Light
    • Off-Camera Flash Photography
    • Lighting & Design
    • On-Camera Flash (1st ed.)
  • Projects
    • Two Perspectives
    • B&W Infrared
    • Vintage lenses
    • Time-lapse photography
  • Info
    • About
    • Contact
    • My Photo Gear
    • Books by NvN
    • Join us on Facebook
    • Acclaim
    • Success Stories

from the hip …

August 30, 2008 Neil vN 29 Comments

Here is a simple technique which some of you might already know of – shooting from the hip without looking through the viewfinder.

At weddings, when photographing the party and dancing during the reception with a wide-angle lens, I often don’t hold the camera up to my eye.  Instead I rely on the infra-red beam from the speedlight to show me what the camera is focusing on.  Then, using the focus-lock-and-hold method, I keep focus and reframe the shot if needed. This way I can shoot from the hip without looking through the viewfinder, but still have images that are well composed.

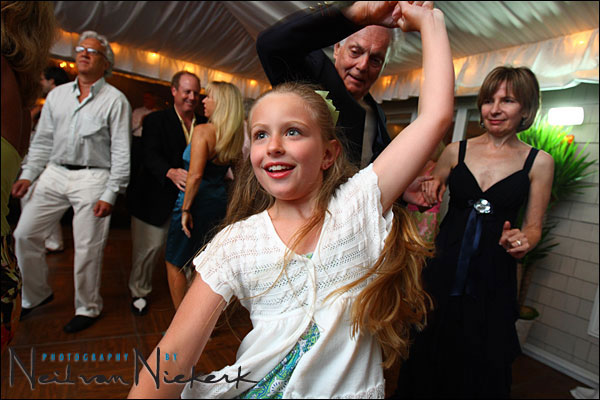
Here are a few images from recent weddings I photographed:
(None of them were cropped to post them here.)

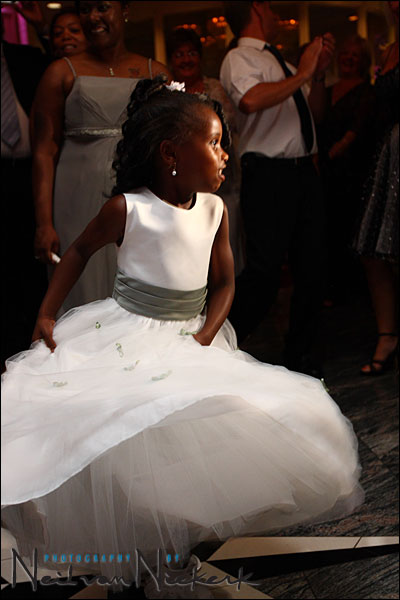
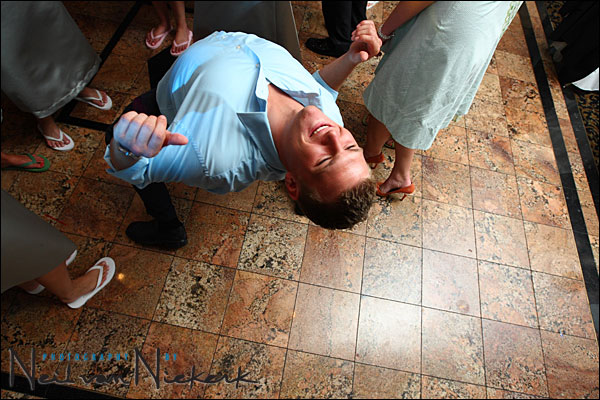
When moving between the guests like that, it is imperative that I don’t annoy anyone by blasting flash in their faces.  This is a large part of the decision why I use this particular method to bounce my flash – using a piece of black foam to flag my speedlight.

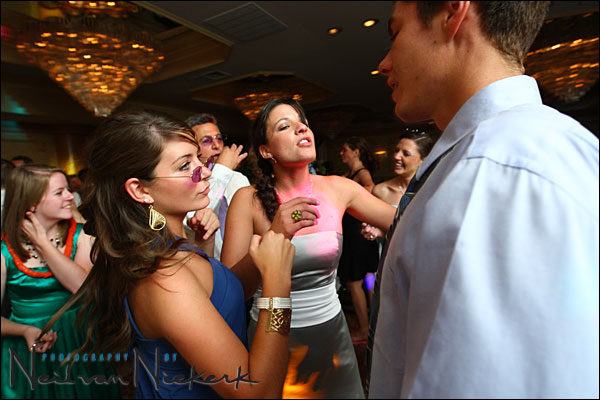
At the same time also note in this image above, that there was no dodging and burning – yet, the lighting on the guests dancing here is quite even on a number of planes. And the guy in the foreground isn’t more brightly lit than the girls he is dancing with.

.

.
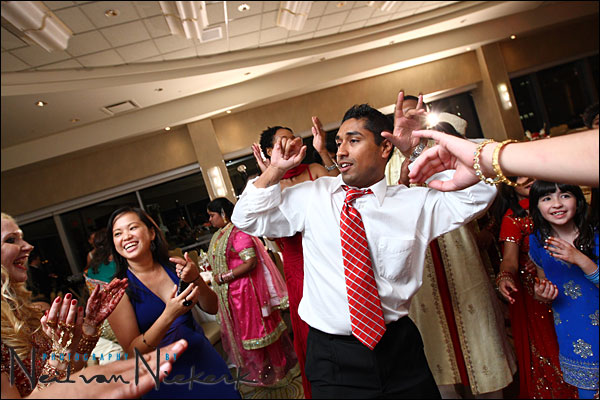
Of course, it is the same technique when holding my camera overhead.

.
It isn’t simply a matter of hoping for the best and blindly firing away – with a bit of practice there is actually a fair measure of accuracy here in framing the images even when not looking through the viewfinder.


Filed Under: flash photography, technique, Uncategorized, wedding photography


Help support this website

If you find these articles of value, please help support this website by using these B&H and Amazon affiliate links to order your photo gear.

I also offer photography workshops and tutoring sessions, whether in person, or via online video tutoring sessions.

Please follow me on Instagram for more.

You can also join our thriving photo community in the Tangents group on Facebook, where we show our photos and discuss all things photography.

Thank you,

Neil vN

Books by Neil van Niekerk


29 Comments, Add Your Own

  1. 1Dave Tong says

    August 31, 2008 at 8:49 am

    Incredible stuff… While we see “hip-level” shooting discussed often for street photography, seeing how well it can be applied during a wedding is amazing.

    May I know how you bounce the flash (even with the black gobo) in a way where you don’t blind the folks that’s in the path of the flash head?

    Reply
  2. 2Neil says

    August 31, 2008 at 8:28 pm

    Dave .. the easiest would be to look at each photo and see where the light is coming in from. I vary the direction that my flash is pointed to, all the time.

    Neil vN

    Reply
  3. 3Daniel says

    September 1, 2008 at 2:59 am

    It seems to me that if you’re going to be bouncing flash on these from-the-hip shots, you’d have to see the scene coming, or have lighting fast reflexes for re-aiming the flash. Perhaps it’s a 6th sense, or gambling on the shot playing out as you hope it will.

    How does it work for you, Neil?

    Reply
  4. 4Neil says

    September 1, 2008 at 8:31 pm

    Daniel ..

    You have to keep in mind that these aren’t individual images, but images selected from sequences of images I took. Anticipating the moments become easier .. but with wedding receptions, with photographs as simple as people dancing, there is less pressure than in other fields of photography (news & sport for example), to get the peak moment. So in this case, opportunities for good images come often, giving you time to nail it.

    Neil vN

    Reply
  5. 5Dave Tong says

    September 1, 2008 at 11:25 pm

    Thanks Neil, gotta practice more… (sorry for saying gobo instead of snoot hehe).

    Reply
  6. 6Dennis says

    September 3, 2008 at 5:45 am

    Hi Neil,

    Did you gel your flash and set white balance to tungsten in some of your sample images?

    Thanks a lot for sharing. I continue to learn from you. God bless.

    Reply
  7. 7Neil says

    September 3, 2008 at 8:31 am

    Hi there Dennis …

    All of them (except the 2nd photo of the little girl dancing), had either a 1/2 CTS or a full CTS gel taped over the flash-head.

    Neil vN

    Reply
  8. 8Stephen says

    September 3, 2008 at 10:46 am

    Hi Neil,
    How do you see the infrared beam from the speedlight? Infrared is not in the visible light spectrum that the human eye can see. I never see the imperceptible infrared “pre-flashes” my Nikon speedlight gives out prior to the flash firing (according to the manual). Can you clarify?

    Reply
  9. 9Neil says

    September 3, 2008 at 11:11 pm

    Stephen … the AF beam from the speedlight isn’t actually infra-red, but heavily filtered to red. I took a short-cut in the description and simply called it infra-red. But you’re right, it isn’t.

    If you put your speedlight on your camera, you will see the red AF assist beam that I was talking about.

    Regarding the pre-flashes (that are used to determine exposure, and also to control the other speedlights via CLS), as far as I know, they are not infra-red but normal light. (With the Nikon SU-800 it is heavily filtered for red again.) The pre-flash sequence is too close in time to the actual output from the speedlight that you won’t be able to see it … unless you go to rear curtain sync and choose a slow enough shutter speed, (and use AF-S mode and one of the central focusing sensors.)

    Then you will be able to see the pre-flash sequence as separate from the actual output.

    More on the actual timing of the pre-flash sequence can be found here.

    Neil vN

    Reply
  10. 10Dave says

    September 6, 2008 at 6:00 am

    Neil, me again…

    I have a question when it comes to bouncing, how do you tackle issues with colored walls (especially if all the walls are colored). A lot of places these days have pastel or far-from-neutral walls. I’m having issues balancing ambient daylight with funky wall colors, even.

    I tried to shoot from the waist a couple of days ago and the green/marble-like wall casted a nasty green shade while the maroon ceiling has a hint of color onto the white shirt of my subject.

    Thanks again for your generosity in sharing your knowledge.

    Reply
  11. 11Neil says

    September 6, 2008 at 9:08 am

    Hi there Dave …

    The best approach here is of course to shoot in RAW. That makes WB correction much simpler.

    I often get color casts, and I nearly always have to touch up my WB as part of my normal RAW workflow.

    There is a problem though in bouncing flash off deeply colored surfaces and getting a discontinuous spectrum, making color correction difficult … and even impossible to get skin tones.

    Neil vN

    Reply
  12. 12Stephen says

    September 6, 2008 at 5:46 pm

    Hi Neil,
    Thanks for the response. I mounted my SB-900 to my camera, and I never noticed the reddish AF illuminator on the flash until now. Since I had been using the flash in brighter environments, so I never saw this before. Now, I understand how you were shooting from the hip. Thanks for the link that describes Nikon’s flash sequence.

    Reply
  13. 13Q. Le says

    September 7, 2008 at 10:24 am

    Hi, Neil:

    First of all, thank you for your generosity to share your expertise with us.

    I love how the lighting on the background of your ‘flash’ images is fine-tuned to a proper level. Was there a second strobe to light up the background or was it done by your manual exposure settings?

    Yes, you’re perfectly right about looking for direction of light in your images. I’ve learned a lot from doing this on your excellent images.

    Once again, thanks for your in-depth technical discussions. I’ve been a fan of your site.

    Best regards,

    QL

    Reply
  14. 14Neil says

    September 7, 2008 at 11:06 am

    Hi there ..

    I sometimes do use additional lighting (one or two or three Q-flashes) in large venues.

    But I also find that in using high ISO settings and wide apertures, enough of the background light comes in that the ‘black hole backgrounds’ aren’t much of a problem.

    In two of the images here, the venues have ceilings which are fairly low for how large the venue is (and one of them has mirrors all around), which make it more difficult to use additional lights with any consistency. So it is just easier to go the high ISO / fast lens route with one on-camera flash.

    Regarding my settings, my camera was in manual exposure mode, and my flash was in a TTL mode.

    Neil vN

    Reply
  15. 15Q. Le says

    September 7, 2008 at 12:10 pm

    Thanks for your detailed answer, Neil.

    BTW, when is your book coming to the bookstore? Will it be distributed by Barns and Noble or Amazon.com? I’ll grab a copy right away; they’ll be sold out, otherwise :)

    Enjoy the weekend,

    QL

    Reply
  16. 16Andy Charnas says

    September 7, 2008 at 4:44 pm

    Niel,

    Just discovered your site (searching for on-camera flash techniques). Awesome! Thanks for providing such great, real-world information.

    When you talk about the “focus-lock-and-hold” method, do you just mean holding the shutter button down half-way and re-composing?

    Reply
  17. 17Neil says

    September 7, 2008 at 9:24 pm

    Andy, yes … that’s the same thing.
    I mostly use Single mode to focus.

    Neil vN

    Reply
  18. 18Joost says

    September 8, 2008 at 5:01 am

    Hello Neil,

    sorry to use this article for this post but I’m not sure if you read comments on older articles…

    First of all, thanks for your site, I love it. Finally someone who explains everything step by step in a clear way! If I received a frequent flyer mile for everytime I visited your site I could’ve made the trip from where I live (Netherlands) and ask you the following question in person…

    You have some excellent images where bot the sky is perfectly shown as well as the people in the foreground. F.e. the image from the wedding (afro-american people), positioned next to eachother (i think on a bridge). Both the foreground, the people and the sky are metered perfect. When I try this, I either get silhouttes or a completely white sky. I know about taking 2 images and merging them into a HDR-image but this is (nearly?) impossible with a large group of people?

    Thanks again, and thanks in advance for any reply.

    Joost

    Reply
  19. 19Joost says

    September 8, 2008 at 6:05 am

    Ps: I own a Nikon D300 & SB-600 (maybe I should change some settings with my camera?)

    Reply
  20. 20Neil says

    September 8, 2008 at 10:07 pm

    Joost, I think it is this image you are referring to?
    In this instance, the flash is just very subtle fill-flash, of around -2EV or -3EV flash exposure compensation. Therefore my exposure is pretty much only ambient light, and that is how I metered. The flash didn’t figure much.

    I therefore had to base my exposure on the couple. (In this instance I used the histogram method while metering off the bride’s dress.)

    This meant that the sky simply is the color it is. I made NO attempt to control it or darken it, whether:
    1. in post-production, or
    2. by having my basic exposure such that the sky is well exposed and then having to expose correctly for my couple by using stronger flash.

    This second option is usually the best way to control how deep you want the sky to be … but it rarely looks good doing to with direct flash, and would need a fairly strong flash unit with a softbox to look good.

    Reply
  21. 21Neil says

    September 8, 2008 at 10:09 pm

    If however, you were referring to this image, the sky is that deep blue simply because I had the sun to my back and had everyone in full sunlight.

    Reply
  22. 22Jonas says

    September 9, 2008 at 4:27 pm

    Cool stuff!
    I tried what you said here, today, but in manual mode my Speedlite doesn’t seem toe fire the infrared beam…
    Do you know why that is?
    I use an EOS 40D with an EX 580II on top.
    Greetz Jonas

    Reply
  23. 23Neil says

    September 9, 2008 at 9:25 pm

    Jonas …

    You probably have your camera in Servo mode.

    Neil vN

    Reply
  24. 24Jonas says

    September 10, 2008 at 12:47 pm

    Hi Neil
    I checked it, but I had the camera in one shot focus mode like most of the time.
    Could it be a mallfunction of the camera cause I searched the manual for it and they don’t mention how to turn it on anywhere …
    Greetings

    Reply
  25. 25Neil says

    September 12, 2008 at 4:57 am

    Jonas …

    Sorry, I am out of ideas on this one.

    best of luck

    Neil vN

    Reply
  26. 26Daneil Sullivan says

    September 16, 2008 at 1:01 pm

    Hi Neil,
    As always, beautiful! Even though this post is about focus and composure, i can’t help but gawk at the beautiful lighting! Thanks for the inspiration. Can you tell me how wide your lens was for the second photo?

    Reply
  27. 27Neil says

    September 30, 2008 at 4:56 am

    Hi there Daniel …

    Thank you for the compliment.
    The EXIF data for that shot says the Canon 16-35mm f2.8 II was set to 16mm.

    Neil vN

    Reply
  28. 28Sportymonk says

    August 20, 2011 at 10:40 pm

    I hate to be dense but I am back to the first question, if the camera is waist high, how can you possible not have the flash go into people’s eyes. I am 5’10” +1/2 (that’s important you know) and it would seem that unless the open side of the BFT was down (not an option) then the flash would be in my eyes. What am I missing?

    Reply
  29. 29Neil vN says

    August 20, 2011 at 10:48 pm

    I used the black foamie thing to block light from hitting people directly behind me.

    Also, keep in mind that “shooting from the hip” is a turn of phrase. I meant it as not holding the camera to your eye all the time. It doesn’t necessarily mean I have the camera glued to my hip.

    For example, with this image below, the perspective should tell you I had the camera around chest-height.

    So read the article in that context, and not as a literal “always with the camera at my hip”.

    Neil vN

    Reply

Leave a Reply to Neil Cancel reply

Your email address will not be published. Required fields are marked *

categories

Articles & Tutorials

  • • About myself & this site
    • Books by Neil vN
    • Best photography books
    • Black foamie thing
    • Photographers’ success stories
  • • Flash Photography Techniques
    • Natural looking flash
    • Flash + Ambient light
    • Dragging the shutter
    • Bouncing your flash
    • On-camera flash outdoors
    • Exposure metering
    • Flash exposure compensation
    • Bounce flash examples
    • Which is the best flashgun?
    • Flash brackets
    • Off-camera flash photography
    • Flash photography basics
    • Using video lights
    • Flash photography tips
  • • Photography workshops NJ / NYC
    • Models @ photography workshops
tutorials:
flash photography
Photography
Workshops

All rights reserved. Copyright © Neil van Niekerk 2025 · Customization by The Traveling Designer

Copyright © 2025 · NvN on Genesis Framework · WordPress · Log in