Headshot photography lighting setup
“OMG, this was so much better than the experience we had last time!” That’s the comment by the contact person who had arranged for the headshots photo session for 8 people at their office. That’s the kind of thing I like to hear from a new client! What made this headshots photo session interesting for me is that I had to match an existing headshot by the CEO of the company. I had to make the headshots of the eight people I had to photograph, look very similar to the example they had given me. So I had to do mild reverse engineering to match the look.
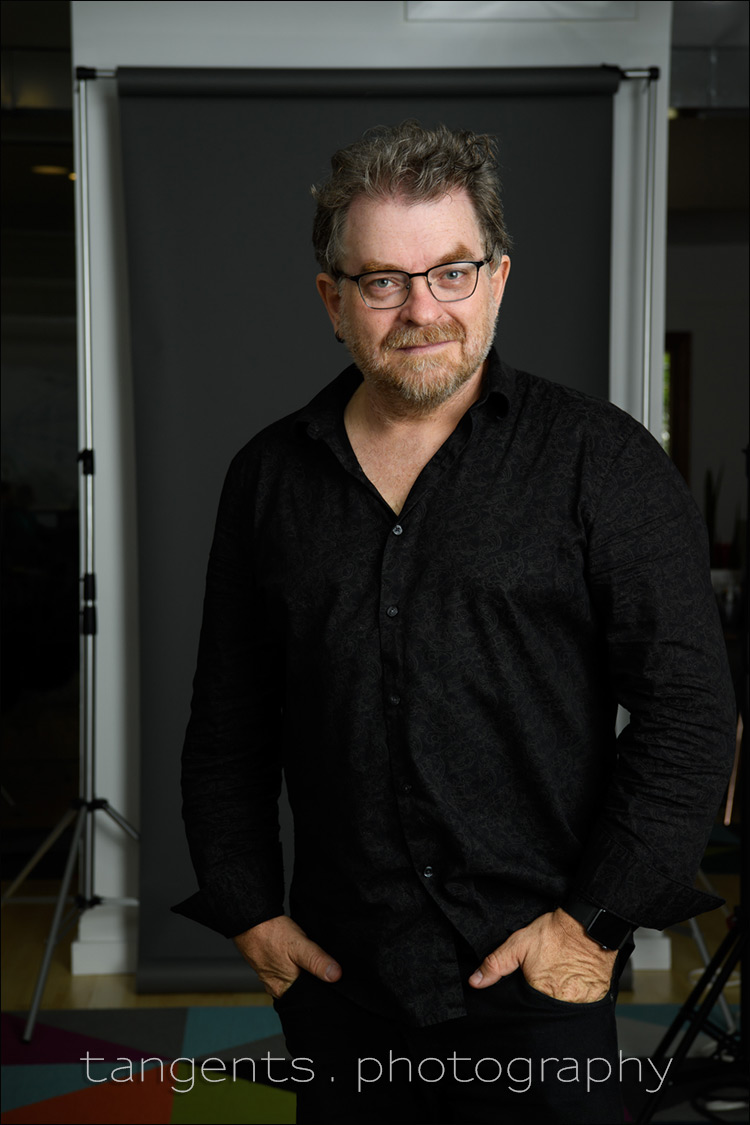
You may well ask why my face is up there instead of a proper example photo from the photo session – I don’t want to intrude on my corporate clients, so it is easier to just have a photo of myself there. I purposely gave the PR lady my camera with the 24-70mm lens – I wanted a slightly wider shot which simultaneously would show the result of the lighting, as well as reveal some of the background for context. And there we have it. The headshots were done with a 70-200mm f/2.8 lens for tighter control of the background.
Now, about the lighting setup – there are a number of ways to set up the lighting when working indoors or in a studio environment, but it usually comes down to two lighting types:
Loop lighting – the main light is off to the side, so that the shadow of the nose creates a gentle ‘loop’ to the side.
Butterfly lighting – and for this we often use a clam-shell lighting setup.
We will look at both these lighting setups in this article – so first let’s step through the lights you might need to set up for the ‘loop light’ lighting pattern.
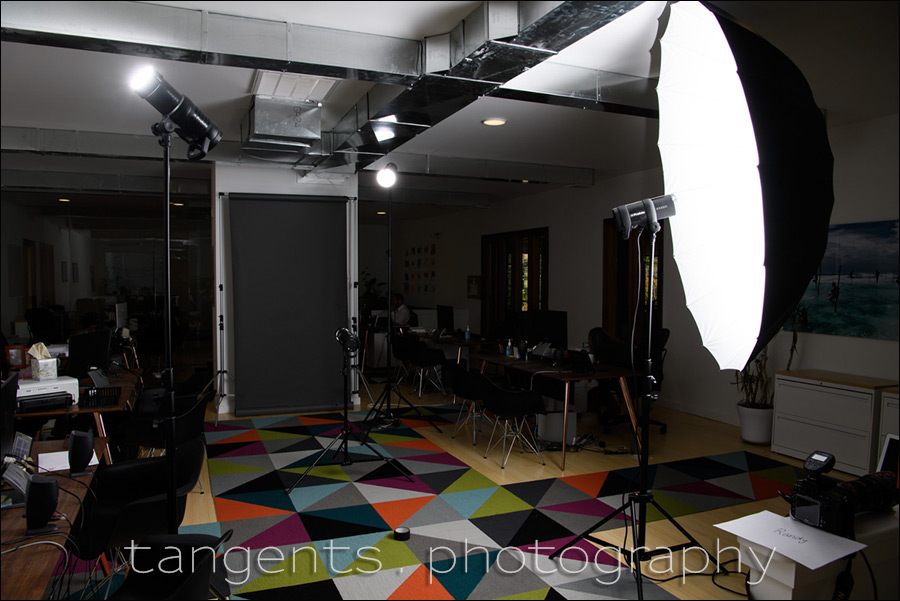
To re-create the lighting they had in their sample image, I set up four lights. Depending on what you want to achieve, you could use only one light. But here I felt I needed four lights.
I used studio lighting on location here, but you could also recreate this with speedlights. It’s the thought-process in setting up the lights that counts, not necessarily the specific gear. So if you only have speedlights, stay with us – it all is still pertinent and translates to the smaller speedlights as well.
I used two Profoto B1 heads, and two Profoto D1 heads. The Profoto B1 flashes run off batteries … and I love them. But I can’t afford 4 of these puppies (yet), so I still bring D1 lights from my studio when I need more lights. The D1 flashes run off AC power. Having two lights (B1) without cables help reduce clutter on the floor. The battery-driven flashes are also quicker to set up – no need to find AC outlets and run extension cables.
The photo above is the pull-back shot to show the placement of the four lights.
Photo gear (or equivalents) used during this photo session
- 1/125 @ f/8 @ 100 ISO
- (2x) Profoto B1 flashes (B&H / Amazon)
- (2x) Profoto D1 Air 500Ws studio lights
- Westcott 7’ Parabolic Umbrella – white (B&H / Amazon) – for the main light
- Savage paper background – Fashion Grey
- Manfrotto 2983 Background Crossbar
- (6x) Manfrotto light-stands
Setting up the lighting in stages:
• Main light:
You need at least one light – the main light. You could get away with just the one light, especially if you use some ambient light in the background to help create separation. If you had out-of-focus areas that are bring enough in the background, you could easily use those – especially so if your client wants a look that is more environmental than a evenly-lit paper or muslin backdrop.
My main light was one of the Profoto D1 heads with the Westcott 7′ umbrella – it’s a massive light source that is easy to swing or move to change the way the main light wraps around your subject.
• Fill-light:
With the main light more to the side, you might want to help ease up the contrast on the shadow side of your subject. You could do that with a reflector, or another light. In this instance I used a flash bounced into the offices – the walls and ceiling were white, so the bounce flash wouldn’t really noticeably affect the color balance compared to the main light.
By ranging the power up and down of the fill-light (or bringing the reflector closer or further away), you will affect the contrast.
• Rim-light:
To help separate your subject from an even background, you could add a rim-light. A gridded speedlight works well here. I used a grid on the one Profoto flash. In the studio I often use a small gridded stripbox. (1′ x 3′)
• Background light:
Then, you might want to light up the background. I did so here with a bare flash pointed straight at the backdrop. I know the Profoto B1 and D1 spread the light very wide – I knew there wouldn’t really be a hotspot. (Reference: Comparing output: Studio lights vs. speedlites / speedlights). Obviously I can now control how bright the grey background is, by changing the power of this flash.
Clam-shell lighting setup for headshots
With clam-shell lighting, you have one light directly angled above your subject, and a second light source (or reflector) below. This light pattern – butterfly lighting – gives a fairly even light. Here I had the main light angled slightly to the one side to give more contrast.
My subject here is my friend, Carlie Remiggio, a personal fitness instructor in Wyckoff, NJ. If you’re in need of some fixing up with a tailor-made fitness program, he’s your guy … if you’re in northern NJ of course.
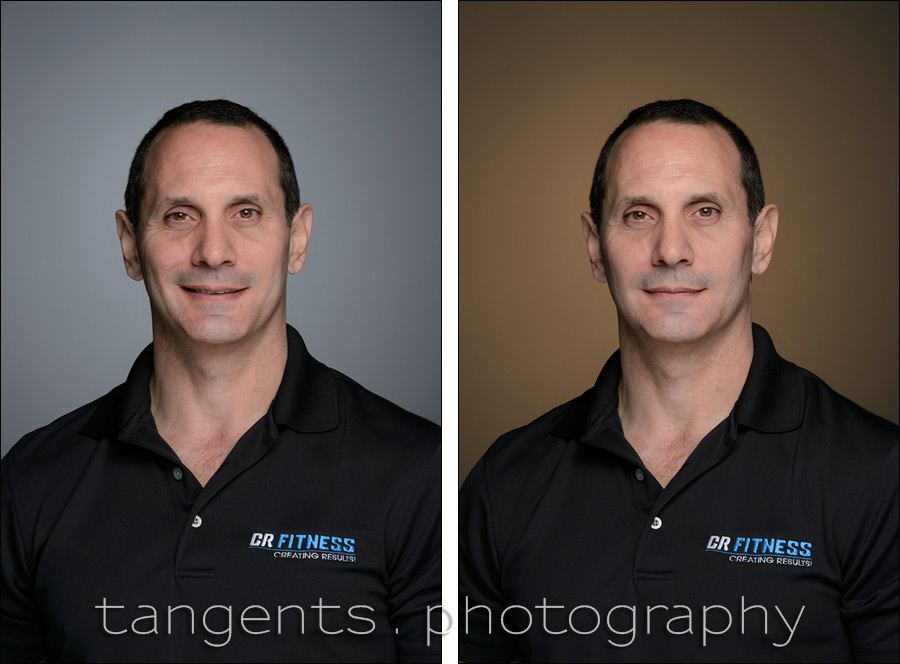
Charlie needed professional headshots for his website and for promotional use, so we spent some time in the studio to get photos with some variety to them. One of the ways I did that was to change the background colors with gels, and by changing the intensity of the background light. Just changing the power up and down on the background light, you can change it from a very light grey background to a dark grey background … and anything in-between. This way the same headshot could have a black background or a white background (if I moved a white V-flat in), to match any website or printing requirement.
Here is a somewhat similar setup: Headshot photography – Clam-shell lighting setup.
Here is the pull-back shot to show the four light sources – with three lights and one reflector.
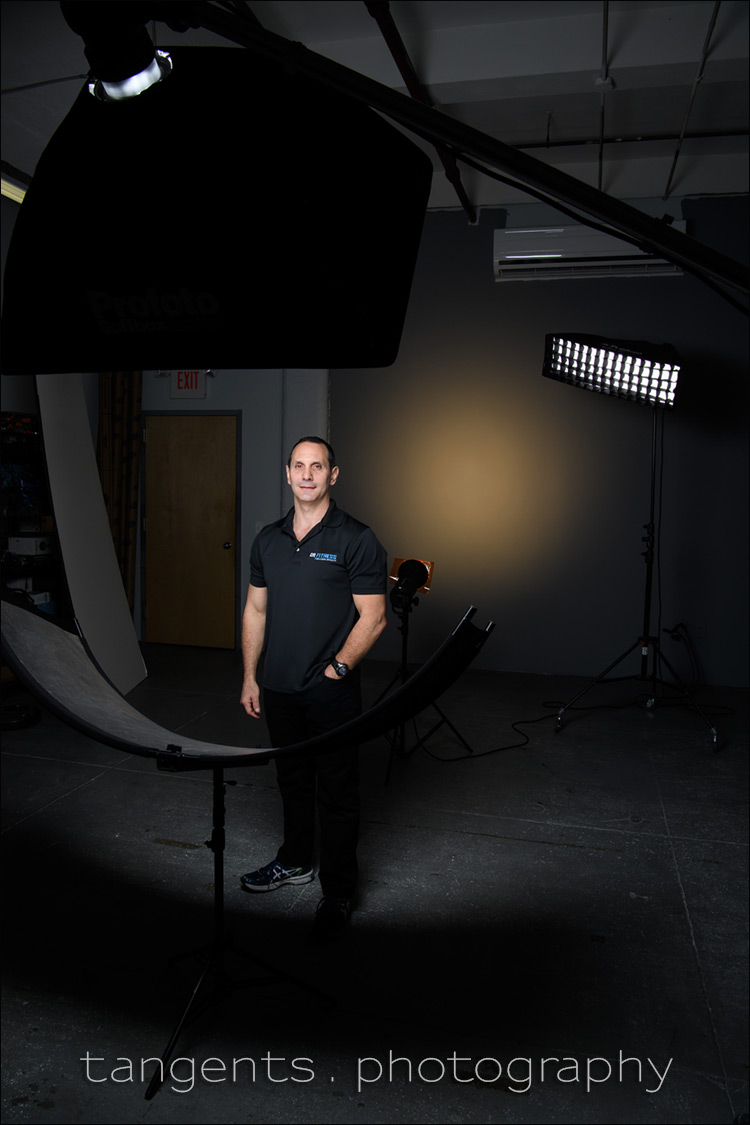
Photo gear (or equivalents) used during this photo session
- 1/125 @ f/11 @ 100 ISO
- (3x) Profoto D1 Air 500Ws studio lights
- Profoto RFi 2’x3’ softbox (B&H / Amazon)
- Manfrotto 025BS boom w/ 008BU stand & casters to hold the main light without obstructing me.
- Westcott Eyelighter (B&H / Amazon) – for fill light from underneath
- Profoto RFi 1’×3’ softbox; Profoto 50 degree 1×3 grid – for the hair-light
- Profoto 7″ Grid Reflector with a Profoto 10-degree Honeycomb Grid – for the spot-light effect on the background
Summary
You have a lot of flexibility in how you position your lights for headshot photography. An important note is that your subject’s pose also affects the lighting: Off-camera flash: Short lighting vs. Broad lighting. By changing the relative power (or position of the lights), you can affect the contrast and even the entire look of the images.
You don’t need to set up four lights, but you need to use at least one light – the main light. From there you can build up the lighting as necessary. But you might find that just a single light source (and a reflector) is all you need.
While there are various recipes for lighting setups, they can be changed in nuanced ways by slight changes in position of the lights, and positioning of your subject. This is how I did it in this one instance … but I often change it up slightly .. or a lot. You have options.
Related articles & links
- Headshot photography – Clam-shell lighting setup
- Photo gear & logistics: Corporate headshots
- Working with a large Octa Softbox
- What makes for good headshot photos?
- On-location headshots – Efficiency and speed
- More articles on Headshot Photography
- Headshot photographer NJ
- Carlie Remiggio, personal fitness instructor, Bergen County, NJ
Great article Neil.
I am still looking for the best way to light the background as you did with the warm gel.
How far is the light and the client away from the backdrop?
I assume you have a grid on that light to control the spread?
And I see you have the flash head Pretty much level. Do you find that works best?
Thanks, have an awesome day.
I would say the background light is about 4-5 meters from the background.
In the first image, there is no grid on it, but I did use a part of the Profoto OCF system to help contain the spill. Here the flash was nearly straight-on to the background – I wanted even lighting.
In the second image (with the gelled background flash), there was a grid on the reflector to give a more circular pattern behind my subject. Here I had the flash aimed upwards since I wanted the spot-light effect behind their head.
I really enjoyed your comparison of loop vs. butterfly lighting for headshots, Neil. Great information! When you go on location for headshots, if you’re not trying to match the same lighting pattern as other headshots (as mentioned in your article in this case), how do you determine whether you go for loop lighting or butterfly lighting? Your own personal preference? Purpose of the headshots (corporate vs. actors vs. models)? Space available for setting up equipment? All of the above? Other?
Patti, my own preference is for loop lighting – this allows for the one side of the face to be more shaded than the other.
However, you can always turn your subject’s face to the one side to give short lighting – and then your loop lighting turns into butterfly lighting (of sorts).
Ultimately, I just want the headshots to look good, and match what the client had in mind.
Thanks for your response, Neil. Good to know that loop lighting is also a great go-to for headshots, and how to be able to set up several lighting scenarios to make the subjects look good and keep the client happy. I appreciate that you help photographers learn what the options are, enabling them to decide what will work best. Perfect!
Amazing!! My mate was just asking me about lighting setups for headshots, shall be sending this link to him, you must have read my mind Neil! lol.
Great information and well explained.
I often struggle with the rim light, either getting too much or not enough. Also don’t like when moving people around and the light wraps around on the cheek. In your trainer headshot, I am having a hard time detecting the rim at all. How much difference is that gridded strip box making in these shots?
David … I tend towards a more subtle rim-light because blonde hair blows out easily, and any balding on someone’s head creates a hotspot that would need fixing. If I have a number of people to photograph in one sitting, I usually forego the rim-light altogether for simplicity.
In the photo at the top (of myself) you can see more of the effect of the rim-light, but even that is subtle.
Hello Neil! The seamless paper backdrop is black or gray? Thank you!
Fashion Grey by Savage