Off-camera flash photography: Short lighting vs. Broad lighting
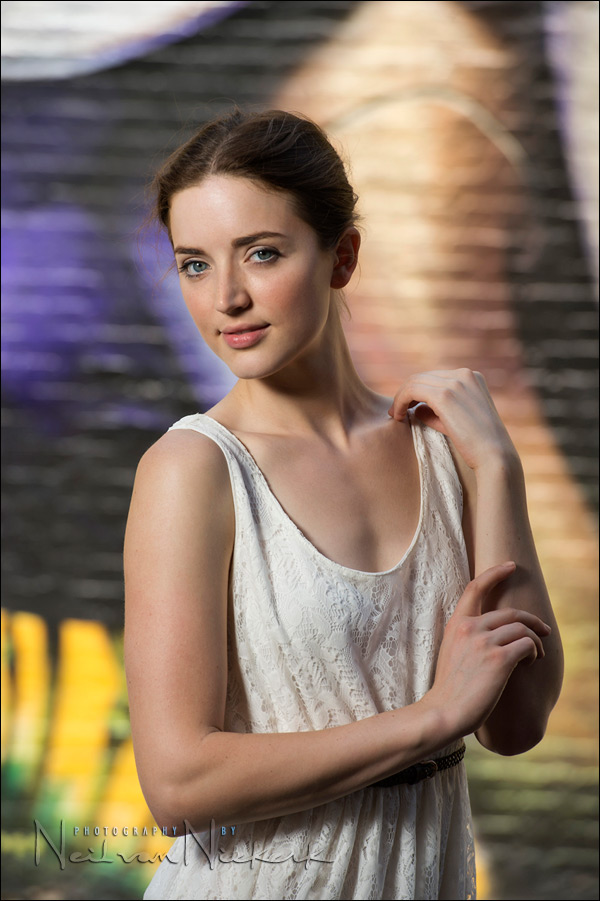
“Short Lighting” is when the side of the face turned away from the camera, is better lit than the side of the face closest to the camera. (top image)
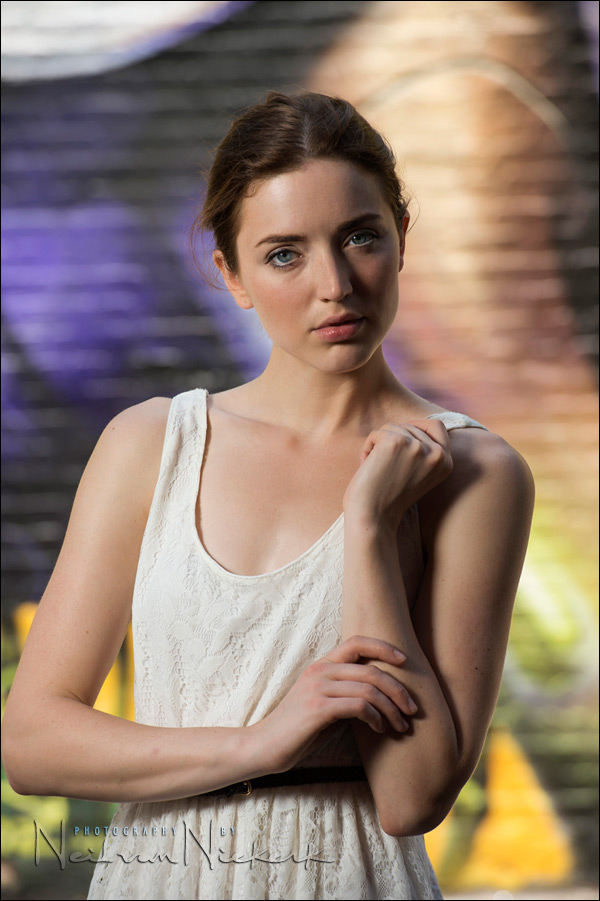
“Broad Lighting” is when the side of the face closest to the camera, is better lit. (second image)
This has as much to do with the position of the light, as with how your subject is posed into the light. This is true for studio photography and off-camera flash on location, and for when you photograph a subject with just the available light. As shown in a previous article here, you can easily achieve short lighting with on-camera bounce flash. Of course, with studio photography you can finesse this to a great degree.
With on-location portraits, I aim towards getting short lighting on my subjects, because it is more dramatic, and more flattering. Look at the gradient of light on Anelisa’s cheek in the top photo. This kind of lighting really helps create a near 3-dimensional look to your image.
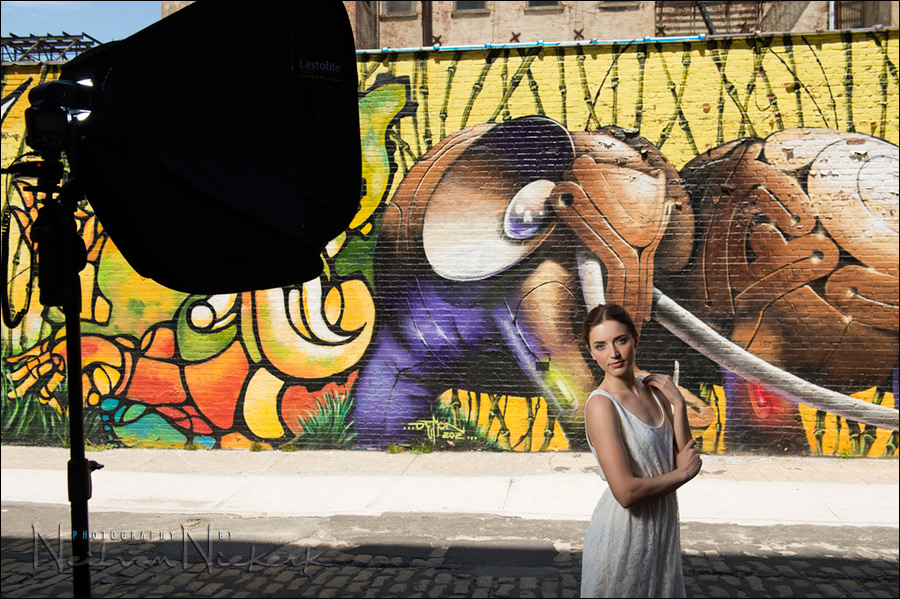
Here is the pull-back shot to show the placement of the light.
Short lighting also has to do with how the body is positioned in relation to the light. I prefer having the light coming over the shoulder (i.e., short lighting), rather than hitting my subject squarely in the chest, creating a large highlight there. I directed Anelisa in how she should turn her body and her face in relation to the light.
I can either position my subject into the light to create short lighting … or, I can move my light to the other side.
The direction of light can be controlled by your subject’s position in terms of the light, or how you position the light. Both will end up with the same results. Sometimes one option is easier than the other.
Now keep in mind that this is an on-location shoot. Anelisa was standing in the street. While you can really finesse this in the studio and make it text-book perfect, for me .. especially on location .. becomes more of an approach. An approximation or guide to how I would position my lights or pose the model. I’d rather keep some of the free-flowing energy, than pose the model to a dead standstill.
So take this article more as an approach – a starting idea on how to work on location with off-camera flash and posing your subject – than a classic study of the lighting types.

Direction & Quality of Light
I wanted to distill the essence of what we, as photographers, work with – light! Before we can truly grasp on-camera flash and off-camera flash, and really, any kind of photography, we have to be aware of the direction and quality of light. We need to observe the light that we have, and then decide how best to use it, or enhance it.
With this book, I try my best to share those “aha!” moments with you, and I do believe this book can make a difference to your photography.
The book is available on Amazon USA and Amazon UK, or can be ordered through Barnes & Nobles and other bookstores. The book is also available on the Apple iBook Store, as well as Amazon Kindle.
Camera settings & photo gear used (or equivalents)
- camera settings: 1/200 @ f7.1 @ 100 ISO
- Nikon D4
- Nikon 70-200mm f2.8 AF-S VR II / Canon EF 70-200mm f/2.8L IS II
- Lastolite EZYBOX 24×24″ softbox
- Nikon SB-910 Speedlight controlled by PocketWizard FlexTT5 & AC3 Controller
or alternately, the Canon 600EX-RT Speedlite controlled by Canon ST-E3 Transmitter
- The off-camera flash in the softbox was set to full manual output to match the bright background.
Related articles:
- Portrait lighting patterns: Loop lighting & Butterfly lighting
- Short lighting with on-camera bounce flash
- Tips on posing people / working with a model
- The next step – going beyond just posing people
- Flash photography tutorial
Neil,
I think the second image ends up looking like an example of Rembrandt Lighting. Or is Rembrandt Lighting a subset of Broad Lighting?
If there was not already a name for this kind of lighting,I would call it “van Niekerk” lighting.Amigo,you definitely know how to play your light.Thanks for your amazing tutorials!I’m a beginner in this strobist thing,and you are my sensai.If I wasn’t living so damn far away I would do some classes with you.Again,…thank you.
Hi Neil
Would it be possible to explain how to setup to get that Rembrandt look
Much appreciated
stephen:
u can use broad or short lighting in conjunction with Rembrandt, loop, and closed loop lighting, this is not a contradiction. its like saying “i used flash for this photo” and u say “yes but it looks like u used a wide aperature,” the answer is that flash was used as well as a wide aperature as well as broad rembrant light. hope this makes sense
Hi Neil.. Any words how you approach this on weddings ?
Especially in the morning when the bride is getting ready..
Erwin
Erwin … for candid photos, I do bounce over my shoulder to get some directional light, but I don’t bother with positioning people in this way. Besides, it goes against the idea of quietly photographing the day’s events.
However, when photographing the bride’s portraits, and we have a few minutes, I most definitely do this with bounce flash photography.
– bounce flash technique – mimicking soft window light
– directional light from your on-camera flash
– bride’s portrait with bounce flash
– bounce flash photography – short lighting
Hey Neil
Great article as usual.
Ive notice in the past few articles that you have been using light stand instead of an assistant.( I could be wrong )
I know you normally shoot with 2 bodies and a Crumpler bag with a third, and now a light stand
My question is how are you managing to handle all that equipment by your self.
Reason I ask is, I shot a wedding past weekend where I was alone and I had too cary a light stand . At one point after the ceremony I had to run back to get it , then chase the bride to the signing area. It was a little awkward.
In the article “shooting wedding photos in the mid-day sun ” you brought Profoto system with you and set it up.
How did you handle that.
Sorry for such a basic question but it looks like I will be doing more more events on my own and Im trying to figure out how handle all this stuff with out killing my self.
Thx
Lou Recine
Lou … specifically with the family formals, I usually have a few minutes to set up any lights I might use, since there is the receiving line. The closest relatives and friends will be the first to congratulate the couple. So for me, those are the key photos to get. Then, while the rest of the guests file past, I have a few minutes to quickly set up.
With the speed lights or when I used Quantums, I’d keep everything half-assembled for speed.
The Profoto AcuteB is very easy to set up. Even the softbox and speeding are a breeze to connect up.