Tangents

photography tutorials, reviews & workshops

tangents photography blog
learn : discuss : share
  • Tangents
  • Tutorials
    • Flash Photography
    • Wedding Photography
    • Studio Photography
    • Posing People
    • Understanding Your Camera
    • Exposure metering
    • BFT
    • Best Photo Books
  • Reviews
    • Sony
    • Nikon
    • Canon
    • Fuji
    • Profoto
    • lighting gear
  • Workshops
    • Info: Workshops
    • In-person
      tutoring sessions
    • Online
      tutoring sessions
    • Workshops in
      New Jersey (NJ)
    • Workshops in
      New York (NYC)
    • Photo walks in NYC
    • Studio Workshop
    • Video tutorials
    • Workshop results
  • Books
    • On-Camera Flash (revised ed.)
    • Direction & Quality of Light
    • Off-Camera Flash Photography
    • Lighting & Design
    • On-Camera Flash (1st ed.)
  • Projects
    • Two Perspectives
    • B&W Infrared
    • Vintage lenses
    • Time-lapse photography
  • Info
    • About
    • Contact
    • My Photo Gear
    • Books by NvN
    • Join us on Facebook
    • Acclaim
    • Success Stories

home studio – portrait lighting setup in limited space

December 22, 2008 Neil vN 24 Comments

home studio portrait lighting setup in limited space

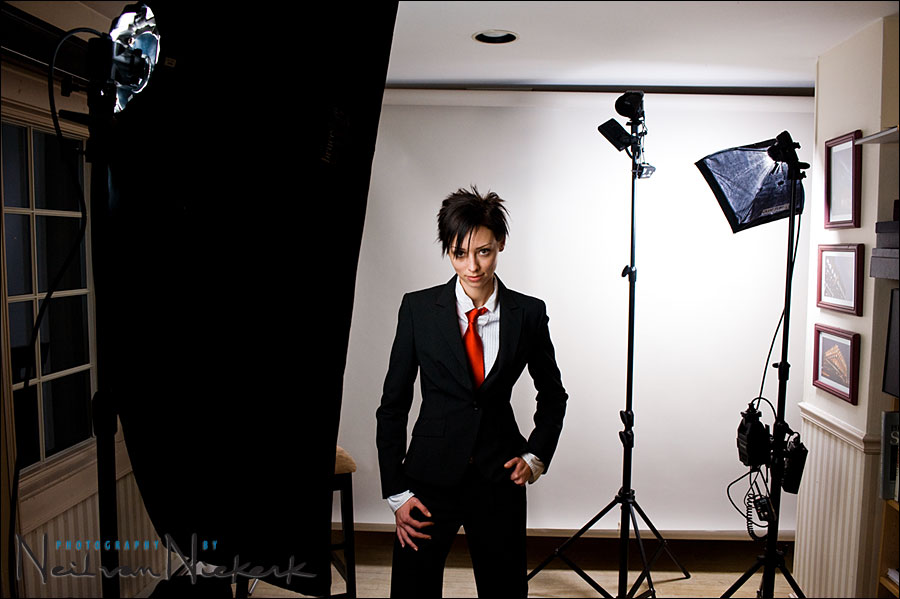
The photos in this article were shot with a fairly simple lighting setup in my dining room area. The main light to my left (model’s right) is the Westcott Bruce Dorn Strip Bank (18″x42″) (B&H). The flashgun was a Quantum T2, but a speedlight would’ve worked just as well. In this small a space, you don’t need huge amounts of light.

I used another Quantum T2 to light up the grey seamless background. I had the Quantum 12×12 softbox on this one, and feathered it to give me uneven light on the backdrop. I also had a snooted Nikon SB-800 as a hair light in most shots.

For some images, shot at f/1.4 the power was turned away down on the Q-flash – all the way down to 1/32 and 1/64 just to ensure that kiss of light.

Here’s a pull-back shot to show you just how unglamorous and cramped it looked. Yet the portraits looked great.


I used a variety of lenses for these portraits:

Nikon D700;  Nikon 85mm f1.4  shot @ f1.4


Canon 1D mk3;  Canon 85mm f1.2 II   shot at @ f1.4


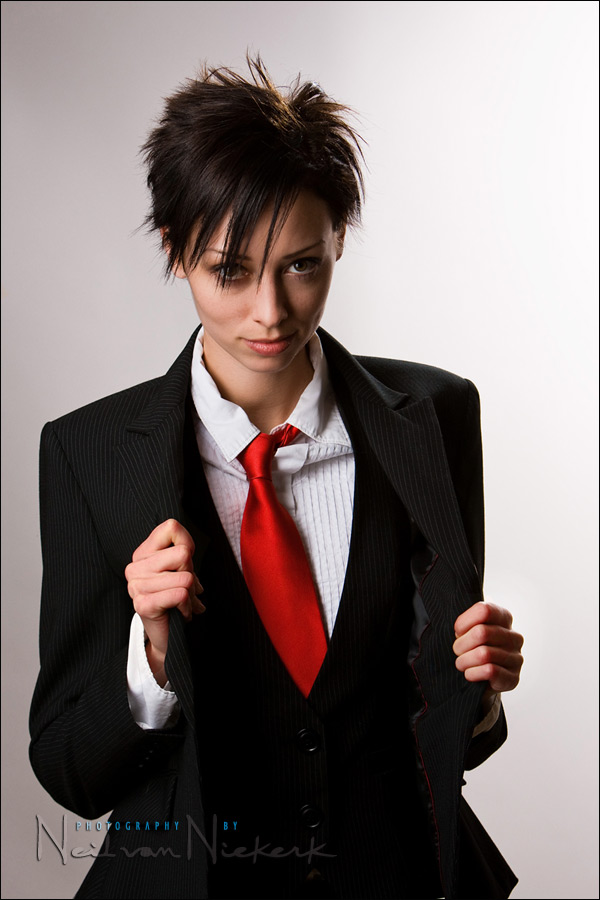
Canon 1D mk3;  Canon 70-200mm f2.8 IS


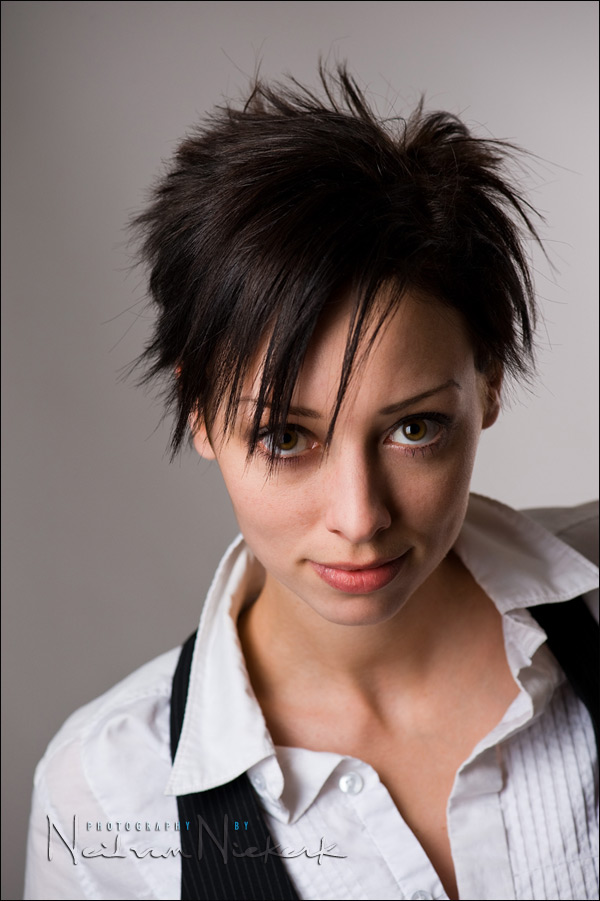
Nikon D700;  Nikon 105mm f2.8 VR macro

Filed Under: gear, lighting, models, studio photography, Uncategorized Tagged With: home studio lighting setup, portrait photography


Help support this website

If you find these articles of value, please help support this website by using these B&H and Amazon affiliate links to order your photo gear.

I also offer photography workshops and tutoring sessions, whether in person, or via online video tutoring sessions.

Please follow me on Instagram for more.

You can also join our thriving photo community in the Tangents group on Facebook, where we show our photos and discuss all things photography.

Thank you,

Neil vN

Books by Neil van Niekerk


24 Comments, Add Your Own

  1. 1Tom K. says

    December 23, 2008 at 10:54 am

    Perfectly gorgeous work and subject.

    The catch lights seem to indicate either window light or a soft box. How were these lit Neil?

    Reply
  2. 2Emil S. says

    December 23, 2008 at 11:19 am

    Nice. Do you have any tips on ensuring enough DoF around the eyes when shooting wide open? Seems one must be very familiar with the lens/camera combination and know how much DoF is achieved at a given subject distance?

    As for lighting, in addition to a big (guessing) soft box to camera left, it looks like there is also a separate light source behind and above Kaylex to camera right. Is the background lit separately?

    Reply
  3. 3Neil says

    December 23, 2008 at 1:47 pm

    Emil, regarding your question about depth-of-field ..

    Honestly, I don’t over-think this. I just use enough depth-of-field.

    In the images where I used f1.4 there is obviously intentionally minimal depth-of-field. For me, there is no calculation when shooting at such wide apertures, other than wanting to attain that specific look of minimal depth-of-field.

    How to ensure there is enough depth-of-field when using those apertures? I don’t. I don’t try to ensure anything other than getting my subject’s eye in focus. (Usually the eye closest to the camera.) That’s all I need to have in focus for the portrait to be effective.

    Your attention is immediately drawn to her eyes (and it does help that she is a striking looking model), but how much her other features fade into a soft out-of-focus look isn’t really of much concern here. If it was, I’d crank up the lights and use another aperture like f8

    I hope this answers your question, even though I didn’t answer with specifics. But essentially .. it doesn’t matter, as long as one of your subject’s eyes is in focus.

    Neil vN

    Reply
  4. 4brett says

    December 23, 2008 at 3:49 pm

    hey neil,

    was wondering, aside from showcasing this model…. were you testing out different lenses etc??? as i noticed each of the 4 shots was shot with a different lens????

    thnx!

    Reply
  5. 5Neil vN says

    December 23, 2008 at 7:12 pm

    Brett …

    The shoot actually started out with me wanting to test my new Profoto AcuteB 600R lighting kit (B&H), and the Profoto beauty dish (B&H) … but I was inadvertently supplied with the incorrect flash-head. So instead of just calling the shoot off, I played with some other lighting instead. : )

    It was far too cold to venture outside, so I improvised a small studio set-up there in my dining room.

    The use of different lenses (and cameras), was in part motivated by a conversation I had with a friend recently who is a Nikon shooter who was pining over the Canon 85mm f1.2 II (B&H) … which I thought was silly, since Nikon has the stellar Nikon 85mm f1.4D (B&H).

    So the choice of lenses was just to show that there isn’t really any difference to be seen between the two lenses. Admittedly I used the Canon f1.2 optic at f1.4 because that is what my lights were set up for at that point … but I’d still go out on a limb here and say that it would be really tough to spot any difference between the results from either lens.

    Similarly, I used 3 different cameras .. Nikon D3 (not posted here), Nikon D700, Canon 1D mk3 … and with slight adjustment in the raw post-production, there isn’t immediately much difference between how the files look when shooting this way.

    Which brings me to a point I mentioned on one of the forums .. that in the everlasting Canon vs Nikon debate (and I certainly have my opinions on this), it ultimately doesn’t matter in the way that most photographers think it matters. What I strongly believe though, that what matters is that we should use the best that there is in any camera / lens make.

    It’s a topic I touched on with an earlier posting here – equipment as inspiration. (This posting in turn was prompted by someone’s comments that the equipment didn’t matter at all.)

    I hope this answers your question, although I think the answer was different than you expected. ; )

    Reply
  6. 6Richard Beisigl says

    December 24, 2008 at 5:38 am

    Thank you for this great web site where us old “film camera” relics can learn from a pro.

    Your photography is outstanding. And this from a retired wedding photographer with 25 or thirty years experience. Your site was posted on https://www.photo.net last night, 12/24/08.

    A very Merry Christmas, and a Happy New Year.

    Richard Beisigl

    Reply
  7. 7Neil says

    December 24, 2008 at 6:35 am

    Richard, thank you very much, and best of luck!

    Neil vN

    Reply
  8. 8Nina says

    December 24, 2008 at 9:14 am

    You just keep making it look so easy! Oh, and that 1.4, that would be a sweet ‘bride’ lens… Thanks for keeping us all inspired!

    Reply
  9. 9Rene Skrodzki says

    December 25, 2008 at 12:13 pm

    A little off topic, but MERRY CHRISTMAS !!!

    Thanks for all the hard work you do in putting together these tips and post and images for us all to learn from.

    Hope Santa brought you something in an F 2.0 flavor :)

    Reply
  10. 10Math says

    December 25, 2008 at 2:20 pm

    Merry Christmas Niel !!! The pictures are awesome. I also have trouble choosing Nikon or Canon for a long time and your advise above make me realize the most important is the person who take photos not the gears. Thanks!

    Reply
  11. 11Stephen says

    December 27, 2008 at 11:40 am

    Happy holidays Neil!
    Thanks for showing the equipment setup you used for this shoot. I’m glad to continue to see that basic studio lighting setups can be bought for less than a few thousand dollars. My wife and I already bought a white backdrop and stand from B&H, and she took a portrait photo of my sister and me for a present to my parents. I am impressed how a little equipment goes a long way in the creative aspects of photography. When we had the photo printed at the local photo development store, the store was asking if this was professionally done (for photo release reasons). It’s nice to be able to reach a point where our photography starts to take a “professional” look to them.

    Reply
  12. 12Alireza says

    December 29, 2008 at 6:08 pm

    I’ve got a question which you might be the right person to ask from: What is the difference between the quality of the out of focus made by large apertures and made by large focal lengths? I mean, for example, could you make the second photo from top by a larger focal length and f/5.6 or f/8?
    By the way, thanks for the great tips. I always follow your posts.

    Reply
  13. 13Neil says

    December 30, 2008 at 6:42 am

    Alireza ..

    Not only would the perspective change, and a much longer lens give you a working distance which isn’t practical, but I do think that to attain the same depth-of-field with a longer lens at f5.6 to give you the same depth of field as an 85mm lens at f1.4 … that would only be a theoretical possibility at best.

    Neil vN

    Reply
  14. 14Tom K. says

    December 31, 2008 at 12:04 am

    Neil,
    I got the feeling when looking at the FM buy/sell forum that you were in the process of getting rid of all your Canon equipment and going Nikon. Is that true?

    Reply
  15. 15Neil says

    December 31, 2008 at 2:26 am

    Tom,

    Indeed, I am moving back to shooting primarily with Nikon. In this case, two Nikon D3 bodies.

    But I am keeping a core of Canon equipment, since I need to be familiar with the Canon flash system for the workshops that I present, and also to keep the tutorials on this website balanced.

    I don’t want the articles on lighting and flash photography to be overly equipment-centric, but rather deal more broadly with the techniques. : )

    Neil vN

    Reply
  16. 16Brian says

    December 31, 2008 at 7:56 am

    Neil,

    Could you elaborate on “feathering” the softbox to get uneven lighting on the backdrop. I’m not familiar with this but I like the look of it.

    Thanks so much!
    Brian

    Reply
  17. 17Neil says

    January 2, 2009 at 3:50 am

    Hi there Brian ..

    What is meant by ‘feathering a light’, is that you don’t point it directly at the subject (or background or whatever), but instead have it at an angle so that there is light fall-off of some kind.

    You can even feather your softbox towards another reflector to add more indirect light.

    Neil vN

    Reply
  18. 18Jeremy says

    January 14, 2009 at 8:35 pm

    Amazingly informative site, Neil. I have learned more here than anywhere else. Thank you.

    I shoot the Nikon 85/1.4 on a D200. I find the DOF almost too razor thin when used wide open and very challenging to get enough in focus. Your shots above look amazing wide open. Do you find it easier to shoot wide open on the full-frame D700 because the DOF is not quite as narrow?

    P.S. Come to Minneapolis with your workshop.

    Reply
  19. 19Neil says

    January 14, 2009 at 11:53 pm

    Jeremy … Depth of Field becomes narrower the larger the sensor / film.

    Here is an article written by Bob Atkins on that subject.
    It’s as clear a description as I’ve ever read on the topic .. but it still makes my head hurt.

    The thin DoF at those apertures is a challenge, and not every shot will be pin-sharp. Quite often the problem is that either the model or I will subtly move out of position. So I do have to take several frames, and refocus every frame to ensure images that are crisply sharp.

    Re a Minneapolis workshop .. probably not this year, although I’ve had a few inquiries. But we’ll see. Add the blog to your RSS feed to keep updated. : )

    Neil vN

    Reply
  20. 20Erez Avraham says

    January 31, 2009 at 8:07 pm

    thanks Neil

    very interesting and enlightening

    Reply
  21. 21augustine says

    June 22, 2013 at 2:04 am

    fantastic !

    Reply
  22. 22ayaz says

    August 17, 2014 at 3:47 pm

    Have you ever compared the 85mm f1.8 vs the f1.4 side by side? How much difference is there in Dof and Bokeh quality at say f1.8 on both?

    Reply
  23. 23Eugene says

    January 27, 2015 at 3:27 am

    Very interesting article! I have a question how you edit the nikon d700 file? I mean if it was a lightroom, what camera profile do you use? Thank you!

    Reply
  24. 24latesh lilwa says

    January 4, 2016 at 2:03 pm

    This is rock solid photography. I would request you to do one entire video / blog post on how to use this 85 mm 1.4 lens. I have noticed many people are facing difficulty in using this lens and later on they just stop using it

    Reply

Leave a Reply to brett Cancel reply

Your email address will not be published. Required fields are marked *

categories

Articles & Tutorials

  • • About myself & this site
    • Books by Neil vN
    • Best photography books
    • Black foamie thing
    • Photographers’ success stories
  • • Flash Photography Techniques
    • Natural looking flash
    • Flash + Ambient light
    • Dragging the shutter
    • Bouncing your flash
    • On-camera flash outdoors
    • Exposure metering
    • Flash exposure compensation
    • Bounce flash examples
    • Which is the best flashgun?
    • Flash brackets
    • Off-camera flash photography
    • Flash photography basics
    • Using video lights
    • Flash photography tips
  • • Photography workshops NJ / NYC
    • Models @ photography workshops
tutorials:
flash photography
Photography
Workshops

All rights reserved. Copyright © Neil van Niekerk 2025 · Customization by The Traveling Designer

Copyright © 2025 · NvN on Genesis Framework · WordPress · Log in