children’s studio portrait – lighting setup and post-processing
The lighting setup was very simple. Mostly because there wasn’t much space in the area where I set up my home-studio in my dining room area. But also, because a complicated lighting setup wasn’t necessary. Just two lights. One light on my subject – this adorable little girl; the other light on my background.
To get an even spread of light and to get softer light than a smaller umbrella (ie, smaller light source) would’ve given me, I used two 60″ umbrellas. Both of them with T2 Q-flashes. But in this small space, two speedlights would’ve worked equally well.
I shot close to the one large umbrella, hoping to create a kind of wrap-around light on the little girl.
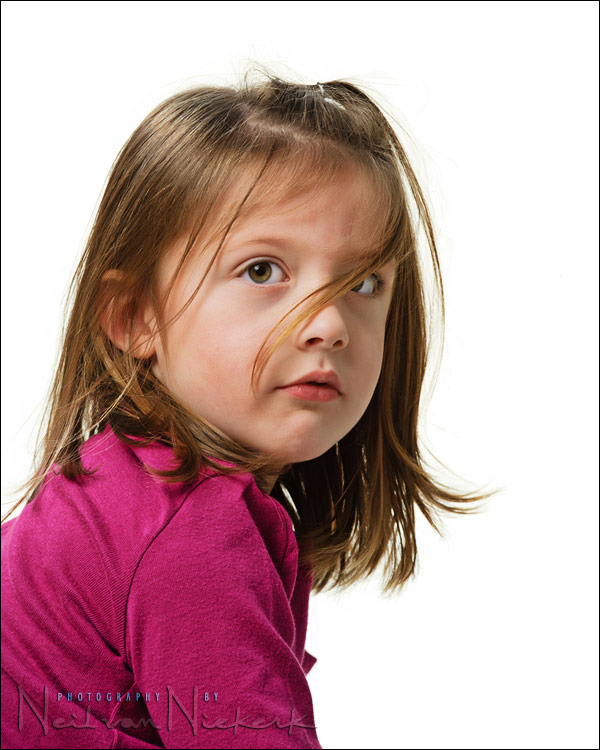
She and her brother had come in for this photo session. Of the sequence of images, I like this one. She and her brother were great subjects, but her younger brother, being .. well, young, didn’t have any interest really or the attention span for the photo session. He was zooming around the dining room and living room area. My assistant Jessica had the idea to use a laser pointer to get the cats involved to see how the kids would react. The kids were just as animated as the cats.
This image here was when she was on the floor and whipped her head around to look at me. I liked the way her hair, slightly in disarray, moved around her face, giving a kind of 3D effect there. Since she isn’t posing for the camera here, I think this is more true to her spirit. I like it.
Back to the lighting. It really was a very straight-forward setup. We had used a lightmeter to get the light on the background at least 1 stop brighter than where I would position the little kids. I wanted the white backdrop to approach blowing out. But not so much to create too much spill light (and flare) on my my subjects.
Looking at the histogram, we had the exposure bunched up tight on the right-hand edge. This showed as well then that we were over-exposing the white background. Even so, for the final edit of the image, I knew I would have to clean it up with Photoshop. But it is always best to start with the best possible image in camera.
camera settings: 1/200 @ f9 @ 400 ISO
Nikon D3; Nikon 70-200mm f2.8 AF-S VR II (B&H)
Here’s an animated GIF to show the effect of the various steps in post-processing.

Image 1: the image directly out of the RAW converter. No adjustments made.
Image 2: clean up the white background; remove sensor dust spots; brighten eyes
I use the Magic Wand tool in Photoshop, and set it to a Tolerance of around 10. The entire background won’t be selected on a first click. Keep the Shift key down and click on the other areas which weren’t initially selected. Select as much of the white background, without selecting large portions of hair.
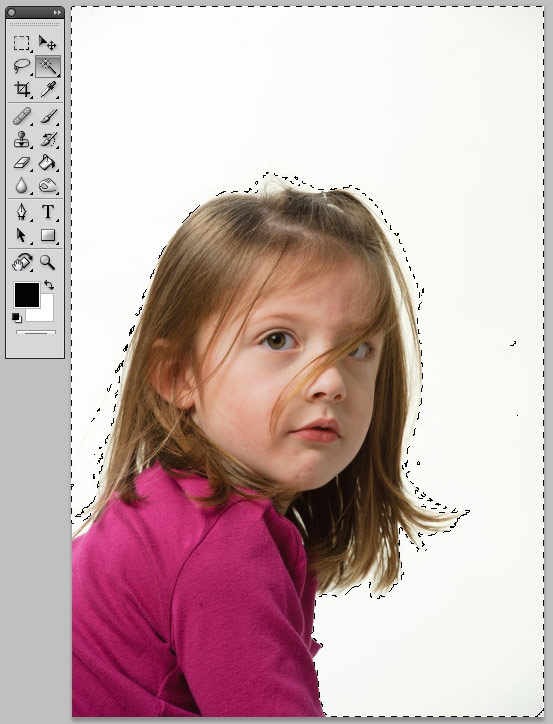
Now with the background still selected, use the Eraser tool to erase the background and make it white. (Make sure the color is selected to white first.)
After this, use the History Brush to bring back any part of your subject that was lost with the selection and erasing of the previous step. This can be tedious, depending on the level of precision you need in the final image. There are software tools like Vertus that makes this whole process much easier. I am sure there are readers of this blog that will have better ideas of how to accomplish this. Perhaps even doing this with minimal effort – a few clicks and its done. I’d love to hear.
The better separation you get between your subject and white background, the better. For then you have to do less work in Photoshop. But the trick is to find that balance where you don’t cause flare or a kind of halo around your subject.
For the next step in post-processing, I brightened her eyes by using the History Brush, set to Screen, with an opacity of less than 10%
Image 3: further retouching
With this step I would use the Healing brush to remove any skin blemishes. Yup, little kids often have scratch marks and bumps. I then went through my usual series of steps for skin retouching, but brought down the opacity on some of those edits.
Image 4: some Photoshop fairy dust to subtly make the image pop a bit more. This step will have to remain my secret sauce for now.
There are the steps I typically use to photograph a portrait against a white backdrop, starting with the lighting of my subject and the background … and then finally finessing the image in post-production.
Just found the blog, thanks very much for all the info Neil, I’ve learned a lot about on-camera flash, I will be buying some black foam today!
Do you ever use Lightroom? Reading that Photoshop description made me thank the lord for LR, Photoshop is far too complicated for my feeble brain.
That’s really funny, I have been a faithful (but rather silent) reader since I ever stumbled upon your blog, and as I have said on another blog that learning from you the bounce flash technique was the best invention after bread.
Anyway, coincidentally I was shooting some product shots yesterday (full length women wear) on a white wall as a background, I had a very tight space, so I used two bare speedlites on the wall and adjusted the power just enough that the white wall is over-exposed (I have already selected my desired aperture of f/8), then all that remained was to place the objects (and I tried some subjects as well) in front of the wall and adjust the main light (a shoot-through umbrella) to correctly expose for my subject. I checked and there was no flare or halos from the over-exposed background.
What I want to say is that instead of having to mask several photos in post to make a clean white background (which I tediously did in my previous trials, and I wouldn’t even start about masking the hair), you could have it completely white in camera.
What do you think?
I don’t have Adobe Photoshop. In GIMP, there is Select by Color tool which works similar to “Magic Wand” to select (non)contiguous areas.
Using that with varying options of threshold & hue helped a lot in selection of the blown out sky patches amongst the tree branches & leaves (end point was to selectively sharpen the branches & leaves).
This is like a post on my blog recently, although you took it a step further and made a prettier diagram!
It was a good idea to use an animated GIF to show the different states of the image.
I’m a little curious as to why you selected to shoot with the umbrellas as reflectors instead of shooting through them, especially after the post a few weeks back where you tried both methods. It had been my impression of late you preferred shooting through.
Your “secret sauce” looks like the [redacted] process that we often use to bring a bit more detail out on our product images on the web here at work. It may not be, but the result is nearly identical. And it’s so simple and easy to set up an action for.
Neil, as always, a great post.
you can definitely see the effect of a big umbrella on how soft the light is.
I was wondering if you have any tricks to have the kids not move. I always find it hard to have them sit still.
I was also wondering if there is a routine you follow for kids sessions.
lastly, the animated gif is a riot – great presentation.
Hi Neil:
Great post as always! I decided to shoot 3 nieces last year ranging in age from weeks to about 2 years old and scheduled them one afternoon – one right after another. I knew after that shoot that kid photography was NOT something that I was interested in doing, my nerves were shot – I can’t remember ever being so exhausted – the room looked like a war zone when they were done but, the moms loved the pics we got from it.
Anyhow, I was asked by a company that calls me for work this December that they wanted headshots on a white background and everyone was to wear black turtlenecks. I almost declined and chickened out but, they insisted and I set up a white background for the first time in my home and setup my lighting and sent them a sample to see how they liked it – they hired me! Now since I am still a poor photographer and couldn’t really afford (nor had time to buy) the big roll of white paper (and I had to transport this to their location) a friend of mine told me to use a white flat bed sheet, it’s pure white and non-reflective AND cheap. For my first try, I set up the main light exactly like you did and I also setup a hair light but, the light for the background was giving me too much spill on the black turtle neck and it just didn’t look right. I also wasn’t going to be getting that much space to separate the subject from the backcground. So I thought of this problem overnight for about two days and then it occured to me! I had a light bulb moment and saw that the sheet was a tiny bit transparent and decided to try put a light BEHIND the sheet and there you have it. I lit up the white background with a light aimed at it from behind – it worked! Then I did the same – I cleaned up the background a little, used the majic want to select the white, used ‘refine selection’ in CS5 and put up brightness in ‘brigntness and contrast’ in PS5 and it looked even better.
Anyhow, since a lot of folks are still starting out and not all have the resources for the stuff we want yet, I thought this might help someone else out that needs to improvise and is on a shoestring budget.
Hope my post was not too long –
Thanks again Neil
Hi Neil,
I’ve been enjoying your blog ever since I found it for almost a year now. Please keep those articles coming!
I am a little curious about why after sharing so much information that can not be found (or at least easily found) elsewhere you did not disclose the recipe for your “secret sauce” :)
Vlad.
Hi Neil,
Over the last Quarter of 2010 I came across your site doing a Google search, And since then I have seen great improvements in my Photography. Thank you for being so open minded about sharing from your wealth of knowledge. All the best for 2011. O and thanks for the tips. Great image!
Simply beautiful. What I learned here improved my way to make photography. Even with kids. Your knowledge is stunning, your share is gold. Thank you so much!
One request for the ‘Secret Sauce’ recipe please!
What a wealth of priceless information you have on this site Neil. This is the best flash resource I’ve found to date – bar none!
Regarding suggestions as to how to tweak the background without touching your subject, try this:
Go to Image/Calculations. As Source 1 choose the green channel, for Source 2 choose the blue. Blending mode to Linear Burn. Result to New Channel.
From your Channels palette, copy the new Alpha channel.
Open a Curves adjustment layer; option-click (on mac) the mask thumbnail and paste in the contents of the Alpha channel. Use a big, soft brush to fill in any highlights on her face.
You should now have a perfect mask to separate your subject from the background. Option-click back on the adjustment layer again and use the white eyedropper to drop your background back to pure white.
Voila! This whole process should take no more than 15 seconds, and should give a far more accurate result than tedious manual masking/history brushing etc etc.
Regards
Chris
I have tried various methods of lighting my white background and had never considered using one of my brollies to direct my light and to reduce spill back onto my subjects. I will be trying it tomorrow as it may well solve some of the issues I have been having because of the lack of depth in my “set”. Nice idea.
Hey Neil I enjoy your posts very much and have learned a lot. In an earlier comment on this post from January you said, “But it will have to remain ‘secret sauce’ as a kind of cliff-hanger for this episode. We’ll get there though with another blog future blog post. There’s always more.”
I am hopeful you are ready to get there now. It’s been 10 months seems like a long enough cliff hanger wouldn’t you agree? :)
Dan
Neil,
Secret sauce please?? I know you said that it is a simple and well known process but there are many different processes people talk about on boards can you please explain this one?