lighting the romantic portraits of the bride & groom
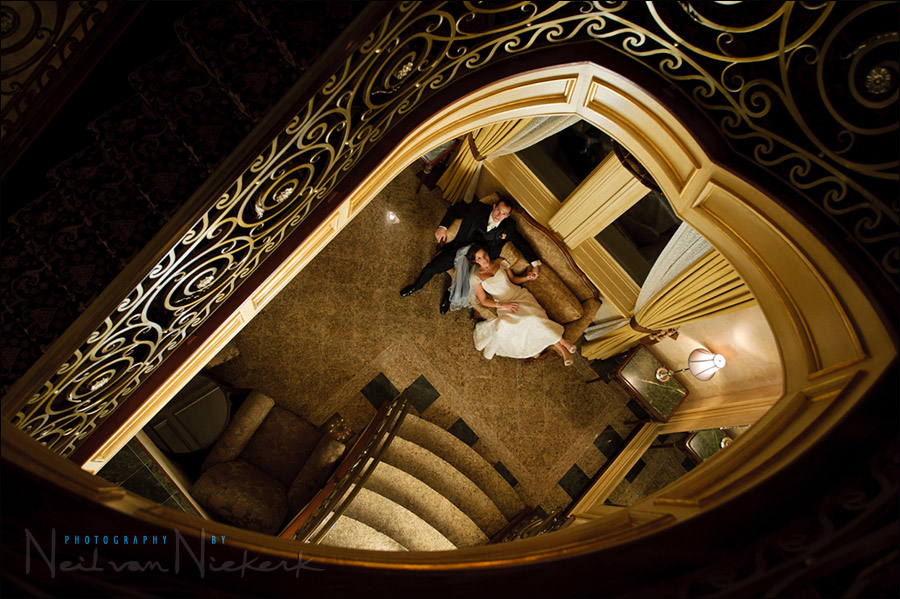
Scouting around the location during dinner time, I peered over the edge of this spiraling staircase and thought it would be a good idea to get some light on the couple, seated on the couch. I posed Melissa so that she lounged back with her head on Dennis’ lap. There is no way to get light on them from my position with on-camera bounce flash, and definitely not if my intention is to get light only on them. It needed off-camera flash.
To add some variety, I also thought of a few other things to try with the lighting, using the same set-up and pose.
First there was the setup as shown in the photo above, with the intent of having the couple within the geometric shape of the staircase. I bounced flash off a wall. The speedlight was set to full manual power, and tripped with a PocketWizard. The flash had to be in manual output since these older style pocketwizards don’t allow for TTL capability. No problem however. I just used the flash as a manual flash. Metering was done by making sure there were no blinking highlights on the bride’s dress. Since that is the brightest relevant tone, and I didn’t want to lose detail there, I checked that I wasn’t getting an over-exposure warning on her dress.
camera settings: 1/80 @ f3.5 @ 800 ISO
Anticipating an extreme wide angle for the top image, I used the Nikon 14-24mm f2.8G ED AF-S (B&H), but ended up using it at 24mm.
Here is a shot of the flash on the ground, held up with the foot that comes with the speedlight.

Next I wanted a more straight-forward photograph of the couple, but still leggy and sexy.

In the first of these two images, I still fired the off-camera speedlight via the Pocketwizard, but I also bounced flash behind me, flooding the place with even light. It looks good … but looks a little flat in terms of the lighting. My FEC was set to 0 EV. (Actually, -0.7EV on the Nikon D3 & Sb-900 combination, which is my ‘zero’ FEC for this combo.)
Camera settings for image above: 1/80 @ f4.5 @ 640 ISO
I wanted less of my camera’s bounce flash, so needed to dial it down. I ended up at -2EV … but I also knew this would now mean the image is under-exposed. So I opened up a little bit to allow more of the manual flash in and had my settings at 1/80 @ f4 @ 800 ISO … which is just 1/3rd stop away from the image right at the top which was lit by only the off-camera manual flash. So now the TTL bounce flash just lifted the shadows a bit, with the off-camera flash giving the majority of light. And since it is off-camera, it has directional and more interesting here.

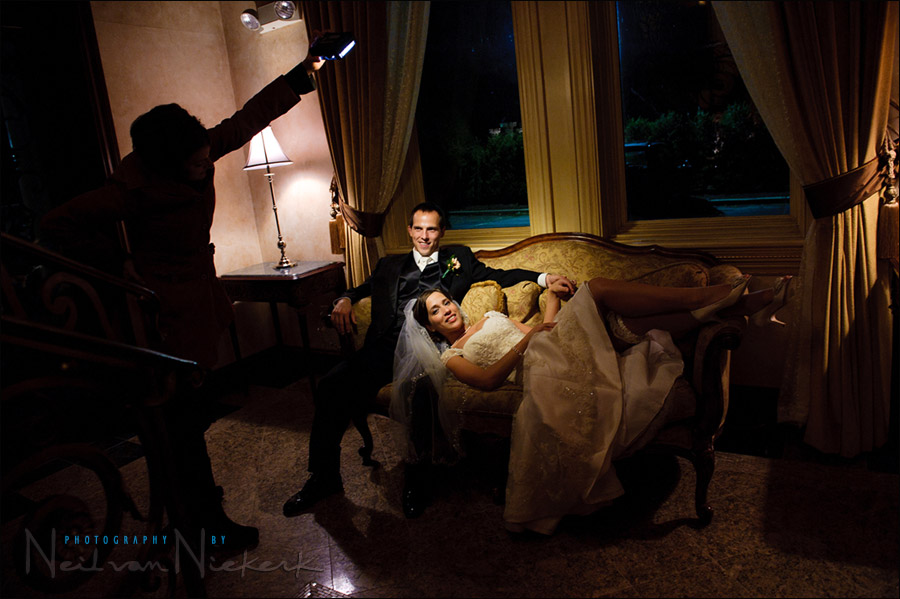
Finally, I oped for video light for a more intimate and dramatic look. If the bounce flash completely ‘opened up’ the image, video light goes the opposite way – giving a spot-light effect.

different lighting ideas for the romantic wedding portraits
Normally I would tone down the brighter spot next to the groom, so it doesn’t distract … but I wanted the images here to be faithful in terms of what can be achieved with the specific lighting. So no dodging and burning or local corrections.
Camera settings: 1/60 @ f4 @ 1600 ISO
video light: Litepanels MicroPro LED video light (B&H),
Here is the pull-back shot to show my assistant holding up the video light.
Within these different ways of lighting the same set-up, there are of course other angles and compositions – all of which allows for a variety of images within a very short space of time. And that is how it usually is with wedding photography – pressure to get great images within tight time constraints.
Fantastic Neil,
Really interesting to see your thought process!
Now that the main wedding season is over, will you be showing any new videos on your blog? I miss seeing those and really enjoy watching them.
Have you considered making and selling tutorial DVD’s?
Would make a nice change from the workout, shape-up DVD’s, that flood the shelves at Christmas time. :-)
Best wishes,
David
really nice explanations and images to go along with them, I always appreciate the way you explain things
Dear wizard, these marvelous photos became my favorites. The first has almost a shape of heart, beautiful. Thanks for inspiration.
3 different approaches – great stuff. Bouncing the light viewed from the top of the staircase is a winner for me.
Neil, like always very helpful information,thank you for taking the time to share your knowledge. I like the blue color on the window I believe is by adjusting the white balance to tungsten?
Wow!! Fantastic works!! The same location with 3 different lighting approaches, and those photos look totally different and very impressive. Thank you for sharing how you made the photos step by step and for great inspiration. BTW, as Mr.Galeano asked, I also wonder what color temperature setting you used with the video light. According to B&H, the light is daylight-balanced at 5600K.
Best regards,
Shig-
Neil, this series of images is imply AMAZING.
Thanks for sharing your talent so freely.
BTW, the “black foamie thingy” has become an essential part of my kit – it keeps astounding me with its wonderful “softbox” like results!
Best, P:)
Awesome! I had the same situation recently where a couple was in a room, but I wanted to shoot as if we were peeking in AND get the sign outside of the swinging doors. The entire area was dark, so I asked a waiter to hold a flashlight on the sign and set a flash to bounce in the room… All inspired by you!
I love the image created by the video light.
Did you use the diffusion filter on the light ?
Best regards
oi leio muito seu blog e acho que vc poderia lançar um dvd de seu livro obrigado
Masterful work Neil. Thanks for sharing.