Tangents

photography tutorials, reviews & workshops

tangents photography blog
learn : discuss : share
  • Tangents
  • Tutorials
    • Flash Photography
    • Wedding Photography
    • Studio Photography
    • Posing People
    • Understanding Your Camera
    • Exposure metering
    • BFT
    • Best Photo Books
  • Reviews
    • Sony
    • Nikon
    • Canon
    • Fuji
    • Profoto
    • lighting gear
  • Workshops
    • Info: Workshops
    • In-person
      tutoring sessions
    • Online
      tutoring sessions
    • Workshops in
      New Jersey (NJ)
    • Workshops in
      New York (NYC)
    • Photo walks in NYC
    • Studio Workshop
    • Video tutorials
    • Workshop results
  • Books
    • On-Camera Flash (revised ed.)
    • Direction & Quality of Light
    • Off-Camera Flash Photography
    • Lighting & Design
    • On-Camera Flash (1st ed.)
  • Projects
    • Two Perspectives
    • B&W Infrared
    • Vintage lenses
    • Time-lapse photography
  • Info
    • About
    • Contact
    • My Photo Gear
    • Books by NvN
    • Join us on Facebook
    • Acclaim
    • Success Stories

NYC photo shoot-out

June 2, 2009 Neil vN 27 Comments

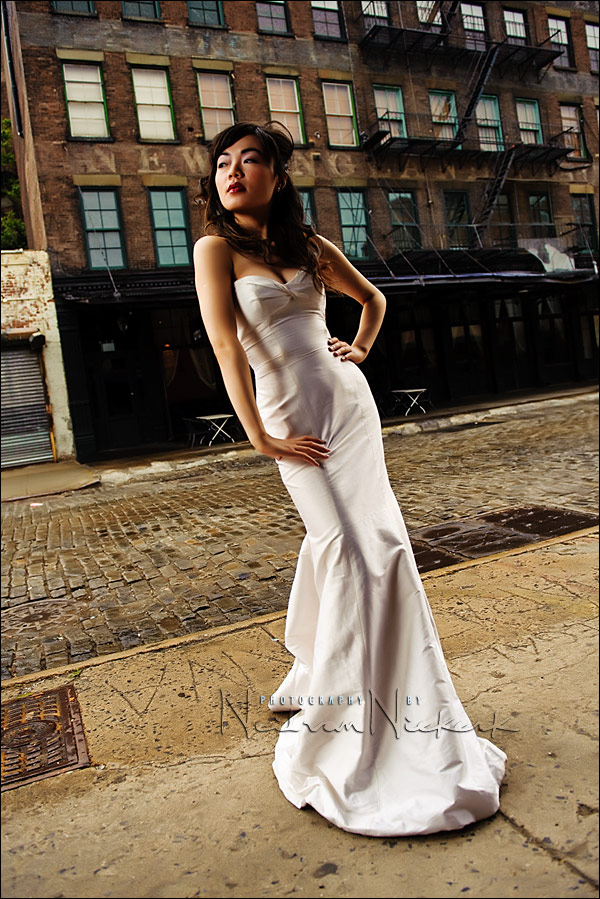
An exotic model in a bridal dress; manual off-camera flash with a softbox; some Photoshop fairy dust … and there’s an image I really like.

Earlier today, a group of about 50 photographers, (along with 5 models), converged on the Meat-Packing District in New York – another of the photo shoot-out / get-togethers / super-fun events that Rob Nicholson arranged.  I helped rotating groups of photographers, showing the essentials of using a single off-camera softbox with manual flash.  The techniques included balancing the flash with ambient light, and also looking at the direction of light.

The settings used for this photo?  Weeeell … they are less essential than the method.  The way we got to the settings are more important than the specifics of it being an f3.5 aperture.   If you’d like to figure it out .. here’s a recent post covering one of the approaches to this style of lighting.


Photography workshops

  • More info about upcoming photography workshops.
  • Recap of previous photography workshops.


Filed Under: flash photography, lighting, models, photography workshops, Uncategorized


Help support this website

If you find these articles of value, please help support this website by using these B&H and Amazon affiliate links to order your photo gear.

I also offer photography workshops and tutoring sessions, whether in person, or via online video tutoring sessions.

Please follow me on Instagram for more.

You can also join our thriving photo community in the Tangents group on Facebook, where we show our photos and discuss all things photography.

Thank you,

Neil vN

Books by Neil van Niekerk


27 Comments, Add Your Own

  1. 1Rory Mole says

    June 3, 2009 at 5:31 am

    Hi there Neil,

    This is a great shot with so much going on in it. Just love the beautiful directional light and the post processing you did in Photoshop.

    You mentioned Photoshop Fairy dust. What was it you did in Photoshop that took this photo to where it is now from what came out of the camera? It would be helpful to know what the process was, step by step.

    Thanks so much for sharing this with us.

    Reply
  2. 2Joost says

    June 3, 2009 at 7:35 am

    Nice shot Neil,

    what’s this photoshop fairy dust you speak of? A specific action or some general adjustments?

    You’re familiar with the strobist site? It’s got great tutorials on off-camera flash for amateurs to pro’s…

    Joost

    Reply
  3. 3Thorsten says

    June 3, 2009 at 7:51 am

    Oh my, what a superb image! Just as I’m on a personal mission to use Photoshop less in my work, you post an image that makes me rethink my mission ;-) That’s not to say that the image on it’s own would not have worked as well, but addition of “fairy dust” sure adds an extra dimension to this image.

    I’m trying to deconstruct the lighting here and in doing so, I figure that the flash is coming from the left side of the image. But what’s creating the highlight running down along the models left arm? It’s obviously not another flash because you say only one flash was used. I wouldn’t have thought the ambient light could produce such a specular highlight, considering how the lighting looks in the remainder of the scene.

    Reply
  4. 4Kathy Marciante says

    June 3, 2009 at 8:11 am

    Awesome image!! ….as always:)

    Reply
  5. 5Michael Fisher says

    June 3, 2009 at 8:22 am

    You have two sources of light, one on the right and one on the left. One is ambient light being forced down the street between the rows of buildings and the other is the manual softbox. It doesn’t really matter which is which, as the ambient light source is likely open sky and fairly large, too. My guess would be the softbox is to our left and the sky is to the right.

    Love your work, Neil. I was at the St. Louis workshop. I was the crazy guy that drove down from Chicago just to get into the workshop. Cheers, buddy!

    Reply
  6. 6johnlo says

    June 3, 2009 at 8:46 am

    Neil,

    Thanks for showing us (and me) how things work yesterday. Learned alot and understand more much now then I did two days ago. I wont be able to make it to your workshop this year.. Will be there next year hopefully. It was very nice to meet you yesterday. Thx again.

    johnlo

    Reply
  7. 7Anthony Vivinetto says

    June 3, 2009 at 10:07 am

    Awesome shot. Thank you for sharing with us yesterday. It was so great being there.

    Reply
  8. 8Neil says

    June 3, 2009 at 10:51 am

    Thank you everyone for the great compliments.

    Just for comparison, here is the image without flash – just available light. (on the left) And the image with flash on the right, but unprocessed.

    The only adjustment I made to both images was a change in WB to make the photo slightly warmer than it was. But it wasn’t a huge jump.

    As for the Photoshop Fairy Dust … it’s a combination of actions on different layers blended in different ways.

    The image was ever so slightly cropped from the original, and I did remove two people seated at the restaurant in the background.

    But I think the photo (nearly) directly out of camera works already. The Photoshop work wasn’t done to salvage anything, but to make the image pop a bit more.

    Reply
  9. 9Neil says

    June 3, 2009 at 10:59 am

    As for the lighting, and the light sources .. Michael, you nailed it there. : )

    Because it was raining slightly, we were working under an overhang in front of one of the warehouses. So there was a lot of available light coming down the street between the buildings, and then we just sweetened it all by adding flash from a softbox.

    Neil vN

    Reply
  10. 10Chad Pennington says

    June 3, 2009 at 2:24 pm

    Neil thanks for your class – you have opened me up to some new thinking, I was the guy who asked you how did you remember the ISO’s and Shutter numbers so well as you do – I was highly impressed. Looking forward to one of your classes

    Reply
  11. 11Tom K. says

    June 3, 2009 at 2:25 pm

    It’s really an exceptional photo. The more I read this blog the more I learn. Thanks again Neil.

    Reply
  12. 12Eileen says

    June 3, 2009 at 2:33 pm

    It’s a wonderful shot. Thanks for sharing, both the picture and your technical tips.

    Reply
  13. 13Stephen says

    June 3, 2009 at 5:22 pm

    Neil,
    Great photo. So even professional photographers have workshops to attend. :-)

    Reply
  14. 14Peter Salo says

    June 3, 2009 at 6:41 pm

    What a great shot Neil…

    Thank you for taking the time to share your knowledge with all of us yesterday. I really did learn so much in such a short amount of time.

    Oh yeah, thanks especially for making me lay down on the ground. They are some of my best shots of the day!

    Reply
  15. 15Ronald says

    June 4, 2009 at 1:13 am

    Thanks for side by side with explanation. Teacher live to give. We all benefit from you releasing your gift. Thanks Neil.

    Reply
  16. 16Roger says

    June 4, 2009 at 2:03 am

    Wow amazing photo and thanks for the detailed explanations and side by side photo’s.

    Keep up the excellent work and brilliant tutorials with or without Fairy Dust magic,
    Roger

    Reply
  17. 17Rory Mole says

    June 4, 2009 at 7:42 am

    Hi there Neil,

    Thanks for the explanation about how you got the shot. I was just thinking if you could give a step by step tutorial of how you got the image to pop. It’s one thing to say that it is a combination of actions on different layers which are blended in different ways and to actually explain what the actions are and what blending modes where which you used. On some sites the guys give the actual step by step procedure that they used to get the image to the finished product. I must say, that I was expecting more from your answer.

    That would be very helpful with how to achieve a similar look to images shot in a similar way.

    Thanks so much for sharing your knowledge.

    Reply
  18. 18Neil says

    June 4, 2009 at 2:25 pm

    Rory, there are specific reasons why I didn’t want to share the exact post-production technique in a step-by-step manner.

    That said, I’m a little bemused and amused though, that even with one of the most transparent websites out there in terms of how I share information, you feel disappointed when I don’t summarily give everything on demand.

    Anyway, look again at the image .. it isn’t the post-production that makes it work. The photoshopping is just some extra sweetening of the image. The majority of the “work” done here is by the model, the location and the lighting.

    Neil vN

    Reply
  19. 19Trevor says

    June 4, 2009 at 3:53 pm

    Neil,

    Thanks so much for sharing the knowledge you have with us. You’ve shared so much already, I couldn’t expect any more. Some secrets are meant to be kept! (o;

    I check your posts every day and will continue to for ideas, information and inspiration!

    Thanks again,
    Trevor

    Reply
  20. 20Tunji Sarumi says

    June 4, 2009 at 9:34 pm

    Hi Neil,
    Thanks for sharing us your knowledge. I really learned a lot from the photog shoot out.

    Thanks

    Reply
  21. 21Michael Davies says

    June 4, 2009 at 10:35 pm

    Hi Neil,

    Wonderful shot, brilliant blog – thanks for the inspiration!

    Michael

    Reply
  22. 22Rory Mole says

    June 5, 2009 at 12:07 pm

    Hi there Neil,

    Thanks for the answer to my second question.

    Sorry if I asked the wrong question for you to explain the Photoshop procedures. I didn’t mean that I was ungrateful for what you have already shared.

    I will take it as it is.

    Thanks for all the great help you have given and still continue to give.

    Reply
  23. 23Kathy Marciante says

    June 7, 2009 at 8:14 pm

    Awesome image!! What lens did you use?

    Reply
  24. 24Neil says

    June 7, 2009 at 8:31 pm

    Thanks! The lens that I used was the fearsomely awesome Nikon 24-70mm f2.8 AF-S, set to 24mm and used at f3.5

    Reply
  25. 25Kathy Marciante says

    June 8, 2009 at 9:54 am

    mmmm…I’ve been looking into that lens. Thanks for the info…even though I believe it’s your talent that gets the shot..I’m sure you could produce great images with your phone camera!

    Reply
  26. 26Neil says

    June 8, 2009 at 10:11 am

    Thanks Kathy! … phone camera? Naaaah .. I’ll pass. I want the big toys!

    Reply
  27. 27William Chang says

    December 6, 2009 at 10:20 pm

    Had a great time at this event, thanks for teaching Neil!

    Reply

Leave a Reply Cancel reply

Your email address will not be published. Required fields are marked *

categories

Articles & Tutorials

  • • About myself & this site
    • Books by Neil vN
    • Best photography books
    • Black foamie thing
    • Photographers’ success stories
  • • Flash Photography Techniques
    • Natural looking flash
    • Flash + Ambient light
    • Dragging the shutter
    • Bouncing your flash
    • On-camera flash outdoors
    • Exposure metering
    • Flash exposure compensation
    • Bounce flash examples
    • Which is the best flashgun?
    • Flash brackets
    • Off-camera flash photography
    • Flash photography basics
    • Using video lights
    • Flash photography tips
  • • Photography workshops NJ / NYC
    • Models @ photography workshops
tutorials:
flash photography
Photography
Workshops

All rights reserved. Copyright © Neil van Niekerk 2025 · Customization by The Traveling Designer

Copyright © 2025 · NvN on Genesis Framework · WordPress · Log in