exposure metering for manual flash and softbox
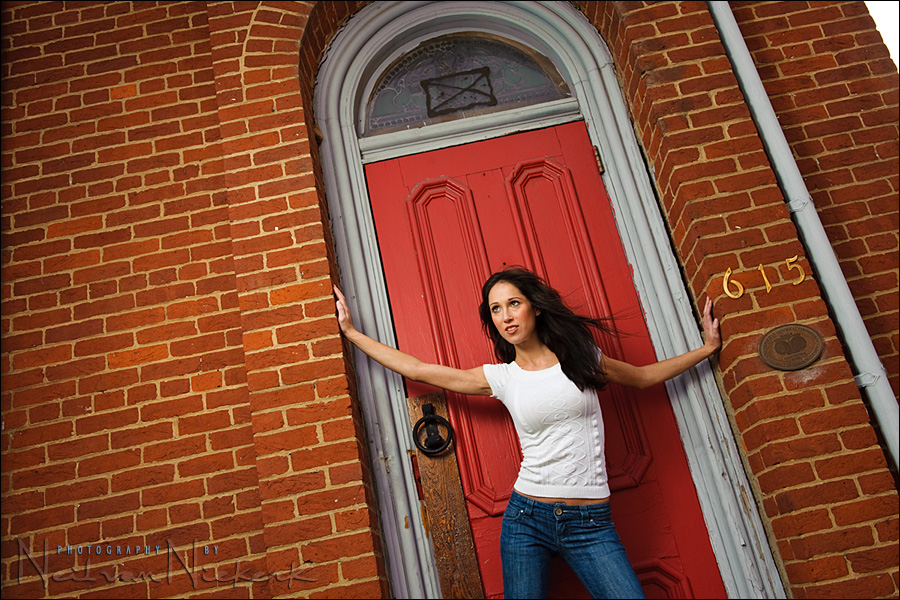
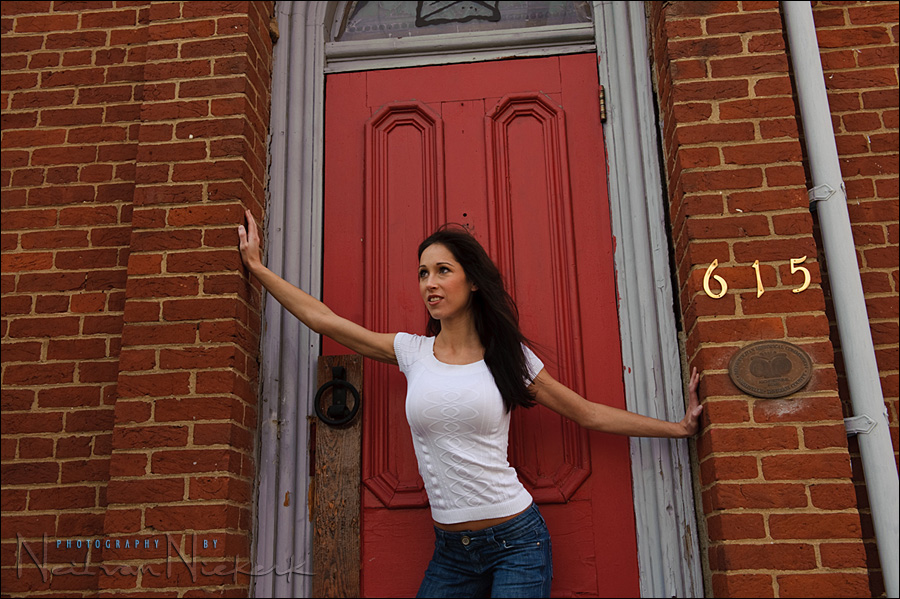
Valerie is the striking model I used for a flash photography workshop held in Nashville. The lighting is simple – the softbox is held to the my left-hand side in this instance. As you can see in the ambient-only image below, I let the available light under-expose by a stop. I metered for the available light with a hand-held meter.If you’re unfamiliar with using a light meter, check out this first-steps guide to using a light meter with manual flash.
You could just as well have used the histogram method .. and then take the ambient exposure down by 1 stop, as in this example. It could be more, for a more dramatic result. You could do this via my shutter speed or aperture or ISO choice .. or a combination of those.
Here is the available light image before flash was added.
My settings for the sequence of images here were: 1/200th @ f5.6 @ 200 ISO.
This time I wasn’t quite at maximum sync speed (1/250th for this camera) since I was working in the shade, and not in very bright light. But the moment I work in bright light, using flash, it makes the most sense to be at maximum flash sync speed, and figure your settings out from there.
The ambient light was metered at 1/200th @ f4 @ 200 ISO. Once again, this could’ve been done with either the flashmeter here, or by using the histogram.
I then changed my settings so that I would underexpose the ambient light by a stop. I could’ve changed any of those settings, or a combination of them. In this case I simply dialled down my aperture to f5.6 since I was already at the minimum ISO for this specific camera. Then I set my speedlight to a specific power setting. We’ll get to that.
manual flash is determined by 4 factors
– aperture
– ISO
– distance from the light source to subject
– and flash power setting.
In this instance, by metering for the ambient light and pulling it down by one stop, we have determined what aperture and ISO we would like to be at … which just leaves distance and power of our speedlight to be determined.
how far do we hold the softbox from the model?
This is where we balance out the decision based on a couple of factors. The larger the light source (in relation to our subject), the softer the light .. but we also need a comfortable working distance so that the softbox doesn’t appear in the image. If we hold our softbox too far away, then the light progressively becomes harder. Therefore, in practice, we would slow ourselves down if we worked precisely according to textbook formulas and set-ups. It is just easier to be flexible about it on a shoot, and find that sweet spot where the light still wraps around your subject to an extent .. and you have enough space to move around without having to change the light’s positioning too often.
Here, as part of the workshop demonstration, someone was holding the softbox up for me on a monopod. This makes it much easier to change the position of the light as the model moves around.
When we’ve figured out the approximate positioning of the speedlight and softbox, then we need to adjust the power to where we get f5.6 – but there is some flex built into doing it this way. If we need a 1/3rd stop more or less light from our speedlight and softbox, we can just move the softbox closer or further away by a slight amount. This is an easier way to adjust the manual flash that continually hoisting it up and down to adjust the power ratio on the back of the speedlight.
And then of course there is also the leeway built into using the RAW file format. In the image at the top, I had to pull down the exposure slider in ACR by 2/3 rds of a stop. It seems that somewhere during the shoot the person holding the light up, might have moved a little closer. But this is less of a concern while taking the photo, than keeping the rhythm of the photo sesssion. Rather than a stop-start way of adjusting the lighting, it is better to take up that slack in exposure precision, while editing the image.
So while it might seem that there are a confusing number of settings we need to adjust, they aren’t entirely random and they do fall into place with a certain amount of logic.
related articles:
- off-camera flash photography: what are your camera settings?
- off-camera flash photography: distance between softbox and subject
- various scenarios: balancing flash with ambient light
- flash photography: questions & answers (FAQ)
- controlling bright daylight w/ direct off-camera flash (model: Molly K)
- flash photography tutorial – balancing flash and ambient (model: Camille)
- camera & flash settings: what do you want to achieve? (model: Ulorin Vex)
Hi there again Neil,
Thanks for the info again. So nice to know how this kind of shot is done practically speaking.
Could you have used a shoot through umbrella for this shot, or is a softbox the best option?
Hi Neil,
Thanks a lot for the explanations! I love the difference between with and without flash. With flash it just looks so smoother and more professional.
Two points from my side:
– Is manual flash also influenced by zoom head setting?
– You could also set flash power just approximately in the correct region and then find the correct aperture to get the correct flash exposure, thereby leaving the ambient exposure (e.g. aperture+1/2 stop, shutter -1/2 stop). Did you have any reason for not doing this? Or was it just convenient enough to let the “flash holding person” increasing/decreasing the power?
Looking forward to your next posts,
Martin
Hi Neil,
Great article explained in an easy to digest manner. Am really looking forward to your workshop in Ireland later this year.
A quick question, if I may, on using an incident meter, such as the L-358, in ambient light such as in this case. It’s something that has been the topic of much debate on forums the world over, but in most cases the discussion relates to using it in a studio environment. The question is simply, what is the correct direction in which to point the lumisphere when taking your ambient light reading – from the subject back towards the camera or from the subject back towards the light source?
Whilst I’ve had great success in using my L-358 in the controlled environs of the studio, using it outdoors is a different matter and I often end up with under-exposed results, particularly on bright days, unless I retract the lumisphere or shade it from the brightness of the overhead sky.
Oh, by the way, this blog just keeps getting better and better!
Thorsten.
Hi Neil,
Sekonic gear question: Is this the Transmitter module that you install into the Sekonic?
hallo neil,
some questions:
why did you underexpose the ambient light for one stop?
Would it not be different when metering off her white shirt and go down minus one stop OR metering on the bricks and than go down by one stop?
Ah I see, metering the light with the sekonic is different than metering “the reflected light of bricks or white shirt”.
“If we hold our softbox too far away, then the light progressively becomes harder.”…does that mean that YOU (or the person that takes the picture) is holding the softbox?…means far away from HIS body?
than it is right.
but if the assistent will hold the box too far away (in relation to the model)…than it is wrong, because the light will go softer.
as far away the softbox…as softer the light.
“then we need to adjust the power to where we get f5.6″…can you not select the aperture and iso on your flash in man. mode?
on my FL-50 i can select ISO and Aperture or the power ratio…..1/64, 1/128, 1/2, 1/4…and so on….
thank you for sharing a new lerning lesson.
peter
olympus_fotograph,
Unfortunately, I must contradict your statement. “As far away the soft box from the subject as _harder_ the light” is the correct expression since the apparent light size gets smaller and smaller with distance from the subject. In infinite distance, the soft box gets a point source. So what is softer, big or small light? – Exactly: big light, which means soft box in short distance.
To help to understand, imagine how the light beams spread from the different positions from the soft box towards the subject: Light from the center hits the subject differently than light from the border of the soft box. Make a small sketch if you want to. And you will realize that the bigger the (apparent) light source, the more the light will “wrap” around the subject which is actually what makes it look softer.
Did you understand my explanations? Maybe Neil will find some better words, he’s talented in explaining such stuff.
hello what i mean is visible here:
http://www.traumflieger.de/desktop/blitzreport/grafik_lichtausbreitung.jpg
so if the light is close to object—>> the light is hard.
if the light is far to object—> the light is soft.
which brings us to my question from what place neil is talking about the softbox.
“If we hold our softbox too far away, then the light progressively becomes harder.”…does that mean that YOU (or the person that takes the picture) is holding the softbox?…means far away from HIS body?…you can move the left hand fwd or aft.
than it is right.
but if the assistent will hold the box too far away (in relation to the model)…than it is wrong, because the light will go softer.
as far away the softbox…as softer the light.
grts
peter
@olympus_fotograph:
If we start with the fact that we all know that the sun is bigger than any softbox we are ever likely to use, and yet we all know that the light of the sun in the middle of a bright cloudless summers day is just about as hard as you can get, then it should quickly become apparent that the reason the suns light is so hard is because it is so far away.
So, it’s not the actual size of the light source that matters, but the apparent size, relative to your subject. As you move your light source away from your subject, the apparent size decreases, just like if you are right up beside a car, it is big enough for you to get into, but if you walk away far enough, you could literally fit that same car between your thumb and forefinger if you hold them up and look through them at the car; the size of the car didn’t change, but because the distance between you and the car changed, the apparent size of the car changed.
The diagram you have linked to simply describes the inverse square law of light, which states that as you double the distance between the light source and what the light is falling on, you reduce the intensity of light where it is falling, by a factor of 4 (i.e., it becomes 1/4 of what it was at that point).
@Thorsten,
Thanks for extending my explanations.
@Olympus_photograph,
You must be careful to not mix up “soft/hard” light with “bright/dull” light. As Thorsten said, your image describes how the light intensity per square meter decreases with distance. What I meant with soft light is that the border between bright and shadow area on the subject is soft. With a point source this border is very small (e.g. 1-2 mm) and sharp – in other words hard. But the bigger the apparent light source, the wider this range becomes and we are saying soft light (e.g. 20-30 mm).
Hey Neil! Thanks for the great workshop in Nashville. I had already known a lot of what you covered, but putting it into action with the one-on-one tutoring by you really made everything sink in. I also discovered just how much my equipment is limiting me. Before the workshop my wife and I have been just getting by when it comes time to use flash, but now I think it’s time to make it a priority to update everything we have. There’s so much we’re missing out on by not using created lighting regularly. Thanks again and I had a great time meeting you in person!
Hi Neil,
Thanks for this, I’m going out this weekend to shoot bridal portraits and I put together my version of a light on a stick with a softbox. It’s pretty stable but I could have sworn I saw an article or post by you using a pretty nice mount on top of your monopod. Is that article on your site? I’d really like to see again how you set yours up.
Hi there Neil, I am a long time follower-first time commenter of your blog. My big question for you is this – Since this example is primarily an ambient light photo what do you set on camera as far as white balance goes? Do you just leave it in auto, set it to flash, or do some sort of custom white balance? Does really underexposing the background by like 3 or 4 stops affect what you would initially set the camera to? I am just so curious how you approach wb with off camera flash. Thanks so much Jason
Here is an earlier post on how I choose WB settings.
In short, I primarily shoot with Daylight, Cloudy, Tungsten or 3700K white balance settings.
But I do shoot in RAW and then touch up the color temperature a bit as part of my regular post-processing workflow.
I don’t use custom WB settings, since, for me, it would slow down my rhythm during a shoot. But I have more slack here than a commercial photographer would, so I think this decision is very much based on the kind of precision your photographer requires.
I generally don’t use Auto WB, since I would rather not have the WB change from image to image. It is faster to edit sequences of images … and I’d rather have a group of images have the same not-quite-correct WB than have them have different colors. This way I edit groups of images instead of individual images.
For this image, (and most times when I use flash), I start off with Cloudy WB. On my Nikon D3 bodies, I have dialed in B1 on the Cloudy setting, to make it a touch colder than they have it as the default.
All of this just points to it not being necessary for most photography, to get too stuck on precise WB.
Though the example with flash is more dramatic, it looks as if flash has been used. Not just that it’s a little hot.. which is easily corrected even in LR or PS.. but also because the light starts to taper off at the top. With tall backgrounds there will be limits to how far a soft box can reach. Other than dodge/burn what can be done, if anything, if move the box further away (to reach higher) doesn’t light the subject as desired? A reflector could be utilized opposite the box, but I don’t see where to put it in that situation out of view.
Ken … I’m not sure that is a problem per se – that the light tapers off to the edges of the frame. In fact, I like that slight ‘hot-spot’ look to it.
The solution around it is to use multiple lights and really add as much as you need, in every part of the frame. But this then becomes a much larger production, and you lose the ability to move easily from one spot to another.
Neil..great work and explanations!
Can I ask about setting the manual flash. I have a 550EX speedlite. It wouldn’t be dedicated to my camera, so I would set the flash manually. You mentioned setting the flash to a power output that would register 5.6 when read with a meter. If I had to set this are you just dialing in say 1/2 power and taking a meter reading to see where you’re at. I can’t set my ISO and F.stop in this mode.
If I shot in ETTL, do I set my flash settings to match my camera settings and then dial in FEC?
Thanks
Hi there Julian .. you seem a little lost. :)
With E-TTL, your camera and flash will follow your settings. In other words, as you change your aperture and ISO, your camera and flash will work together to give you correct flash exposure (Within reason of course.) You then change your FEC to have more or less flash than the camera thought you need.
So it isn’t quite as you have it there: “do I set my flash settings to match my camera settings”. That is how manual flash would work. Not TTL.
Back to the first part of your question. Your 550EX should be dedicated to your camera if it is a Canon D-SLR. What camera do you have?
And with manual flash, this is exactly what you would do … you would set your ISO and aperture on your camera. You would set the ISO and aperture, based on your ambient light, and what you want to do with your manual flash.
Neil,
I am lost it would seem! I am aware that the flash and camera in E-ttl mode are communicating – it must have been the long night! :)
I am practicing shooting portraits with some loaned equipment and was trying to learn setting up an off-camera flash with my Canon 40D. There’s no transmitter involved, so camera and flash would be set manually.
My confusion, or clarification, is once the exposure is set without flash for the ambient (-1 stop)light, do I then set the flash power to 1/4, or 1/8 to begin and adjust as necessary to match the lightmeter’s suggested F-stop.
If it’s that simple, then I obviously had been over-engineering it :)
Your posts are great, and I appreciate the feedback!
best,
JH
When you say there is no transmitter involved, are you using the camera and speedlight in wireless mode?
My confusion, or clarification, is once the exposure is set without flash for the ambient (-1 stop) light, do I then set the flash power to 1/4, or 1/8 to begin and adjust as necessary to match the light meter’s suggested F-stop.
ok .. let’s take it a step back.
You have your ambient exposure, and it tells you .. for example:
f5.6 @ 100 ISO (at whatever shutter speed, no higher than max sync speed)
Then you take it to f8
It seems that is what you’re trying to do there with the (-1 stop) comment?
ok .. so you now want f8 at100 ISO from your manual flash.
You have a few ways of getting there.
1. You can use your flashmeter, and dial your flash’s power (1/2 or 1/4 or 1/8) until you get f8.
2. You use your histogram in the same manner.
3. You can guess, take a shot, and look at your LCD preview. Repeat until you like what you see. It’s a clumsy method, but will get you there, but not with as much accuracy as the other two methods.
It’s that simple.
“When we’ve figured out the approximate positioning of the speedlight and softbox, then we need to adjust the power to where we get f5.6”
Hi Neil, As usual great site great info. Quick question on the above comment. I am trying do some amateur studio work and I am using two SB-800’s, one bounced into a Westcott Softbox (the umbrella style that requires no speed ring) and the other into an umbrella. I’m getting inconsistent exposures with TTL everytime I recompose or change from landscape to portrait format so I am trying to switch to manual flash to increase the consistency of my exposures. Here’s my question. When I’m using the 800’s in wireless mode triggered by the my camera (no Pocketwizard) I then have no aperture reading from the flash only the ratios as the appear on my D200’s menu. So in that case how do I determine my aperture setting? Can’t really uses the GN method because the flashes are both being bounced in to their respective light modifiers. Don’t have a flash meter either.
Sorry for the long winded question and thanks again for a great website.
Ross
Hello Neil,
I’m not sure if you’re still answering questions posted on this page, but hopefully so…
I’m baffled by your suggestion that, after metering for ambient and dropping exposure by 1 stop (from f/4 to f/5.6 in this case), you’d then go attempt to get a manual flash reading of f/5.6. Why not f/4?
To my way of thinking, this would be tantamount to dialing in -1 FEC if you’re going the ETTL route, which I don’t think you’d do unless there was a specific reason to do so. When I’m shooting with ETTL flash, I’ll manually determine ambient exposure, drop exposure by 1 stop or so, and then default to +/- 0 FEC unless scene reflectivity is an issue one way or another.
So my gut tells me than when using manual flash, you should meter for ambient, drop exposure by 1, then adjust flash power/distance until your flash meter gives you the aperture that was originally suggested as correct in the original ambient metering step. What am I missing here?
BTW, I bought your book on off-camera flash, and I love it.
Good day!
Dave
Dave,
The metering of f4 to f5.6 so the ambient light is one stop under-exposed is no problem, that’s how he wanted to have the ambient, so far that’s easy.
Now, the explanation of why you then meter the flash to f5.6 is because that’s his current f-stop, 5.6, therefore he must have the flash metered to f5.6 to match the camera, so the subject is at the correct exposure, but not the ambient fall-off since the flash will only light a part of the scene, making the subject stand out.
If he was to meter the flash at f4, which is the original ‘correct’ exposure for the overall scene, you would end up with, in theory, the exact same light as the ambient, therefore the image would almost be identical as shot without flash, -1 stop.
Remember, f4 lets more light in then f5.6, and flash works with aperture, so by saying the flash needs to be set to have an f4 rating is telling the flash that there is already enough light to only need f4 where in fact you need that extra stop of light to match f5.6
You forget the actual *camera* setting is aperture of f5.6, so the flash will not then put out enough power to compensate the difference between f4 and f5.6. Ergo, flash metering needs to read f5.6 [more light] to match camera’s f-stop, so that ‘more’ light then correctly exposes the subject.
Flash is only light, and if you just pretend for a moment that it’s ‘ambient’ if that flash is then used like ‘ambient’ and you only meter it for f4, with the camera at f5.6 it will simply be underexposed, no different if there had been no flash in the first place.
Hope this explains it.
Trev.
Trev,
That was exactly the explanation I needed – totally makes sense (so much so that i can’t believe I didn’t realize it in the first place). Thank you very much for taking the time to post that.
Dave
Glad to help, as Neil says, sometimes we all have that “aahaa moment” and it clicks into place.
Trev.
Brilliant!! I too have been searching for that explanation as I have been tied up using TTL. Searching for such a simple answer has been really hard.
Trev,
As with Daves comment, I couldn’t understand why you wouldn’t meter the flash for the original correct exposure for ambient light but as soon as you explained it, BAM!! of course, so simple and now measuring for fill flash makes sense also.
Thank you soooo much
Jon