Camera & flash settings: What do you want to achieve?
In one of the multitude of photography groups on Facebook, I saw a newcomer to off-camera flash say that she bought an Alien-Bee set, but she has no idea what to set it to. My reply was that she needed a light-meter. My thinking is that then she’d know what the specific output of the flash or strobe would be, and then be able to set her camera to it. But then, thinking about it some more, I realized if there is hesitation there or confusion, it is about what specific camera settings (mostly aperture) should be in the first place.
I think this is the baffling part of using off-camera lighting or studio gear on location for the first time – where do you start? What should your camera and flash settings be?
Well, if you shoot on location, your settings are usually decided for you by your available light …
For example:
You might be battling hard sun:
– overpowering the sun with flash (models: Sarah & Mark)
– overpowering hard sunlight with flash (model: Johannie)
You might need to balance shaded subjects against a brighter background:
– so what are your camera settings?
Or you just want to get rid of the blah:
– off-camera flash for that extra bit of drama (mode: Olena)
So it really comes down to .. what do you want to achieve?
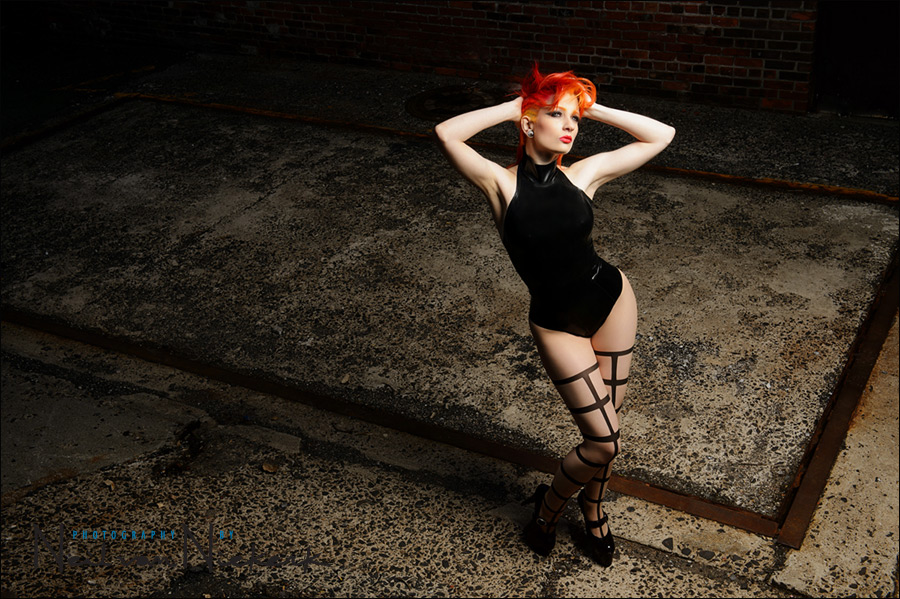
Still working with Ulorin Vex during the photo session which was shown in the recent article on using a neutral density (ND) filter, let’s have a look at a different setup. With the example where we used the ND filter, we had Ulorin Vex with her back to the sun, and her hair lit from behind by the sun. So there was a specific thought-process there.
But moving around the corner at those same warehouses, we were in the shade. I liked the surroundings … but the light was blah. Using the same kind of idea as shown in this article – off-camera flash for that extra bit of drama – we got to the dramatic image shown at the top.
I wanted it to appear as if Ulorin Vex was in a pool of light.
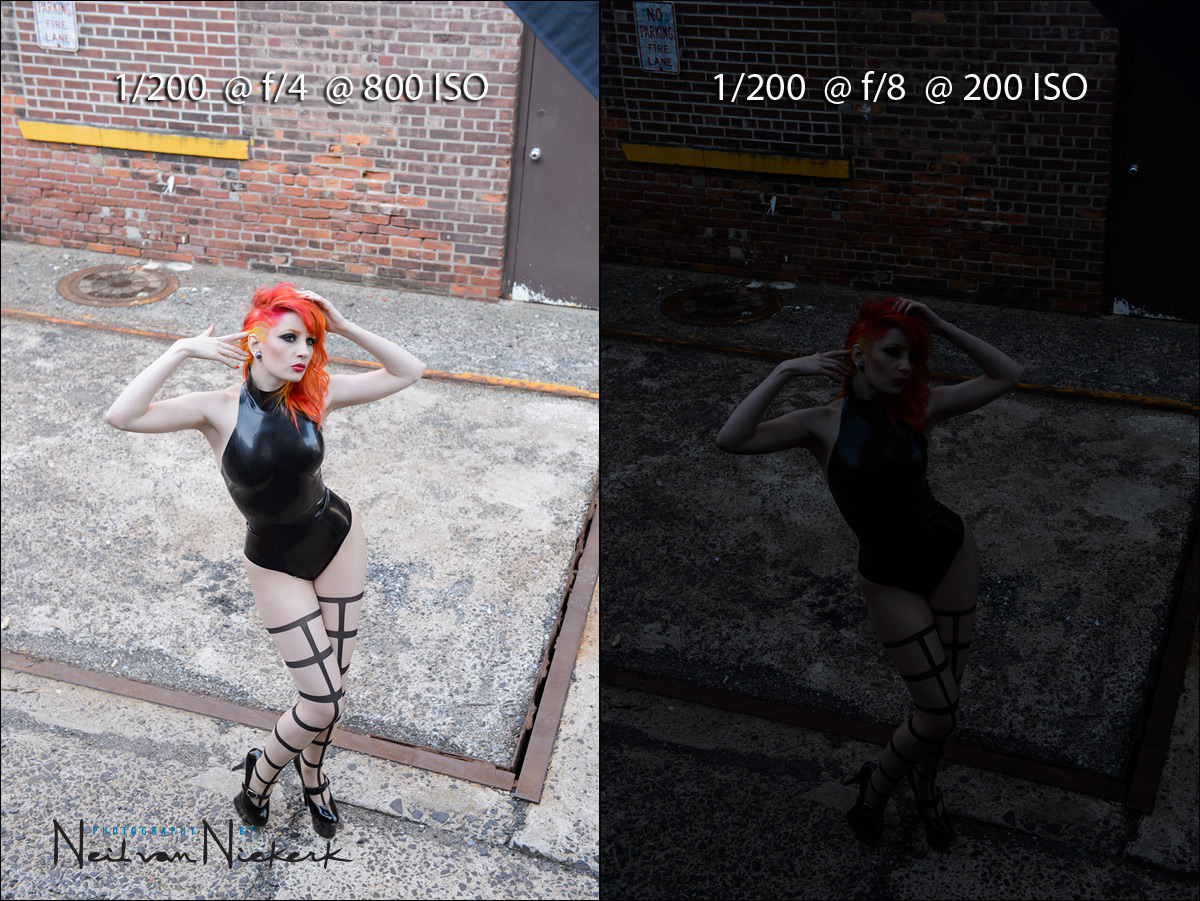
The available light shot looked quite bland. Well, the lighting looked bland. Under-exposing by 4 stops, pulled the available light down to where it pretty much is of no consequence – and it is at this point that the off-camera lighting becomes everything, and we have absolute control over the final result. Remember, around 5 stops under-exposure, the ambient light is less than 1% of your final exposure – i.e. non-exsistent.
I specifically only wanted to use one light source here – a large softbox from above. I was standing on a wall to shoot down on her. The light was on a 12′ tall lightstand.
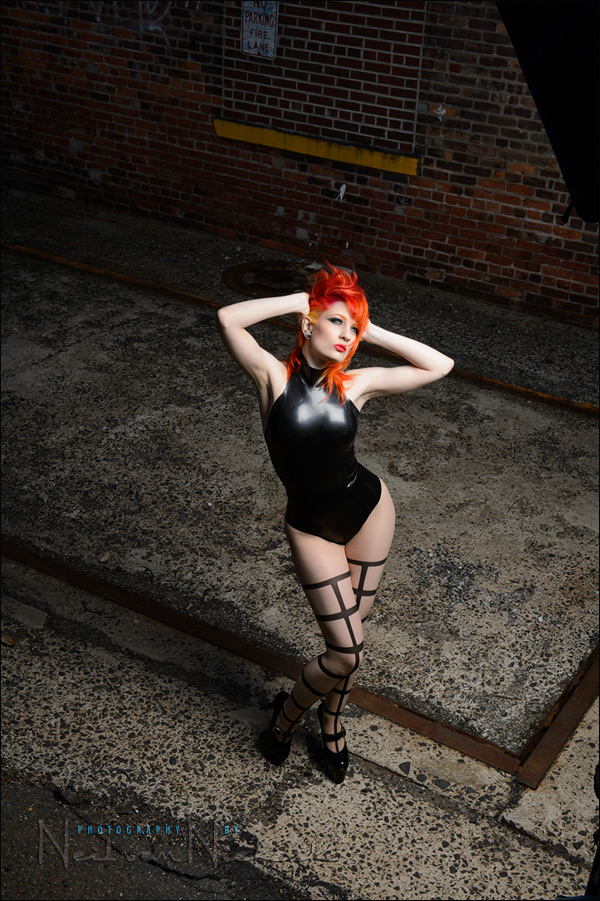
This shot shows where the softbox was in relation to our model. High above and next to me. You can see part of the light-stand in the bottom-right corner.
The final image (of which the square version was shown at the top), had the distracting high-lights on her latex costume removed in Photoshop.
So now the question remains … why did I decide to do it this way, and under-expose the available light and set up the softbox like this? Simply because I thought it might look cool. I did a few test shots to make sure, and then, “yeah! this works.”
That was the crux in deciding to set up this (quite simple) shot – I thought it would look cool. Then the decisions about what I need to do to capture that pre-visualized idea followed. That’s the essence of it – you need to have some idea of what you want to do, before you can get there. It seems superfluously obvious when stated like that, but that is really how it works. You have to figure out what it is you want to achieve, even if your end result is different than your original idea.
Photo gear (or equivalents) used in this photo session
- Nikon D4
- Nikon 24-70mm f2.8G AF-S / Canon 24-70mm f/2.8L II
- Profoto D1 Air 500 Ws studio light
or Profoto B1 500 Ws battery powered flash - Profoto RFi 3’x4′ softbox
- Manfrotto 1004BAC – tall light-stand
- Profoto Air Remote Transceiver
- Profoto BatPac portable battery
Related articles
- Off-camera flash for that extra bit of drama (mode: Olena)
- Overpowering hard sunlight with flash
- What are your camera settings?
- Overpowering the sun with flash (models: Sarah & Mark)
- Using a neutral density (ND) filter to control DoF with flash (model: Ulorin Vex)
- Other photo sessions with Ulorin Vex
A little bit of homework
- Why did I not need to drop the ambient exposure by more than 4 stops?
looks good Neil…nice light fall-off accross the photo
Answer: Because you wanted to leave some light to show the surrounding environment in the scene that the OCF wouldnt touch…
Am I correct?
Not quite. If I wanted light to register, I’d have to bring in more available light.
At 4 stops under-exposure, the available light really is of no consequence, as the comparison shot shows.
Therefore, under-exposing by 6 stops or 7 stops is redundant.
Neil, I’m pretty limited to umbrellas in my off-camera flash arsenal right now (using Nikon SB-28s). Can you advise on a good choice of modifier to perform this kind of look? Should I perhaps consider the Westcott Apollo 28″ or the Orb? Someone recently suggested the 26″ Rapid Box, but, I wasn’t sure how evenly it lit the subject. TIA
Shawn .. an umbrella (and especially a shoot-through umbrella), scatters the light too much.
A softbox will concentrate the light better .. even more so if it is a gridded softbox.
Hi Neil!
As your ambient only registered 1%, then by underexposeing by another stop or more wouldn’t have made any difference to the final image.
Am I on the right track to your thought?
Mike .. spot-on.
Awesome article! I love the image. Wouldn’t under exposing by more than 4 stops (using aperture & ISO) also mean you would have to unnecessarily use more flash power.
@Martin – you are correct in my opinion. This would have impacted speedlight severely (if using one, of course).
Neil, how did you come up with 1% calculation? I can already see we are using some kind of different formula: http://goo.gl/KEd1K
Artur … in short, if you consider 18% as average, then by doubling the exposure, you get 36% … and doubling it again, you get to 72% … and if you double it again, you’re way way over-exposed.
You can test this by pointing your camera at a white wall, and zero-ing your exposure in manual, and then adding a stop more light at a time. (You could also shoot in Auto, and use exposure compensation.)
Now, going about this in reverse …
18%
9%
4.5%
2.25%
1%
So by the time we get to 5 stops under-exposure, the existing light pretty much doesn’t register!