A guide to using a light meter with manual flash & ambient light
A question posted on the Tangents forum was on the topic of exactly how to use a light meter to get to correct settings for manual flash. This article covers that first tentative step in what exactly you should do with this brand-new light-meter in your hand. It will help you cope with that initial “what now?” moment.
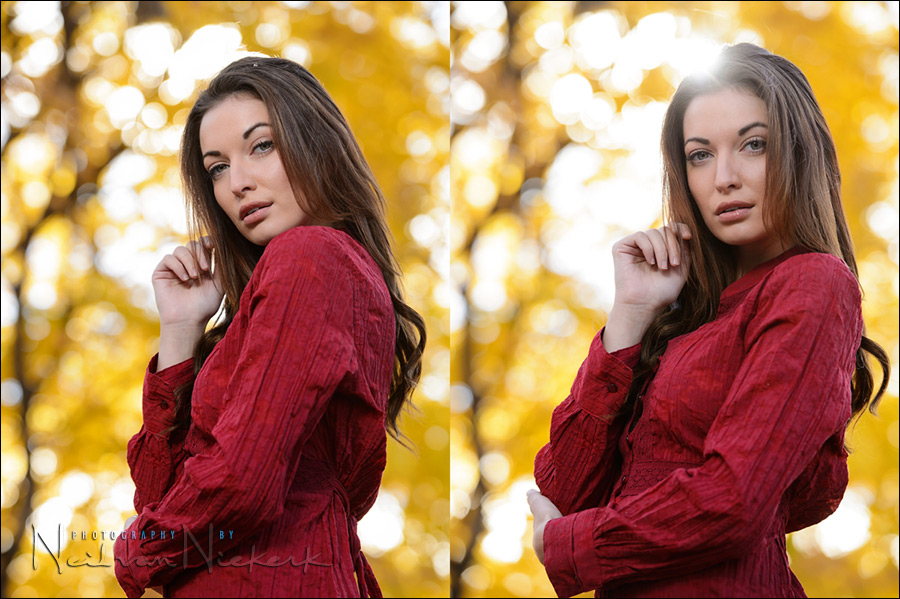
How exactly would you have used the flash meter (with the strobe in manual mode) to arrive at the correct settings to illuminate the model properly without changing your in-camera settings? Values entered into the flash meter?
It is much easier than you think, so let’s take it step-by-step:
- Let’s say you have this specific scenario as an example:
For example, let’s say you need f/3.5 for your background exposure to be correct, and that you’re adding flash to your subject (with a softbox perhaps), so that your subject and background are both equally well exposed. (Keep in mind that this is not a fill-flash scenario.)
- You position your speedlight and sofbox and then set your flash output to something, anything – let’s say 1/2 power. You might have no real idea of the amount of flash power because the softbox’s diffusion eating up light. In other words, you can’t rely on using the guide number of your flash.
- Now set your light-meter to the same ISO that you are using in your camera.
- Okay, you’re all set up now. The next step is to hold the light-meter where your subject is going to stand. Now trigger the flash while pointing the flash meter at the light source. Ooops! You just got f/7.1 (for example) … which would be way too much light. You need f3.5 and therefore need to pull the flash exposure down.
- But how much do you need to pull the flash exposure down? Two stops. But, if you’re not familiar in counting in third-stop values, then look at your camera, and count the clicks on your lens’s aperture control.
- Set your lens to f/3.5 and count the clicks until you get to f/7.1
Remember to set it back to f/3.5 though! That’s your correct exposure.
- Yup, 6 clicks. In other words, six 1/3-stop clicks … which is 2 stops of exposure.
- Now you go to your flash, and dial down the manual flash output by 2 stops. In this example you had randomly let the flash output be 1/2 of full manual output. So you now simply dial down the flash by 2 stops, or 6 clicks. So your flash should now be at 1/8 of full power. Two stops.
- Do another test shot to confirm, and voila! Perfect. You’ve nailed it.
- Now, if for some reason the flash’s output isn’t quite that linear, and you’re off by 1/3 stop or so, then just shrug and dial your flash up (or down) by one click, until you get correct flash exposure.
- Done!
- It’s really that simple. But it will need your fingers on the buttons and the light meter in your other hand to try this out.
A litte bit of homework
- Why did I not mention the shutter speed in this explanation?
- Why did we not change the ISO in the example?
Photo gear (or equivalents) used in this photo session
- Nikon D4
- Nikon 70-200mm f2.8 AF-S VR II / Canon EF 70-200mm f/2.8L IS II
- Westcott Rapidbox – 26″ Octa Softbox
- Manfrotto 1004BAC – taller, heavier light-stand
- Nikon SB-910 Speedlight / Canon 600EX-RT Speedlite
- Nikon SD-9 battery pack / Canon CP-E4 battery pack
Related articles
- Photography composition – get down lower for a better perspective
- Using off-camera flash on a photo shoot
- tutorial: How to use the Guide Number of your flash
- Exposure metering – Shifting exposure settings
- review: Westcott Rapid Box – 26″ Octa Softbox
Shutter speed doesn’t impact the flash exposure.
Because if you’re below your camera’s max sync speed, the shutter speed would be of no concern to flash exposure. That would be a function of aperture.
Why didn’t we change the ISO then, since ISO will impact flash exposure?
Because you are running the flash in manual, which is not impacted by ISO (or aperture, or shutter speed). If it was run in TTL, then yes, ISO and aperture would both impact flash exposure.
Good article, Neil!
Patti … it’s the other way around.
https://neilvn.com/tangents/when-aperture-does-not-control-flash-exposure/
The first part was to determine your background exposure. You’ve already determined the shutter speed, aperture and ISO for the background. Now that part is set. The next step is to add the correct amount of light onto your subject. The only remaining “thing” to determine is to equal the amount of light on your subject to the background. So, your meter will already have the shutter speed and ISO set. Now you just want to match the same amout of light (f/3.5 in your example).
No mention of shutter speed or ISO because you said, “For example, let’s say you need f/3.5 for your background exposure to be correct”
If you mess with shutter speed or ISO at this point, there goes your background exposure.
Peter and David have it.
While ISO does affect manual flash, we are seemingly happy with f3.5 because that’s where we are. If we had needed f/5.6 we would’ve adjusted shutter speed and / or ISO to be there.
So in that sense, f/3.5 is a specific decision. Now we just need to adjust our flash power to get f/3.5 from the flash.
Hence, ISO and shutter speed choice don’t come into play here.
You don’t mention shutter speed because it’s already “fixed” by whatever shutter speed that was needed to properly expose for the background. While shutter speed does not affect flash exposure as long as it is below maximum synch speed, it does affect ambient light. Therefore, any change to shutter speed would change the background exposure.
I think the same thing more or less applies to ISO. It would have been whatever was chosen to get the background properly exposed. Changing ISO would have affected the amount of ambient light.
Manual flash exposure is determined by four things: power, distance, ISO, aperture.
Once the background has been properly exposed, any change to ISO, and aperture would have affected the ambient light. And since we don’t really like to keep adjusting the distance of a softbox in relation to the subject, the only thing left to play with is power.
I hope I am right.
Simple and clear. This article further drives home the huge advantage of knowing your equipment like “the back of your hand” along with the intimate knowledge of the interrelationships of iso, aperture, and shutter speed vis-à-vis flash – to the point of being able to quickly spin your dials and press your buttons without so much as taking your eye from the viewfinder. Neil apparently is a master of all of that.
Clean and Simple explanation. Thank you!
A: Shutter speed effects Ambient Exposure not flash (as long as one is not using HSS). ISO would effect both Flash and Ambient equally, so no point messing that unless you wanted to move both (flash and ambient exposure) in a particular direction.
Read my comment #9 … it doesn’t have to do with shutter speed or ISO per se. Those you have decided on already.
I have one question though – when determining the right exposure for the ambient (when a flash is being used not just as fill light) do you underexpose the background a little to make subject pop a little (since flash is lighting that) ?
That would be part of the decision before you add flash. It’s part of the decision about what you want to achieve with the final photograph.
Remember, this wasn’t first a landscape photo and then randomly decided to add someone there.
Very clear explanation, Neil. Thank you. But suppose in this situation you didn’t have a flash meter. I would probably use several trial shots to find a flash power that delivers the right amount of light (to my eye). Is there a better way (other than using a flash meter, of course)? There’s nothing white on the model, so using the histogram might be difficult. I guess I’m asking this in part to try and decide if investing in a flash meter is worthwhile. Thanks!
Justin
With flash meters, iso and shutter speed are fixed values you enter before metering. After that you just play with aperture and flash power to create your view and desired depth of field.
Go through the explanation again – we didn’t actually change the aperture here. We were happy with the chosen aperture, but had to figure out the flash exposure.
Clear explanation,
One note though , actually, for completeness, I think you should mention ISO in your story, but only to set the lightmeter to the iso your are using in order to get the proper reading from it.
@Justin, using a flash meter makes life soooo much easier, after buying my lightmeter I was immediately sold, and I wondered really why I even ever tried to guestimate with chimping and looking at the histogram. My exposures are now always exactly how I want them and consistent. I never could get that to work with using the histogram. (at least not in the same amount of time). Now I can work a lot faster, which saves a lot of waiting time for the model, and leaves me more time for creative activities instead of messing with settings.
(no intention to start a flashmeter v.s. histogram flame war here, both flash meter and histogram are valuable tools that I use all the time)
Kees
Good point about needing to set the appropriate ISO in the meter. I have amended the article now with that specific step, since it is important to mention that to someone using a light-meter for the first time.
Hmm I see that I use both the wording flash meter and light meter. I actually should have used flash meter consistently every where in my post. @ Neil, feel free to change that
Kees
I prefer the term “flash-meter” but I also noticed some people are confused by that term since most (or all?) light-meters these days meter flash as well. So I also tend to use it interchangeably.
Worth pointing out that a light-meter doesn’t necessarily need to be at the subject to take an ‘ambient’ reading.
Ambient light is often the same where the photographer is and where the subject is (unless in shade) so you can just hold it up facing yourself in most cases.
Fair enough. But in this case we are metering for the flash.
Neil,
I know that the extent to which one exposes the background is a matter of taste and dictated by what the photographer is trying to achieve, but I’m very interested to know if you have a personal rule of thumb that guides you in deciding whether to expose the background properly and simply add fill, or underexpose the background a little or a lot and use flash as the main light. It’s something I always struggle with.
Dan, it really is a matter of taste to an extent.
Most often though, it is more of a “that’s where it falls” thing.
With the original decision inn wanting to clean up the light on my subject, or make it more dramatic, I want to use (off-camera) flash – then I under-expose the ambient light on my subject somewhat. Maybe 1 stop, maybe 2 stops. Even 3 stops. THAT decision – the amount I want to under-expose my subject by, will dictate then how bright my background is.
It gives me some leeway, but not that much ultimately that I could choose between both pastel-bright background colors OR super-saturated dark background.
So usually it is decided this way – I under-expose the ambient on my subject by a stop, and then take a test-shot to see if I still like the background. Then I might nudge it a bit brighter or darker … and then add flash.
So there is a little bit of leeway, but within reason.
Hi Neil
which light / flash meter do you use, please?
Donald, here is a list of flash accessories, scroll about 1/3rd way down and you will see.
Sekonic meters, although the wonderful L358 is no longer in production.
FLASH ACCESSORIES
?Okay, you’re all set up now. The next step is to hold the light-meter where your subject is going to stand. Now trigger the flash while pointing the flash meter at the light source. Ooops! You just got f/7.1 (for example) … which would be way too much light. You need f3.5 and therefore need to pull the flash exposure down.
Neil, totally new to flash meters. Bought an older Minolta one. Your quote from above states meter read F7.1 after firing the flash and then you state it’s waaay to much light. and then you would need to pull flash power down. I’m REALLY confused. Wouldn’t an F7.1 mean too Little power for if you wanted F3.5? Seems F3.5 would let in waaay too much light, and not other way around at F7.1, which generally means less light.
You only need f/3.5 but your flash is giving you f/7.1
hence you need to dial your flash’s power down.
Still confused Neil. F3.5 lets soooo much more light in…If metered flash is reading F7.1, doesnt that mean you need more light. Again, this light meter thing new to me. I’ve read the manual and it’s pretty much chinese to me. I generally, without meter…just shoot and chimp.
Ok … let’s forget flash for a moment.
Let’s say you’re outside, and it is bright. And let’s say that it is so bright that you need f/8 for proper exposure.
What happens when you open up to f/4 ?
It over-exposes by 2 stops.
Which means you need to reduce the light.
With flash you can.
If your flash is giving you f/8 worth of light, i.e., LOTS of light, but you only need f/4 what is your next step?
If your flash is giving you f/8 worth of light, i.e., LOTS of light, but you only need f/4 what is your next step?
Only need F4 Neil? F4 is a lot more light, If I set my cameras aperture to F4, it certainly lets in a lot more light then f8…as you can see, I’m totaly lost with this whol meter thing…Setting the camera setting, setting the falsh setting, and then the meter…Seems like a whole lot more work then simple chimping. apparently I’m missing something here, this seesm quite involved and Very complicated.
If you need to open up your aperture to f/4 then you have less light than if you needed f/8
Don’t look at it from the camera aperture point of view but instead the light point of view.
I’ve watched numerous youtube videos on the subject and just got more confused.
I need a complete idiots guide, so to speak, from the gitgo, Okay, set my camera to What? Then my flash to what, then Merter. And after metering, what’s next? As you can plainly see Neil, metering not my field of expertise
Say I’m in my little home studio, and using a softbox, just one keylight. Camera is on tripod. I want to meter the flash in the softbox. Where the heck do I even start? Camera setting? Okay. to what? Do I then set Flash to manual same setting as camera? if so, then what? I set Meter to what Camera and flash seetings are? Then I fire flash and it gives me a reading? What do I do with it? If metered flash if different from Camer/Flash settings, what gets changed? Both camera and flash? Can’t wrap my head around this meter thing.
Where do you start with settings in this home-studio setup? YOU decide.
YOU decide you want f/8 or you want f/1.4 or you want f/22
YOU decide.
Then you set your flash to give you f/8 (or whatever you decide), according to the description in this article.
Then you set your flash to give you f/8 (or whatever you decide), according to the description in this article.
That part is also confusing. WhaT DO YOU MEAN TO give ME f8? wHATEVER f STOP i SET MY CAMERA ON, do I then set my flash on manual and dial in F8? Then meter the flash? Neil I’m generaly the kind of person that hasa to be shown thinfgs, once I’m shown something and physically do it myself, it’s commited to memory. Muscle memory they call it I think. Describing it to me doesnt really sink in. I know you’re very busy Neil, so I won’t trouble you further. I need to get with a photographer in my area and have him physically show me the procedure in studio. Thanks for trying anyway.
Ron, you will just have to systematically step through this article. It is all there.
It looks to me like you are jumping around in your process.
For example, when you ask if you dial in f/8 on your flash, this is what is covered in this article – the step-by-step process in how to set your flash.
But to answer you specifically, it was explained in step 2:
But really, set a teddy bear on a stool in your living room. Set up your flash with a softbox or an umbrella, or even just an off-camera flash bouncing behind into the room. Then work methodically through this article. It’s all there.
Thanks Neil.
I think I may have to simply keep on chimping. Trial and error as I’ve been doing for bit. Seems to work. I thought a light meter would make things a tad easier for me. Just confuses me more. If I can’t get with a fellow Photographer and have him/her walk me through it in his/her studio, I’ll just sell my recently aquired Light meter, and go on chimping. Thank you so much for trying to explian it to me. Very patient person considering how busy i know you are. Take care Neil!
Don’t give up Ron and don’t sell your light meter.it will be a bad idea you will regret.they are amazing and really work wonders once you get the hang of it. There are a ton of free videos and tutorials on the sekonic site that will help you learn better with step by step instructions. Even if you don’t have a demonic brand the process is the same on most meters.
Get some well deserved rest my fellow Jerseyian!
Ron,
I think you can understand thinking as follows: if the flash has a lot of power, is required a small lens aperture to achieve exposure. Conversely, when the flash power is less, then a larger lens opening is necessary.
What the flash meter tells us is that, for power with the flash, just a lens aperture of f/7.1 is necessary, so if you want a larger lens opening (f/4, f/3.5, etc.) then you must reduce the flash power.
@ Neil
I have five (similar) questions about gear and how important they are for a fulltime pro portraiture and wedding photographer like you
1. Nikon 85 1.4 vs. 1.8
How important is for you the 2/3rds extra capability of gathering light for portrait ? (e.g. low light portrait situations)
How useful and how often do you really need and use the 1.4 wide open?
Much difference in shallower depth of field? (“creamy”)
Would you buy the 1.8 instead of the 1.4 even as a “pro” ? (price/performance, lighter/traveling, having not the 1.4 already etc.)
2. Please make a review of the relatively new Nikon 70-200 f4!
I would love to see your opinions about this lens….
There are some indications that this lens has even a lot of advantages in comparison to the 70-700 2.8 VRII (lighter/traveling, better VR III (5Stops), sharper, better resolution, fx corner performance, and especially no focus breathing at 200mm, better minimum focus distance, higher max. aperture f32 like other reviewers/reviews nasim mansurov/photographylife, cameralabs, lenstip, photozone, ephototzine already suggested etc.)
How important is for you the 1 f stop extra capability of gathering light for portrait ? (e.g. low light portrait situations)
How useful and how often do you really need and use the 2.8 wide open on the tele instead of stopping down to f4+ ? Is the one extra stop in terms of better bokeh, shallower DoF really important (or in low light portrait) to you? The majority of made portraitures (studio) on ff are not between f4 and f 5.6 either way having the best sharpness? Your thoughts, opinion…
Much difference in shallower depth of field? (“creamy”)?
Would you buy the 70-200 f4 instead of the 2.8 even as a “pro” (price/performance, lighter/traveling, having not the 2.8 already etc.)?
3. What about the impacts of the huge focus breathing of the 70-200 2.8 VRII and your experiences in this regard?
4. How often do you really make portraits from 5 to about 13 feet with the 70-200 2.8 VRII at 200mm? (refering to focus breathing/article/source https://photographylife.com/nikon-70-200mm-f4-vs-f2-8
5. Would you agree with the opinion (of Nasim Mansurov) and conclusions of the mentioned article above (link) in terms of the 70-200 f4 might be even better for portraiture especially for close ups?
Thank you in advance and so far! I already learned a lot on your site about photography and i really appreciate your section “photo tutorials and education section”
Keep it up and take care!
Best regards.
Spero
A lot of times you want all the pix in focus and all you will need to close down the aperture to f5.6 or f8 to get it all in focus.sometimes you want just the wires in focus and you will want f4 or f2.8.
The lighter f4 from Canon is widely praised as the best choice even over the f2.8
If you need lots of indoor dark places shots then you need the f2.8 bit in studio or outdoors the f4 will be great and much lighter.your arms (and pocket book) will thank you. Pros use the 2.8 because they get paid / sponsored and they are in demanding conditions. If you aren’t a pro the f4 is fine.
Go to Flickr or 500pix and find some images taken with each lens to see if you can tell the difference and if you like the images or not.
You can always rent the 2.8 to try it out first at lensrentals
Alfredo,
While I greatly appreciate you’re trying to explain it further, it will not sink in until I can either get to a studio and have a photography actually show me and then let me do it myself or trial and error. I find I have always learned things MUCH better in this manner. No matter who explains it, same result, Nada! Have to physically have it shown to me then immediately repeat the precess myself. Kinda like muscle memory. math and ratios and the like, not my better suite. Might as well be trying to read Chinese. Thank you very much. The more I discuss this the worse I feel about it.
Ron
Let’s just drop the whole thing…Much appreciated
Ron
Ron
I recently bought a flash meter after spending ages thinking about it. Turned out to be one of the best photography-related gadgets I’ve bought in a very long time. This thing basically gives me a perfect exposure every time, once you understand how to use it.
I have a small home-studio set up and took some portraits the other day with one of my new black backdrops. If I give you a run-through of what I did then hopefully it might help your understanding of using the flash meter more.
My camera was set to 1/125 @ f/9 @ 200 ISO. Why? Because that’s what it happened to be set to the last time I used the camera! The thing here is that I wanted my subject in sharp focus and I knew that f/9 would have given me that so I just left it as it was. The shutter speed is below my flash sync speed, so that’s fine. The ISO? Could have set that to 100 but left it at 200, primarily because I hadn’t charged the batteries in my flash for a while so that meant it wasn’t going to have to work as hard.
Took a test shot without flash, and the picture was virtually all black. No ambient light at all. No problem though, because flash is going to be my main light source. You normally get your ambient exposure first, and I can’t help you any further on that because that is whatever you want it to be for a given situation. In this case, no ambient light registering was perfectly ok for what I was trying to achieve.
My flash was on a light stand firing through an umbrella at roughly 45 degrees to the subject and slightly above.
When I switched it on I think the flash was at something like 1/16 power, again the setting it was on the last time I used it, so I left it as it was. I then set the flash meter 1/125 and ISO 200, placed it under the subjects chin pointing towards the flash and remotely triggered the flash gun.
Can’t remember the exact aperture the flash meter gave me, but it was something like f/4.5. I’ve now got two options: set my camera to f/4.5, or adjust the flash power so that the light from the flash gun hitting the flash meter registers as f/9.
If I set my camera to f/4.5 then I will still get perfect exposure on my subject, but it’s not the aperture I want to shoot at. I want f/9, so I need to adjust the power on the flash UP a couple of stops. I think I upped it to 1/4 power and took another meter reading. I then fine tuned it by a 1/3rd stop to give f/9. The resulting photos were
perfectly exposed. (By the way, if my desired aperture was f/2.8 instead of f/9 then I would have adjusted the flash power DOWN by a stop or so).
It was confusing to me at first which way to adjust the flash power to give the aperture you want, it’s kind of the opposite way round to normal metering I guess. But if it helps, think of it this way. If you’re in a dark environment then you will typically need a bigger aperture, say f/2.8. If you’re in a bright environment you will typically need a smaller aperture, say f/11 (assuming you’re not bothered about depth of field effects). The flash meter is registering the light from the flash gun hitting the dome on the front of the meter, so flash set to a low power (say 1/128) will register a larger aperture reading because the light source is not as bright, and flash set to a high power (say 1/2) will register a smaller aperture reading because the light source is a lot brighter.
Hope this helps you!
Jon
Great explanation there.
Hi Ron
Don’t give up just yet. All the explanations thus far have been spot on!
Let me see if my slant helps at all.
Here goes:
You’ve gone to bed, lights are out and its dark. A few minutes have passed and you begin to see much better in the dark (lets ignore the fact that we can’t see perfectly in the dark). Our pupils have dilated (got bigger) to allow more light in and we see better…lets equate this to an aperture of f3.5. All of a sudden some one comes into the room and switches the light on…..boom we have a flood of excess light that we can’t deal with.
However our pupils soon cope by constricting (get smaller) to allow less light through, again enabling us to see better. Lets equate this to an aperture of f7.1. If the switch was of the dimmer type you would ask the person to dim the light by an appreciable amount. Our pupils enlarge or contract to deal with any given amount of light (too little or excess).
Summarising…. Since we chose a fixed aperture of f3.5 (quite wide, lots of light allowed through) the only thing that can change is the
amount of light (flash power), it has to be less because our flash meter tells us were currently getting f7.1 worth of light from our flash
(we need to dim it down).
Hope that helps and doesn’t add to the confusion.
Tony
Tony great analogy there perfect perfect
Jon,
I think you summed it up quite nicely. The reverse thing was blowing my mind. I’ll still have to try it out myself, but your breakdown is very much appreciated. I know it’s a lot to write down to explain each step in detail. I like things broken down to their absolute basics with nothing taken for granted. this way nothing is left out. Granted there are times with anything that we must come to our own conclusions, but Metering for me wasn’t/isn’t one of them. Thanks to all for the VERY concise walk-thru’s. All very patient and that says a lot.
Ron
Tony,
I understand completely concept of aperture. It’s the whole relation of using the meter and how it ties in. Can’t grasp the concept of what the meter is telling me after I take the reading…Do I leave my settings on camera intact, not changing a thing? So I merely adjust the flash output, then take another meter reading, and adjust accordingly either increasing or decreasing power of Flash? I think that’s what all of you are saying. If not, I’m really missing it.
Ron
Ron you have to remember that your camera is taking/reading the light that is reflected back from your subject and back into the lens/sensor.
This is reflected metering and is affected by bright lights or dark/bright clothes/scenes
The light meter on the other hand is reading the light falling on its dome.
Thats incident light metering and it’s not affected by a bright/dark scene or subject since it just reads how much light it is sensing is present.
It’s kind of opposite bit it’s better as it will never be fooled and your exposure will be perfect every time once it’s dialed in.
Ron, yes in a nutshell that’s it. Set the ambient exposure on the camera as required (you might want it underexposed for example) then program the camera’s shutter speed and ISO into the flash meter, place it near your subject facing towards the flash, trigger the flash and adjust power accordingly (or move the flash closer/further away) until the aperture reading on the meter matches that on your camera. Then you’re good to go.
Ron,
Absolutely!
You’ve got to the camera settings you want for the ambient (exposing for it correctly in this case), that’s now fixed.
In this example we’re at f3.5 and flash power is set to 1/2.
We take a flash meter reading and it gives us f7.1 that’s 2 stops brighter than the f3.5 aperture we’re after.
Hence we now reduce our flash power by 2 stops from 1/2 to 1/8 power to give us our balanced flash and ambient exposure.
Flash power is adjusted correctly with just one meter reading.
Tony.
Tony, Jon,
You guys explained very nicely. Not sure why I wasn’t getting it when Neil layed it out. he covered it as well. Just wasn’t sinking in. Still, I was under the impression it would make things easier by a big margin as compared to chimping, trial/error method. Doesn’t appear so. But i def think I have a handle on it. Thanks to all
It may help to think of it this way-
With an ambient exposure we are adjusting camera settings to get a good exposure with the existing level of light.
With flash we are adjusting the level of light to get a good exposure with the existing camera settings.
The light meter is telling you what camera settings to use to get the correct exposure for the existing level of light. Since we don’t want to change the settings we change the flash power and re-meter.
Note that this is a very simplified explanation. But it should help get you started. Before long it becomes automatic.
Bill,
a work in progress. Seems more trouble then it’s worth, but I’ll put it thru its paces over the week end. Thank you.
Ron
I sense a new video by Neil will be in the works on this subject soon to help others like Ron.
It can be confusing a little for a beginner to understand.
I started to skim after a few of Ron’s queries… but whilst doing so I felt I needed to give my take.
Ron:
We wanted f/3.5 because that is the desired ambient exposure – might be 2/3 stop under to taste. Nice sky tone etc.
OK now we are setting the lighting for the subject with flash. Out comes the meter. We have ISO100 @ f/3.5 dialed in on the camera so that is what we set the meter to. Shutter speed might be 1/200th.
We pop the flash and it states that with that much flash you would need to stop ‘the camera’ down to f/7.1 because the light meter gives you camera settings. But we don’t want to adjust the camera because we liked the ambient at f/3.5.
So, we drop the FLASH output by the EQUIVALENT of 2 stops or the 6 x 1/3 clicks. NOT the camera.
That way we have the DESIRED exposure for ambient and the CORRECT exposure for flash.
That helped me comprehend.
http://www.jlphotocreative.com
In a setup like this, with manual flash and a static setup, you chimp at the start to get the exposure, and then you’re set. Then it is just occasional checking.
Neil, what do you think of using Canon’s Exposure Simulation from the LCD? I use it all the time on my 5D Mk II to fine tune my exposures and it is very accurate. What’s your take.
Got it guys!!!
Thank you ALL for expaining it further. After setting everytrhing up at home using two umbrellas and both my flashes set to manual and using wireless triggers. I had everything set up, took the first shot, and wha la!, first exposure very high. dialed down the two FLASHES a few stops just to see which way the exposre was going to go, clicked on my Flash meter…took the shot, and I FinaLLY understood! Once you do it, then you actually see how simple it is. It’s one of those things that is hard to explain, but doing it makes all the difference. Thank you all so much, and especially Neil. The way you expalined it in the beginning was spot on, just wasn’t sinking in. Thanks again.
The first Meter reading taken read f8. So after going thru the replies again, I realized the meter was telling me for the amount of light It was registering, I would need an F stop of F8…too bright! Duh! So, if I wanted to keep the camera at f2.8, shallow DOF, I neededd to lower the output of my two flashed until I got the meter as close to F2.8 as possible…which I actually got it to read F2.5! Exposure, was spot on! Neil and all who chimmed in…Thanks!!
Hi Ron pleased you got there in the end.
You should be able to nail the flash exposure after just one meter reading, doesn’t need to be an iterative process (almost chimping).
You have the aperture the flash meter is telling you to use for the current amount of flash output and the one you want to use, work out the difference in stops or better still in clicks as Neil suggests. Assuming both your camera and flash are set to use the same increments (usually 1/3rd), it’s much easier to do it like this imo. If you’re not sure on the number of clicks needed, count them on your camera as you change from the aperture you want to use to the one the flash meter is telling you (don’t forget to set it back again).
Then on your flash(es) dial the power down/up by the same number of clicks.
A final flash meter reading to confirm you’ve got to the aperture you need, should be all you need to do.
ATB
Tony
Hey Tony,
With all the help and guidance we got there!!! Whew!!! I was thinking I’d be chimping forever!! LOL
Hello Neil first good day to you , i just love being on your site i really learn so much . My problem is i shoot weddings with a Nikon d 7100 a 50 mm & 18-200 lens . The 18 -200 lens not being a constant aperture as you know when you zoom in or out the aperture will change . I really can’t afford Nikon full frame cameras & lens . I saw sigma brought out the 24-105mm F4 DG OS HSM Art lens which is realy for full frame cameras & it can also be use on crop sensor cameras as well i am thinking of getting one . I would like to know from you if it will make a good combination on the Nikon d 7100 .
It need not be a huge problem that your zoom changes aperture from f/3.5 to f/5.6 as you zoom. With film cameras and mechanical links, this did affect you at any aperture. But with modern electronic cameras, the aperture stays (approximately) constant once you have your aperture set to f/5.6 or any slower aperture.
Try it. Take it to f/8 and zoom in and out – your aperture should remain constant.
So just make sure then you shoot at apertures slower than f/5.6 for that lens.
That said the new Sigma would be a very good option, if we go by what Sigma is doing with their Art series lenses.
How you measure ambient light if you don’t have a light meter just take a photo with the camera with the settings you want? How do you control the ambient light by making it dark (background)?
Thx
You can (and probably should) use your camera’s built-in meter then, and adjust your settings as you please.
How do I control the ambient light? shutter speed / aperture / ISO.
Thank you so much for this article! You answered in 3 minutes what two hours of YouTube watching failed to teach me. Well done!
David
Thanks for writing the article. I would like to ask how to use the meter while in hss mode. I mean if you would like to use your super fancy 1.4 lens wide open.
I heard its not possible with incident meters…
Thanks
Hi. I am wondering why the flash meter needs to know what shutter speed your camera will be on if you are using it for flash; as shutter speed does not affect flash output. So why do i have to tell the meter the shutter speed?
The shutter speed is of no real consequence when shooting in the studio. However the more sophisticated light meters will help you balance flash and ambient light … and for that, the light meter needs to know the shutter speed.
I have a Phottix Indra and like to shoot HSS. When I take it out on location I run into the problem where when I shoot any less than full power, I get a black bar at the bottom. I can jack up my shutter speed for over-exposure issues but I can’t turn down the power on the strobe without getting that black bar across the bottom. Then there is no real balancing because the background fades to black. So I’m here to try to figure out this balancing act because right now I am just not getting it right!
It sounds to me like there is a syncing problem, and that your flash is not actually allowing HSS.
What model camera? And what trigger are you using?
Well, 2014 seems light years :) away from 2020, but light, of course, never changes.
I actually appreciate Ron for not being afraid to ask all of those questions. Even though I have learned enough to know that if the meter says 7.1 and I want 3.5 I Have too much light and have to dial the power down, it took me a bit to get the relationship correct, so I totally understand where he was coming from. I am just learning to use a meter because I want to appear more “professional “ than the chipping and changing allows.
Thanks, as always for providing this forum for education!