Off-camera flash with the Profoto A1, A1x, A10 flashes
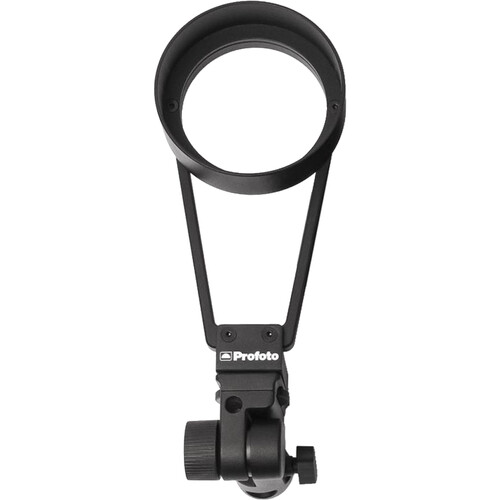
Profoto has a huge array of light modifiers which use their proprietary speed-ring and collar. The Profoto collar is especially easy to use in how the light modifiers fasten to the Profoto flashes. All fine .. except that until now, there was a big gap preventing you from using the Profoto A series flashes with those light modifiers. Profoto took the obvious next big step by adding the Profoto OCF adapter (B&H / Amazon) into the mix.
You can now use your Profoto A1 series flashes with any of those light modifiers! Not only can you use any of the Profoto light modifiers, the Profoto OCF adapter has an integrated umbrella mount.
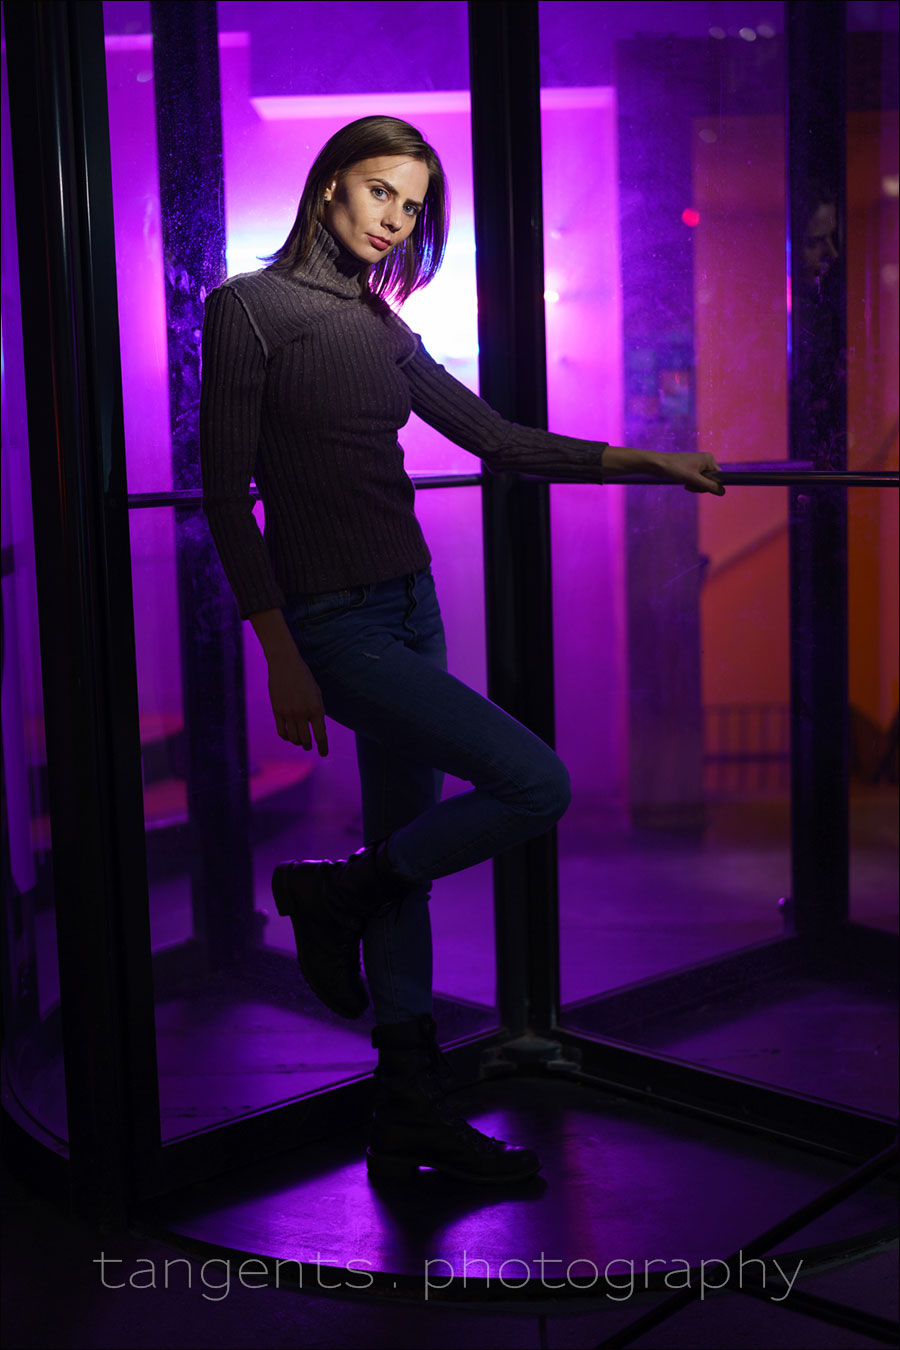
With this video, I met up in New York with Rozalinda, one of my favorite models to get some cool photos using one of my Profoto A1 flashes. (This Rozalinda’s Instagram account.) The idea with the photo session was to get a variety of photos using the Profoto A1 flash, and the Profoto OCF Beauty Dish (24″) (B&H / Amazon). That OCF beauty dish is my preferred light modifier when shooting out on location because if its portability and small size.
As with any of the review videos on this site, I wanted to make it wider in appeal than just mentioning the specific device in this case, the Profoto OCF adapter (B&H / Amazon). I want anyone who watches the video to perhaps learn more about how I shoot and perhaps pick up an idea or two. Also, I kept a section in the video which shows how I directed Rozalinda with her posing.

I used the Sony 85mm f/1.4 GM lens here, mostly wide open. One thing that made a substantial difference in my photography in constantly getting critically sharp images when shooting with lenses wide open, is the eye-focus feature of mirrorless cameras. More on that topic: Intuitive composition with eye-focus of mirrorless cameras
Camera settings and camera gear used for this sequence of photos
- 1/200 @ f/1.4 @ 320 ISO
- Sony FE 85mm f/1.4 GM (B&H / Amazon)
- Sony A9 (B&H)
- Profoto A1x flash for Sony (B&H / Amazon)
- Profoto OCF Beauty Dish (24″) (B&H)
- Profoto OCF adapter (B&H / Amazon)
- Manfrotto 1004BAC light stand (Amazon)

Even now I am still surprised at how you can transform any background in a photo with a portrait lens, using a wide aperture. More on that topic: 85mm – The best lens to change your portrait photography
Camera settings and camera gear used for this sequence of photos
- 1/250 @ f/1.4 @ 125 ISO
- Sony FE 85mm f/1.4 GM (B&H / Amazon)
- Sony A9 (B&H)
- Profoto A1x flash for Sony (B&H / Amazon)
- Profoto OCF Beauty Dish (24″) (B&H)
- Profoto OCF adapter (B&H / Amazon)
- Manfrotto 1004BAC light stand (Amazon)

Here I wanted to balance the light on her with the brightest part of the background. I set the flash (in the octabox) to full manual output because I knew I would need maximum amount of light from the flash. Even though we do lose about a stop of light by going to High-Speed Flash Sync, I wanted that shallow depth of field.
Camera settings and camera gear used for this sequence of photos
- 1/1250 @ f/2 @ 125 ISO
- full power manual flash
- Sony FE 85mm f/1.4 GM (B&H / Amazon)
- Sony A9 (B&H)
- Profoto A1x flash for Sony (B&H / Amazon)
- Profoto OCF Beauty Dish (24″) (B&H)
- Profoto OCF adapter (B&H / Amazon)
- Manfrotto 1004BAC light stand (Amazon)

We have a range of options on how to balance our flash with the background, depending on desired outcome — especially in a scenario like this where the background isn’t very specific. Here I want to the other extreme — gentle fill-flash to augment the available light. Here I was in TTL flash with the FEC turned down to (probably) -1 EV. More on that topic: Flash photography tutorial: Balancing flash & ambient exposure
Camera settings and camera gear used for this sequence of photos
- 1/250 @ f/1.6 @ 80 ISO
- TTL flash at -1EV
- Sony FE 85mm f/1.4 GM (B&H / Amazon)
- Sony A9 (B&H)
- Profoto A1x flash for Sony (B&H / Amazon)
- Profoto OCF Beauty Dish (24″) (B&H)
- Profoto OCF adapter (B&H / Amazon)
- Manfrotto 1004BAC light stand (Amazon)


In the video I describe how I feathered the flash to the side to control the amount of light-spill on the background to camera left. In terms of flash exposure in relation to the ambient light — I purposely underexposed the ambient light by about 3 stops to have the flash dominate for more dynamic light. More on that topic: Off-camera flash vs. available light.
Instead of an 85mm lens, I used the Sony Planar FE 50mm f/1.4 ZA (B&H / Amazon) for an easier working distance, since I was shooting full-length.
Camera settings and camera gear used for this sequence of photos
- 1/1250 @ f/2.8 @ 400 ISO
- manual flash
- Profoto A1x flash for Sony (B&H / Amazon)
- Profoto OCF Beauty Dish (24″) (B&H)
- Profoto OCF adapter (B&H / Amazon)
- Manfrotto 1004BAC light stand (Amazon)
Instead of flash and a softbox, I wanted a more concentrated, dramatic beam of light on Rozalinda’s face. I opted for just using the modeling light with a grid on it.
Camera settings and camera gear used for this sequence of photos
- 1/1250 @ f/2.8 @ 400 ISO
- manual flash
- Sony Planar FE 50mm f/1.4 ZA (B&H / Amazon)
- Sony A9 (B&H)
- Profoto A1x flash for Sony (B&H / Amazon)
- Grids for the Profoto A1 series flashes
- Profoto OCF adapter (B&H / Amazon)
- Manfrotto 1004BAC light stand (Amazon)


Summary
The Profoto OCF adapter makes it possible to access a vast array of existing Profoto light modifiers. With the eye on having fun with this photo session, and getting a few solid images, it came together pretty well, I think. The Profoto A1 flash was easy to use and the entire setup quite portable and light … except for the light-stand of course.
Related articles
- 85mm – The best lens to change your portrait photography
- Intuitive composition with eye-focus of mirrorless cameras
- Video tutorial – High Speed Flash Sync (HSS)
- Flash photography tutorial: Balancing flash & ambient exposure
- Off-camera flash vs. available light
That girl has great body positioning. Is that how I say it? I just like the way Rozalinda always comes up with interesting poses and angles. I know you help, but still: she’s good.
I’ll probably get the bracket but. . .The A1 is considerably lighter than the A10, but then you have to use that kludgy bracket and you give up a lot of power. When do you see yourself using it instead of the Profoto B10? I’m always nervous hanging my B10 plus softbox on a stand and abandoning it, especially without a sandbag. Did you feel more secure, or that the rig was more secure, with the lighter A1? I guess I do have one input about the A1: it doesn’t make a big popping noise lie the B10, B1, etc.
Holding the camera out front–did you lose any shots from arm motion? I know the flash duration would cover most of it, and you weren’t using a big lens but it still seems a factor. Especially when the flash was only fill light. Interesting comment you made about the difference in the feel of framing a shot, though. I’ll have to try that sometime (with my heavy 1DxMkIII .
Excellent tutorial, once again. Thanks.
Thank you! Yeah, holding out the camera in front like that does make me look like a tourist or something. But I find it is often easier to shoot like that to finesse my composition, instead of moving my entire body to change the viewpoint. Also, when I need a higher viewpoint, the LCD on the back of the camera is invaluable.
I don’t lose any shots like that because I keep my shutter speed relatively high. The one instance here were I was sloppy shooting like this, was that initial photo with the 50mm lens, when we had the Fall colors background. But that was just a test shot. Yet, it was still crisply sharp.
The built-in stabilization of the cameras do help greatly here.
Regarding working with a light-stand like this on my own, it does make me nervous that the slightest bit of wind will topple it, regardless of the flash on the top. This is one of the reasons I prefer that Profoto 24″ OCF Beauty Dish — I feel like it has less change of scooping wind like an umbrella would have.
This was a useful video, as I never heard about the Profoto OCF adapter for the A1 before. Being able to use all existing OCF softboxes with the A1 is incredibly handy. This reminds me a little of the Lastolite Hotshoe Ezyboxes back in 2010. It is remarkable how much the market for softboxes and flashes have changed in a decade.