
using off-camera flash to give more snap to photos
Scheduling an on-location photo session, we are always left at the mercy of the weather. This Sunday the threat of rain turned into a real downpour just before the photo session with a couple, Jen & Chris, whose wedding I am photographing later on in 2011. During phone conversation while driving in, we agreed to just go ahead and work under the overhangs of various buildings if it should rain. When we started, it was still raining so we moved to certain spots where we were shielded from the rain. I could shoot towards the building facades, or ‘outwards’.
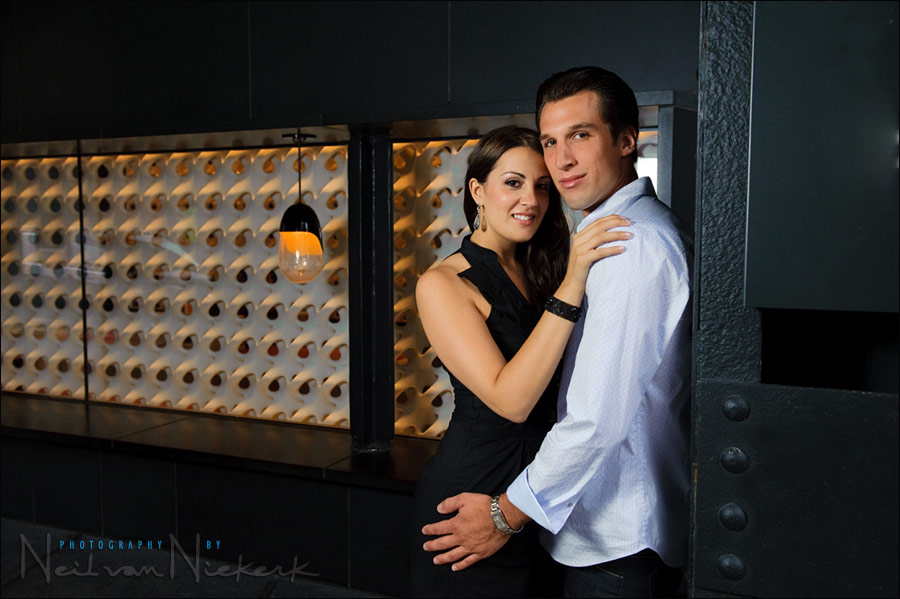
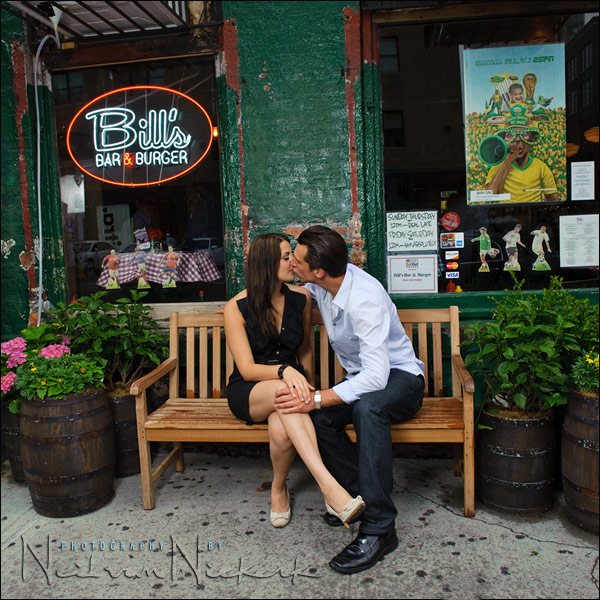
What gave me the most control though over the photo session, was the use of off-camera flash. As mentioned in another article here, why I love off-camera flash, the major benefit of having off-camera lighting, is the control over the quality and direction of light. Instead of being limited in the direction I can shoot, I can use any background that looks good … and add beautiful light to my subject. The colors pop, skin tones are great and it all looks pretty good … with relatively minimal effort. It just works! Place your subject and add off-camera flash.
For this photo session, I again used the Lastolite Ezybox softbox (B&H), with a speedlight, just as recently reviewed. The softbox is easy to carry around; easy to assemble, and is light-weight. And the light looks really sweet …
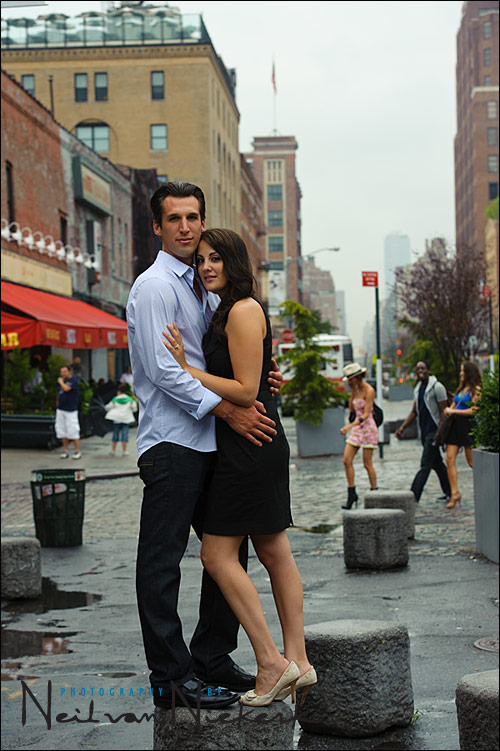
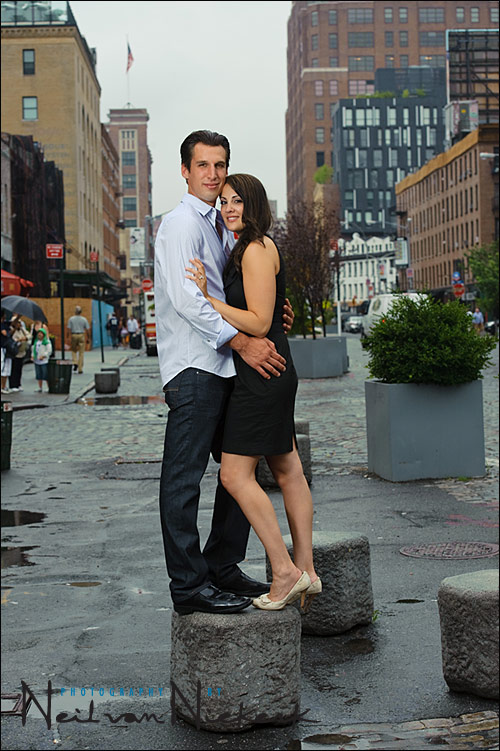
Image settings for the two images above:
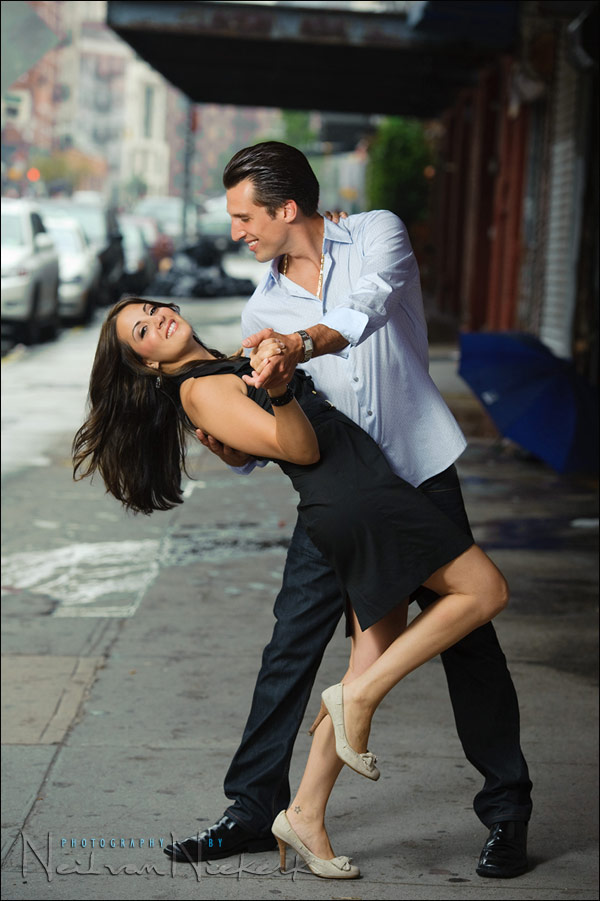
1/250 @ f4 @ 640 ISO .. TTL flash, FEC -0.3 EV
Nikon D3; Nikon 24-70 mm f2.8 AF-S … at 48mm
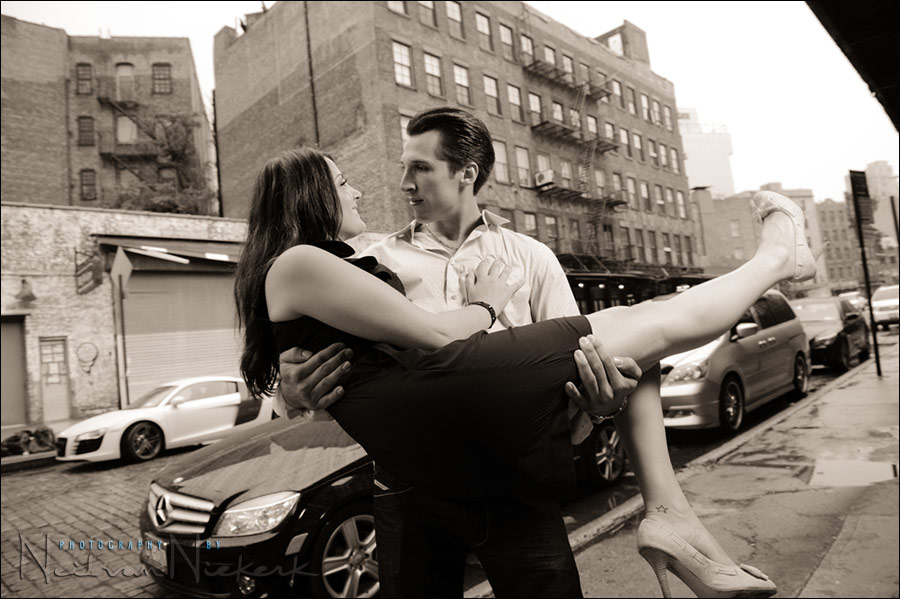
1/250 @ f4 @ 640 ISO .. TTL flash, FEC +0.7 EV
Nikon D3; Nikon 70-200 mm f2.8 AF-S VR II … at 120mm
The speedlight (Nikon SB-900) was used in TTL mode, and fired wirelessly by my on-camera speedlight. I had disabled the output from my on-camera flash. It just acted as the Master flash, and its sole purpose was to fire the Remote / Slave speedlight that was mounted on the softbox.
The Ezybox made it easy to swivel the Slave flash around so that the Wireless TTL control sensor faced towards the camera. This way it was much more reliable in picking up the Master flash’s control signals.
Throughout the photo session, the basic technique in balancing the flash with the ambient light, was to under-expose the ambient light to a certain extent … and then add TTL flash to bring the subjects’ exposure up correctly. This technique is described in several posts at the top of the off-camera flash resource page.
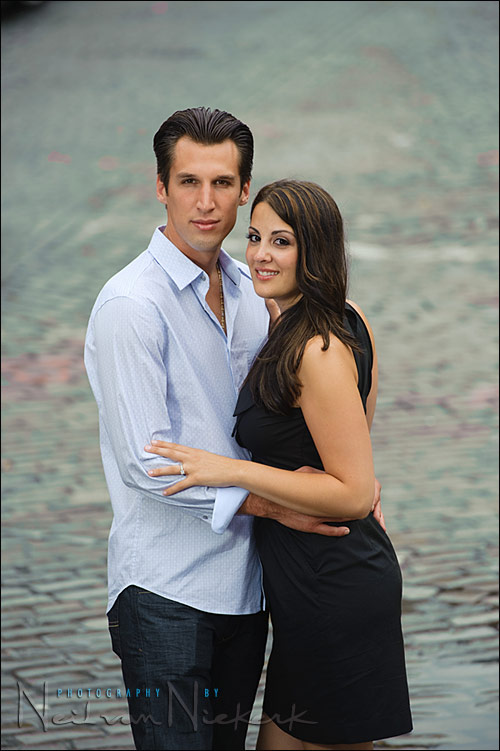
1/250 @ f5.6 @ 640 ISO .. TTL flash, FEC 0 EV
Nikon D3; Nikon 24-70 mm f2.8 AF-S … at 24mm
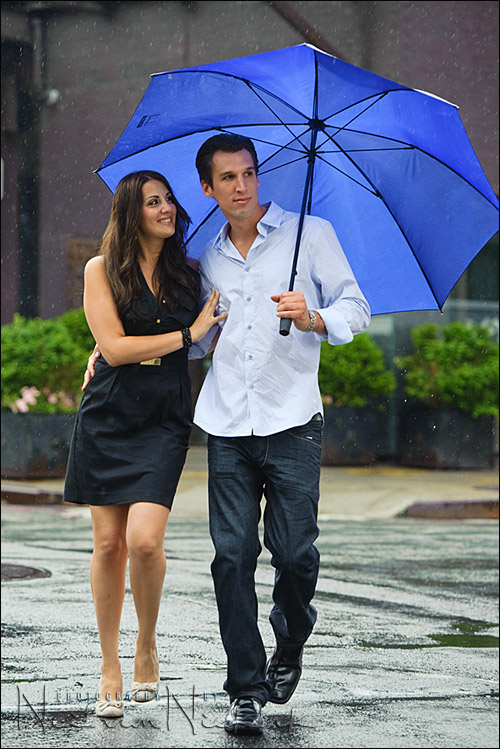
With this image of the couple crossing the street, I didn’t use flash since it was raining heavily. But the direction I wanted them to walk in, was such that the light falling on them was from their front. This gave clean open light on them. It worked.
1/500 @ f3.5 @ 800 ISO
Nikon D3; Nikon 70-200 mm f2.8 AF-S VR II … at 135mm

Here I wanted to show the test shot, to show how much the available light was under-exposed by, at the settings I chose.
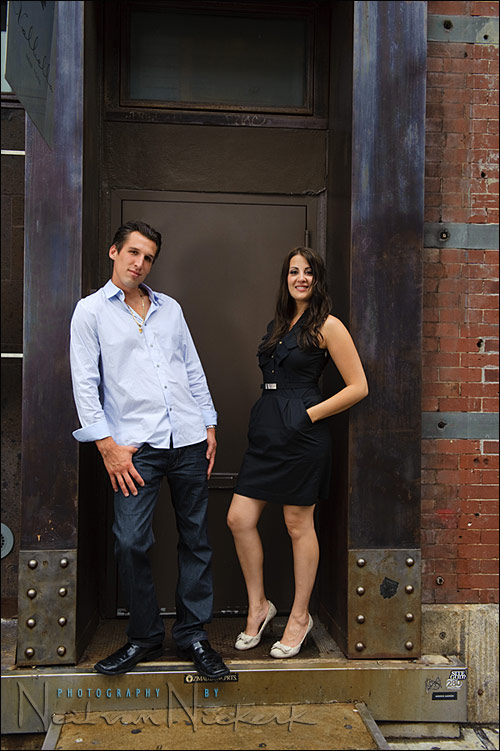
1/250 @ f5.6 @ 640 ISO ..TTL flash, FEC -0.7 EV
Nikon D3; Nikon 24-70 mm f2.8 AF-S … at 62mm for the image below
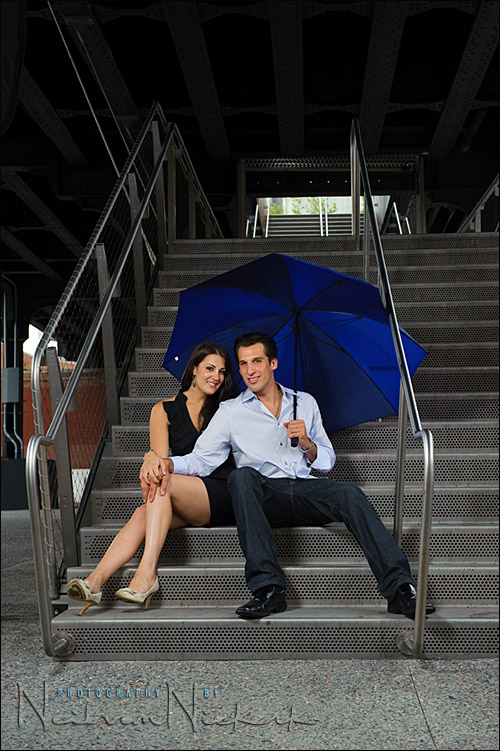
For this next photo, I asked the couple to show off their dance moves in front of this colorful fence. They were just under the edge of the foot bridge, so was sheltered from the rain, but enough light came from behind them to give nice gentle rim-lighting. Then I simply added light from my wirelessly controlled TTL flash on the softbox.
1/250 @ f4 @ 500 ISO .. TTL flash, FEC -0.7 EV
Nikon D3; Nikon 70-200 mm f2.8 AF-S VR II … at 110mm

Here again I wanted to show the effect of the flash, and how the image would’ve appeared without the flash .. slightly under-exposed at the settings I chose. The flash then simply cleans up the light on them, giving the photo that extra bit of snap.
1/250 @ f5.6 @ 200 ISO .. TTL flash, FEC +0.3 EV
Nikon D3; Nikon 70-200 mm f2.8 AF-S VR II … around 85mm
For the next two images shown here, I chose an elevated point of view to isolate them against the cobble-stone road.
1/250 @ f4.5 @ 200 ISO .. TTL flash, FEC +0.3 EV
Nikon D3; Nikon 70-200 mm f2.8 AF-S VR II … at 125mm

The processing here was all done by adjusting a few sliders in ACR / Lightroom. No actions, no Photoshop filters of plug-ins.

1/250 @ f5.6 @ 640 ISO ..TTL flash, FEC 0 EV
Nikon D3; Nikon 24-70 mm f2.8 AF-S … at 24mm

for both images:
1/250 @ f5.6 @ 640 ISO ..TTL flash, FEC -0.3 EV
Nikon D3; Nikon 24-70 mm f2.8 AF-S … at 35mm
1/200 @ f4.5 @ 640 ISO ..TTL flash, FEC -0.3 EV
Nikon D3; Nikon 24-70 mm f2.8 AF-S … at 35mm

And a final image, with a pull-back shot to show the placement of the softbox. In this case I had the softbox fairly close to me, so I wouldn’t get a reflection of the flash in the windows.
1/200 @ f5.6 @ 640 ISO ..TTL flash, FEC -0.7 EV
Nikon D3; Nikon 24-70 mm f2.8 AF-S … at 24mm for the square cropped image.
Hi Neil,
As always, love your shots and very informative.
Guess even a rainy day would not spoil you day huh? However, on the 11th pics, you mentioned you only adjust the pic in ACR/lightroom, care to share how you did it? Love the effect.
Great post Neil. I think this is one of your best yet. So many details. My question is concerning working with out an assistant. If you had no assistant and mounted the box on a light stand, would it slow you down too much having to constantly adjust and maneuver the stand?
Hi Neil
Another GREAT & INFORMATIVE post again. AWESOME stuff. Got yr book and “desecrated” – sorry…. it by highlighting sections thru out the book. There’s so much to absorb that I am going thru it for a 3rd time….and probably will again for a 4th 5th…… THANKS for sharing your expertise & skills with us :)
John
RSA
Hi Neil, Was that regular TTL or TTL “BL” that was used in these shots ?
In the first image, graffiti is so much compelling that the the intended subject is a distraction (to enjoy the graffiti).
Thanks for showing as I had suspected that a flash would be quite appropriate on a very cloudy|rainy day. But then without softening the flash light, the image might come out just as well cruddy as without any flash. And, that brings me to Alfred’s query.
What a great series of urban portraits, and very informative with the settings included. From a technical point of view the pull-back images are especially useful as they also show light placement which is something I struggle a little with on off-camera flash.
Would it be possible sometime to explain the importance of the level of ambient light and the consideration needed for its direction with this style of photography? For example, at what point of under exposure of ambient light does it become irrelevant. In the umbrella shot, (with no flash) the term ‘clean open light’ is key. Is this a non-directional ambient light causing no shadow and the same light I should look for in off-camera flash shots so it can be under exposed to still give a good quality ‘fill’ light in the shadow areas?
Thanks a lot for all the technical info and again for a great set of shots.
Nigel
Neil I know if you were shooting in manual and the ambient light measured was 1/250 @ f5.6 @ 200 ISO. You could then the set the flash for f5.6 at those settings and then change the aperature to f8 underexposing the ambient light a stop. (I think that’s right). Does it work the same way in TTL?
Hi Neil,
You’re obviously very highly practised with these techniques, but I’m curious – do you now just get these right first shot or are do you have a preceding sequence of shots with various adjustments to get the one you want?
Thanks,
Barrie
Niel,
I see the review for the softbox you used, but where did you get that pole your assistant is holding? Does it come with the softbox kit or did you buy it separately? Where might I lay my hands on one of these?
Steve,
The softbox is connected to a monopod. It does not come with the kit. You can find a basic monopod at a very resonable price online or your local camera store.
Neil,
I used Loctite to marry the stud to the release plate. Although I now have a dedicated release plate with a stud glued to it, it eliminated the swiveling issue for me.
Matt
Neil,
I loved the Lastolite | Hot Shoe EZYBOX Softbox …
I’m resolving to buy a seller here in Brazil.
Want to know what the weight of sofbox. BH has no specifications for weight.
Could you provide me?
Thanks for another great post.
A big hug.
(I do not speak English. I used Google translator)
Neil,
adorei o Lastolite | Hot Shoe EZYBOX Softbox…
Estou resolvendo comprar com um vendedor aqui do Brasil.
Ele gostaria de saber qual é o peso do sofbox. na BH não tem as especificações em relação a peso.
Você poderia me fornecer?
Obrigado por mais um grande post.
Um grande abraço.
(Não falo Inglês. Usei o Google tradutor)
I love your work, Neil! Thank you so much for all the time you put in to share your knowledge. I have come back to your site again and again to learn and relearn about lighting :) Can’t wait for your upcoming webinar through PPA…I’ve had it marked on my calendar for days now!
Great post and great photos!
This kind of weather usually spoils my photos, I really need to start practising my flash more ;-)
Would the look of this series have changed much when you would have used the ‘bare’ flash, instead of the softbox? I don’t have a softbox of any sort, because I don’t think I will use it much when walking around…. photos like this are very tempting to get one though!
Neil,
Good work. I’m assuming yo are using and SB-900? What setting to have the head zoomed too? Thanks
Neil,
stunning images as usual, nothing new there.
In your experience a similar setup (remote sb-900 with small softbox) would work as well if the “somewhat” underexposed ambient light would be around f11 and up ? Basically a much brighter day, or in that case a more powerful strobe becomes a necessity.
Thanks again
As a beginner, I guess one of the things i struggle with is ‘exposing for the ambient’..how do u do it? .. do you zero out the meter and then under expose it by a few stops? or do you like …look at a scene…decide it is, say, Zone 7..and then underexpose it so it falls into Zone 5? do u spot meter?
Great looking couple and great shots!
Derryl .. go over this article again about balancing flash with ambient light – where do we start?. I think much of your question is covered there.
You can’t simply zero out your camera’s meter.
For starters, you need to take the tonality of your scene into account.
Also, the background is often not uniformly lit.
So if you decide to meter for the background, you need to decide what part of the background you want to meter for .. and then the tonal placement.
I rarely spot meter anymore. I do selectively meter though.
Sensational photos as usual Neil – beautiful light. Overcast or rainy days can be a bonus – no harsh shadows or strong contrasts to contend with. Even better if you know how to light your subject the way you do!
Neil,
Thanks for the link!
Derryl.
Neil, I just want to thank you for spending as much time as you do teaching guys like us so much. It’s refreshing to see a person share their knowledge, for free no less.
Now for the question. I know in situations like these your flash is balanced for daylight so you’re good to go, but let’s say in the “under the bridge downtown” shot you took had tungsten lighting abouve… Would you have used a gel of some sort to balance the temperature or just rely on the color temperature of the flash to overpower it?
Thanks so much!
Echo to all the praises!
I especially love the pulled back shots and would really value to see more of them!! Possible?
Thank u!
Amanda
I am new to anything other than natural light so this may be a dumb question, but how do you determine which ISO to use? I am so glad I found this site. I need to learn lighting techniques and it looks like there is a wealth of info here.
Many thanks Neil. Lucky me, I had just purchased the Ezybox and here is your article. Thanks especially for including the pictures showing how and where the Ezybox is positioned.
Neil, as usual your excellent photos demonstrate the off-camera flash benefits you extol.
If only a second camera behind your camera could show the story of equipment position, crucial distances and angles.
Fred Hoegeman
Hi Neil,
Great website, and I’ve been learning a lot from you. My question concerns your use of Quantum strobes. Could you tell me the reason you would choose a Quantum over a monolight with a portable power pack? I would imagine that for sheer power, a monolight would work great. Thanks.
Thomas
Thanks, Neil
I appreciate all your great lessons. Will be buying your book soon!
Thomas
Ok I have been following you for sometime and this post is the one that has the most enthusiasm. You’re posts are great, don’t get me wrong but this one has so much excitement added to it. I was smiling the whole time I was reading through it.
Great work…thank you, thank you, thank you for sharing so willingly.
Another great post Neil. In addition to the light and atmpospheric background I love the energy and variety of poses you’ve captured. What a great couple – I’m sure you’ll get wonderful images at their wedding!
Hi Neil,
As always your work is excellent and your colors are wonderful. What are you using to trigger your SB900?
Is it another SB900 dialed down or SU800 or some other type of trigger?
Thank you,
Richard
Neil
Fantastic source of information, your book has become my bible.
My question is, how would you deal with extremely bright lighting, for example at a location say a park where there is no shade and the lighting is causing shadows on the face, what would be your technique to deal with this.
Regards Phil
Thanks so much for all the work this obviously takes. It’s a great resource for me as well as my Community College students. Your models always seem so fresh and their smiles so natural. My models, usually high school seniors or engaged couples, seem to tire of smiling after a bit. When you do test shots for exposure, lighting, etc, do you coach your subjects to rest their smile muscles a bit, and do you send in a stand-in assistant for the tests? And after bringing in the real people, do you ask them for just a brief smile so they don’t get weary of it? Thanks again.
Again, a great article with perfect examples showing the power you get from off-camera flash with softbox. Many thanks Neil!
1 – Re: Flash battery power: I see a cord snaking down the monopod from the flash. Is that the external battery pack? Quantum or the one with 8 AAs?
2- Re: the Lastolite, I’ve read comments about the box/bracket attachment being a little loose or prone to twisting off. Has this affected you?
3 – Thanks for sharing your experience. I’ve learned a lot from your blog.
Neil, in regards to the “box on a stick” approach (which I really like, what a cool idea) I have all the equipement, softbox may not be as big but collapsible and portalbe, question is, are you firing that head via a pocket wizard or similar device? I’m wondering for going around and shooting table shots at a receiption if that would be a good idea or not? thoughts?
thanks
Mike
Hi Neil,
I’ve been following your blogs for quite sometimes and would like thank you so much because it has elevated my knowledge and improved my photography techniques so much in such a short time, more than all the photography books (not yours) and magazine I’ve bought all these years. Thank you so much!
Syahrir, Malaysia
Hi Neil,
How do you decide what setting for FEC when using TTL? I realized your image01, FEC -0.3EV, image02 FEC +0.7EV, image03 FEC 0.0EV, and image06&07 FEC -0.7EV. Thanks!!
Flash Exposure Compensation
Great examples of what OCF can pull off in an otherwise poor-lighting condition.