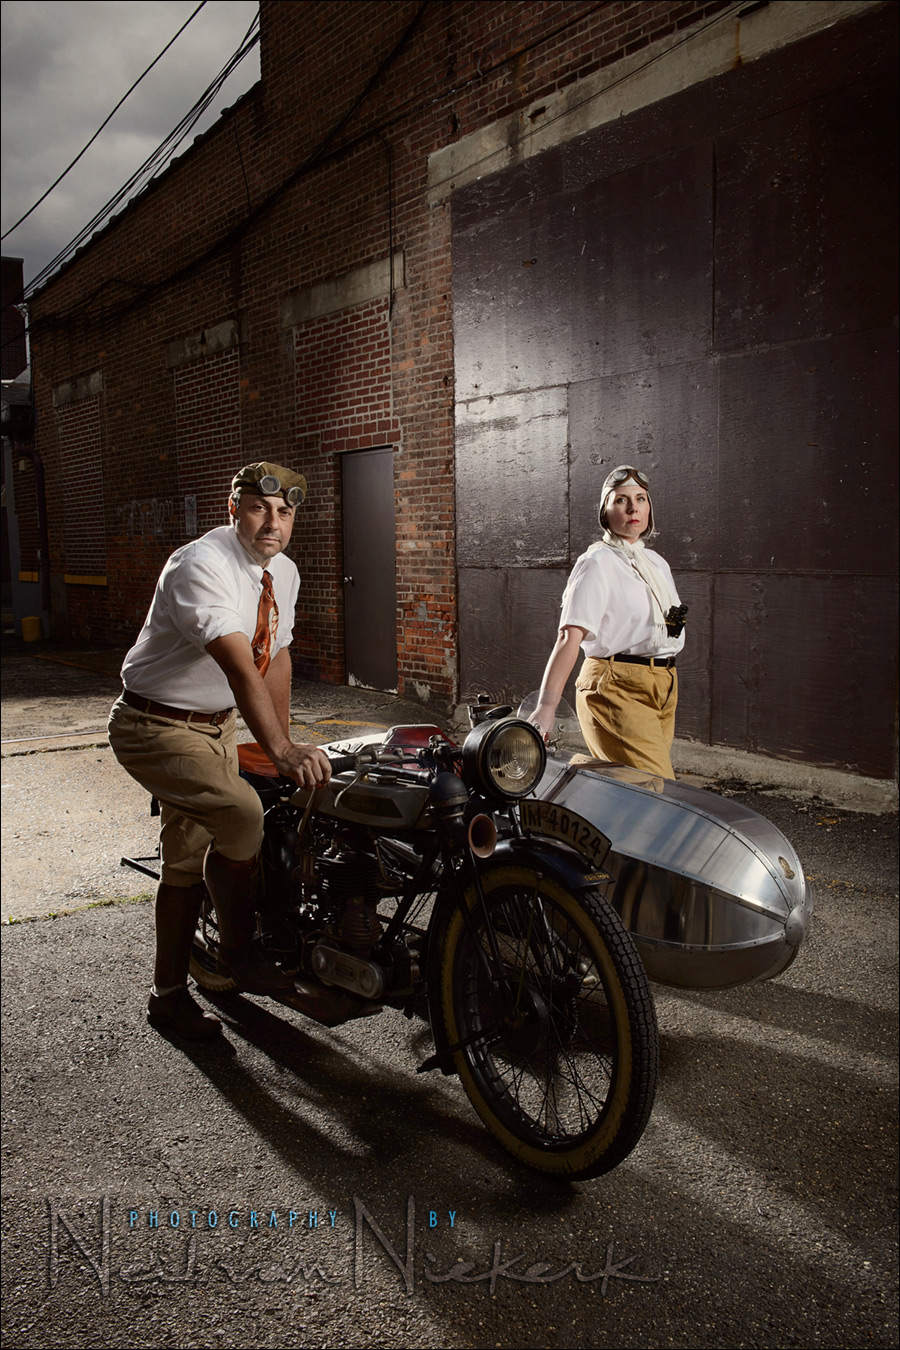
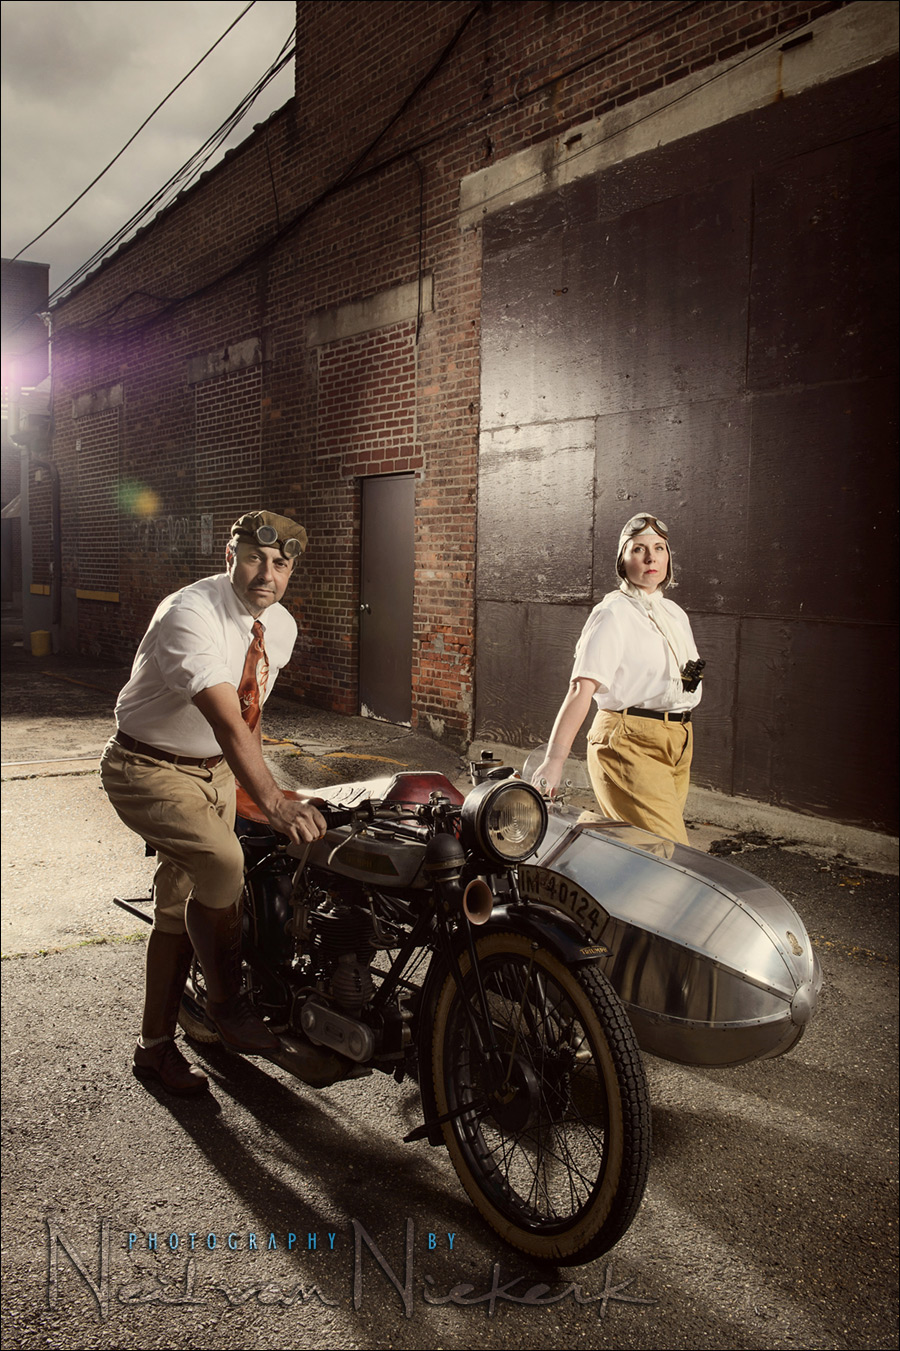
Photographing a vintage motorbike on location with Profoto lighting gear
I’m getting to meet so many people while photographing interesting subjects for my book, Lighting & Design, that I was bound to meet some truly interesting characters. John collects vintage … oh, everything. Most impressive in a way, is John’s workshop where he maintains his two vintage era motorbikes and a Model A Ford. The tools in his workshop are all authentic to the era … and they work. The way John describes it, it actually makes sense in the way he maintains everything with hand-tools and lathes and such.
His one motorbike is from WW1 era, and the other is this 1928 German-built Triumph. The sidecar was made by Hindenburg Metalworks. Yup, the zeppelin guys. John’s friend, Barbara, frequently accompanies him to shows and rallies, and came along for this photo shoot. After all, there is a side-car!
I photographed a few sequences of John and Barbara with this motorbike, using different setups. I liked this dramatic series the most, with the light from behind casting a shadow in front of them. I wanted the light to etch the frame of the motorbike and side-car, without revealing too much detail – I wanted this to be a portrait of John and Barbara. However, I took a number of other images, where the motorbike is better lit. Just to have the variety. Such a unique opportunity doesn’t come along that often, so I had to make sure I got variety in the images.
Now, the techie details about the photograph:
camera settings were 1/250 @ f/14 @ 200 ISO
As always, the pull-back shot to show the lighting setup …
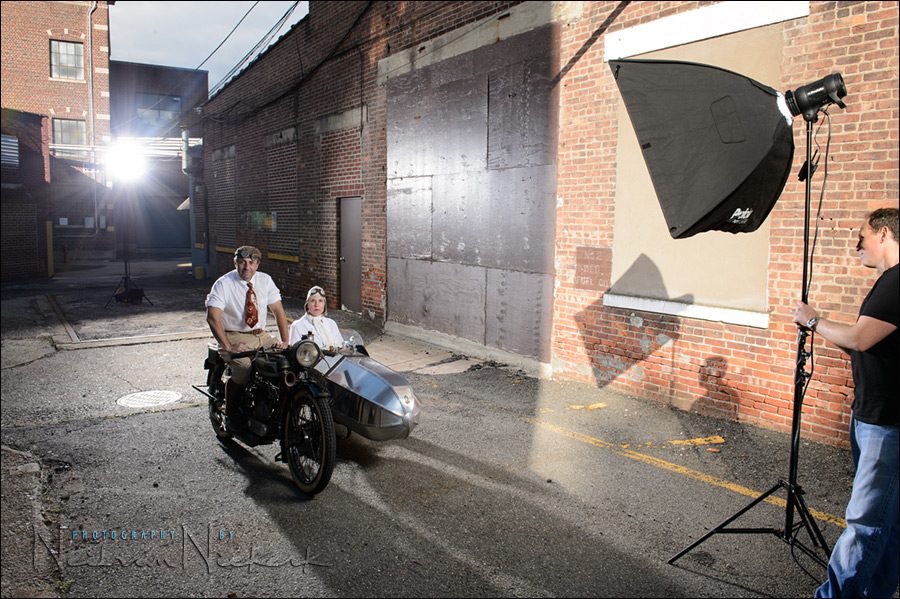
The light from behind was from a Profoto 50 degree Magnum Reflector (affiliate), because I needed a big light behind them. I needed the light out of shot, but strong enough to cast enough light on them to create that shadow in the front. The Magnum Reflector concentrates the beam. I even used it in some shots for flare.
- This photo session was before the Profoto B1 TTL flash (B&H / Amazon) was released, so I had to rely on a Profoto D1 studio head, and the portable battery pack, and the Acute B2 power pack. (It would’ve been so much easier with two B1 flashes!)
The Profoto 50 degree Magnum Reflector (affiliate) was mounted on a Profoto Acute B2 600 Ws powerpack (affiliate), which is a nicely self-contained powerful light giving 600 Ws of juice.
The light in the front is Profoto D1 Air 500 Ws studio light (affiliate) mounted in a Profoto RFi 3’x4′ softbox (affiliate). This creates a large soft light on them. The Profoto D1 unit was powered by a Profoto BatPac portable battery (affiliate). This main light came from camera-right, and not from the camera’s point of view. This helps maintain the dramatic quality of the light, and not flatten it out.
The pull-back shot was taken at 1/125 @ f/11 @ 200 ISO, so there is nearly two stops more available light in this image than the one at the top.
Lighting & Design for Portrait Photography
Lighting & Design is a follow-up of sorts to Direction & Quality of Light. It’s a slightly eclectic mix, discussing the thought-process with various scenarios shooting portraits. The examples use available light, bounce flash, off-camera flash as well as studio lighting.
The idea is that in every one of the 60 sections, there is something to be learnt and applied, regardless of your level as a photographer or where you shoot – all shaped to form a cohesive narrative arc throughout the book.
You can either purchase a copy via Amazon USA or Amazon UK. The book will also available on the Apple iBook Store, and Amazon Kindle.
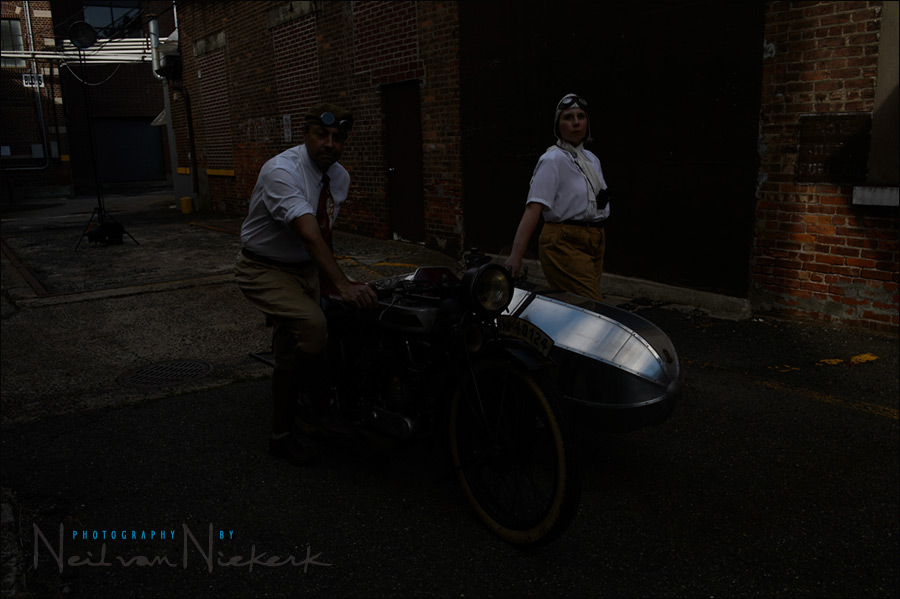
Here, for comparison, is a test shot at 1/250 @ f/11 @ 200 ISO to show that the two flashes were doing all the work in terms of lighting my subjects. And that is how I wanted it. For a few images in this sequence, I allowed the lens to flare. Because the light in the background was so strong, I had to use my hand on the edge of the lens to control the amount of flare. I had to shoot and check a number of times, until I had a few images where the flare wasn’t too over-powering.
In terms of the processing, I ran one of the HDR filters in Nik’s collection, and reduced the opacity. That gave both the main images a certain crispness and brought out some shadow detail. Then I used the another Photoshop filter to add a Vintage flavor.
Camera settings & gear info
- Nikon D4
- Nikon 24-70mm f2.8G AF-S / Canon 24-70mm f/2.8L II
- Profoto D1 Air 500 Ws studio light
- Profoto BatPac portable battery
- Profoto RFi 3’x4′ softbox
- Profoto Acute B2 600 Ws power-pack
or alternately, the Profoto B1 flash (B&H / Amazon)
- Profoto 50 degree Magnum Reflector
- (2x) Manfrotto 1004BAC – tall light-stand
Related articles
- Camera & flash settings: what do you want to achieve?
- Photo session: urban ballerina – Viktoria
- review: Profoto B1 flash
Absolutely fabulous work there Neil. ‘As always’!!
Awesome shot, Neil. But more importantly – did you get to ride in the side car?
I realize the people are the featured subject but in my mind, you missed by not lighting the bike to. The bike speaks volume about the people in the picture.
“I photographed a few sequences of John and Barbara with this motorbike, using different setups.”
So maybe, just maybe I did take photos where the bike is more prominently lit. It’s such a wonderful opportunity! However …
“I liked this dramatic series the most, with the light from behind casting a shadow in front of them.”
Thanks again for walking us through your setup! Question – what would you change if you decided to eliminate that highlight on the black woodwork behind them?
Neil – great stuff, and I gues although you may have done stuff like this before it’s nice to see a departure from the normal portrait stuff we see of yours. Bravo. My question is this: I have 2 x 600EX-RT speedlites and a trigger. Practically speaking I could re-create something like this with those two lights?
I have a 60cm speedlite soft box and I was thinking a bare speedlite behind… I think it could be replicated… what do you think?
Jon
You could achieve similar, although in this case, the brute power of the Profoto 600R with the Magnum reflector, allowed me to place the flash much further back to get that composition.
You could flag the flash, to make sure no light hits that part of the background. Or you could feather the light away from that direction, so that less of that light hits the background.
Foregoing detail in the bike brilliantly achieves your goal of creating a portrait of the people. If the bike were more lit it probably would’ve competed visually with the couple. Is the light in back the more powerful one? Seems so with the shadow but you refer to the light in front as the main light. How did you decide that 1/250, f14 and iso200 was correct exposure? Light meter or did you just eyeball it?
I have one problem with the image. My eye is drawn directly to that awful glare on the plywood wall behind them. I honestly have to force my eyes away from it to look at the real subject. It forms a visual triangle and since it’s the brightest thing in the image the eye rests on it.
If it were my setup I would have flagged the light to get rid of the reflection and added a 25º grid spot directed near the headlight/license plate area to make the triangle.
The other option would be to keep the lighting setup, but do a square or 4:5 crop leaving the bottom as is, but cutting out the majority of top, ending the frame just above their heads. That would eliminate the glare and I don’t see that all of that empty space at the top of the frame is necessary anyway. It detracts from the subject. The scene is sufficiently set without all that extra junk at the top anyway.
Anyway, that’s just my 2¢.
I wasn’t going to reply, since there are always dissenting opinions, and they are welcome too.
But then the email rolled in from John, who had seen these images now. (I didn’t solicit his reply in any way.)
So there is that. He likes it, especially for that. So did I.
Great use of the reflector, I love it!
Neil, this is a great shot. I was wondering the power you used on both flashes, did you set the rear light at full power and front at 1/2?
As far as I recall, those were my approximate settings.
Hi Neil: What effect, if any, did the reflector have beyond concentrating the beam of light? For example, did it also intensify the light? Direct it better? By ‘concentrate’ do you mean control and narrow (or widen?) what area of the scene the light covered?
The concentrated beam meant that I could place it further back, out of shot, for a wider composition.
The Magnum Reflector concentrates the light so much, that I’ve read about instances where the powerful light from this melted table-top items being photographed in the studio when the studio-light was fired repeatedly.
Very good !
interesting photos …!
Great image, really want a profoto setup and hear nothing but good things about them, one day :)
Thanks for the share Neil,
I can see detail on the bike, perhaps some people’s monitors are not displaying brightness correctly. Anyway, if I were the client I would personally have opted for a 5×7 crop with the flare coming in at the top left corner. But that’s just my personal preference. Lovely image!