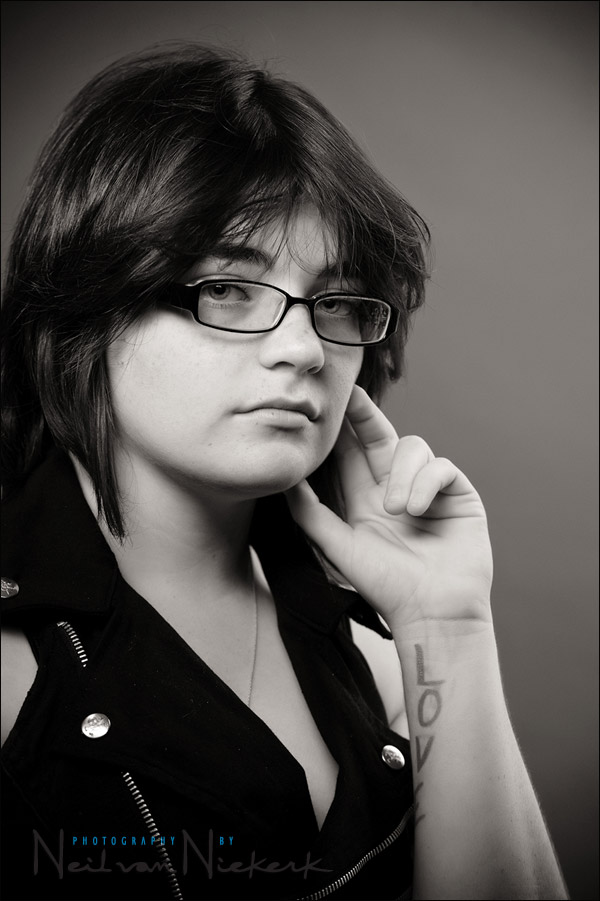
portrait using a gridded softbox
It’s been about a year since I last took a more formal portrait of my daughter Janine. Last year it was her with the steam-punk goggles, when I used a beauty dish (with a sock) as lighting. During a restaurant dinner last night I noticed Janine had ‘LOVE’ scribbled on both her forearms with a felt marker. I asked her about it, and she explained the idea behind ‘To Write Love On Her Arms‘. So I decided to include this tonight in the portrait of her.
Lighting her and the words on her arms was a slight challenge. I wanted a moody portrait, instead of just flooding it with even light from something like bounced flash …
For the sequence of photos I took of her here, I used a few speedlights. To control the light, I used a gridded softbox – exactly the same as shown in a previous article about the sequence of setting up the lighting during a shoot. In a small and simple light set-up with speedlights, there just wasn’t the control to have short lighting on her face, and somehow spot-light the writing on her arm. With a sprained wrist she couldn’t turn her right hand towards me, so we only photographed the one.
In getting the light on her and her arm, I ended up with broad lighting, and the pose was more formal than I originally intended. I wanted something more dramatic … but this is where we ended up for this photograph of her.
To give a more dramatic light fall-off to the top and bottom, I turned the gridded softbox sideways. See the pull-back shot below.

The grey backdrop was lit up by another speedlight bouncing flash into the passage to the right of the backdrop. I used an on-camera speedlight as Master (with its own output disabled), which controlled the gridded softbox (Group A), and the light on the background (Group B). Both Slaved speedlights were in manual output. The light reflected back onto the backdrop gave the slight gradient of light you can see there on the background. That same reflected light spilled onto her face, giving a bit of a welcome accent light. More accident light perhaps, since it wasn’t necessarily by design.
The expression? Not boredom as you might suspect, but annoyance because I dared brush her hair out of her eyes for the photographs. Not everything is under our control as photographers. ; )
![]()
Lighting equipment used with this photo session:
Here is what the gridded softbox looks like that were used:

the Creative Light 1×3′ Recessed Softbox (B&H),
with the Creative Light 1×3′ Softgrid (B&H), attached to it.
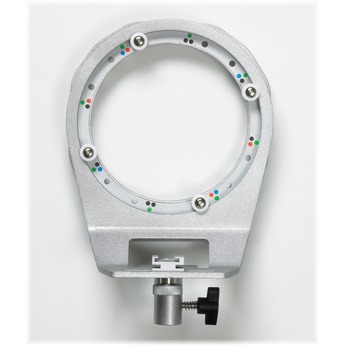 |
The softbox does need a speed ring to attach it to the speedlight or other flashgun. The speedring I used here is the one made by Creative Light (B&H), which is specifically made for speedlights. It also rotates, which is helpful if you use it with other softboxes as well. Other accessories used can be seen on my equipment page. |
You get different types of grids – ‘eggcrate’ and ‘honeycomb’. The actual construction and look of the grid will tell you which name is applicable. The Softgrid shown above is of the eggcrate type. A search on B&H’s website will show you numerous options and possibilities.
Beautiful portrait!! Great look and love her glasses!! Lots of beautiful character.
Nice portrait with terrific light.
Just as an aside here, it seems the use of broad lighting helped to eliminate reflections of the key light in her glasses. In my experience, it’s much harder to control these reflections with short lighting, which tends to put eyeglasses in exactly the wrong place. When doing groups, for instance, I always tend to put people with glasses on the same side of the image as the key light, with their bodies turned inward (ie. broad lighting).
Neil,
I’m glad you posted on this, as I have a specific question in regard to your setup. I currently own the light stand you recommend on your equipment page, along with the umbrella adapter you suggest as well. The umbrella adapter has the adjustable handle, so you can tilt your flash/umbrella down, up, etc. Now, I just purchased some newer equipment to do a setup similar to this post. The issue I ran into was using the stand I have and connecting the speedring to it, and connecting it in a way where I could use the handle to shift the softbox downward. With the current stand and umbrella adapter I have, it doesn’t work. However, here in your setup, its clear you have a stand that DOES work, with an adjustable handle so you can tilt the ring/flash/softbox down. So, what stand and adapter are you using? Should I be purchasing something different to use the speedring and softbox, or is there a way I can convert my current stand with another type of adapter?
Sorry, very longwinded…I hope this all makes sense. :)
Lisa
Ah, I think my issue is with the brass adapter I’m using. I currently don’t have the female part attached in side the umbrella adapter. Once that’s screwed in, I think the speedring I have will be fine. Just had to pull some things apart to figure it out. Thanks! :)
Neil,
Have you found an adjustable adapter for the Lastolite Ezybox 24×24, so you can tilt the Ezybox downward at an angle? Does the Creative Light Speedring mount into the Lastolite Ezybox? The Ezybox is great, but its mount does not tilt.
Neil,
Would you mind expanding on what you and Mike were discussing at the top of this post? Specifically what is meant by short, broad, etc. lighting?
Also, is there a good source for understanding general lighting terminology such as key, hi-key, kicker, specular, etc. I understand the very basics such as fill vs. ambient, etc. but keep missing the studio specific terms.
Thanks!
Derrick,
Try reading this article for a description of short and broad lighting.
https://www.diyphotography.net/studio-lighting-what-short-light-and-broad-light-are/
There are also butterfly, Rembrandt, and split lighting that you can look up in a search engine. Together, these five lighting styles are the archetypes you will read or hear about in portrait photogaphy.
Thanks Neil. This link and the others via google were great. Really like the Pooh setup. Very funny.