Tangents

photography tutorials, reviews & workshops

tangents photography blog
learn : discuss : share
  • Tangents
  • Tutorials
    • Flash Photography
    • Wedding Photography
    • Studio Photography
    • Posing People
    • Understanding Your Camera
    • Exposure metering
    • BFT
    • Best Photo Books
  • Reviews
    • Sony
    • Nikon
    • Canon
    • Fuji
    • Profoto
    • lighting gear
  • Workshops
    • Info: Workshops
    • In-person
      tutoring sessions
    • Online
      tutoring sessions
    • Workshops in
      New Jersey (NJ)
    • Workshops in
      New York (NYC)
    • Photo walks in NYC
    • Studio Workshop
    • Video tutorials
    • Workshop results
  • Books
    • On-Camera Flash (revised ed.)
    • Direction & Quality of Light
    • Off-Camera Flash Photography
    • Lighting & Design
    • On-Camera Flash (1st ed.)
  • Projects
    • Two Perspectives
    • B&W Infrared
    • Vintage lenses
    • Time-lapse photography
  • Info
    • About
    • Contact
    • My Photo Gear
    • Books by NvN
    • Join us on Facebook
    • Acclaim
    • Success Stories

Posing tips: Avoid foreshortening by seeing two-dimensionally

July 6, 2017 Neil vN 2 Comments

Posing tips: Avoid foreshortening by seeing two-dimensionally

There is this translation we have to do as photographers, from seeing in 3 dimensions, to realizing our images will be shown in 2 dimension. We might see the depth, but that information is mostly missing when the scene is flattened as a photograph. This is a stumbling block when we pose people – we might see their limbs and hands in 3 dimensions, but when your subjects hands extend towards you, there is foreshortening. The perspective changes, and makes the limbs look shorter than they are. This can be visually awkward.

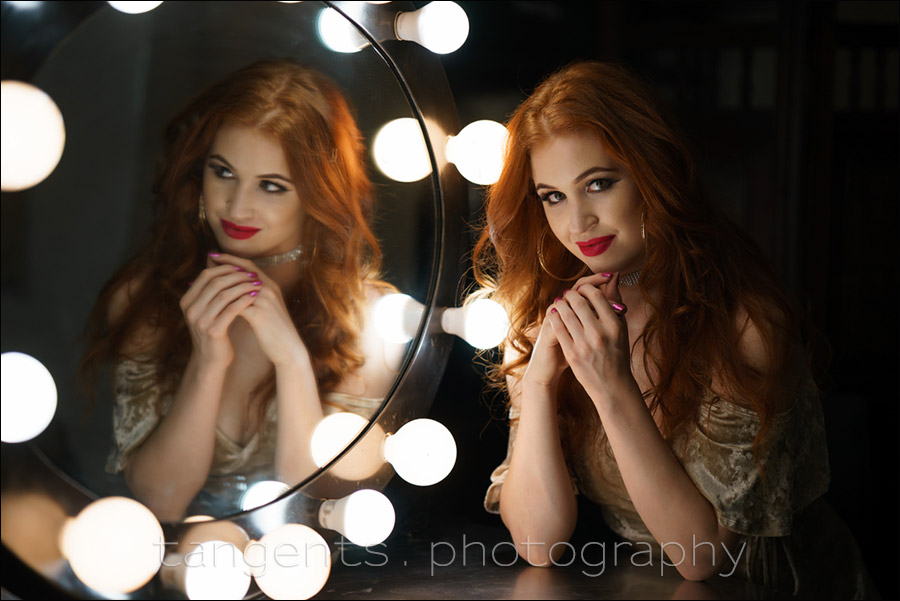
Look at the photo below, Alix, our model, has her hands extended towards us on the table. This creates that foreshortening of her arms, which make her fore-arms look awkwardly short.

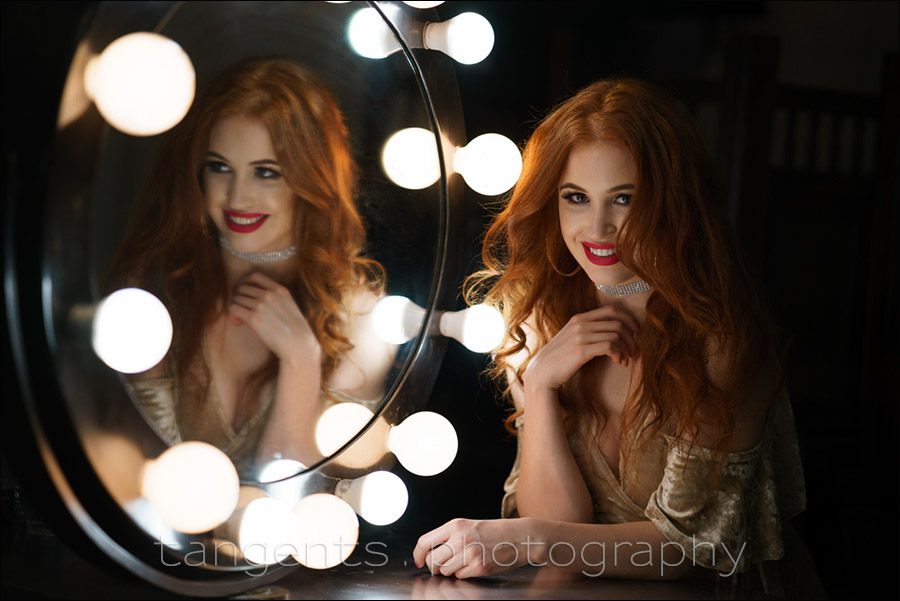
We can avoid this by having our subject pose their hands and arms (and legs) in a plane that is approximately parallel to the camera. For example, as in the other three photographs shown here. I had Alix pose with her hands and arms parallel to herself, and not extend them to the camera.

Sure, if the pose warrants that look – arms extended to the camera for a dynamic pose – then go for it. Do it with purpose. Generally however, we want to avoid that foreshortening effect.

That is it in a nutshell – pose your subject so that their hands and limbs are more or less parallel to the camera. A straightforward tip on posing that will help you avoid awkward looking photos.

And here’s the awkwardly posed photo as an example:

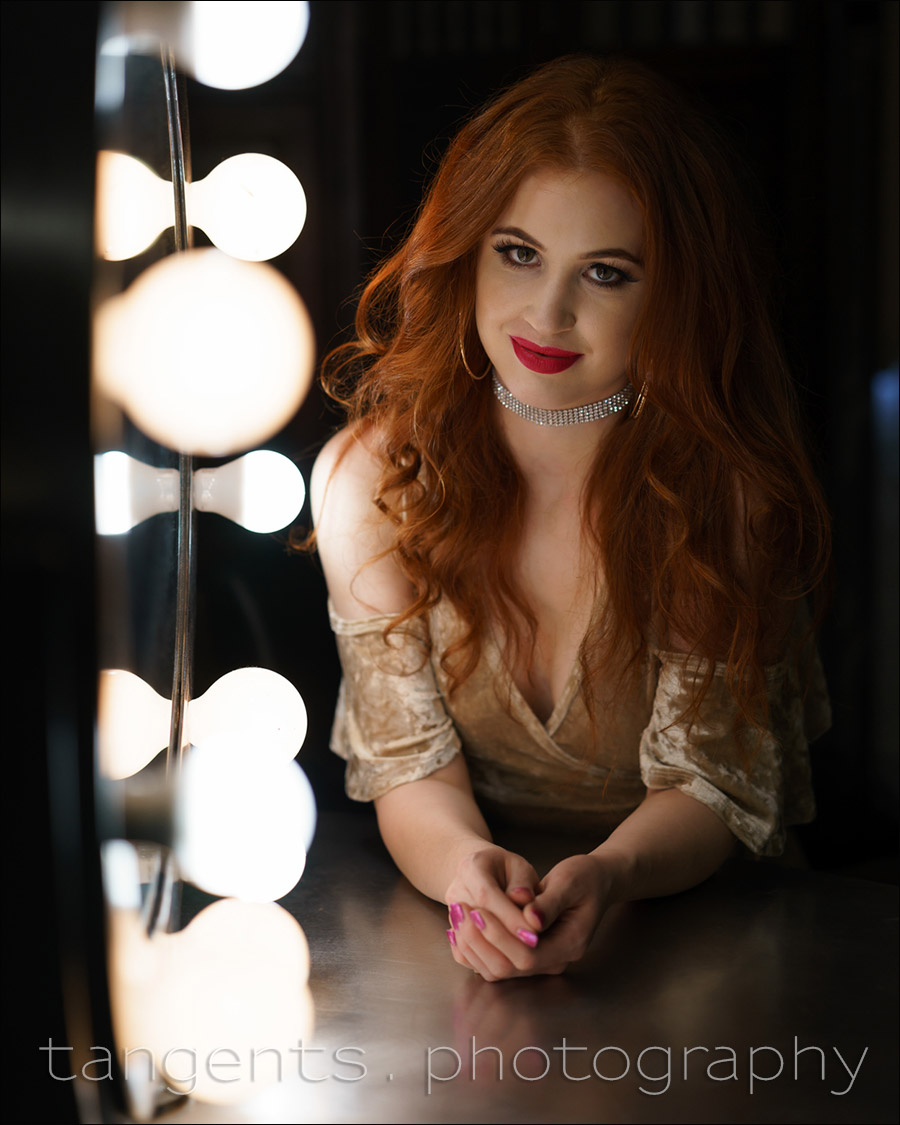
Below you can immediately see the improvement with this repositioning of her hands:


Camera settings & Photo gear (or equivalents) used during this shoot

  • 1/640 @ f2 @ 250 ISO
  • Sony A7ii  (B&H / Amazon)
  • Zeiss Batis 85mm f/1.8  (B&H / Amazon)

I photographed Alix at the mirrored dressing table in the studio, using only the lights encircling the mirror. For these photos I used a loaner copy of the stellar Zeiss Batis 85mm f/1.8  (B&H / Amazon). It’s razor-sharp, as you’d expect from any Zeiss optic.

The Batis range of lenses by Zeiss are specifically designed to offer auto-focus with the Sony E-mount cameras. However, I used it in manual focus mode on my Sony A7ii camera (B&H / Amazon). The Sony and Zeiss combo generally nails the focus perfectly … but I didn’t want to risk it grabbing the eyebrows or some other part of her features. So with a photo session where the focus is more exacting because of such a shallow depth-of-field, then the manual focus (in the way the Sony handles it), works better for me.


Related articles

  • Tips on posing hands  (Christy)
  • Adjusting a pose with incremental changes  (Irene)
  • More articles on how to pose people


Filed Under: Alix, models, posing, Zeiss Tagged With: posing, posing hands, Sony A7ii, Zeiss Batis, Zeiss lenses


Help support this website

If you find these articles of value, please help support this website by using these B&H and Amazon affiliate links to order your photo gear.

I also offer photography workshops and tutoring sessions, whether in person, or via online video tutoring sessions.

Please follow me on Instagram for more.

You can also join our thriving photo community in the Tangents group on Facebook, where we show our photos and discuss all things photography.

Thank you,

Neil vN

Books by Neil van Niekerk


2 Comments, Add Your Own

  1. 1Irene A, Classy Boudoir Photography says

    August 2, 2017 at 2:09 pm

    These images are beautiful, Neil. Love the mirror and the reflection.

    Reply
  2. 2Kefa Olang says

    October 13, 2017 at 11:16 pm

    Great article. Posing can be a challenge especially with certain people. But you are absolutely right, focus on positioning is important to ensure that arms, legs and other body parts do not appear awkward in a 2-dimensional frame.

    Reply

Leave a Reply Cancel reply

Your email address will not be published. Required fields are marked *

categories

Articles & Tutorials

  • • About myself & this site
    • Books by Neil vN
    • Best photography books
    • Black foamie thing
    • Photographers’ success stories
  • • Flash Photography Techniques
    • Natural looking flash
    • Flash + Ambient light
    • Dragging the shutter
    • Bouncing your flash
    • On-camera flash outdoors
    • Exposure metering
    • Flash exposure compensation
    • Bounce flash examples
    • Which is the best flashgun?
    • Flash brackets
    • Off-camera flash photography
    • Flash photography basics
    • Using video lights
    • Flash photography tips
  • • Photography workshops NJ / NYC
    • Models @ photography workshops
tutorials:
flash photography
Photography
Workshops

All rights reserved. Copyright © Neil van Niekerk 2025 · Customization by The Traveling Designer

Copyright © 2025 · NvN on Genesis Framework · WordPress · Log in