Tips on posing hands
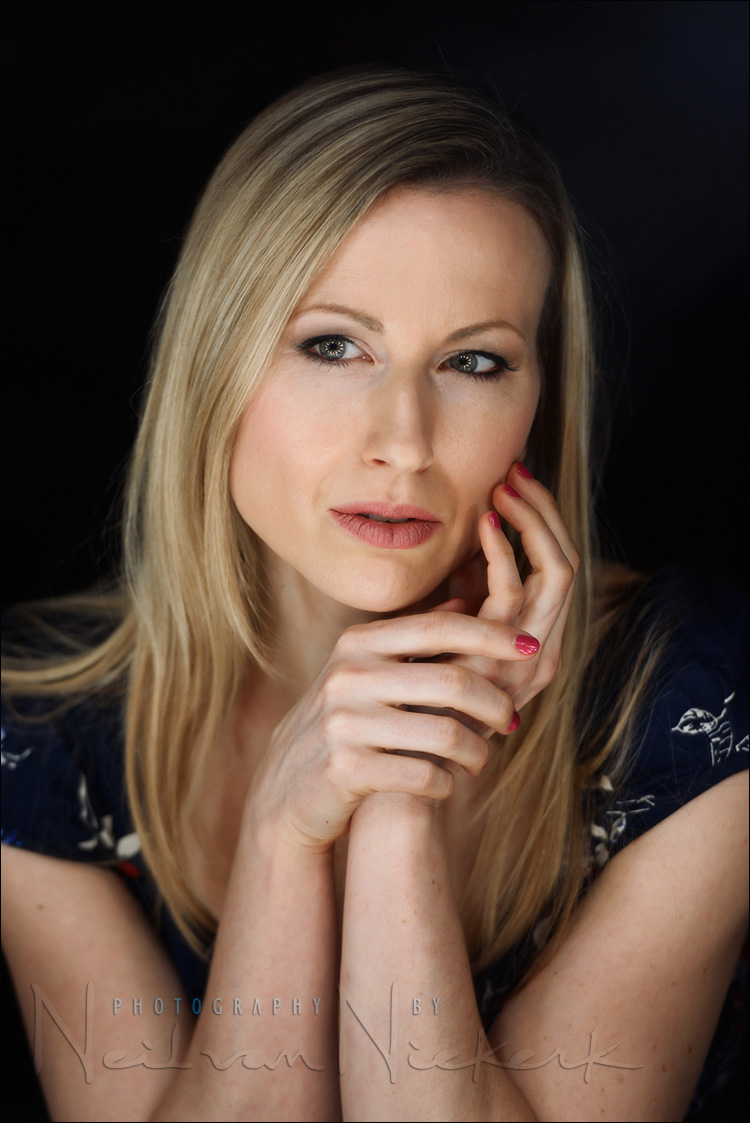
This portrait of my friend Christy, was shot in my studio – the lighting entirely from the globes circling the make-up table. In fact, if you look closely, you can see the ring of lights circling the iris of her eyes.
Now, as drop-dead gorgeous as Christy is, it is also a running joke between us that she is tough to pose. She isn’t a model, so hasn’t built up the experience or repertoire of poses yet to naturally glide into a pose in front of the camera. So it needs me to pose her or adjust her pose along the way.
In the case of her hands, it needed meticulous posing from me to get to the point where the portrait really looks elegant.
I tend not to pose mechanically, but rather in a more ‘organic’ way, by looking at my subject, and the context of where we are. Every person’s body and posture and personality is different, that I don’t feel you can apply those “flow-posing” instructions without adapting them. It might mean carefully placing the body’s elements (hands, feet, fingers), and posture in a way that very specific. Or you can do it in an intuitive way. Or somewhere in-between. But it does imply that when you work with someone who isn’t an experienced model, you will have to help with the posing.
Here I specifically placed Christy’s hands, even down to shifting the position of her elbows where they rested on the table.
What I look for when posing hands:
- Ideally, there should be an S-curve to the shape of the hands. We want to avoid the wrist being straight – that elongates the shape of the forearm into the extended hand, and it usually looks odd. So we ideally want an S-curve to the shape of the hand.
- Then, we want to avoid the back of the hand towards the camera. That can look ‘blocky’. The back of the hand becomes a larger square surface that competes with your subject’s face. So a good starting point is to have the edge of the hand towards the camera.
- Fingers can be tough to deal with. People tend to place their fingers rigidly, instead of relaxing them into a slightly curved shape. Relax the hands, but don’t let them just flop down. There has to be some gesture still to the hands. I often tell people to use their middle finger or ring finger to place slight pressure on where they touch. This relaxes the forefinger, but still helps shape the hand. It is a subtle shift in the dynamic of how the hand is placed – let them subtly concentrate on placing pressure with either of those two fingers – the ring finger or the middle finger. See if that affects your subject’s hands.
- Symmetry vs asymmetry. I tend towards asymmetry in posing. One hand higher than the other. One foot up on something, one foot down. Or forward / back. With Christy’s hands here, I avoided that she cups her face with both hands. That kind of symmetry can work if down with specific intent. However, it is easier to go specifically for asymmetrical posing. Here we started with her hand that lightly grazed her face, and then we carefully ‘wrapped’ her other hand around the palm of her band.
Obviously, these aren’t strict rules – these are ideas that guide a more intuitive way of posing someone’s hands. Ultimately, we are guided by this singular motive, “does this look good in the camera?”
Post-processing of this photo
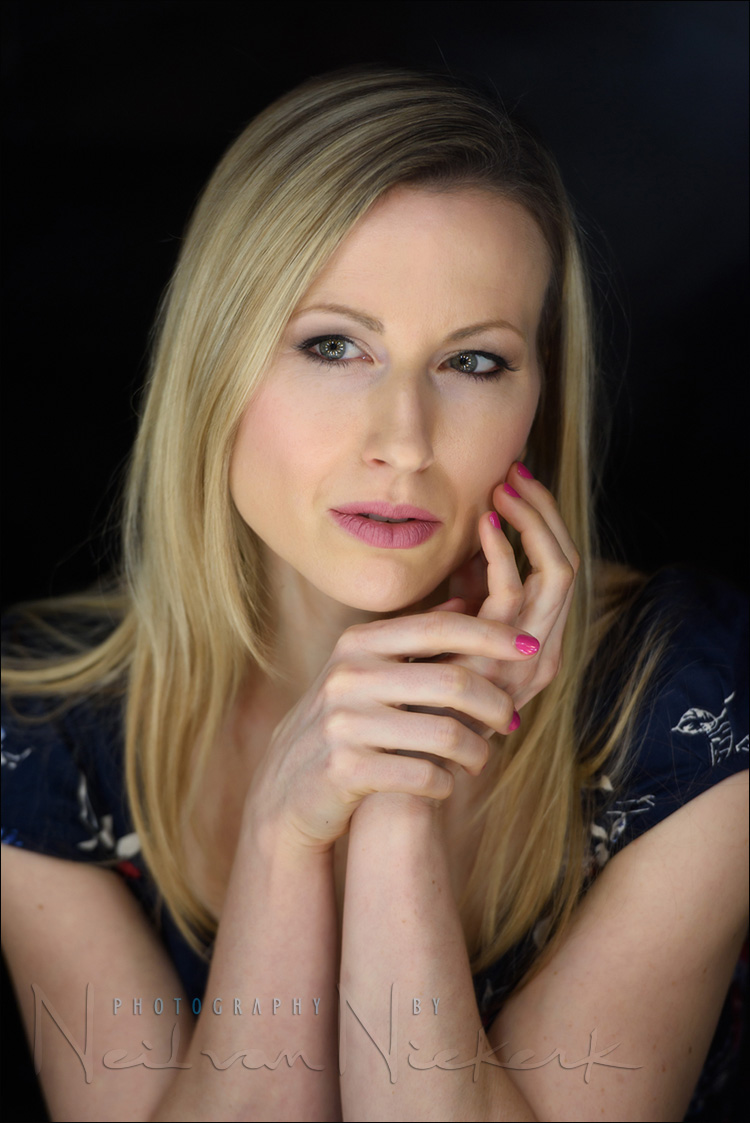
Aside from minimal skin retouching, I sweetened the final image using Alien Skin Exposure X, which is a Photoshop plug-in that has an incredible range of film-like simulations, and other effects. I tend to favor a more subtle approach to my post-processing effects, so I usually place the effects in layers, and reduce the opacity to taste.
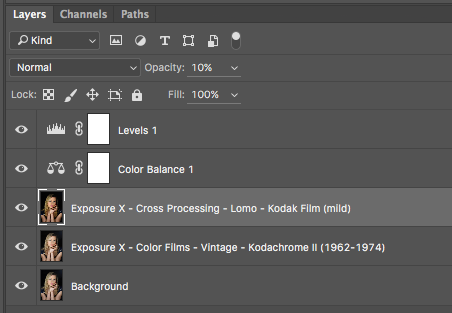
Here, I used the Kodachrome II vintage film simulation (at 100% opacity), and a Cross-Processing effect at 10% opacity. Then, a Levels and Color Balance layers to adjust the final image to where I liked it. Swipe between to see the effect. Subtle, but still significant.
Related articles
- Posing and lighting technique
- Posing tip – check the wrists and hands
- Posing people: Tips for improving your portrait photos
- Posing technique – Adjusting a pose with incremental changes
- Wedding photography: posing and lighting – a consistent style
Hi Neil, I was wondering about the location of the make-up table. From the reflection of the globes in her eyes it looks like it was squarely in front of her. But I think there’s a slight shadow below the left side (her left side) of her nose, suggesting the table/lights was off to her right? The pinky shadow suggests light coming from her left?
The make-up globes in her eyes is too foreign, for me. Distracting and not realistic. Looks like an effect they’d use in a horror movie.
Lovely hand positioning.
Actually, I think the tilt of her head would be enough to put that small shadow below her nose, subject left, even if the light is front and center?
That light is just so beautiful, Neil. Those hands almost have a 3D quality to them. Love it! Alien Skin is terrific too…I’m a fan of the very subtle way it can be used. It really is a very fluid tool.
Not only did the hands ‘fall into place’ but that slight angle of her face gave terrific modelling light and it just ‘balances’ the whole shot for me.
Trev.
Totally agree on the tilt of the head Trev. Very subtle but makes a big difference.
The eyes with the lights are mesmerizing. I really needed the posing tips as it’s my weak spot. Always good to see someone else using Exposure X. Now I have some new film effects to try.
,Jerry
Hey Neil, thanks for adressing this, hand posing is such a big deal in portraiture and wedding work that I think on having some classes with my future brides just for this topic and posture posing. It gets so frustrating when they aren’t used to posing and they either keep their hands straight down or they grab their waist.
Cheers!
The globes reflections make it quite surreal. Definitely an interesting effect to have.