Wedding photography: posing and lighting – aiming for a consistent style
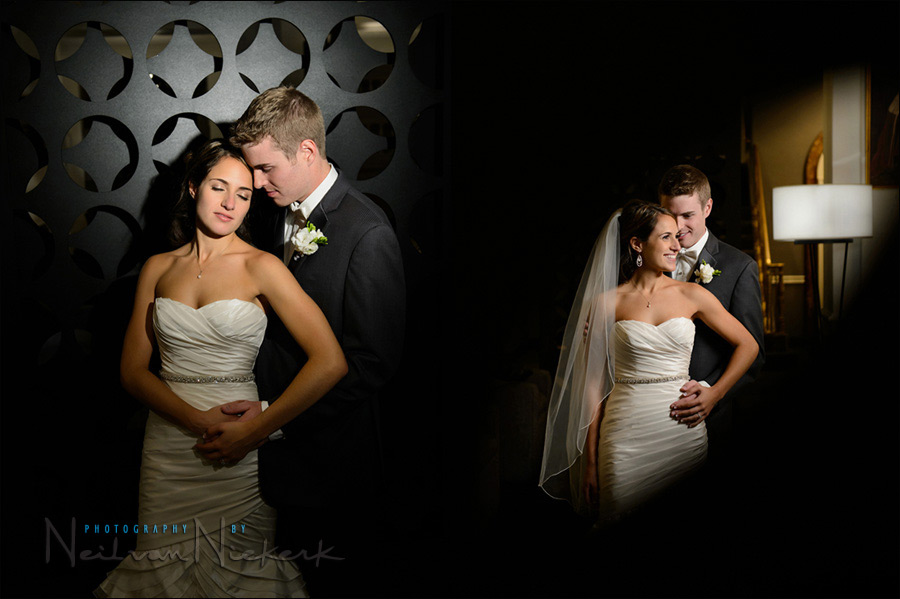
The two images were taken about half an hour apart, with entire different lighting setups – yet there is a consistent look.
The photo on the left was shot using video light with an Incandescent white balance. A video light is a small light source, so the lighting is usually quite contrasty – so you need to take care with the posing to have your main subject posing into the light. With a bridal couple, I will nearly always favor the bride for the more flattering light. Hence, I will invariably pose the bride in relation to the light – and then add the groom.
The image on the right was shot with a Profoto B1 flash (affiliate), and the Profoto RFi 1’×3’ soft box (affiliate). (Check the comments in this article – high-speed flash with the Profoto B1 – to see why the narrow 1×3 soft box is a favorite for on-location portraits. The image on the right was shot through one of those elliptical shaped openings you in the divider screen you see on the left.
When posing a couple, I start with one person first, and then add the second person. This makes it easier to assemble the pose. In the examples here, the pose is quite similar, but changed up because my position (and angle) changed.
Now, back to the theme of this article – how it is entirely possible to aim for a consistent style, even though using a variety of lighting – this is a topic we’ve explored before. For example, in the article adapting the use of light & flash photography, I emphasized that I do mix up the lighting types, depending on what is needed; what is practical; and what is the best option. Similarly, in the article where I used the Profoto B1 flash at a wedding, I added examples of using available light; video light; and on-camera bounce flash. Again, I base what I use on whether it is necessary, or most practical or the best choice.
Even though I mix up the lighting I use as the day progresses, I want a coherent style to be apparent. It will count in your favor if your work shows diversity, but there’s a discipline so that it doesn’t look random or hodgepodge.
Let’s look at further examples from Nicole & Brad’s wedding:
- 1/80 @ f/3.2 @ 2000 ISO … available light only.
- Nikon D4
- Nikon 24-70mm f2.8G AF-S / Canon 24-70mm f/2.8L II … @ 30mm
The daylight streaming in through the window, went to a cold blue tone when I corrected the RAW file for the interior Incandescent light inside. I like the complementary colors! Warm & cool.
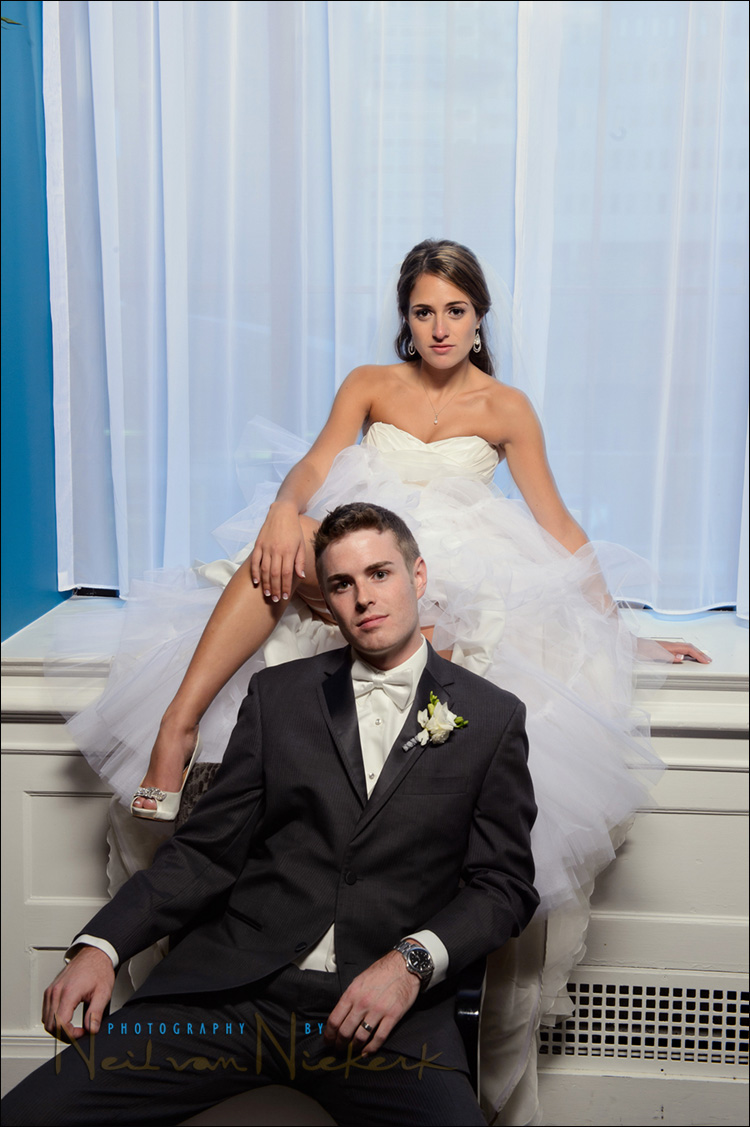
- 1/15 @ f/11 @ 800 ISO … off-camera flash with the Profoto B1 flash
- Nikon D4
- Nikon 24-70mm f2.8G AF-S / Canon 24-70mm f/2.8L II … @ 65mm
- Profoto B1 500Ws flash with the Profoto RFi 1’×3’ softbox
This is one of several poses we tried here, with the accent on making the photos look sexy, and perhaps with a modern edge.
Regarding the choice of camera settings, we’ll keep this as a little bit of homework!

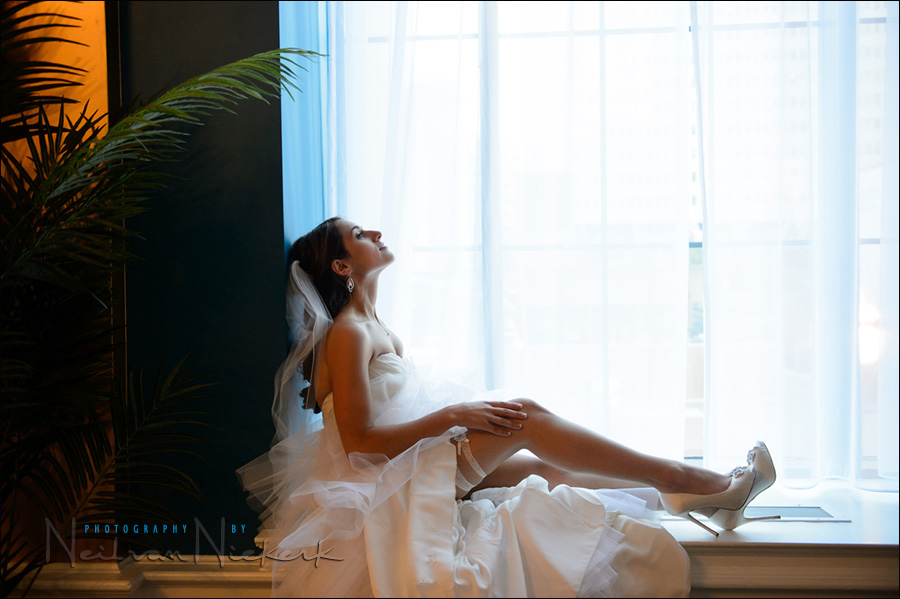
- 1/125 @ f/4 @ 1600 ISO … video light
- Nikon D4
- Nikon 24-70mm f2.8G AF-S / Canon 24-70mm f/2.8L II … @ 35mm
- Lowel ID-Light 100W video light
Again, the intention here was clearly to show leggy sexiness. The video light gave that dramatic light fall-off which I rely on with the romantic portraits of the couple.
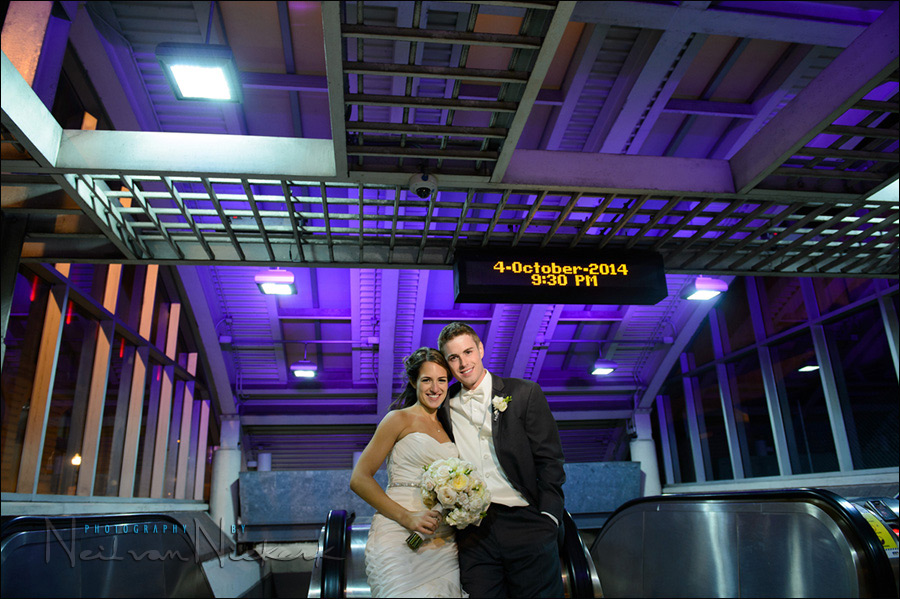
- 1/125 @ f/4 @ 1600 ISO … video light as accent light.
- Nikon D4
- Nikon 24-70mm f2.8G AF-S / Canon 24-70mm f/2.8L II … @ 24mm
- Lowel ID-Light 100W video light
I’ve used this idea before. It works. The colors and the urban look. The bonus – their wedding date on the sign.
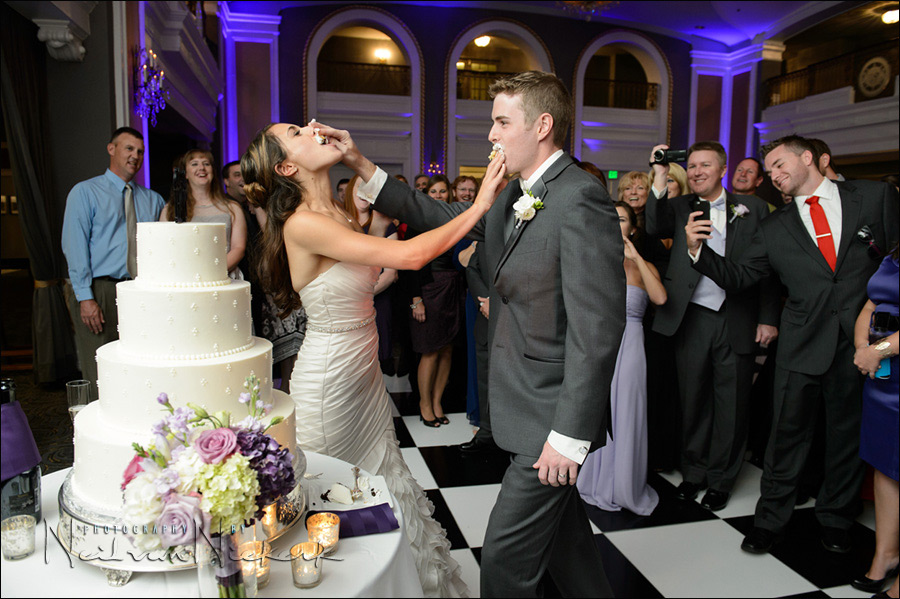
- 1/30 @ f/4 @ 2000 ISO … on-camera bounce flash
- Nikon D4
- Nikon 24-70mm f2.8G AF-S / Canon 24-70mm f/2.8L II … @ 28mm
- Nikon SB-910 Speedlight / Canon 600EX-RT Speedlite
This wedding venue, The Lord Baltimore hotel, has a massively large reception room. I prefer not having to use multiple off-camera flashes, since they are difficult to control with unpredictable shadows as people move, and with the risk of random hot-spots in the frame. For me, the use of a single on-camera bounce flash is easier to control, and gives some of the ambience of the place still if you use proper camera settings.
More about the topic of using high ISO settings with bounce flash at weddings:
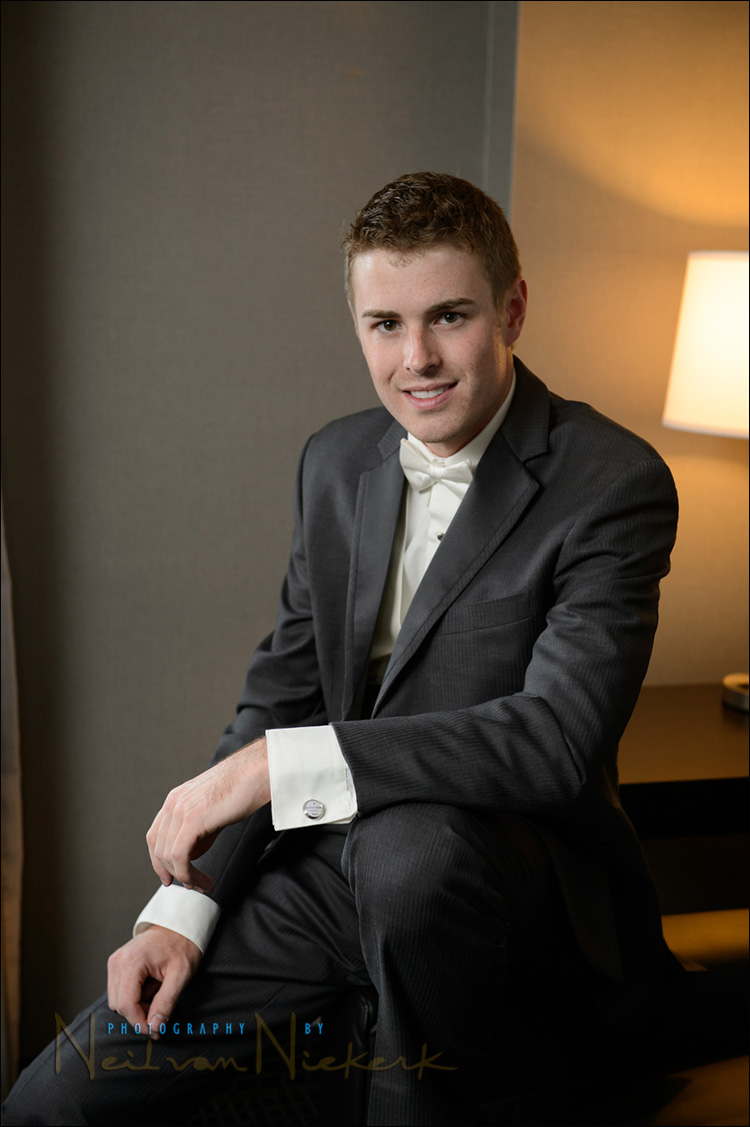
- 1/200 @ f/4.0 @ 1600 ISO … available light + on-camera bounce flash
- Nikon D4
- Nikon 24-70mm f2.8G AF-S / Canon 24-70mm f/2.8L II … @ 65mm
- Nikon SB-910 Speedlight / Canon 600EX-RT Speedlite
Just the right balance between the available light coming in through the window, and the incandescent lamp behind Brad … with a touch of bounce flash from the sped light on my camera.
A little bit of homework – figure out the exact angle I bounced my flash.
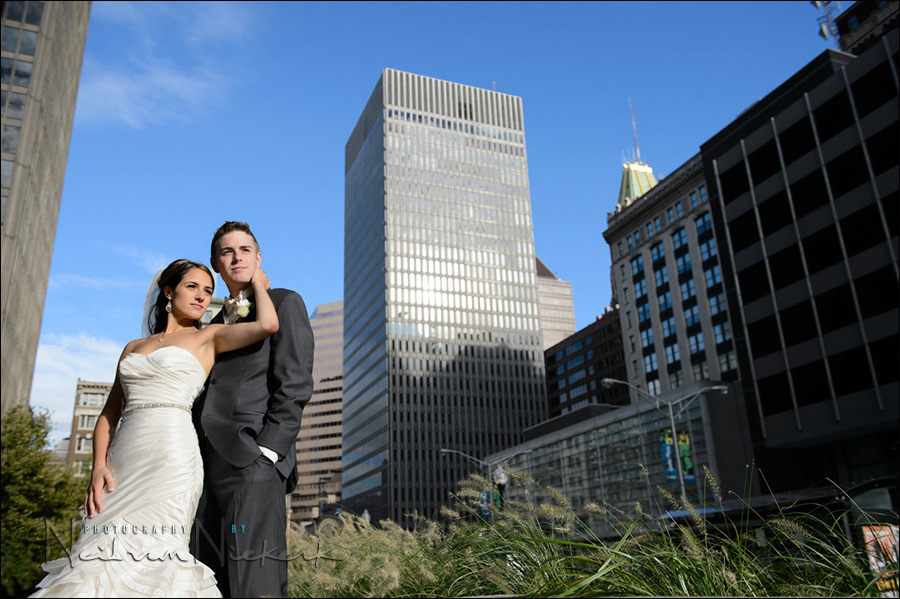
- 1/640 @ f/4 @ 100 ISO … available light only.
- Nikon D4
- Nikon 24-70mm f2.8G AF-S / Canon 24-70mm f/2.8L II … @ 30mm
I shot an extensive sequence here, varying the composition. I wanted an appropriately dramatic pose to match the urban setting.The pose was also done in relation to the available light.
- 1/640 @ f/2.8 @ 100 ISO … available light only.
- Canon 5D mk II
- Canon EF 70-200mm f/2.8L IS II / Nikon 70-200mm f2.8 AF-S VR II … @ 125mm
This image was shot by Theresa Choi, who helped me at this wedding. She did exactly what I expect of second shooters – she found an alternate angle, and worked around me. She didn’t duplicate what I was shooting by shooting in the same direction as I did. In this way, working independently off my setups of the bride and groom, she gave me images that supplement what I deliver to my clients. Awesome.
As mentioned in that article, I also prefer that 2nd shooters pick off images with a longer lens for tighter compositions and detailed moments.
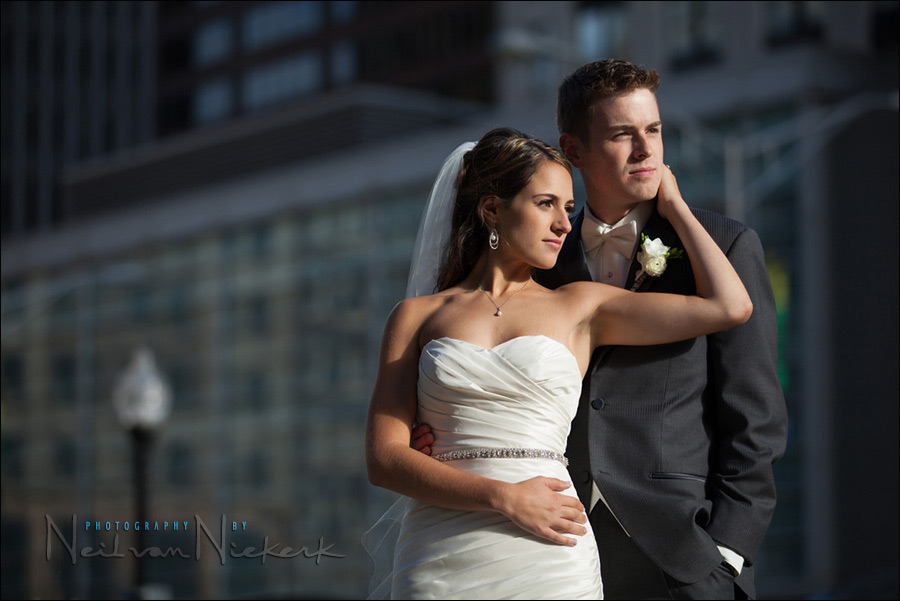
- 1/1000 @ f/7.1 @ 500 ISO … available light only.
- Nikon D4
- Nikon 24-70mm f2.8G AF-S / Canon 24-70mm f/2.8L II … @ 24mm
The sunlight, slightly filtered by the thin cloud layer, was just perfect to give a contrasty look, but not unflattering. Again, Nicole’s pose is directed towards the light.
There is some perspective distortion because of the ultra-wide angle view and placing them towards the corner of the photo – but this is a small sacrifice in getting a photo that looks dramatic and unusual in its setting. Impact trumps a finicky insistence on what should be correct.
The settings might not make perfect sense in deconstructing it now – they came from shooting various sequences fast, and me rotating dials to get correct exposure. Sometimes these odd numbers are the lucky numbers. They still work perfectly.
- 1/250 @ f/11 @ 160 ISO … off-camera flash, with Profoto B1 flash
- Nikon D4
- Nikon 14-24mm f/2.8G AF-S / Canon EF 16-35mm f/4L IS … @ 20mm
- Profoto B1 500Ws flash with white shoot-through umbrella
When you need a lot of light to match bright sunlight, and have enough DoF, you need a big light. Have I mentioned lately just how much I love the Profoto B1 for work like this!?
- Using the Profoto B1 flash at a wedding
- High-speed flash sync (HSS) with the Profoto B1 portable flash

- 1/100 @ f/4 @ 1600 ISO … video light
- Nikon D4
- Nikon 24-70mm f2.8G AF-S / Canon 24-70mm f/2.8L II … @ 40mm
- Lowel ID-Light 100W video light

- 1/60 @ f/3.5 @ 1600 ISO … off-camera flash, with Profoto B1 flash
- Nikon D4
- Nikon 24-70mm f2.8G AF-S / Canon 24-70mm f/2.8L II … @ 65mm
- Profoto B1 500Ws flash with the Profoto RFi 1’×3’ softbox
A little bit of homework: working with such a high-powered flash, why did I still use a high ISO and wide-ish aperture?
Summary
More images from Nicole & Brad’s wedding at the Lord Baltimore hotel, Maryland
With this article, I wanted to give some insight in how it all comes together. Even though it is sometimes a mad dash to keep within the time-frame and still be creative and do more than just live up to your clients expectations – in being prepared, and in being able to fluidly adapt to different scenarios, you can still deliver images that have a recognizable style to them.
Photo gear (and equivalents) used in photographing this wedding
- Nikon D4
- Nikon 24-70mm f2.8G AF-S / Canon 24-70mm f/2.8L II
- Nikon 70-200mm f2.8 AF-S VR II / Canon EF 70-200mm f/2.8L IS II
- Nikon 14-24mm f/2.8G AF-S / Canon EF 16-35mm f/4L IS
- Nikon SB-910 Speedlight / Canon 600EX-RT Speedlite
- Nikon SD-9 battery pack / Canon CP-E4 battery pack
- Profoto B1 500Ws AirTTL portable flash
- Profoto RFi 1’×3’ softbox
- Manfrotto 1004BAC – tall light-stand
Related articles
- Adapting the use of light & flash photography (Alesha & Patrick)
- Using the Profoto B1 flash at a wedding (Karissa & Rory)
- Use light & lighting to add impact to your photos (Grace & Joseph)
- Wedding photography – a photo-journalistic style, or more posed? (Cherryl & Jim)
- Photographers – becoming more confident in posing people (Kelly & Joe)
- Wedding photography tutorials
- Nicole & Brad – wedding photography, Lord Baltimore hotel
- NJ wedding photographer
- New Jersey wedding photographer
- New Jersey wedding photographers
A little bit of homework

- 1/200 @ f/4.0 @ 1600 ISO … available light + on-camera bounce flash
- tutorial: bounce flash photography
Just the right balance between the available light coming in through the window, and the incandescent lamp behind Brad … with a touch of bounce flash from the sped light on my camera.
A little bit of homework – figure out the exact angle I bounced my flash.

- 1/15 @ f/11 @ 800 ISO
- Profoto B1 500Ws flash with the Profoto RFi 1’×3’ softbox
Explain the choice of camera settings.

- 1/60 @ f/3.5 @ 1600 ISO
- Profoto B1 500Ws flash with the Profoto RFi 1’×3’ softbox
A little bit of homework: working with such a high-powered flash, why did I still use a high ISO and wide-ish aperture?
Thanks Neil. I’ll take a stab at the homework.
1. Portrait of groom: you bounced the light way up high above his right (our left) eyebrow/temple. Slightly forward (not directly above him) but not much.
2. Couple at window: you needed f11 because they were so far apart and you needed a deep depth of field. That was the critical consideration. Then you upped the ISO without going too far to avoid noise and sacrificed the shutter speed, going super slow, which you could do because you were using flash and because they were sitting still. With the D4 you could’ve gone higher on the ISO and still been comfortable re noise but you must have felt you were in good shape with shutter speed at 1/15 for reasons above.
3. Basically I think the answer is because it was so darn dark you had to. You could do f3.5 because their heads were close together and they were a good distance from you. A shutter speed of 60 should be fine with a flash and stationary subjects. You had to jack up the ISO due to low light. You could have blasted the high-powered flash but you were avoiding the flashy look. With such a dark background balancing the light meant using the flash conservatively. The f3.5 was not only possible but also desirable to isolate couple from background. With D4 you could comfortably up the ISO to 1600.
1. Flash turned left about 135 degrees (or 45 degrees shy of straight back) and 50 to 60 degrees up.
2. The small aperture is to ensure focus all the way from the groom’s hands to the bride’s earrings which must be at least four feet and you were probably quite close to them. The slow shutter speed to compensate for the aperture and you couldn’t use to much power on the flash without blowing out the dress and the curtain.
3. The high ISO was to capture the dim ambient light in the background. If you powered up the flash to use a lower ISO you would have thrown too much light behind them, revealing too much detail in the background.
1. behind you, little on the left to create catchlights in his eyes
2. they are quite far by each other, so you need to have both of them in focus, that`s why you need f11 and reasonably short shutter. ISO 800 to save as much power as you can
3. To have a little of ambient light in
For #1, I’m going to agree with Jennifer. There’s a shadow under his nose that’s angled too sharply for window light, and it’s a tad too dark to have been caused by flash bounced from behind you.
What Jennifer said ^
Picking up on what Peter and Baart1980 said about photo #3, yes, I think they’re right. The only way to get the back room was to expose for the back room with the camera settings – the high ISO and the shutter speed. The flash wouldn’t have reached it no matter what you set it to. Or you’d have to set the flash so high you’d way overexpose the couple. So now that the back room is exposed with the ISO and shutter speed, you just used enough flash to properly expose the couple.
^^^ Don’t forget, that’s a Profoto B1 used in #3 and I’ll bet that could flood the whole space like broad daylight including up the stairs that are all but invisible now. I would also take a wild guess and and say the 1×3 softbox was rotated 45 degrees and feathered to the right. :)
1) The highlights on his forehead makes me think it was pointed nearly above the models head, a little back towards yourself and left to create natural angle (window) of fill light for the shadows.
2) The tele end of the lens limits your DOF drastically so hence the small aperture. (couple is in line formation)
The light modifier isn’t that big so you’ve put it back a long way, to get a soft enough set up? The distance limits the power, so upping the ISO eases the burden. (This could be also even an off camera bounce flash off the ceiling??)
The small aperture also limits the flash power. The slow shutter speed lets the ambient light, which must be really low, balance the atmosphere.
3) Is that a mirror in the background? The desk lamp wouldn’t be in front of a doorway I think.
So you have them standing in a dark room, and the subject is lighted by the modified narrow dramatic flash, and the ambient is reflected through the mirror. The ambient is weak so up the ISO and slower the shutter. The wide aperture is for subtracting them from the background.
Just guessing! It will be educating to learn the lesson though. Especially the last two pics!
What does your 2nd do when you are doing indoor portraits with presumably the only B1?
1. To the left and over your shoulder, based on the shadow of the nose.
2. 1/15 to let the ambient burn in a bit for the blue background, f/11 for depth of field all the way and because even at its weakest the Profoto throws out a bucketload of power so close to the subject (I’m guessing there wasn’t a lot of space inside the room).
3. Once again, probably to let the ambient come in a bit in the background, and to get shallow-ish depth of field, I guess. I also have a gut feeling you’re running with an egg-crate grid here, though I’m not certain if you had enough time to do that while shooting on location.