photography using only the existing light
Instead of a photo session where I had to rely on off-camera lighting to give some color and snap to the photos, I want to show a photo session where I used no additional lighting or reflectors. Just the available light. This photo session was shot in same area as the previous one, but a week later with different light and a different couple, Kristy and Tom. They were just as great to photograph with tons of personality, making my work easier. But I still had to look for opportunity and great backgrounds.

Using off-camera flash makes a photo session relatively easier, since you can have fantastic light on the couple pretty much anywhere you place them. Then it is a simple matter of finding an interesting or complementary background, and then try and capture some element of your subject – in this case, some part of the couple’s relationship with each other.
For this photo session however, I decided to work on my own,
and rely on finding great existing light …
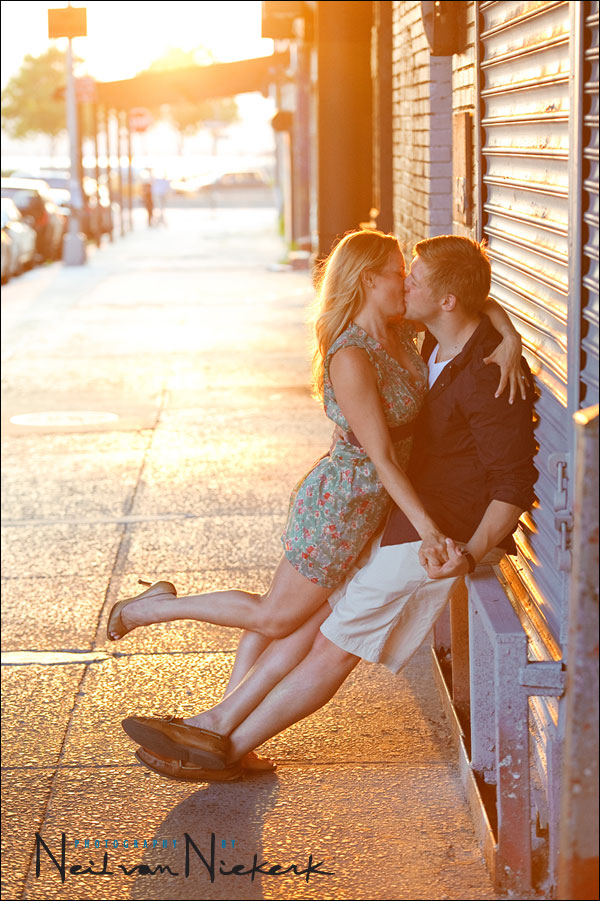
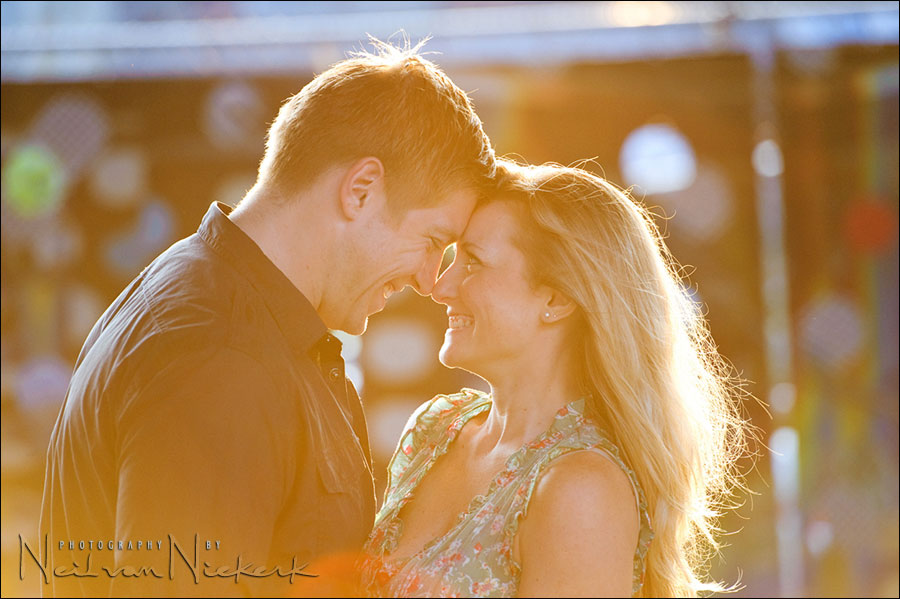
Details for the image at the top:
1/250 @ f3.5 @ 1600 ISO
Nikon D3; Nikon 70-200 mm f2.8 AF-S VR II … at 100mm
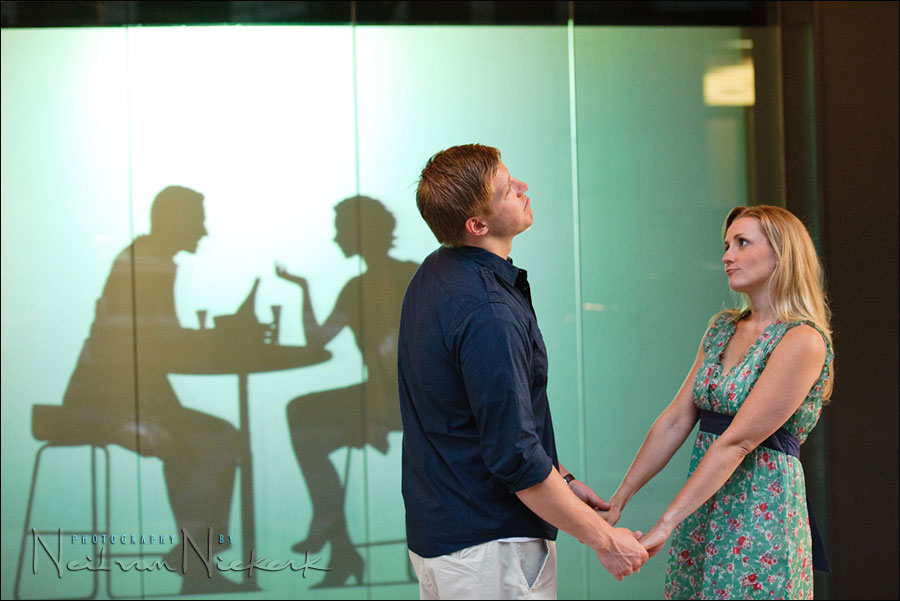
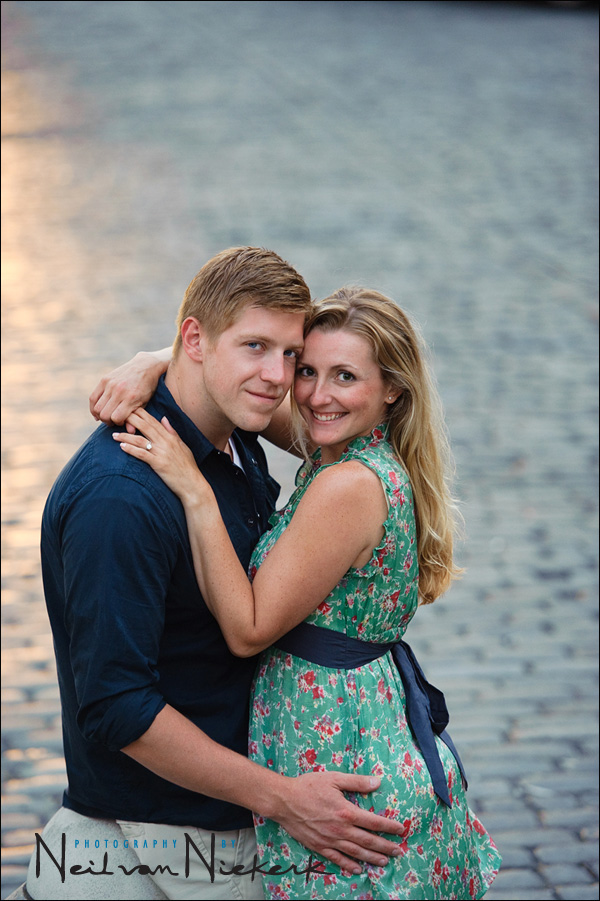
Details for the next two images:
1/160 @ f2.8 @ 1600 ISO
Nikon D3; Nikon 70-200 mm f2.8 AF-S VR II … at 70mm
The high ISO was necessary for these images, since the light, even though it looks very bright in the top image, was starting to get low. And I needed a relatively high shutter speed to stop their movement. I don’t get much digital noise with the Nikon D3 and will happily push the ISO up higher if need be – the idea is that it I can fix digital noise, but I can’t fix an unsharp image.
When I mentioned looking for ‘great light’ in relation to portraits, I’m generally referring to not having dark eye sockets, or harsh uneven light on my subjects. So in a case like this, with the hard sunlight on them, I posed the couple so that the light falls evenly on their faces.
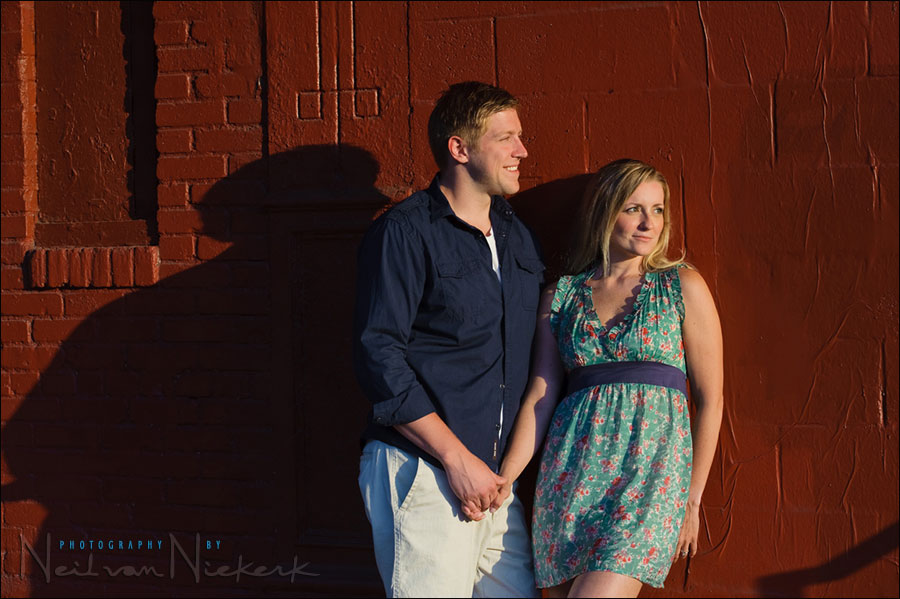
1/200 @ f8 @ 400 ISO
Nikon D3; Nikon 70-200 mm f2.8 AF-S VR II … at 70mm

With backlight, it becomes a lot easier. The open shade gives soft light, while the light from behind gives rim-lighting, which helps separate them from the background.
1/250 @ f4 @ 400 ISO
Nikon D3; Nikon 70-200 mm f2.8 AF-S VR II … at 120mm
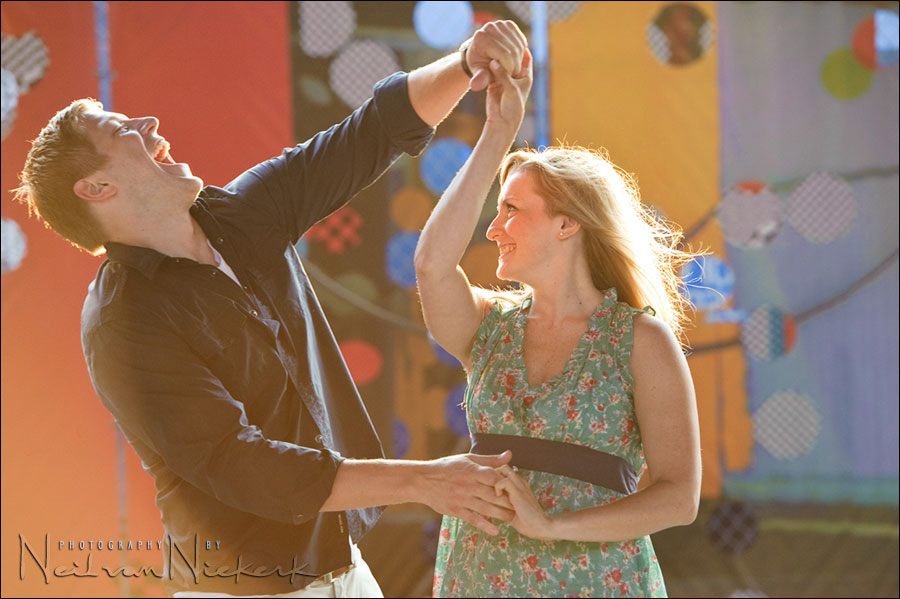
So much of the photo session’s success depends on the energy of the couple. The photographer can’t fake it or force it. If a couple has dynamic personalities and easily interact with each other, then the session can only have great results. Now it just depends on the photographer’s composition, use of light and timing.
1/400 @ f4 @ 1250 ISO
Nikon D3; Nikon 70-200 mm f2.8 AF-S VR II … at 150mm
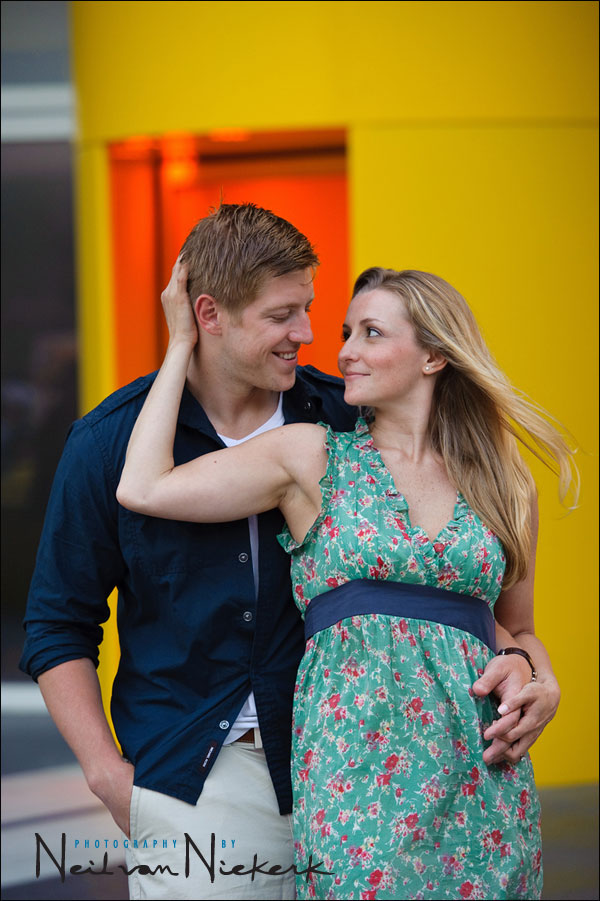
I easily let the lens flare, giving that warm golden glow. The image then needs adjusting in post-production though to bring the exposure down, and increase the contrast.
1/400 @ f4 @ 1250 ISO
Nikon D3; Nikon 70-200 mm f2.8 AF-S VR II … at 200mm
1/320 @ f4 @ 640 ISO
Nikon D3; Nikon 70-200 mm f2.8 AF-S VR II … at 200mm

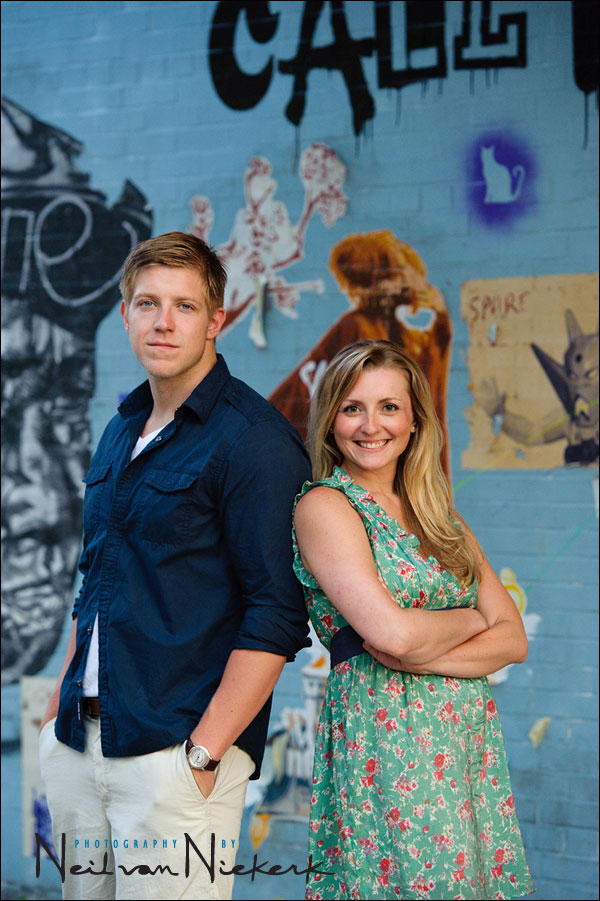
If this setting here might look familiar, it is because I used the images I took of Kristy here as illustration for the article on choice of the camera’s white balance.
1/160 @ f3.5 @ 1600 ISO
Nikon D3; Nikon 70-200 mm f2.8 AF-S VR II … at 175mm
1/200 @ f4 @ 1000 ISO
Nikon D3; Nikon 70-200 mm f2.8 AF-S VR II … at 150mm
Here I specifically wanted a similar pose and image as I used the week before with the other couple. Mostly because it is a cool background, but also as a comparison to the photo where I used flash in a softbox to clean up the light.
1/250 @ f4 @ 1250 ISO
Nikon D3; Nikon 70-200 mm f2.8 AF-S VR II … at 125mm

1/160 @ f2.8 @ 1600 ISO
Nikon D3; Nikon 70-200 mm f2.8 AF-S VR II … at 180mm
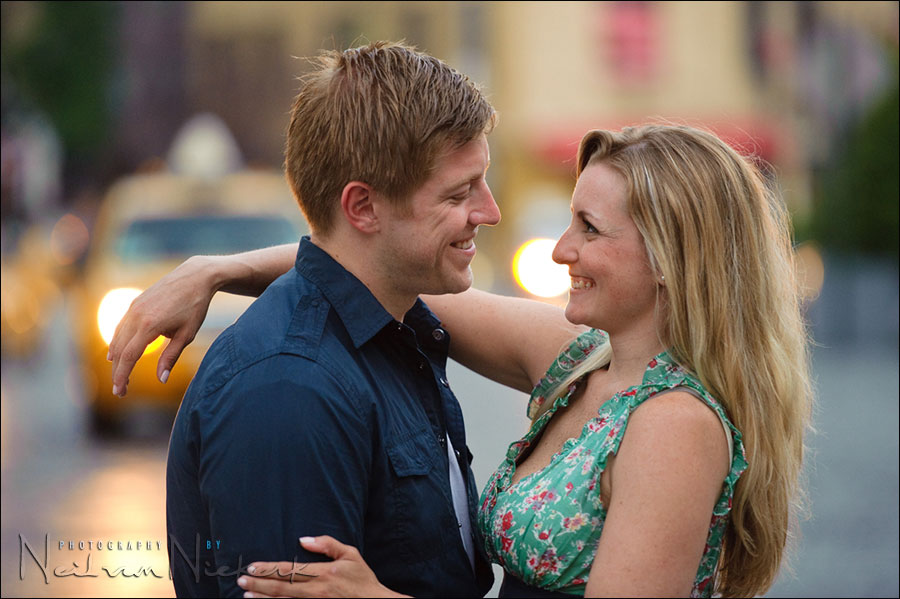
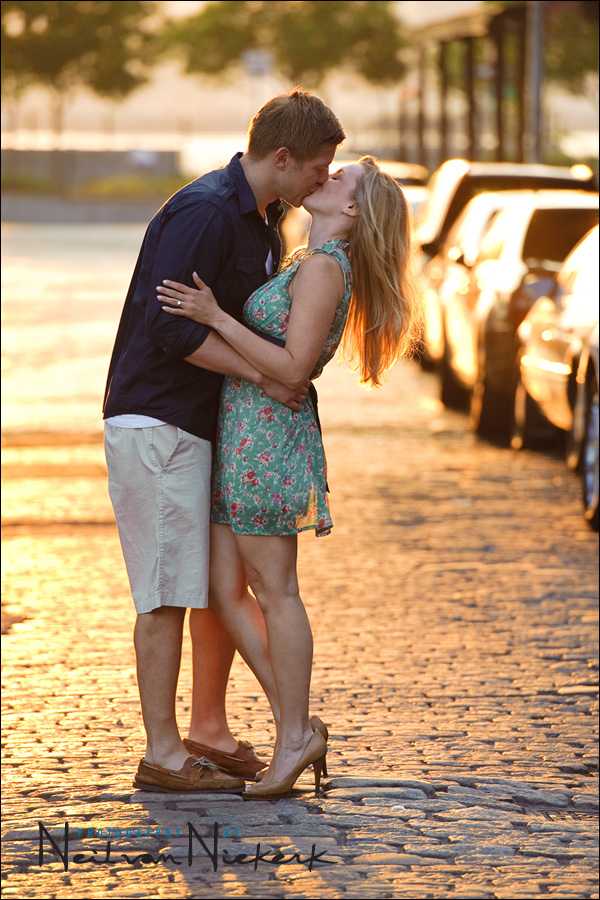
For the final sequence of images, I wanted the yellow New York taxi cabs in the background. For color, but also for their headlights creating interesting patterns and shapes .. and providing some rim-lighting.
1/160 @ f2.8 @ 1600 ISO
Nikon D3; Nikon 70-200 mm f2.8 AF-S VR II … at 185mm
For the closing image, I chose one where I waited for the taxi cab’s headlights to reflect in the cobblestones behind them. That accent of warm color helps break the monotonous grey paving.
1/100 @ f2.8 @ 1600 ISO
Nikon D3; Nikon 70-200 mm f2.8 AF-S VR II … at 160mm
As a final note, I want to make the observation that by observing the existing light – the quality and direction of the light – it was possible to come up with a variety of images that would please my clients. In taking care during the shoot to look for good opportunities and great light, it was possible to set up the photos so that the images needed a minimum of post-processing work. No need to remove ugly shadows and casts. Just the use of the existing light, carefully considered.
I chose one where I waited for the taxi cab’s headlights to reflect in the cobblestones behind them. That accent of warm color helps break the monotonous grey paving.
that right there is one of the most subtle but important tips…..genius!
Neil, again a great tutorial!
I am glad you are showing some work with natural light. I know you do not use use flash per se.
I come to your website to learn about using flash in a better way. I want to be able to take great photos in any situation by using flash to help control the lighting. At the moment I tend to have to “control” lighting by moving to areas where the lighting is more amenable to non-flash photography. This means of course that at times I cannot take photos in certain places and with certain backgrounds because of the (usually) harsh sunlight where I live (Spain).
Do you think that non-professional models can be more relaxed with natural lighting and one photographer rather than have another person pointing a lightstick above them? Today´s photos do seem to have a certain spontaneity about them.
Thanks again Neil.
I think it is only easier to use off camera flash when you know what you are doing, like you obviously do Neil! I’ll take my chances with available light until I have more knowledge of off camera. These images are great, thank you for sharing.
Hi Neil
Once again, thanks for a very relevant and well explained topic, illustrated with great images.
This relates back to my previous question about how important is the quality/direction of the natural light when using flash, especially if flash is contributing up to a max of no more than 50% of the light and probably less as flash fill in most situations.
I’ve often heard not to ignore, and always be aware of potential natural light picture making opportunities when using flash, and this is where I personally struggle most. The decision to flash or not. Perhaps the decision to use flash or natural light is ultimately a creative one when the option of both is available.
I’ve experimented quite a bit with this, by removing the top light, exposing for the face and letting the background do what it wants according to the set exposure, and with good success. This exercise in itself causes me to have to give thought to the tonality of the background relative to the subject. Would it be possible though to explain sometime what makes the commonly used phrases of ‘good light’, clean, directional light and open shade. Quality, quantity and direction of natural light are obviously important, of which quality is the grey area for me. For example, it’s said that under the first tree into a wood will give good clean light, whereas 3 or 4 row of trees in gives a poor quality of light. I’m unsure why this is.
Thanks again for providing such inspirational and technical information.
Neil,
In the very first image, can you touch on how you metered for this. Obviously, with the bright sun in the back if you let the camera’s meter decide, your couple would be underexposed…
Brian, one approach would be to take a general meter reading off their shaded side, but oriented more towards the shaded areas that aren’t too deep in shade. (If that makes sense.) Then a test shot will show whether I need to bring my exposure down a bit more in order not to lose too much of the brighter background. In this case I liked the sun-drenched washed-out look.
The key is to meter selectively for your subject.
Reading this is like a breath of fresh air. Working with couples is such a dance. Juggling the light, the posing, the moment, all of it. And of course, you make it look easy. Very inspiring. Thanks for another great post!
Thank you for your reply. That makes a lot of sense, Neil. Of course there is the little problem of financing ;-)
Nice one Neil,
On the button again with the easy to understand info.
Cheers
Neil, thanks for all the hard work this tutorial represents. Your models look so fresh and eager to keep smiling. When you mention ‘test shots’ are you telling your models to just relax while you get things worked out, then to burst into their ‘happy faces’? My models, usually high school seniors or just-engaged couples, don’t quite know when to stop smiling, and as a result after 30 minutes or so, their cheek muscles are ready to cramp up. What do you tell them, or are you testing with a stand-in assistant?
[ placeholder ]
Neil, the work you do truly is inspiring. After reading your site for only a few days I bought your book :) I am a beginning, but avid hobbyist desperately trying to get a handle on all the subtle considerations that make for creating a great image. One of the things that stands out to me, particularly in this shoot is how sharply focused all your shots are and how they pop so vividly from the background. Do you have a technique for nailing the focus like that? Do you centre point focus lock and recompose, or do you change the focus points to fit your composition? I have been told that the latter is the better technique, but I find it difficult (and annoying) especially with moving subjects. Thanks so much for sharing!
Hello Neil….Thank you for the wonderful site. Very helpful.
You had touched on this a bit with Sean, but I wondered if you would go a little further about your settings and technique?
I wanted to know what and how your shooting, moving subjects such as a wedding? Specifically speaking, which drive mode do you use for moving subjects (single shot or ai servo(for tracking))? Also, given your answer, how do you use your AF points in conjunction with the drive mode to get more consistent tight focus shots?
Thanks again.
Dominic
Hi Neil, thanks for all your tips and photos. In the above photos what metering mode will you use?
Monica, I mostly just use Evaluative / Matrix. But I do meter selectively.
Hi Neil!
I stumbled upon your site while surfing the web for little tips and pointers for an upcoming beach wedding I will be shooting. I have only been really doing photography for about a year and a half and have only done a couple small weddings, so naturally I have some nerves about the light that can be presented to me in such a setting. Besides weddings I have mainly worked in outdoor situations (family, sibling, engagement type sessions), in various lighting and have had some great successes and triumphs for photos, on top of some learning experiences. I am always trying to learn, as I am a self taught photog, and have a LOT more learning to do to even be half of what many are, especially in terms of the technical side and knowing my camera well in manual. I love that you did this post, as it it very much my approach to photography.
I use my surroundings and camera (no extra flashes, etc….on quite the budget!) and what I have around me for lighting and scene. I am however, looking into buying an external flash so that I have some more flexibility and precision. Is this something that will benefit me greatly, for the type of work I do?
Mostly daytime, although the wedding reception will be continuing on into the evening with less light and so forth. And I would also love to get into weddings a bit more, but have shied away because indoor reception spaces and dance floors scare the living daylights out of me! That is why I figured an external flash might give me that confidence and more importantly ability to capture those types of scenes and shots better.
If you could give me one solid piece of advice for the beach wedding I have in May, what would it be? You can bet your bottom dollar I am sifting through info to gather tidbits of info, and hopefully will have a few nice days closer to the wedding and in the spring that I can head to the city (I live outside of Chicago) and do some test shots to build on my confidence. Thanks for all of your lovely work here, and sharing such beautiful, down to earth inspiration in both your photos and your writing! :)
-Megan
shooting wedding portraits in bright sunlight on the beach
Neil, quick question.
Overcast sky, no light modifiers or flashes and model on meadow. How to pose the model, so he/she doesn`t have dark shadows under the eyes (I had this sort of session:-) )?
Unless you pose them with their faces up to the sky the whole time, there isn’t much you can do, considering the limitations you’re placing on this scenario – no light modifiers and no flashes, with an overcast sky.
Thank you for this, beautiful photos and what I consider to be very sound advice. Especially the mention of getting the lighting right in the camera with minimal editing in which is my preference!!!!