Tangents

photography tutorials, reviews & workshops

tangents photography blog
learn : discuss : share
  • Tangents
  • Tutorials
    • Flash Photography
    • Wedding Photography
    • Studio Photography
    • Posing People
    • Understanding Your Camera
    • Exposure metering
    • BFT
    • Best Photo Books
  • Reviews
    • Sony
    • Nikon
    • Canon
    • Fuji
    • Profoto
    • lighting gear
  • Workshops
    • Info: Workshops
    • In-person
      tutoring sessions
    • Online
      tutoring sessions
    • Workshops in
      New Jersey (NJ)
    • Workshops in
      New York (NYC)
    • Photo walks in NYC
    • Studio Workshop
    • Video tutorials
    • Workshop results
  • Books
    • On-Camera Flash (revised ed.)
    • Direction & Quality of Light
    • Off-Camera Flash Photography
    • Lighting & Design
    • On-Camera Flash (1st ed.)
  • Projects
    • Two Perspectives
    • B&W Infrared
    • Vintage lenses
    • Time-lapse photography
  • Info
    • About
    • Contact
    • My Photo Gear
    • Books by NvN
    • Join us on Facebook
    • Acclaim
    • Success Stories

video light & boudoir photography

April 6, 2009 Neil vN 7 Comments

using a video light for boudoir photography

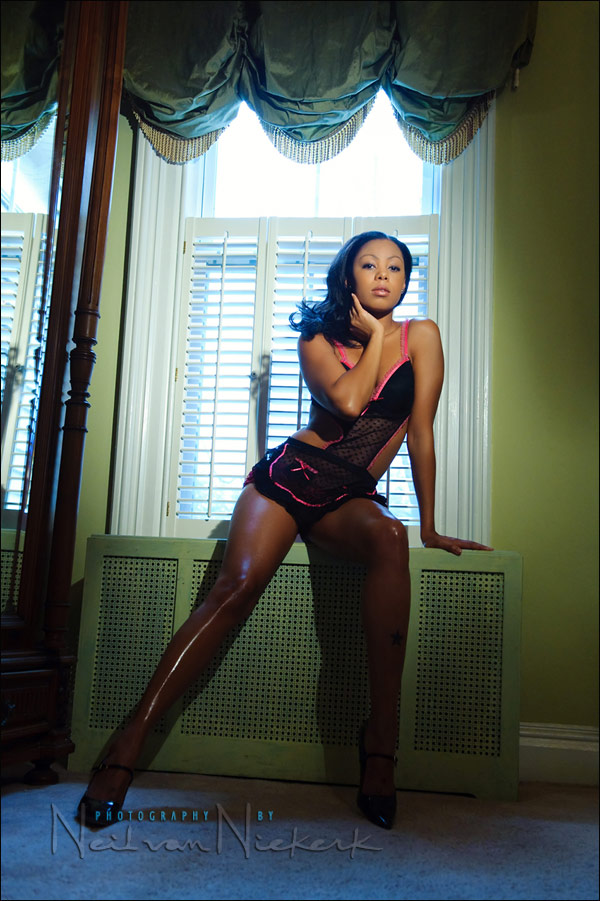
An image from a boudoir photo session today.  I ended up mostly using a video light (or two) for the directional and dramatic quality of the light.  I tried on-camera bounce flash a few times, but even when I carefully flagged and bounced the flash, there were a number of times where I found that the bounce flash just evened out the light too much.  Sometimes it is soft light, and sometimes it just becomes flat light.

With the video light (held up by my assistant), I was able to ask my assistant to flag the light and drop the light off dramatically to the model’s legs.  That’s the beauty of using video light – it is completely WYSIWYG.   You can make immediate changes to the position of the light – or how you position yourself – based on the light and light patterns on your subject.   And with an assistant holding up the light, instead of fixed on a stand, you even have voice-activated automation in how the light is placed.


More on the video light equipment I use, and more examples of how I use video light for photography lighting.


Filed Under: boudoir photography, lighting, models, Uncategorized, video light


Help support this website

If you find these articles of value, please help support this website by using these B&H and Amazon affiliate links to order your photo gear.

I also offer photography workshops and tutoring sessions, whether in person, or via online video tutoring sessions.

Please follow me on Instagram for more.

You can also join our thriving photo community in the Tangents group on Facebook, where we show our photos and discuss all things photography.

Thank you,

Neil vN

Books by Neil van Niekerk


7 Comments, Add Your Own

  1. 1Steel Photo says

    April 7, 2009 at 6:23 am

    Very dramatic photo.

    I am guessing that the image posted has had little to no post processing as per your usual.

    I do have to comment that the particular look of that photo with the colors and light drop off has the modern lomo type processing looks that seems to be one of the photography rages today. Although, most of the people I know doing that actually use photoshop to do it.

    Its nice to see other styles of your photography.

    Thanks for another great read.

    Reply
  2. 2Neil says

    April 8, 2009 at 8:34 am

    Hi there Jeff ..

    This image did see some work in post-production.

    Firstly I pushed up the saturation and contrast, and made a slight adjustment on the exposure, as well as crop the image slightly to go from a 3:2 to 4:3 aspect ratio. … all of this in ACR and Bridge.

    Then in Photoshop I cloned out a piece of metal pipe in the corner … and then I also touched up some minor skin blemishes as is usual with portraits. I also removed some specular reflections on her legs.

    Then through a series of actions in Photoshop, I punched the image up a bit.

    Neil vN

    Reply
  3. 3Pat says

    April 9, 2009 at 10:19 am

    Lovely image Neil!

    I had not thought of using a video light for boudoir on location before but can see the obvious benefits :-)

    I’m curious why you only tried bounce flash and not triggering it remotely?

    Although I can see the advantage of WYSIWYG of video over a flashgun.

    Reply
  4. 4Neil says

    April 9, 2009 at 11:05 pm

    Hi there Pat,

    The main reason why I didn’t use umbrellas or softboxes (with pocketwizards and lightstands), is that I left all that at home.

    I kept my lighting gear to a minimum, since I knew I’d only be using available light, or video light, or a little bit of bounce flash.

    When I scouted the location, I knew I wouldn’t have a lot of space to move around in and set up lighting gear. But my biggest consideration in not using flash with softboxes, etc .. was that I wanted to shoot fast, and have the models move around a little. This would free us all up from static set-ups.

    But the most important consideration in using video light is that it is WYSIWYG. My assistant, my daughter, knows how to hold the light and follow the model’s movement. So when a model changes the positioning of her head a little, my daughter can follow her gesture with the video light .. and keep the same lighting pattern on the model’s face.

    So let’s say I want a loop lighting pattern on her face .. then my assistant can follow the model’s movement, and keep that lighting pattern fairly consistently.

    You would have a harder time doing this with flash, because you can’t immediately see the result in changing the position of your lighting when you use a minimalist lighting set-up with a speedlight and a softbox.

    It is that direct feedback with video light (since it is continuous light), that makes it so useful when shooting under tungsten lighting conditions.

    Neil vN

    Reply
  5. 5Andrew says

    April 11, 2009 at 11:00 am

    Neil,

    You need to use that as your promotional shot for your workshops :)

    Fundy

    Reply
  6. 6Jonathan says

    May 24, 2009 at 7:27 am

    Hi Neil,
    Great work. What about color temperature of ambient light mixing with video light ?
    How to color correct ?

    Reply
  7. 7Neil says

    May 24, 2009 at 10:19 pm

    Jonathan, in this instance, I made sure to keep the model’s back towards the daylight color balanced areas, and light up the opposite side with video light … which is also the same as the lighting in the interior of the room.

    It would be much harder work getting a good-looking image of the model with two completely different color balanced light sources shining on her.

    So in this instance I didn’t have to “correct” for the white balance .. I just kept it to Tungsten WB and then touched it up a little in post-processing to keep it warm.

    Neil vN

    Reply

Leave a Reply to Steel Photo Cancel reply

Your email address will not be published. Required fields are marked *

categories

Articles & Tutorials

  • • About myself & this site
    • Books by Neil vN
    • Best photography books
    • Black foamie thing
    • Photographers’ success stories
  • • Flash Photography Techniques
    • Natural looking flash
    • Flash + Ambient light
    • Dragging the shutter
    • Bouncing your flash
    • On-camera flash outdoors
    • Exposure metering
    • Flash exposure compensation
    • Bounce flash examples
    • Which is the best flashgun?
    • Flash brackets
    • Off-camera flash photography
    • Flash photography basics
    • Using video lights
    • Flash photography tips
  • • Photography workshops NJ / NYC
    • Models @ photography workshops
tutorials:
flash photography
Photography
Workshops

All rights reserved. Copyright © Neil van Niekerk 2025 · Customization by The Traveling Designer

Copyright © 2025 · NvN on Genesis Framework · WordPress · Log in