Tangents

photography tutorials, reviews & workshops

tangents photography blog
learn : discuss : share
subscribe today
  • Tangents
  • Tutorials
    • Flash Photography
    • Wedding Photography
    • Studio Photography
    • Posing People
    • Understanding Your Camera
    • Exposure metering
    • BFT
    • Best Photo Books
  • Workshops
    • Info: Workshops
    • In-person
      tutoring sessions
    • Online
      tutoring sessions
    • Video tutorials
    • Workshops in
      New Jersey (NJ)
    • Workshops in
      New York (NYC)
    • Studio Workshop
    • Workshop results
  • Books
    • On-Camera Flash (revised ed.)
    • Direction & Quality of Light
    • Off-Camera Flash Photography
    • Lighting & Design
    • On-Camera Flash (1st ed.)
  • Reviews
    • Nikon
    • Sony
    • Canon
    • Fuji
    • Profoto
    • lighting gear
  • Projects
    • Two Perspectives
    • B&W Infrared
    • Vintage lenses
    • Time-lapse photography
  • Info
    • About
    • Contact
    • My Photo Gear
    • Books by NvN
    • Newsletter
    • Join us on Facebook
    • Acclaim
    • Success Stories
    • Photoshop Actions
  • Forum

Wedding photography – Retouching & style

December 1, 2009 Neil vN 40 Comments

Wedding photography – Retouching & style

My style in wedding photography veers towards the more straight-forward image – uncluttered and without much Photoshop work done. I really believe that the more you fudge with a photograph, the more likely it would not be as timeless as you might want it to be. Retouching styles become dated. So I tend towards the more straight-forward rendition of a photograph. That said, you can most definitely enhance the original photograph to make it really pop.

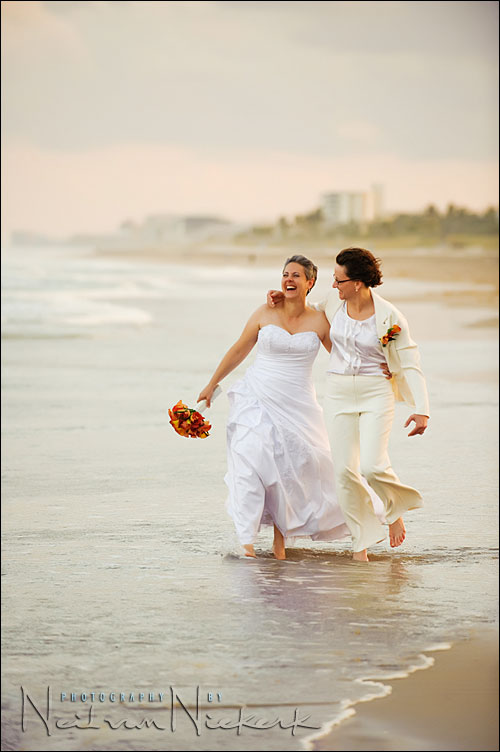
Here is an example – a favorite image from a sequence taken during the romantic portrait session after a wedding.  The wedding took place in Florida. As a wedding photographer in New Jersey, it is quite a treat to do a destination wedding – someplace a little more exotic than the Garden State. Not only was it a destination wedding in Florida, but this also happened to be the first time that I photographed a same-sex wedding.   And I felt particularly honored to have so much faith placed in me with a special event like this.

The reason why this image is my favorite is that it shows a wonderful couple together in a spontaneous moment.  It is  very much *them*, and I am sure their friends and family will instantly recognize this image as capturing the essence of who they are, and how they are.

This is where a lens like the 70-200mm f2.8 is essential .. it allows breathing space between you and your subjects.   The light is all available light.  No flash necessary with the soft early evening light.

But I did a little bit of work on the image in Photoshop, so let’s see how I got there ..

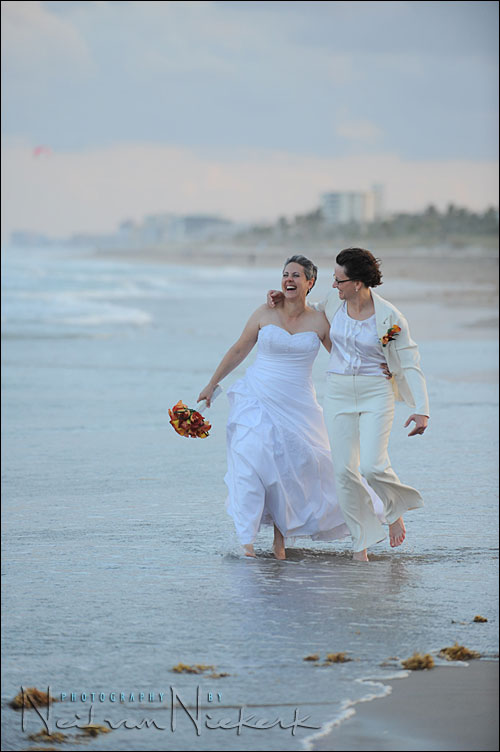
Here is the image directly out of camera.   To get this, I extracted the embedded JPG from the RAW file using BreezeBrowser.

The first thing you’ll notice is the strong blue color cast because of the late evening.  Even with my WB set to Cloudy, it is still too cold.  But instead of wasting time messing around with the white balance settings, I accepted this .. and knowing I have the leeway with a RAW file, I just got stuck into the actual job of photographing the couple.  I could always fine-tune the WB later to my liking.   And my liking is a much warmer color balance, as adjusted in ACR / Bridge …

With this I would like to labor a small point again.  I am often asked what White Balance setting I am using, or used in an image … but really, it isn’t of much consequence.   Rather concentrate on the moment .. the lighting .. reacting to what you’re seeing .. than getting stuck into specific Kelvin settings during the photography session.

Which does briefly bring us to the technical details:
Nikon D3;  Nikon 70-200mm f2.8 AF-S (B&H)
1/500th @ f4 @ 500 ISO … but exposure was pulled up 0.5 EV in  post-processing the RAW file.

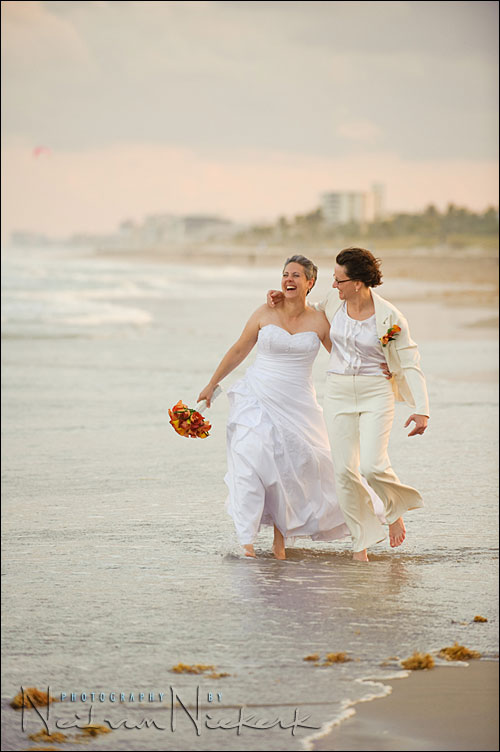
Back to the image .. now you’ll notice that compared to the original, I cloned out all the seaweed.  That’s just visual clutter distracting from the couple.  I also removed a hint of red in the clouds to the top left in the image.  It kept pulling my eye away .. when I really wanted attention on the bride’s expression.

Then with those details taken care of, I wanted a bit more snap to the image.  The previous post on this blog touched on this topic .. making the image pop a bit more, and for this image, I used a different technique.

I created a duplicate layer on which I ran a softening plug-in -Portraiture by Imagenomic.  I used it at the default settings.  Simple.  There are hordes of other actions and plug-ins available to soften an image.

But what I really was after was some snap to the image.   For this I used an amazing piece of software  – Topaz Adjust (Topaz Labs).   (And as software goes, it is quite affordable.)  I ran Topaz Adjust on another layer, and then set it to Soft Light blending mode.  Very similar to that previous article on making an image more vibrant.

And there you have it .. the final image that I am very proud of.


Filed Under: digital imaging, Photoshop, Uncategorized, wedding photography Tagged With: destination wedding, Photoshop technique


Help support this website

If you find these articles of value, please help support this website by using these B&H and Amazon affiliate links to order your photo gear.

I also offer photography workshops and tutoring sessions, whether in person, or via online video tutoring sessions.

Stay informed via the monthly newsletter.

Please follow me on Instagram for more.

You can also join our thriving photo community in the Tangents group on Facebook, where we show our photos and discuss all things photography.

Thank you,

Neil vN

Books by Neil van Niekerk


40 Comments, Add Your Own

  1. 1Katrina Kennedy says

    December 2, 2009 at 12:28 am

    What a gorgeous image! Thank you for sharing your process!

    Reply
  2. 2Emily DeWan says

    December 2, 2009 at 12:32 am

    Gorgeous image! What joy on their faces.

    Reply
  3. 3Gorka says

    December 2, 2009 at 3:33 am

    Hi Neil,another great photo as usual…you rock :)
    One question,if I may ask: how do you deal with noise?.If I go higher than 800 ISO on my Canon Powershot SX10,I get rubbish.No way trying to set 1600 ISO,or so.You must been using good lenses [or camera] then.

    Thank you for your efforts and lessons!

    Reply
  4. 4Neil says

    December 2, 2009 at 3:53 am

    Thank you everyone for the lovely compliments!

    Gorka, generally I don’t worry much about high-ISO noise. I specifically use a camera that has great high-ISO response, and I also take care to get my exposures as accurate as possible.

    With this image, I used 500 ISO which doesn’t even come close to being an issue with the D3 or most modern D-SLRs.

    With a camera with a small sensor such as the SX10, and pretty much any other point-and-shoot digital camera, the image quality does suffer with higher ISOs. That’s simply the trade-off with using a smaller more compact camera, as opposed to a camera with a larger sensor.

    best

    Neil vN

    Reply
  5. 5Joost says

    December 2, 2009 at 5:10 am

    Awesome picture and kudos for sharing how you got the final image!

    Have you tried the D3S? It’s got even better high ISO’s, the 12800 looks like the 1600 on my d300. Shots on 6400 with D3 and D3s are much cleaner on the latter..

    Also, how much instruction do you give your subjects? Did you just tell them to
    1. “walk towards me” or
    2. “walk towards me with your arms around eachother” or
    3. “walk towards me with your arms around eachother laughing while you look at her and she looks at the horizon”
    4.or “walk towards me, with your left arm around her waist, just enough so I can see your hand while holding the bouquet 10 cm’s from your waist pointing in a 45’angle downwards while holding your head just a bit backwards with an open mouth and squinted eyes. I want you to put your right arm over her shoulder and hold your hand next to her face while looking at her teeth and keep your other arm in a 45′ angle downwards so your jacket falls open and I can see her hand around you waist” ?

    Thanks again!

    Reply
  6. 6Neil says

    December 2, 2009 at 6:07 am

    Joost .. I haven’t tried the D3s yet. I’m not sure right now whether I’d upgrade one body, or just skip this cycle and wait for the eventual D4 to be released. Or perhaps a D700s with video and the same sensor and software as the D3s? Now there would be a killer camera.

    About how I coach the couples .. it is a balance between instructing them and allowing them to be spontaneous and be themselves. This is where a photo session or engagement shoot prior to the wedding day is very important for me in establishing a rapport with the couple.

    The photo session prior to the wedding is where you get to know the couple and they get to know your rhythm and style more closely. And they get to see the way they appear in the images. This is excellent feedback for them, and most couples are far more relaxed then on the wedding day as far as the portrait session goes.

    So my instruction to them would be closer to your version #2, but I do stop and guide things. For example if someone had a tendency to look down on the ground or something similar .. then I’d help correct that since it would appear as a disconnection in the photographs with one of them constantly looking down. You have to correct some of these personal habits sometimes for better results with these photo sessions.

    Neil vN

    Reply
  7. 7Joost says

    December 2, 2009 at 6:16 am

    Thanks for your response, setting up engagement sessions may indeed be a good idea…

    Food for thought :)

    Joost

    Reply
  8. 8Neil says

    December 2, 2009 at 6:18 am

    In posing people, you have to get in there and physically show what you had in mind. Verbal instruction can be confusing, especially with left & right and mirror image.

    Neil vN

    Reply
  9. 9Joost says

    December 2, 2009 at 6:19 am

    And nice tai-chi picture :)

    Reply
  10. 10Lou says

    December 2, 2009 at 9:59 am

    Hi Neil. Beautiful image of the couple on the beach. You obviously had great luck using Imagenomic’s Portraiture 2 software. Regarding Gorka’s question about noise, she should try Imagenomic’s Noiseware Pro software. With the same single-click ease you used with Portraiture, Noiseware will also produce amazing results with her Canon PS SX10 or any other camera.

    Reply
  11. 11Neil says

    December 2, 2009 at 10:10 am

    Lou .. the way I use Portraiture, isn’t as a final layer, but as an intermediate layer. Then I also pull the opacity back of the Portraiture layer. I didn’t mention this in the article, but should have.

    Neil vN

    Reply
  12. 12Peter van der Does says

    December 2, 2009 at 10:38 am

    Neil,

    Nice job on the final picture, I love it.
    I have a question, which is unrelated to this post, maybe you could even dedicate another post/page to this but which Photoshop plugins do you have and which ones do you use the most?

    Awesome blog, I learn a lot from your articles.
    Peter

    Reply
  13. 13Neil says

    December 2, 2009 at 10:45 am

    Peter .. good idea. But I think it should be a separate article, and then everyone can add their favorites as well.

    Neil vN

    Reply
  14. 14Ty M says

    December 2, 2009 at 10:59 am

    Neil, thank you so much for the reference to topaz adjust. And a great tutorial on the photo. To often, teachers show us the final product without giving us the workflow.

    BTW — over the brides right shoulder on the shoreline — is that a blob of sensor dust? :)

    Reply
  15. 15Neil says

    December 2, 2009 at 11:38 am

    Ty .. you know, I had to go back and look at other images in the sequence to see if the blob stays static in the same position relative in the frame (which would mean it is sensor dust) .. or move around as I move my camera.

    Turns out it is someone out of focus far away in the background, and not sensor dust. But now I can’t not see that blob. I should’ve edited it out in the first round of edits.

    Neil vN

    Reply
  16. 16Mac Swift says

    December 2, 2009 at 11:41 am

    Wonderful, beautiful photograph, Neil and kudos for you for showing out-of-camera images as not many pros would do that for risk of looking mediocre ;-) I’ll be doing a post on my blog later today about the making of this photograph including what came out of the camera (18+)

    I want Topaz Adjust so badly, but it only runs on an Intel Mac and my wife would kill me if I dropped another $5,000 on anything remotely related to photography ;-)

    Reply
  17. 17Stephen says

    December 2, 2009 at 11:46 am

    Neil,

    It’s just amazing the number of Photohsop/Lightroom plug-ins available for photo adjustment. I’m actually overwhelmed. I just want one set of software and run with it. Otherwise, we would all be switching/upgrading software like we do with camera equipment.

    Reply
  18. 18Ty M says

    December 2, 2009 at 11:53 am

    @Neil on the “blob” — sorry about that. On the plus side — that’s some great bokeh! :)

    Reply
  19. 19Stephen says

    December 2, 2009 at 11:55 am

    Mac,
    Topaz Adjust is $50. Surely, you have a budget for that. :-)

    Reply
  20. 20Hope says

    December 2, 2009 at 12:34 pm

    Lovely picture, it really does seem to capture their essence!

    Reply
  21. 21Mac Swift says

    December 2, 2009 at 2:02 pm

    Stephen,
    Topaz Adjust only runs on an Intel Mac. I have the older PowerPC processor. Alas, it will have to wait until I upgrade computers.

    Reply
  22. 22Mac Swift says

    December 2, 2009 at 2:05 pm

    Neil,
    Do you bring all your images through Photoshop or do you leave some as-is after Raw conversion?

    Reply
  23. 23Neil says

    December 2, 2009 at 2:30 pm

    Mac .. for proofing, I just have the images as I ran them through ACR / Bridge. I don’t open them in Photoshop since that would eat up too much time.

    For posting on my Latest Work blog, I do some minor retouching, and usually bump up the contrast and saturation a bit.

    For posting on the Tangents blog, I most often don’t run an image through Photoshop (aside from skin retouching), since I want the image to remain true to how I shot it. When I do retouch an image in Photoshop that I post on the Tangents blog, I always mention it .. and usually show the comparison image.

    Neil vN

    Reply
  24. 24Gorka says

    December 2, 2009 at 2:44 pm

    @Lou,Gorka is basque for George ;).BTW,I often use Noiseware,a great piece of software for noise reduction.Hijgly recommended.

    @Neil,thanks for your quick answer,and I’ll pick a decent DSLR next time I change my camera.Do you have any plans on coming to Spain to give us a seminar?.I look forward to your next book [or DVD],and I’m sure I’m not the only one :-).

    Reply
  25. 25Stephen says

    December 2, 2009 at 6:04 pm

    Hi Mac,
    I misunderstood. I didn’t realize that you only had a PowerPC processor. I didn’t make the connection that the “IntelMac” reference meant that you had to buy a new computer. Buying a new computer would be a problem. :-)

    –Stephen

    Reply
  26. 26Sasha says

    December 2, 2009 at 6:26 pm

    @Gorka If you go for a cheap DSLR like the Nikon D90, you will have NO visible noise at up to ISO1600. Best bang for the buck, and it has flash commander etc all built in, unlike the more expensive Canons.

    Reply
  27. 27Mac Swift says

    December 2, 2009 at 10:07 pm

    Stephen,
    Yes, indeed that was the inference I was making ;-)

    Reply
  28. 28C says

    December 3, 2009 at 12:11 am

    I managed to achieve a similar result using Capture NX – took me 10 minutes to reproduce most of the effect. Check it out!

    http:\\www.goodstockphotos.com\tests\LK-2555-orig_CaptureNX.jpg

    Some extra effect
    http:\\www.goodstockphotos.com\tests\LK-2555-orig_CaptureNX_Extra.jpg

    Great capture Neil!

    Reply
  29. 29Gorka says

    December 3, 2009 at 3:31 am

    @Sasha,thanks for the advice,I have a very good opinion on Nikon products.My cousin has one,he gets fantastic pics,and he’s only a beginner who only uses “point and shoot”.However,I’ve just bought a brand-new 480 EX Speedlite [thanks to Neil and the blog ;-)],so I’d rather buy a Canon DSLR.

    Reply
  30. 30David Purslow says

    December 3, 2009 at 6:38 am

    Neil,

    I love the 70-200 but use it on my d300 because of the vignette issue with the D3 – my normal combination is d300/70-200 and d3 24-70 – I keep a 14-24 and a 50 1.4 in the bag but most of the time just use the two cameras as detailed above.

    can I ask how you deal with the vignette issue on the d3 /70-200 ? – I would love to use this combination in the church but dont.

    I have tried it once or twice with the vignette control switched on in the camera – is that what you do ? or do you have an action to fix it in post ?

    cheers

    dp

    Reply
  31. 31Neil says

    December 3, 2009 at 10:43 am

    David, I honestly don’t deal with the vignetting that the lens exhibits at wide apertures on a full-frame camera. In fact, I often add more vignetting as part of my post-processing of the image. (Currently I do this in ACR / Bridge)

    I think the vignetting would be troublesome in many fields of photography, but in portraiture and wedding photography, it is much less of an issue.

    You could always reduce the vignetting in ACR / Lightroom.

    Neil vN

    Reply
  32. 32Andrew says

    December 3, 2009 at 5:42 pm

    Neil, what default mode on Topaz adjust do you use (micro detail enhance, or some other function), and do you end up blending the opacity of the softlight layer down around 10% or so?

    Thanks for the insights into the complete flow.

    Reply
  33. 33Neil says

    December 3, 2009 at 6:01 pm

    Andrew, for this image I used either ‘Photo-Pop’ or ‘Crisp’ (I can’t remember which of the two), at the default levels. I then kept the layer at 60% opacity, and used Soft Light blending mode.

    Juuust enough of an effect to punch up the contrast and saturation and local contrast for nice effect, without being overwhelming.

    Neil vN

    Reply
  34. 34Winston Anthony Mattis says

    December 4, 2009 at 11:09 pm

    How do you get such sharp focus on your moving subject

    Reply
  35. 35Neil says

    December 4, 2009 at 11:16 pm

    Winston, even though they were moving, they were moving towards me. So it isn’t as if there is any lateral movement, or any movement that is ‘fast’ per se.

    With a shutter speed of 1/500th and aperture of f4 there is enough headroom to get sharp images, even with the camera handheld at a focal lenght of 200mm. It was very windy, and even with vibration reduction I had to be careful to get sharp images .. but their movement was the least of the technical problems.

    Then also, I am using the Nikon D3. It is a very responsive camera.

    Neil vN

    Reply
  36. 36Winston Mattis says

    December 5, 2009 at 8:39 am

    Thanks for that Neil.
    I use the D700 and still find it hard to choose how many points of focus to use, to get that sharp image

    Reply
  37. 37Neil says

    December 5, 2009 at 7:40 pm

    Winston, I mostly just use the center point to auto-focus while in AF-S mode, and then lock-and-recompose.

    The one AF setting that really helps with how fast my camera locks onto the subject, is Dynamic Area AF. (The center of the 3 positions.)

    When I photograph a subject that is moving erratically, then I often go to AF-C mode (continuous AF), with the camera set to Dynamic Area AF.

    Neil vN

    Reply
  38. 38Jonas says

    December 6, 2009 at 12:35 pm

    Again very nice read Neil! Thanks for sharing!

    Though when you refer to you camera settings in this, and most other posts on the blog I have read, you don’t mention at which focal length you are with your zoom lenses. I find it very useful information and would love to see it in future articles!

    Greets
    Jonas

    PS: In comment 35 you do mention 200mm so I assume that was the lens setting you used…

    Reply
  39. 39Neil says

    December 6, 2009 at 7:54 pm

    Jonas .. I usually do note the techie details that I think are relevant. The actual focal length used for a specific shot on a zoom is usually not that pertinent, imho.

    This image was one of a sequence, where I have the couple walk towards me. I shoot at 200mm and zoom tighter and zoom wider as they approach. Horizontal / vertical. I stand in one position, and also walk backwards .. or take steps to the side to influence my composition.

    As they get much closer, I’ll zoom wider obviously.

    When they get to me, I might show an image or two, to show what we’re getting. This is great reinforcement with my subjects that *this* is working and the images look great. It’s a huge confidence booster for them. Confidence in themselves; confidence in me as a photographer; and confidence in the actual session.

    Then I might run ahead again, and have them continue walking towards me.

    The point is, I zoom in and out. So the specific focal length of an individual shot here .. is, as far as I’m concerned, trivial to the whole process.

    That I am working with a telephoto zoom, already implies that my approach will be one of trying to isolate my subjects against an out-of-focus background. For that .. 200mm (which I used for this image), or 135mm .. or 148mm .. isn’t of real value to me.

    For me there is more useful information in the approach to the session, and in working with my subjects .. than there is in a specific numerical value.

    That said, as promised in a previous post somewhere else .. if the focal length is pertinent or of interest, I will be sure to mention it.

    thanks

    Neil vN

    Reply
  40. 40Eileen says

    March 16, 2010 at 6:20 am

    Great picture Neil – it really catches a sense of fun and connection. Thanks for the tip about Topaz. I’ve bought it and started to play. It’s a very effective tool but I think easy to overdo the effect. I really like the subtle effect you’ve created here.

    Thanks also for the tips on focus. I recently struggled when taking pictures of erratically moving street performers and lost a few shots from lack of focus. I normally use spot mode and haven’t really tried dynamic area mode. I will give it a go!

    Cheers,

    Eileen

    Reply

Leave a Reply Cancel reply

Your email address will not be published. Required fields are marked *

categories

Articles & Tutorials

  • • About myself & this site
    • Books by Neil vN
    • Best photography books
    • Black foamie thing
    • Spinlight 360
    • Photographers’ success stories
    • email newsletter
  • • Flash Photography Techniques
    • Natural looking flash
    • Flash + Ambient light
    • Dragging the shutter
    • Bouncing your flash
    • On-camera flash outdoors
    • Exposure metering
    • Flash exposure compensation
    • Bounce flash examples
    • Which is the best flashgun?
    • Flash brackets
    • Off-camera flash photography
    • Flash photography basics
    • Using video lights
    • Flash photography tips
    • Photography books
  • • Photography workshops NJ / NYC
    • Models @ photography workshops
tutorials:
flash photography
Photography
Workshops

Recent Comments

  • Pat: Right up front, I’ll say I would NEVER buy a Sigma lens. That out of the way, and referring to these...
  • Stuard Santana: Poor Garret Shaw! he should know better, lol I got another one today with the same exact wording and...
  • Mohd Zamri Mohd Zan: In my country are even worst, most guest asking professional photographer to take their photo...
  • HenkW: Thanks for this review – one of the very few I could find on this most interesting topic. So, the...
  • Rachel Abi: Thank you so much for this guide!! There are some many options and you made this really clear :D

All rights reserved. Copyright © Neil van Niekerk 2023 · Customization by The Traveling Designer

Copyright © 2023 · NvN on Genesis Framework · WordPress · Log in