Tangents

photography tutorials, reviews & workshops

tangents photography blog
learn : discuss : share
  • Tangents
  • Tutorials
    • Flash Photography
    • Wedding Photography
    • Studio Photography
    • Posing People
    • Understanding Your Camera
    • Exposure metering
    • BFT
    • Best Photo Books
  • Reviews
    • Sony
    • Nikon
    • Canon
    • Fuji
    • Profoto
    • lighting gear
  • Workshops
    • Info: Workshops
    • In-person
      tutoring sessions
    • Online
      tutoring sessions
    • Workshops in
      New Jersey (NJ)
    • Workshops in
      New York (NYC)
    • Photo walks in NYC
    • Studio Workshop
    • Video tutorials
    • Workshop results
  • Books
    • On-Camera Flash (revised ed.)
    • Direction & Quality of Light
    • Off-Camera Flash Photography
    • Lighting & Design
    • On-Camera Flash (1st ed.)
  • Projects
    • Two Perspectives
    • B&W Infrared
    • Vintage lenses
    • Time-lapse photography
  • Info
    • About
    • Contact
    • My Photo Gear
    • Books by NvN
    • Join us on Facebook
    • Acclaim
    • Success Stories

Even with high ISO settings, you still need good light

April 2, 2012 Neil vN 11 Comments

Even with high ISO settings, you still need good light

Still having fun with the Canon 5D Mark III (B&H / Amazon), I met up with Elmira again in New York. Elmira is the model I used in my initial tests of the Canon 5D Mark III high-ISO performance. Being a delightful model to work with, I decided to use her again as a subject. New York was cold on this day, so shooting indoors just seemed a lot more attractive. We went to Grand Central Station – a grandiose building, but with light levels quite low. Low enough that I was glad that I brought the Canon EF 35mm f/1.4 (affiliate) along on this photo shoot.

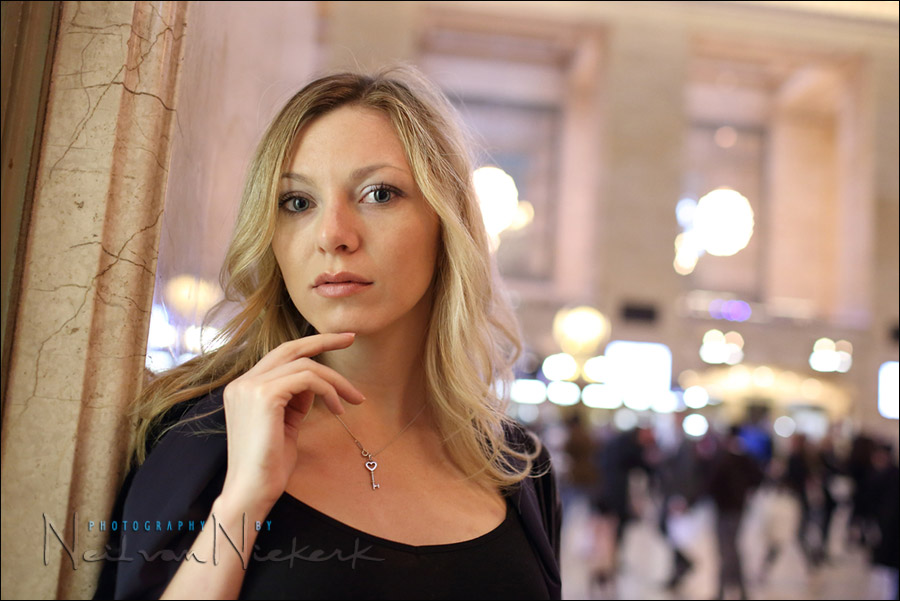
camera settings: 1/100 @ f/2 @ 3200 ISO
Even with a high ISO like that, I had to use a fast aperture.

An approach that I strongly believe in though, is that “using the available light” is not random decision. It needs consideration of what your light is actually like, and whether it is flattering. What I did here was to pull Elmira towards a light source, so that the light would come in from an angle over her shoulder …

With the fluorescent light coming through the frosted glass on the door, I knew I had a large light source there .. and I used it. This way, I purposely controlled the available light falling on her. It’s a conscious choice.

Hopefully with the medium-wide angle of 35mm, and the fast aperture, it lends the image a certain cinematic look.

I did crop the image slightly to remove an unwanted highlight in the top right-hand corner. If anyone wants to look at the photo close-up, along with the other images from the Canon 5D Mark III high-ISO test, the high-resolution JPG is available as a download.  The photo is the JPG generated from the RAW file, via DPP.  Therefore it is as close to an in-camera JPG as you will get, while still allowing me to adjust the WB of the RAW file.


Direction & Quality Of Light

Lighting & Design for Portrait Photography

Lighting & Design is a follow-up of sorts to Direction & Quality of Light. It’s a slightly eclectic mix, discussing the thought-process with various scenarios shooting portraits. The examples use available light, bounce flash, off-camera flash as well as studio lighting.

The idea is that in every one of the 60 sections, there is something to be learnt and applied, regardless of your level as a photographer or where you shoot – all shaped to form a cohesive narrative arc throughout the book.

You can either purchase a copy via Amazon USA or Amazon UK. The book will also available on the Apple iBook Store, and Amazon Kindle.


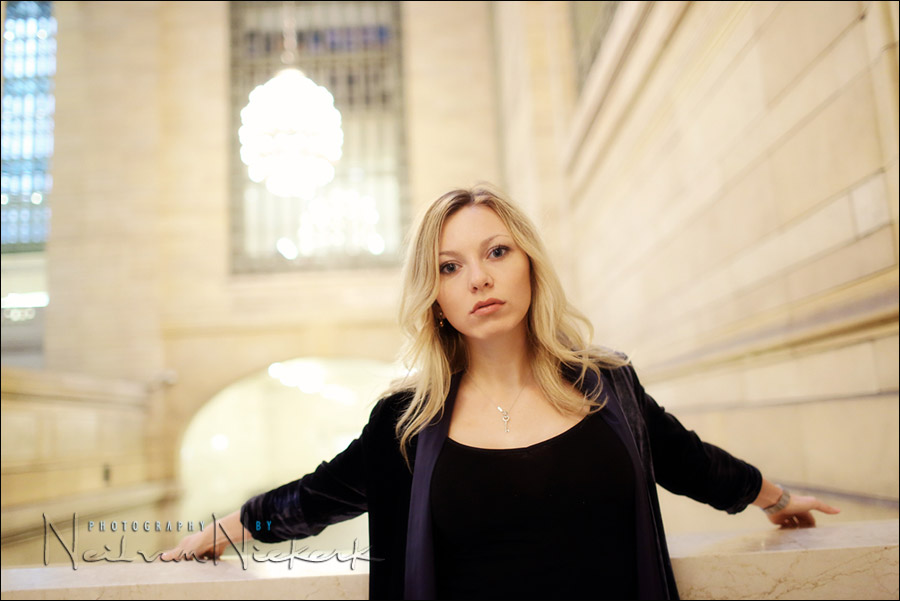
  • camera settings: 1/80 @ f/1.6 @ 3200 ISO
  • Canon 5D Mark III
  • Canon EF 35mm f/1.4

The same idea was applied here in using the available light. I scouted around until I had a place where the light fell on her in a flattering way.


Buy your photo gear through these affiliate links

You can order a Canon 5D Mark III via these affiliate links:  B&H / Amazon

Other reviews of Canon gear.

Filed Under: available light photography, Canon D-SLR, models Tagged With: available light photography, Canon 5D Mark III, review Canon 5D Mark III, review Canon 5D mk3


Help support this website

If you find these articles of value, please help support this website by using these B&H and Amazon affiliate links to order your photo gear.

I also offer photography workshops and tutoring sessions, whether in person, or via online video tutoring sessions.

Please follow me on Instagram for more.

You can also join our thriving photo community in the Tangents group on Facebook, where we show our photos and discuss all things photography.

Thank you,

Neil vN

Books by Neil van Niekerk


11 Comments, Add Your Own

  1. 1Stephen says

    April 2, 2012 at 4:24 pm

    For the first image, where the model is leaning against the office door with the fluorescent light, did you set the camera WB to fluorescent, tungsten, or some other value?

    I get confused when there are mixed lighting sources. I usually set the WB to the dominant light source.

    Reply
  2. 2Neil vN says

    April 2, 2012 at 4:43 pm

    I had the camera set to Auto WB. However, it is immaterial since I am shooting in RAW.

    Neil vN

    Reply
  3. 3Jerry says

    April 3, 2012 at 3:45 am

    So, Neil, are you just testing the Mark III a lot for the blog’s sake, or are you thinking about going back to Canon as your dominant camera again?

    Reply
  4. 4Neil vN says

    April 3, 2012 at 3:48 am

    Jerry .. nope, the camera is on loan from B&H for review purposes. And since this is one of the major releases in the camera world, I was very interested.

    Neil vN

    Reply
  5. 5ugur says

    April 3, 2012 at 3:51 am

    Dear Neil,
    Is the noise level related with ambient light for the same iso level? I mean that “high iso performance level photos” (first samples) are taken with great light (1/400, f4, 12800 iso), whereas your last samples are taken with less light (1/80, f1.6, 3200 iso) There are 3-4 stops differences i think. If you compare both of them according to the noise levels, is there any quality differences in raw files? It’s difficult to understand from jpegs. Thanks.

    Reply
  6. 6Neil vN says

    April 3, 2012 at 4:03 am

    Ugur, a direct comparison here isn’t easy. Not because of the differences in light levels – after all, correct exposure is correct exposure – but because the color spectrum is so different between the two scenarios. So the noise levels may appear different. For all the images I’ve shown here and in the previous article about the Canon 5D Mark III, I kept my exposure adjustment of the RAW file to zero. Nothing. Once you change the exposure, the noise appears differently.

    With the photo in the previous article that was shot at 1/400 @ f4 @ 12800 ISO, there was enough light for a lower ISO .. but to check what the noise looks like (for that particular lighting situation), I decided to go to a higher ISO. It’s still a valid evaluation of what the high-ISO noise looks like.

    I’ve seen criticism on the forums because that specific image on the previous page (1/400 @ f4 @ 12800 ISO), could’ve been shot with lower ISO … but I do think that is a trivial objection.

    That there was more light should have little effect, especially compared to the spectrum of light we’re shooting under.

    Neil vN

    Reply
  7. 7emopunk says

    April 4, 2012 at 10:45 am

    Hello Neil; when do you plan to share some impressions on the new D800/D800E as well? I think a lot of us are really waiting for that insight too.. Greetings!!

    Reply
  8. 8Neil vN says

    April 4, 2012 at 11:05 am

    emopunk … I don’t have the D800 (or D4) bodies yet, due to a hiccup with Nikon Professional Services. I thought I was an NPS member, but apparently wasn’t. Long story. So I am without those cameras at this point.

    Neil vN

    Reply
  9. 9Duane Dale says

    April 4, 2012 at 11:34 am

    A major take-home for me from this post is: keep an eye out for natural-occurring softboxes, such as the frosted glass door with light coming through it. Not a surprise that this message comes from Neil, who has given us the “virtual softbox” in the form of bounce lighting from an on-camera flash, shaped by the black foamie thing.

    Reply
  10. 10emopunk says

    April 4, 2012 at 4:17 pm

    Hi Neil. Yes I read some of your posts about the troubles with Nikon NPS for the latest cameras. I hope they sort it out as soon for you. Regards!

    Reply

Leave a Reply Cancel reply

Your email address will not be published. Required fields are marked *

categories

Articles & Tutorials

  • • About myself & this site
    • Books by Neil vN
    • Best photography books
    • Black foamie thing
    • Photographers’ success stories
  • • Flash Photography Techniques
    • Natural looking flash
    • Flash + Ambient light
    • Dragging the shutter
    • Bouncing your flash
    • On-camera flash outdoors
    • Exposure metering
    • Flash exposure compensation
    • Bounce flash examples
    • Which is the best flashgun?
    • Flash brackets
    • Off-camera flash photography
    • Flash photography basics
    • Using video lights
    • Flash photography tips
  • • Photography workshops NJ / NYC
    • Models @ photography workshops
tutorials:
flash photography
Photography
Workshops

All rights reserved. Copyright © Neil van Niekerk 2025 · Customization by The Traveling Designer

Copyright © 2025 · NvN on Genesis Framework · WordPress · Log in