Tangents

photography tutorials, reviews & workshops

tangents photography blog
learn : discuss : share
  • Tangents
  • Tutorials
    • Flash Photography
    • Wedding Photography
    • Studio Photography
    • Posing People
    • Understanding Your Camera
    • Exposure metering
    • BFT
    • Best Photo Books
  • Reviews
    • Sony
    • Nikon
    • Canon
    • Fuji
    • Profoto
    • lighting gear
  • Workshops
    • Info: Workshops
    • In-person
      tutoring sessions
    • Online
      tutoring sessions
    • Workshops in
      New Jersey (NJ)
    • Workshops in
      New York (NYC)
    • Photo walks in NYC
    • Studio Workshop
    • Video tutorials
    • Workshop results
  • Books
    • On-Camera Flash (revised ed.)
    • Direction & Quality of Light
    • Off-Camera Flash Photography
    • Lighting & Design
    • On-Camera Flash (1st ed.)
  • Projects
    • Two Perspectives
    • B&W Infrared
    • Vintage lenses
    • Time-lapse photography
  • Info
    • About
    • Contact
    • My Photo Gear
    • Books by NvN
    • Join us on Facebook
    • Acclaim
    • Success Stories

Wedding day portraits – Simplifying composition for effect

September 19, 2010 Neil vN 23 Comments

Wedding day portraits – Simplifying composition for effect

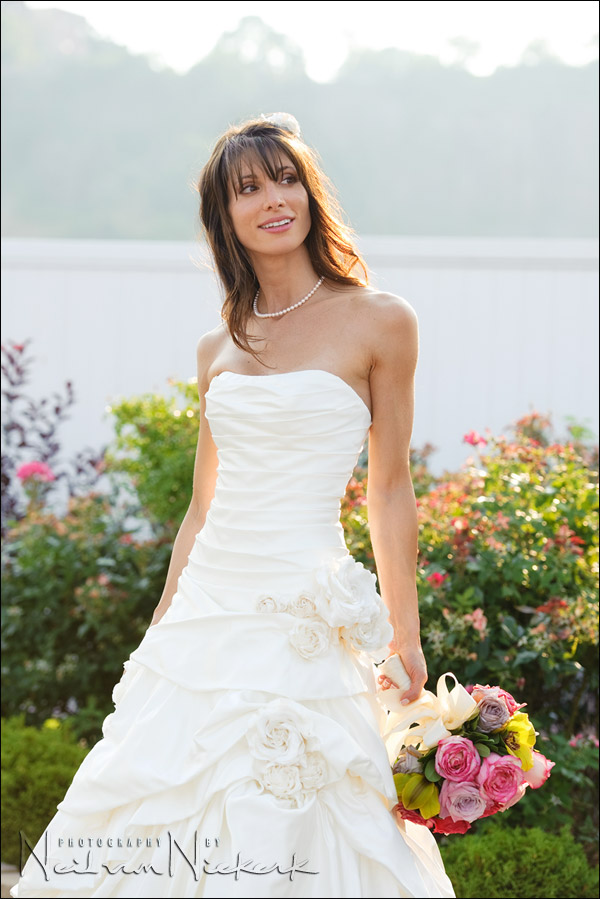
With this article I want to reinforce the idea from a few recent posts about being very specific about your composition. By simplifying the image, we have greater impact. We include only what we need to include in the frame to enhance it.  Just as important, is what we exclude:

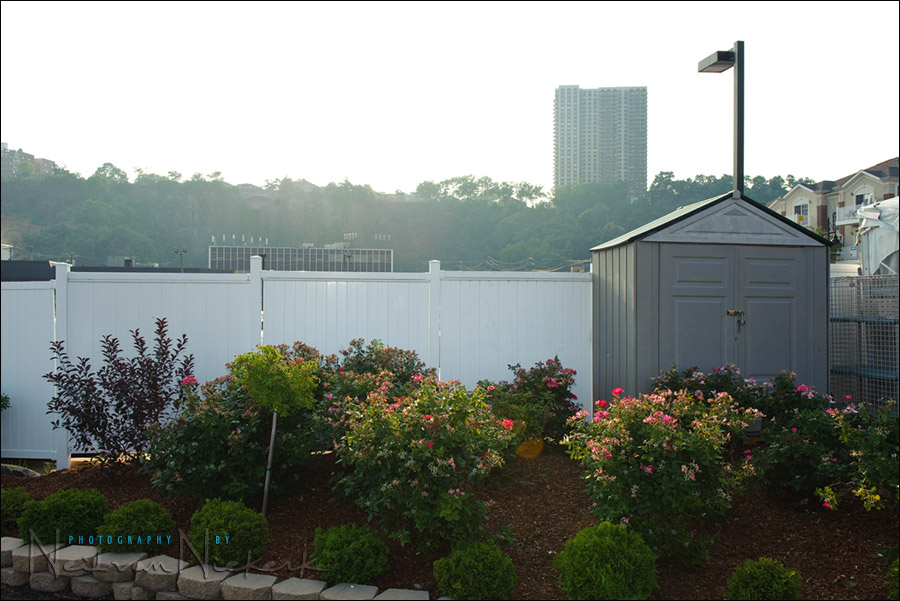
That is the pull-back shot.  To my left were apartment buildings and the walkway along the Hudson river waterfront. To my right was the reception venue and chairs and the outdoor bar area. All visual clutter. If I had turned around, I would be facing the magnificent Manhattan skyline, but the sunlight was brutal at this time.  Harsh.  There would be no way to pose the bride, Jaime, and her bridesmaids without people squinting and being uncomfortable.

Foregoing the grand vista of New York as a backdrop, I was frantically looking for something – anything – to work as a simple background. Similar to this recent article, where I described how I shot tight with a longer lens, I decided to use the same approach here again. That pullback shot shows the wall and hilltop and buildings in the background.  By shooting tight with a longer lens, I could be specific about what I included in the frame.

Better yet, in exposing correctly for the bride, the background would blow out completely. She would be rim-lit by the sun behind her.  That creates separation from the already out-of-focus and over-exposed background.  Now the background actually works for us.  The light falling on her face now, is open shade.  Clean open light. Now all we need to do is direct our subject, whether a bride or a model or family member.

settings: 1/400 @ f4 @ 200 ISO … with on-camera TTL fill-flash.

The point that I want to stress here, is that this approach simple but always an effective approach when photographing in bright sunlight.  If I’m in trouble like this in terms of finding a suitable background, and I’m working in harsh sunlight, then this method is always a good way to get solid results quickly.


Related articles

  • Simplifying composition with a fast telephoto zoom
  • Bride and bridesmaids – finding a nice background


Filed Under: composition, technique, wedding photography Tagged With: New Jersey wedding photographer, wedding photographers in New Jersey, wedding photography, wedding photography techniques


Help support this website

If you find these articles of value, please help support this website by using these B&H and Amazon affiliate links to order your photo gear.

I also offer photography workshops and tutoring sessions, whether in person, or via online video tutoring sessions.

Please follow me on Instagram for more.

You can also join our thriving photo community in the Tangents group on Facebook, where we show our photos and discuss all things photography.

Thank you,

Neil vN

Books by Neil van Niekerk


23 Comments, Add Your Own

  1. 1Roman says

    September 20, 2010 at 4:04 am

    Hi Neil

    what FEC did you used in this particular case ?

    Thnx

    Reply
  2. 2Neil vN says

    September 20, 2010 at 4:09 am

    Roman, it’s in the linked article. It’s the same approach.

    Neil vN

    Reply
  3. 3Lance says

    September 20, 2010 at 6:41 am

    This is a good demonstration of seeing through the clutter and finding good backgrounds. I can just see a bridesmaid standing next to you saying “Why are you doing it here?” One of my favourite parts of wedding photography is using creativity to find backgrounds where none seemingly exist.

    Reply
  4. 4Neil vN says

    September 20, 2010 at 10:51 am

    Lance, I do get that response from a bridesmaid every time. Like clockwork. Followed by a surprised, “Wow! You’re amazing!”, when I show them a preview image on my camera.

    Neil vN

    Reply
  5. 5Annalena Burbridge says

    September 20, 2010 at 12:29 pm

    Did you use a tripod or were your shots handheld?

    Reply
  6. 6Neil vN says

    September 20, 2010 at 12:59 pm

    I very rarely use a tripod, so these photos and pretty much nearly everything on this site are hand-held photographs. But I do use vibration reduction / stabilized lenses. And I also take care to steady myself and the camera when I take a photograph.

    Neil vN

    Reply
  7. 7M. Clay says

    September 20, 2010 at 2:21 pm

    Definitely a useful tip. Those tele-zooms are super useful when you are limited to an ugly parking lot or something. Speaking from experience ;-)

    Reply
  8. 8Suresh Rajaram says

    September 20, 2010 at 9:00 pm

    Neil

    This is excellent post. I love the rim lighting effect and the way the bride is posed. Looking at your camera specs, i see that you were using a TTL fill flash with a camera shutter speed of 1/400 of a second. Does that mean you were at FP synch?

    – Suresh

    Reply
  9. 9Neil vN says

    September 20, 2010 at 9:08 pm

    Suresh, indeed, I had to go in to high-speed flash sync to get the aperture I wanted.

    Neil vN

    Reply
  10. 10Suresh Rajaram says

    September 20, 2010 at 9:32 pm

    Thanks for reply and it makes perfect sense. I love your style of sharing your thought process and picture taking. I am a big fan of your site and almost visit your site 10 times a day. Thank you!

    I also like the way you provide reference links to your previous post in your current post. this is very helpful.

    I have a question, is there a way to access your old posts (search/index)? For example the links you provided in the current post, how can we search for it or look at it with an index or search?

    Reply
  11. 11Neil vN says

    September 20, 2010 at 11:41 pm

    Suresh, there is a search button in the blue column on the right.

    Reply
  12. 12Alfredo says

    September 21, 2010 at 8:17 am

    On another article you chose to use an ND filter instead of going into high speed sync. There’s also the alternative of going to ISO100 (Lo whatever). ISO100 could further help to blow up the background even more, though I don’t know if it’ll also blow up the dress. How do you decide which of these three approaches work in each scenario?

    Reply
  13. 13Neil vN says

    September 21, 2010 at 9:57 am

    Alfredo .. I travel as light as I can. For these portraits outside, I just brought my two bodies and 24-70 and 70-200. So I didn’t bring my ND filter with me. I probably should, since it is in my larger camera case anyway. But I didn’t have it here.

    Going to ISO 100 would’ve given me shallower depth of field .. ie, blurred the background more. As for “blowing it up”, I think you meant “blowing it out”, ie .. over-exposing. Going to ISO 100 (and adjusting my aperture accordingly), wouldn’t have changed anything in comparison to the ISO 200 and f4 images. (Or blown out the dress.)

    Neil vN

    Reply
  14. 14Eduardo B. says

    September 21, 2010 at 11:40 am

    Im reading and loving your blog since yesterday!Its great and you are very generous to share yor knowledge in photography. Can you tell me what kind of focus ajustments you use in receptions and weddings ceremonies? Is it manual or some AF? I didnt find anything about it yet in your blog.

    Thank you!

    Reply
  15. 15Paul says

    September 21, 2010 at 12:39 pm

    This is the exact reason I just purchased the new Nikon 70-200 and added it to my lineup… I was shooting weddings with a 24-70, and if I needed to really throw take out the background I was using my 50 at a very fast f-stop… I know many wedding shooters who just use 1.4 or 1.8 as a modus operandi on their primes but even then the 70-200 produces an altogether different result of magnifying the background behind the subject the other lenses can’t produce regardless of how wide open and fast you shoot them… anything longer than 85 becomes really invaluable for isolation.. Just my thoughts..

    Reply
  16. 16Neil vN says

    September 21, 2010 at 2:52 pm

    Eduardo .. I use auto-focus. Usually the Single mode, but I do flip to Continuous / Servo mode at times.

    Neil vN

    Reply
  17. 17EUGENE-L'EXACT says

    September 21, 2010 at 4:01 pm

    Fistly thank you you post, it’s my favorite blog to use flash photogrpahy.

    I would like to know, what king of Pocketwizard you use in TTL?
    Is pocket wizard plus II or Pocketwizard flex TT5 to controle the high speed syncro wiht flash exposer compensation?

    Thank for your knowledge.

    Marius

    Reply
  18. 18Neil vN says

    September 21, 2010 at 4:35 pm

    Eugene .. I still use the ‘old school’ Pocketwizards .. the Plus II units. They only work with Manual flash; not with TTL.

    When I use off-camera wireless TTL (or manual) flash, then I simply use an on-camera speedlight set to Master, and with its own output disabled.

    Neil vN

    Reply
  19. 19Joe says

    September 21, 2010 at 4:51 pm

    Can you explain the concept of “open shade”? Is it just putting your subject into the shade, or is there more to it?

    Thanks!

    Reply
  20. 20Neil vN says

    September 22, 2010 at 4:00 am

    Joe, check out these three posts on using available light.
    It’s all explained in there with detail:

    – direction of light & choice of background & part 2
    – effective on-location portraits

    Neil vN

    Reply
  21. 21Joop! says

    September 22, 2010 at 5:44 am

    Hi Neil, great image!
    I just returned from a weekend Geneva, Switserland. And you really had me going there, because I thought with a little bit of imagination, your model actually was in front of that lake (white fence) surrounded by the mountains (trees).
    Pure. Awesome.

    Reply
  22. 22Stevo says

    February 25, 2012 at 1:17 pm

    Hi Neil,

    Fantastic creativity under pressure.
    Did you use a softbox for this shot?

    Reply
  23. 23Neil vN says

    February 25, 2012 at 5:17 pm

    I am exposing correctly for the ambient light, and then just adding some direct on-camera fill-flash at -3EV.

    Neil vN

    Reply

Leave a Reply Cancel reply

Your email address will not be published. Required fields are marked *

categories

Articles & Tutorials

  • • About myself & this site
    • Books by Neil vN
    • Best photography books
    • Black foamie thing
    • Photographers’ success stories
  • • Flash Photography Techniques
    • Natural looking flash
    • Flash + Ambient light
    • Dragging the shutter
    • Bouncing your flash
    • On-camera flash outdoors
    • Exposure metering
    • Flash exposure compensation
    • Bounce flash examples
    • Which is the best flashgun?
    • Flash brackets
    • Off-camera flash photography
    • Flash photography basics
    • Using video lights
    • Flash photography tips
  • • Photography workshops NJ / NYC
    • Models @ photography workshops
tutorials:
flash photography
Photography
Workshops

All rights reserved. Copyright © Neil van Niekerk 2025 · Customization by The Traveling Designer

Copyright © 2025 · NvN on Genesis Framework · WordPress · Log in