Adding rim-lighting to available light, with off-camera flash
Off-camera flash need not be all that complex as it might appear to you if you are new to this. During a lunch-time conversation, a friend told me that she felt intimidated by the on-location flash photography by other photographers. The way to use multiple-flash setups seemed impenetrable to grasp. How would one go about and where do you even start. This made me wonder – just how complicated should photography lighting be? I don’t think it has to be complicated. It just has to be enough to be effective or solve a problem.
With on-location photography, my starting point is usually where I consider if I can improve the existing light with flash (or video light). What do I need to add to make it just a little bit better? And does it need something more to make it even better? The final image needs to look good. Tall of this is an iterative thought-process, rather than a compelling desire that I have to use every flash that I own.
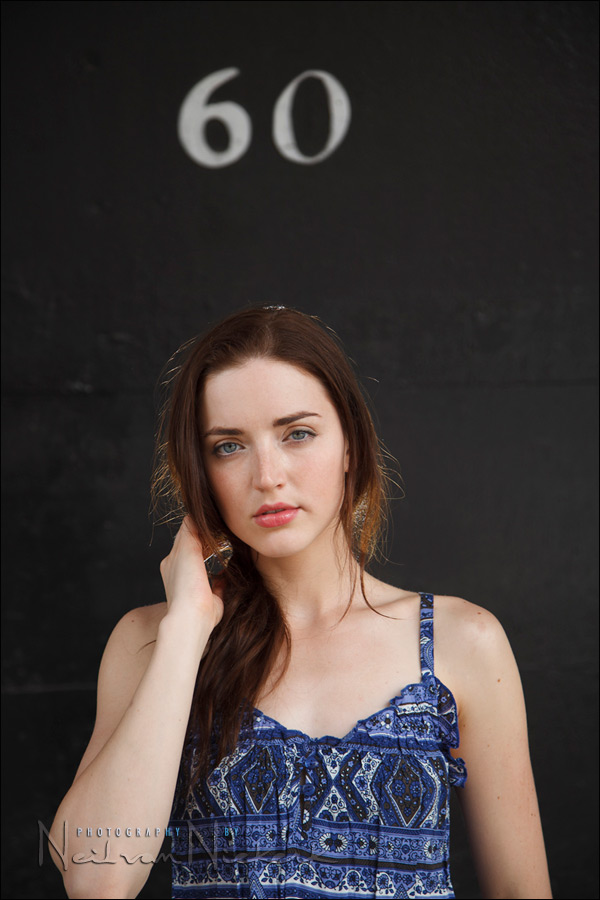
This straight-forward portrait of Anelisa,was taken during an personal photography workshop in New York. It might be a good example where off-camera flash was used for the tiniest bit of sweetening of the light. A bit of rim-lighting to separate Anelisa from the black doorway.

We started off under this awning of a building, where the available light coming in was very flattering – open, clean light.
But I thought it needed a little something. She needed separation from the dark door frame.
A speedlight on a monopod would do the trick. I set it to 1/32 power at first, and then took it up to 1/16 power. I could easily adjust the manual output of the Canon 580EX II via the AC3 ZoneController on the FlexTT5 transceiver (affiliate), which sits on the camera. Of course, the Canon 600EX-RT Speedlite (affiliate) makes it so much easier too with the built-in radio slave. Check my review of the Canon 600EX-RT Speedlite.
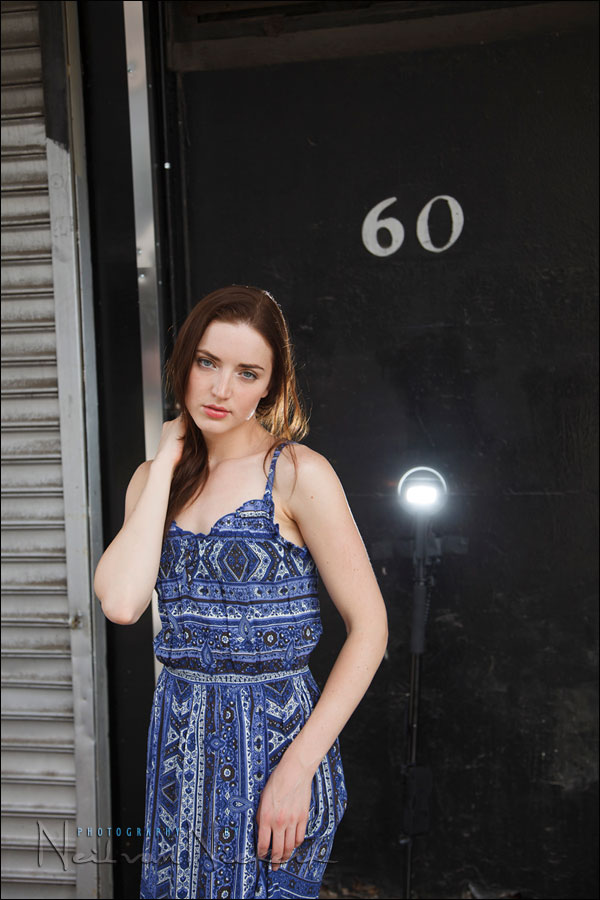
I stuck the light-stick to the door with a bit of gaffer tape so it wouldn’t fall over. A small roll of gaffer tape (B&H), is very useful thing to have in your camera bag. It’s also useful for temporarily mending your trousers when you split them at an event.

camera settings: 1/100 @ f/4 @ 100 ISO
Canon 5D mark II; Canon EF 24-105mm f/4L IS @ 85mm
I felt that this is all the photograph needed to elevate it a little bit. No need to show off crazy skills with lighting. Just an uncomplicated sweetening of the available light. That’s a good place to start. No need to feel that you’re lost because you don’t know how to set up multiple off-camera flashes. If you feel intimidated by off-camera flash, then start at the simplest starting point – enhancing the existing light with just one speedlight.
The pull-back shot:

Check out the Sexy New York Photographer stance there with the foot swept out!
Photo gear (or equivalents) used in this photo session
- Canon 5D mark II
- Canon EF 24-105mm f/4L IS / Nikon 24-120mm f/4 VR
- Canon 580EX II, controlled by PocketWizard FlexTT5 Transceiver & AC3 Controller
or alternately, the Canon 600EX-RT Speedlite controlled by Canon ST-E3 Transmitter
Related articles
- Adding dimension with back-lighting (model: Lea)
- Two speedlight setup for back-lighting (model: Anelisa)
- lighting for on-location photo sessions – pick your battles
I love this article – like all of them – but that bit about the gaffer tape on the split pants – now that really resounded with me for some reason!
Nice work, Neil. Thanks for sharing. I also like the swept out foot stance.
That little bit of rim lighting makes all the difference. I always think I need to have a certain more-dramatic lighting to make this work but this articles shows me different. I will definitely try this! Another great article! thanks, Neil!
As usual, i enjoyed reading your thoughts on lighting and as above mentioned by Roy, the gaffer tape and split pants comment made me laugh.
Also the pull back shot, i was thinking “that’s an interesting stance” then i read your comment below,. . . . again you managed another giggle from me.
Fab. I always have a tendency to hit the back lighting a little too hard (and by ‘a little,’ I mean A LOT). I am going to try toning it down. Thanks, Neil.
Agree with Roy…the gaffer tape works miracles – pants, gels, strapping a flash to a broken flash stand, etc, etc etc. The list is endless. lol.
I need to play with rim lighting. Does it matter how high the light is placed, uplong as it rims the shoulders/hair? i.e. chest height or up higher pointing down?
Rae,
If you look at photo #4 you will see the position of the flash.
The “split pants” scenario seems to resonate with a lot of us! I sustained a massive split in mine (trousers here in the UK!), squatting down whilst photographing a wedding. Fortunately it was during the First Dance. It was the Last Dance as far as I was concerned though. No gaffer tape …
Sexy New York Photographer stance there with the foot swept out???
I didn’t even notice that you were in the scene!
lol at the gaffer tape split trousers comment.
Nothing wrong with the stance Neil…
Looks great! ;)
Neil, is that you (the guy with black t shirt) in the above pic?
I noticed you didn’t use a battery grip. Didn’t you get tired taking pics in portrait orientation without a battery grip?
Oh how I wish I could get those Canon skin tones on my Nikons. Can’t quite explain it, but it’s as if the Canon skin base tone is (for Caucasians) white parchment, over which other colors add structure, depth and character, instead of starting with a hued base tone (no matter how perfect the white balance for the scene, white clothing, etc). Sigh.
John,
Why don’t you try in the Camera Profile [obviously RAW only] use ‘Camera Portrait’ instead of Camera Standard, see if that helps, or one of the other settings available, Adobe Standard also gives a nice touch.
Sometimes I may alternate even in the same wedding, since different lighting can create different nuances on faces.